 Table of content
Magento 2 Certified Professional Front End Developer Guide
Section 6: Customize and Create JavaScript
6.1. Include custom JavaScript on pages
What options exist to include custom JavaScript on a page?
Magento 2 allows connecting custom scripts for the entire site, certain pages, or even certain blocks or parts of the page.It’s possible through connecting scripts in the page head, a special engine framework or RequireJS (the most preferred one).Consider the first option – connecting scripts in the page head. This option is considered the least desirable, since it is impossible to redefine classes in the script and any interaction with a user is minimized. The option is applicable if you connect well known libraries via cdn or if you use a third-party aggregator of your scripts.The connection process is as follows: in your xmlor inline in phtml.To partially smooth out the cons of this option, try to use the attributedeferred = “true” or at least async = “true” in all cases when it is possible (for scripts by links, it doesn’t work with inline scripts).Instead of you can useThe second option– Magento framework.The script can be connected in two ways:Using the following attribute:data-mage-init =‘{“VendorName_Module/js/script”:{“configuration-value”:true}}’.This attribute requests a script with 2 parameters – the element that will work out,and its parameters(animation speed,number of elements,etc.) The final script:app/code/VendorName/Module/view/frontend/web/js/script.js1 2 3 4 5 6 7 | define([],function(){ returnfunction(element,config){ }; }); |
1 2 3 4 5 6 7 |
1 2 3 4 5 6 7 |
1 2 3 | var config = { deps: ['VendorName_Module/js/script'] }; |
What are the advantages and disadvantages of inline JavaScript?
Pros and cons of inline js are the following:+ Easy to connect+ Doesn’t require additional request per page– The code is not delayed. It is executed immediately, so it is not recommended to place inline-bulky and time-consuming code.– Such code is difficult to reuse – on other pages it will have to be reinserted.– Such code is difficult to find in templates, which makes it difficult to maintain.– It is not cached by the browser as it is a part of the page– Such code doesn’t take to Content-Security-Policy, which makes it dangerous in terms of cross-site scripting.How can JavaScript be loaded asynchronously on a page?
By the define method.Require is executed immediately, unlike define, which will expect a call from other modules. For instance:1 2 3 4 5 | require([ 'VendorName_Module/js/script' ], function(FuntionName) { /* … */ }); |
How can JavaScript on a page be configured using block arguments in layout XML? How can it be done directly in a .phtml template?
There is a getJsLayout option in AbstractBlock that returns an array from jsLayout parameters.In frontend getJsLayout();?> it returns a json format string, built from jsLayout.So, using1 2 3 4 5 6 7 8 9 10 | <referenceBlock name="BlockName"> <arguments> <argument name="jsLayout" xsi:type="array"> <item name="components" xsi:type="array"> <item name="script" xsi:type="array"> <item name="component" xsi:type="string">VendorName_Module/js/script</item> </item></item> </argument> </arguments> </referenceBlock> |
6.2. Demonstrate understanding of using jQuery
Demonstrate understanding of jQuery and jQuery UI widgets.
To simplify the development of elements like dropdown lists, accordions, buttons, date pickers, etc. Magento uses the jquery and jquery ui libraries.Comparing jquery with clean js, jquery code is shorter and more simple. But it influence a browser performance.jquery ui is a library extension that provides a set of ready-to-use widgets in projects. The full list can be found here.Demonstrate understanding of how to use Magento core jQuery widgets.
Magento uses jquery ui widgets to save development time – the most frequently used elements in projects are already available out of the box.In almost any project, it’s necessary to create a FAQ page or tabs with product descriptions. Date picking, slider are some of the most commonly used widgets that you will prefer in your theme.How can jQuery UI Widget methods be instantiated?
Usually the requirement process looks as follows (for example, an accordion):$(“#element”).accordion();You can make a requirement in many different ways:- In template using script1234567
- In template using data-mage-init12345678<div id="element" data-mage-init='{"collapsible":{"openedState": "active", "collapsible": true, "active": true, "collateral": { "openedState": "filter-active", "element": "body" } }}'><div data-role="collapsible"><div data-role="trigger"><span>Title 1</span></div></div><div data-role="content">Content 1</div>….
- In the script file using selector or requiring a function12345require(['jquery','accordion'], function ($) {$("#element").accordion();});
- Using 12345678<scripttype="text/x-magento-init">{"#element":{
How can you call jQuery UI Widget methods?
It’s done as follows:$(‘#element’).accordion(“someAction”);We require the widget and the function we want through the method.How can you add new methods to a jQuery UI Widget?
We either finish writing the widget(using mixins)or create our own custom component.The first option is preferable when there is already the code that we would like to expand and supplement.Otherwise,working from scratch,it is better to use the second one.Let’s consider the first way:app/code/Vendor/Module/view/frontend/requirejs-config.js1 2 3 4 5 6 7 8 9 | varconfig={ "config":{ "mixins":{ "mage/tabs":{ 'Vendor_Module/js/accordion-mixin':true } } } }; |
1 2 3 4 5 6 7 8 9 10 11 12 13 14 | define([ 'jquery' ],function($){ returnfunction(original){ $.widget('mage.accordion',original,{ activate:function(){ |
How can a jQuery UI Widget method be wrapped with custom logic?
The second way – a custom component introduction:app/code/Vendor/Module/view/frontend/web/js/custom-accordion.js1 2 3 4 5 6 7 8 9 10 11 | define([ 'jquery', 'jquery/ui', 'mage/accordion' ],function($){ $.widget('vendor.customAccordion',$.mage.accordion,{ someAction:function(element){ |
1 2 3 4 5 6 7 8 9 10 | <div id="element"></div> |
6.3. Demonstrate understanding of requireJS
How do you load a file with require.js?
Magento 2 introduced a number of innovations in JavaScript usage. One of them is requireJS. It is used to load script files, helps add dependencies, and generally simplifies working with script files.To add Js file to your Magento 2 custom module, you need to add requirejs-config.js file to your module along the path app/code/1 2 3 4 5 6 7 | var config = { map: { '*': { belvgmodule: 'Company_modulename/js/belvgrequirejs', } } }; |
How do you define a require.js module?
For example, there is helper/belvg module. To use it, you need to add the following code to the js file (main.js as an example):1 2 3 4 | requirejs(['helper/belvg'], function(helper_belvg) { var message = helper_belvg.getMessage(); alert(message); }); |
1 2 3 4 5 6 7 8 | define([], function(){ var x = {}; x.getMessage = function() { return 'Some message'; } return x; }); |
1 2 3 4 5 | var config = { "shim": { "3-rd-party-plugin": ["jquery"] } }; |
1 2 3 4 | !(function($){ // plugin code // where $ == jQuery })(jQuery); |
How are module aliases configured in requirejs-config.js?
In our example, the RequireJS module name was tied to the source location of this module on disk. In other words, the helper/belvg module will always be on the helper / belvg.js path.RequireJS allows changing this through configuration. For example, if you want your helper/belvg module to be named hello, you would run the following configuration code somewhere before running your program:1 2 3 4 5 | require.config({ paths: { "hello": "helper/belvg" }, }); |
1 2 3 | requirejs(['hello'], function(hello) { alert("Some message"); }); |
How do you regenerate the compiled requirejs-config.js file after changes?
Delete static content and make:php bin/magento cache:cleanTo be totally sure.How do you debug which file a requireJS alias refers to?
To track which file corresponds to the renamed module, you need to open the requirejs-config.js file:1 2 3 4 5 6 7 | var config = { map: { '*': { addToCart: 'Magento_Module/js/module' } } }; |
Demonstrate that you understand how to create and configure Magento JavaScript mixins.
Magento 2 has lots of off-the-shelf functions. When it comes to overriding the javascript component or extending the javascript component in Magento 2, you need to use mixins.Mixins are JavaScript files located in the web/js directory. A mixin file can be in several directories if these directories are in web/js.An example of creating a mixin for custom product samples:Step 1: Create app/code/VendorName/ModuleName/view/frontend/requirejs-config.js1 2 3 4 5 6 7 8 9 | var config = { config: { mixins: { 'Magento_Swatches/js/swatch-renderer': { 'VendorName_ModuleName/js/swatch-renderer-mixin': true } } } }; |
1 2 3 4 5 6 7 8 9 10 11 12 13 | define(['jquery'], function ($) { 'use strict'; return function (SwatchRenderer) { $.widget('VendorName.SwatchRenderer', $['mage']['SwatchRenderer'], { _init: function () { console.log('getProductSwatchRenderer'); this._super(); } }); return $['mage']['SwatchRenderer']; }; }); |
6.4. Configure JavaScript merging and minify in the Admin UI
What options are available to configure JavaScript minification and bundling?
Options responsible for merging and minify JS files configuration are on the path:Admin UI > Stores > Configuration > Advanced tab > Developer > JavaScript Settings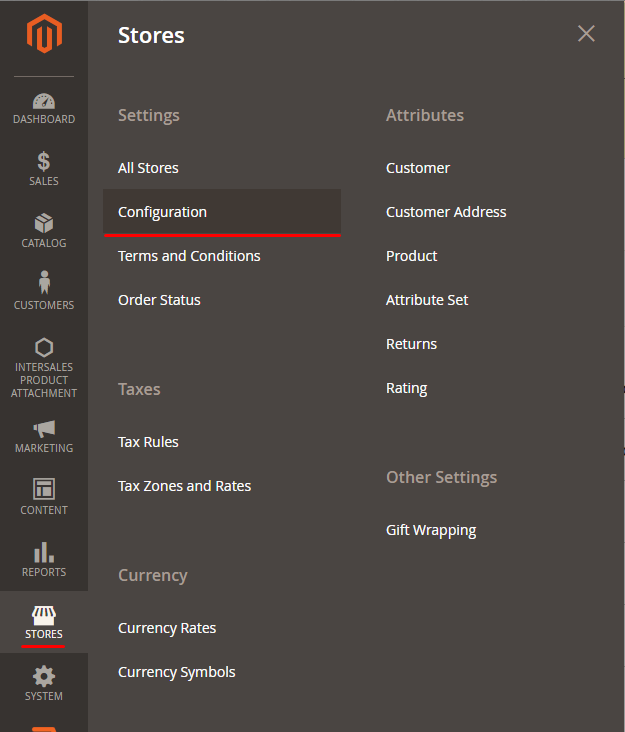
 The “Developer” tab is displayed if the site is in Developer’s mode. To switch the site to this mode, you must enter the magento server in console:
bin/magento deploy:mode:set developerIf everything is entered correctly, the console will display the following:Switched to developer mode.How does Magento minify JavaScript?
The point of js files minification is that everything useless (spaces, lines breaks, etc.) is removed from the file code, thereby reducing the size (weight), which positively affects the loading of the site as a whole.What is the purpose of JavaScript bundling and minification?
Before turning on building options, all js files are loaded alternately. Many files – many server requests during the site loading.A lot of files – a lot of server requests when loading a site. JavaScript bundling combines all the files into one, therefore there will be only one request to the server, and with the files minification (their weight reduction) the merged file will be loaded faster.All this optimizes the site and reduces page loading time.There’re also some disadvantages. You can exclude some scripts from the package, but you cannot select specific scripts for a specific page.With Merging, you can only merge Javascript files that are not loaded via RequireJS. If you want to “merge” JS modules, you have to use packaging.In Vendor/Theme/etc/view.xml you can resize the package and exclude some scripts from the package.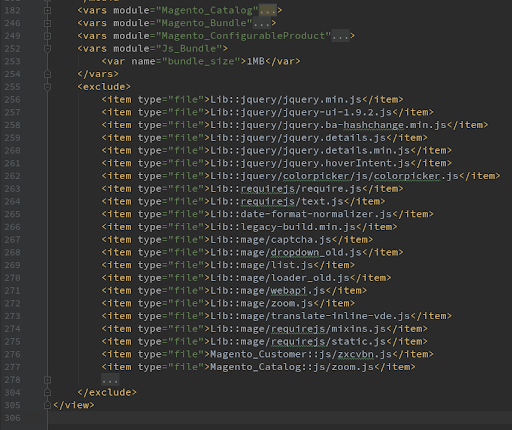 The default size for the package is 1 MB. The packet size determines the number of packets that will be created.For example, if you have 3 MB of script files and the package size is 1 MB, there will be created 3 packages. If the number is too small, you are likely to have 10 or more small bundles that will block each other during rendering, so be careful with this. Remember that packages aren’t loaded asynchronously.We can also exclude some scenarios from the kits. They will be downloaded from RequireJS if necessary.Example script requests without bundling and merging JavaScript files:
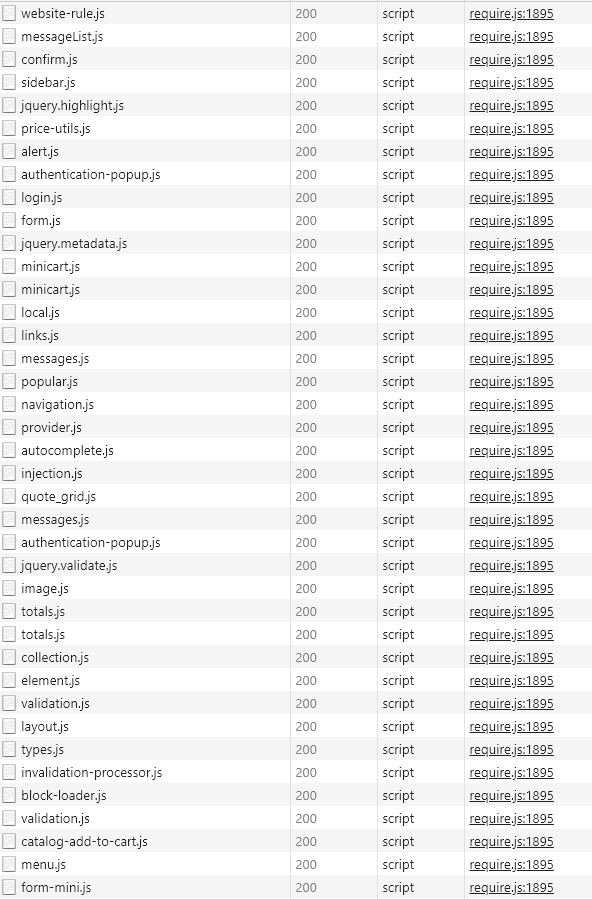
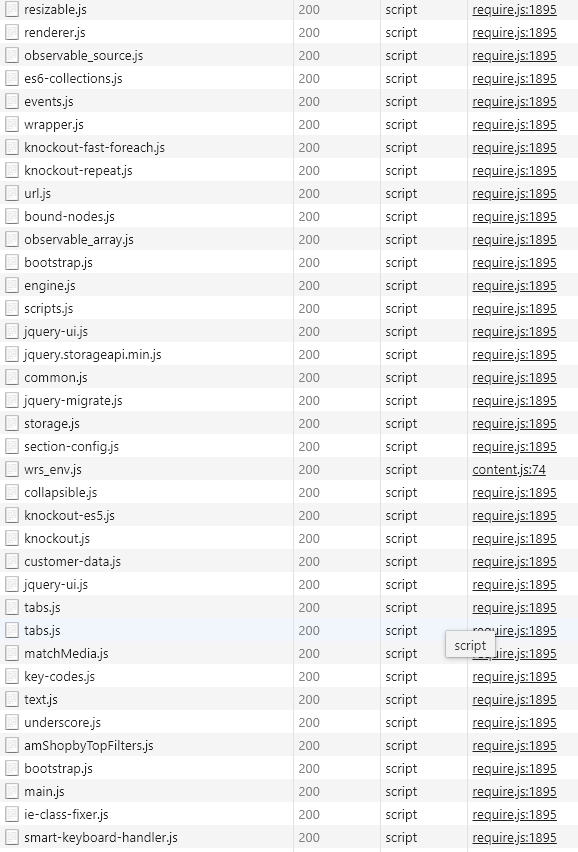 A large number of scripts adversely affects page loading speed.Here is an example of loading with the bundling function of JavaScript files:
 We see that some scripts were loaded separately, through RequireJS and six scripts packaged in bundle.Here is the example of loading scripts with bundle and merging JavaScript files functions:
 Instead of some bundling JavaScript files, we get one merged file and several separate scripts loaded using RequireJS
6.5. UI component configuration in Magento 2
Each UI Component consists of the following elements combination:- XML declaration (defines the internal structure of the component and its configuration parameters)
- JavaScript class (inherits from one of the base classes of the Magento JavaScript framework UI components, such as UIElement, UIClass, or UICollection)
- Related templates (using KnockoutJS bindings, UI Components can be bound to HTML templates).
How can specify configuration options on a UI Component widget in JSON and in Layout XML?
Before clarifying configuration options on a UI Component, it’s necessary to explain the general rendering principles of the component in the Magento system. Initially, the server receives a page request. During response generation, the system receives the UI Component configuration as .xml declaration files. Then this configuration is changed by .php modifiers. After that, the combined configuration is packaged in JSON format and added to the HTTP response code from the serverAs you can see, initially, configuration on UI Components is specified in .xml declaration. The example of such configuration you can see in the file “app/code/Magento/Catalog/view/frontend/layout/default.xml”:1 2 3 4 5 6 7 |
What configuration options are available on UI Components?
There are 2 UI Component types in Magento 2 – basic and secondary. There are 2 basic ones – Listing component and Form component. Other components are secondary and inherited from basic components.Each UI Component has default properties. Parental components of this one (basic UI Components) also have defaults. Value of all these properties can be redefined in your configuration (the information on how to do it can be found above).After page rendering, properties’ values from the resulting JSON overwrite the values for the defaults properties. After that, the resulting properties become the first-level properties of the newly created UI Component instance, and the original defaults property values are deleted.The full list of properties for each UI Components can be found on the official sitehttps://devdocs.magento.com/guides/v2.2/ui_comp_guide/bk-ui_comps.htmlHow do you specify the ko template for a UI Component?
Almost every UI Component contains a “template” property that sets the template for it. The value of this property is formed as{Module_Name}/{Path}/{Template_Name}, where{Module_Name} is the name of the module where the template is located{Path} – path to the template file, regarding the view//web/template folder in the module folder (if the template lies directly in this folder, the Path will be absent in the template address){Template_Name} – the name of the template without the suffix .htmlFor example, the file app/code/Magento/Checkout/view/frontend/layout/checkout_index_index.xml has a fragment of the UI Component configuration code:1 2 3 4 5 6 7 8 9 10 11 12 13 14 | <!-- --> <arguments> <argument name="jsLayout" xsi:type="array"> <item name="components" xsi:type="array"> <item name="checkout" xsi:type="array"> <item name="component" xsi:type="string">uiComponent</item> <item name="config" xsi:type="array"> <item name="template" xsi:type="string">Magento_Checkout/onepage</item> </item> </item> </item> </argument> </arguments> <!-- --> |
- Magento_Checkout/onepage
Demonstrate an understanding of default.tracks
UI Component JS files can contain tracks special object. In this object you put those UI Component properties that can be changed dynamically and those changes we need to track. This object converts the properties placed into it in knockout-es5 observable (more about knockout-es5 observable can be found here https://knockoutjs.com/documentation/observables.html).It has the following structure:1 2 3 4 5 6 7 8 9 10 11 | <!-- --> defaults: { property1: 'value 1', property2: 'value 2', property3: 'value 3', tracks: { property2: true, property3: true } }, <!-- --> |
6.6. Understanding knockout framework
Knockout.js is a library that allows creating dynamic interfaces using various bindings to DOM elements. It implements the Model-View-ViewModel pattern. In Magento 2, it is used in dynamic modules like Checkout, Customer and others. In this article, we refer to the module files that use knockout.js and explain the usage of the framework to perform various functions in Magento 2. In this article, we will answer the following questions:- How do you use knockout.js bindings?
- How do you bind a ko view model to a section of the DOM with the scope binding?
- How do you render a ko template of a UiComponent?
- Demonstrate an understanding of the different types of knockout observables.
- What common ko bindings are used?
- Demonstrate an understanding of ko virtual elements.
- Model contains data
- View shows data on the screen
- ViewModel is the intermediary between Model and View, that allows getting data for View and impact Model
How do you use knockout.js bindings?
Bind is the ability to bind various components to HTML.In knockout.js we use the html data-bind attribute for this as follows:On frontend Magento 2 as an example of a user greeting component, a link to a file on github:https://github.com/magento/magento2/blob/2.2/app/code/Magento/Customer/view/frontend/templates/account/customer.phtml- <
!-- ko template: getTemplate() -->is responsible for the output of the template specified in the component, here is the function responsible for the output:https://github.com/magento/magento2/blob/2.2/app/code/Magento/Ui/view/base/web/js/lib/core/element/element.js#L266123getTemplate: function () {return this.template;} is a virtual element used for translation in Magento 2. You may say that you can just write it inbut no. It is specially designed to integrate everything with translations in Magento 2. It can be used as an attribute and data-bind:12<span translate="international text" /><span data-bind="i18n: 'international text'"></span>— used to add a function after an element rendering.<div data-bind="fadeVisble: isVisble">
- Appearance:
- visible – show/hide the item depending on the condition
- text – displays text, html tags are displayed as text
- html – displays html, html tags will be rendered
- css – add css class depending on the condition
- style – add css style depending on the condition
- attr – set attribute values
- Flow:
- foreach – duplicates the contents of the element for each item in the specified array
- if – adds the contents of a condition block to the DOM, if it’s true
- ifnot – adds the contents of a condition block to the DOM if it is false
- with – creates a new bundling property context in which you can directly access the subproperties of this property.
- component – embeds an external component in the DOM
- Work with form fields:
- click – function call on click
- event – function call upon event occurrence
- submit – function call on submit
- enable – turns on the element when the condition is true
- disable – turns off the element when the condition is true
- value – changes the value of a form field
- textInput – similar to value, it works only with text fields, provides instant updates from the DOM for all types of user input, including autocomplete, drag-and-drop, and clipboard events
- hasFocus – changes the value of a property upon receipt (if it’s true) and loss of focus (if it’s false)
- checked – changes the value of a property when selecting checkbox, radio elements
- options – provides options for dropdown
- selectedOptions – provides selected options of dropdown
- uniqueName – sets a unique name for empty form fields
- Template rendering:
- template – renders another template
How do you bind a ko view model to a section of the DOM with the scope binding?
It binds an element with a UI Component that is already declared in xml in jsLayout or in1 2 3 4 5 6 7 |
1 | <div id="checkout-loader" data-role="checkout-loader" class="loading-mask" data-mage-init='{"checkoutLoader": {}}'> |
How do you render a ko template of a UiComponent?
Knockout templates can be specified in different ways. Here we will try to cover possible ways to specify templates for UiComponent.The first way is to indicate a specific component in the viewmodel file.code:1 2 3 4 5 6 7 8 9 | define([...], function (...) { 'use strict'; return Component.extend({ defaults: { template: 'Magento_Customer/authentication-popup' }, }); }); |
1 2 3 4 5 6 7 8 9 10 11 12 13 14 |
1 2 3 4 5 6 7 | <item name="summary" xsi:type="array"> <item name="component" xsi:type="string">Magento_Checkout/js/view/summary</item> <item name="displayArea" xsi:type="string">summary</item> <item name="config" xsi:type="array"> <item name="template" xsi:type="string">Magento_Checkout/summary</item></item> <item name="children" xsi:type="array"></item> </item> |
1 2 3 4 5 6 7 8 9 10 | <div id="checkout" data-bind="scope:'checkout'" class="checkout-container"> <!-- ko template: getTemplate() --><!-- /ko --> </div> |
1 2 3 4 5 6 7 8 9 10 11 12 13 14 15 16 17 18 19 20 21 22 23 24 25 26 27 28 29 30 31 32 | <!-- /** * Copyright © Magento, Inc. All rights reserved. * See COPYING.txt for license details. */ --> <!-- ko foreach: getRegion('authentication') --> <!-- ko template: getTemplate() --><!-- /ko --> <!--/ko--> <!-- ko foreach: getRegion('progressBar') --> <!-- ko template: getTemplate() --><!-- /ko --> <!--/ko--> <!-- ko foreach: getRegion('estimation') --> <!-- ko template: getTemplate() --><!-- /ko --> <!--/ko--> <!-- ko foreach: getRegion('messages') --> <!-- ko template: getTemplate() --><!-- /ko --> <!--/ko--> <div class="opc-wrapper"> <ol class="opc" id="checkoutSteps"> <!-- ko foreach: getRegion('steps') --> <!-- ko template: getTemplate() --><!-- /ko --> <!--/ko--> </ol> </div> <!-- ko foreach: getRegion('sidebar') --> <!-- ko template: getTemplate() --><!-- /ko --> <!--/ko--> |
Demonstrate an understanding of the different types of knockout observables.
Observables are observed objects and arrays that are updated asynchronously when the value changes. In knockout.js, this is implemented by following functions:- ko.observable() — the function is used for observable objects to asynchronously change values, for example, when retrieving data from json.
- ko.observableArray([]) — the function is used for observable arrays, which can also be updated asynchronously. They change the values and use methods for arrays such as: .map, .filter, .each, etc.
1 2 | var Name = ko.observable(null); Name('New value!'); |
 If we want to get the value of the observed object or array, we call our function without arguments:Name();
 You can subscribe to observable objects or arrays to change the value using the subscribe method:
- To get the value before assignment you need to write the following construction:123Name.subscribe(function(oldValue) {alert("Old value: " + oldValue);}, null, "beforeChange");
- To get the value after assignment you need to write the following construction:123Name.subscribe(function(newValue) {alert("New value: " + newValue);});
ko.computed(callback)is used to update the value when changing an observable object used in this function.ko.pureComputed(callback)is used to return observable objects without updating. Due to this, we get more performance and less memory consumption to compare with the ko.computed function.
1 2 3 4 5 6 7 8 9 10 11 12 13 14 15 16 17 18 19 | Observables examples: html: The name is <span data-bind="text: name"></span> <button data-bind="click: change">Change</button> script: var myViewModel = { name: ko.observable('Bob'), change: function() { this.name('Alice'); } }; ko.applyBindings(myViewModel); output before pressing the Change button: The name is Bob Output after pressing the Change button: The name is Alice |
What common ko bindings are used?
As it was mentioned before, you can find more about bindings in the knockout.js documentation(https://knockoutjs.com/documentation/introduction.html). Let’s consider some of the main ones used in Magento:- is responsible for the visibility of the element and takes the value boolean.is used to display text
is used to output html.— attr is user to output attributesDemonstrate an understanding of ko virtual elements.
Virtual elements are child element bindings with no need to embed html to anchor the element. Virtual elements are used to render an html document. For example, how this is done in the payment methods template:We will also analyze the main virtual elements that are used in Magento 2:123<!-- ko foreach: getRegion('payment-methods-list') --><!-- ko template: getTemplate() --><!-- /ko --><!-- /ko -->for the opposite conditions.
- Support for older browsers up to IE 6
- Simple library
- Separation of HTML and JavaScript
- Dynamic data binding
- Poor performance if there are a lot of objects
- Magento is switching to PWA, using React, and Knockout may sooner or later become deprecated.
- Underscore template is rendered only when the _.template (template) (params) method is called, the Knockout template is automatically rendered if the data changes.
- Underscore uses the blocks <% = …%>, <% …%>, <% – …%> to run scripts. Knockout uses the data-bind attribute in html elements and html comments.
Demonstrate understanding of the knockout-es5 library
Knockout observables get and change as functions:Knockout-es5 library allows simplifying the knockout observable getting/changing. The library uses ES5 getter/setter.12var value = this.knockoutProperty(); // getthis.knockoutProperty(value); // setThere also can be used aperators += , -= , *= , /=12var value = this.knockoutProperty; // getthis.knockoutProperty = value; // setWhat is identical to the expression:1this.knockoutProperty += value; // setIn order to apply the plugin to the model, you need to call ko.track (someModel);Additionally, you can specify an array of model fields as the second parameter to limit the fields to which this plugin is applied:1this.knockoutProperty(this.knockoutProperty() + value)ko.track (someModel, ['firstName', 'lastName', 'email']);Now to get the original observable, we need to callko.getObservable(someModel, 'email')The plugin also makes it easier to get the value of the calculated functions.For example, instead ofWe can writeWe need to call the following code:ko.defineProperty(someModel, 'subtotal', function() {return this.price * this.quantity; });6.7. Understanding dependency between components
Demonstrate an understanding of the links, imports, exports, and listens UiComponent configuration directives.
Links, imports, exports and listens are used for binding components to demonstrate how binding works. We need two UI Components and a module with the following contents: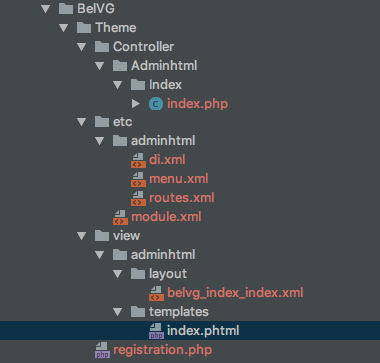 The module is created in the article on areas in Magento (Relink). We will add the missing files to display our module in the admin panel menu and as a separate page:app/code/BelVG/Theme/etc/adminhtml/menu.xmlapp/code/BelVG/Theme/etc/adminhtml/routes.xml12345678910111213xml version="1.0"?><config xmlns:xsi="http://www.w3.org/2001/XMLSchema-instance"xsi:noNamespaceSchemaLocation="urn:magento:module:Magento_Backend:etc/menu.xsd"><menu><add id="BelVG_Theme::belvg"title="BelVG"module="BelVG_Theme"sortOrder="55"resource="BelVG_Theme::belvg"action="belvg"/></menu></config>app/code/BelVG/Theme/Controller/Adminhtml/Index/index.php1234567<config xmlns:xsi="http://www.w3.org/2001/XMLSchema-instance" xsi:noNamespaceSchemaLocation="urn:magento:framework:App/etc/routes.xsd"><router id="admin"><route id="belvg" frontName="belvg"><module name="BelVG_Theme" /></route></router></config>app/code/BelVG/Theme/view/adminhtml/layout/belvg_index_index.xml12345678910111213141516171819202122232425262728293031323334353637namespace BelVG\Theme\Controller\Adminhtml\Index;class Index extends \Magento\Backend\App\Action{/*** @var \Magento\Framework\View\Result\PageFactory*/protected $resultPageFactory;/*** Constructor** @param \Magento\Backend\App\Action\Context $context* @param \Magento\Framework\View\Result\PageFactory $resultPageFactory*/public function __construct(\Magento\Backend\App\Action\Context $context,\Magento\Framework\View\Result\PageFactory $resultPageFactory) {parent::__construct($context);$this->resultPageFactory = $resultPageFactory;}/*** Load the page defined in view/adminhtml/layout/belvg_index_index.xml** @return \Magento\Framework\View\Result\Page*/public function execute(){$resultPage = $this->resultPageFactory->create();$resultPage->getConfig()->getTitle()->prepend(__("Custom Component"));return $resultPage;}}?>This is the module we will need to see the UI Component binding, and now we will create our components ourselves:app/code/BelVG/Theme/view/adminhtml/web/js/component-one.js12345678910<page xmlns:xsi="http://www.w3.org/2001/XMLSchema-instance" xsi:noNamespaceSchemaLocation="urn:magento:framework:View/Layout/etc/page_configuration.xsd"><body><head><title>Custom Component</title></head><referenceContainer name="content"><block class="Magento\Backend\Block\Template" template="BelVG_Theme::index.phtml"/></referenceContainer></body></page>app/code/BelVG/Theme/view/adminhtml/web/js/component-two.js12345678910111213define(['jquery','uiComponent'],function ($, Component) {'use strict';return Component.extend({defaults: {title: 'Component One',value: 'Value text'}});});Declare them in the templateapp/code/BelVG/Theme/view/adminhtml/templates/index.phtml12345678910111213define(['jquery','uiComponent'], function ($, Component) {return Component.extend({defaults : {title: 'Component One',value: 'Value text'}});});Consider the imports directive. The imports directive is used to pass values, let’s add imports and Observable to observe our value property.– add our imports directive to the defaults object in the second component:12345678910111213141516171819202122232425262728293031323334<div class="row"><div class="col-m-6"><div class="dashboard-item" data-bind="scope: 'componentOne'"><div class="dashboard-item-title" data-bind="text: title"></div><div class="dashboard-item-content"></div></div></div><div class="col-m-6"><div class="dashboard-item" data-bind="scope: 'componentTwo'"><div class="dashboard-item-title" data-bind="text: title"></div><div class="dashboard-item-content"></div></div></div></div>wherecomponentOne is the name of the UiRegistry component from which the value will be taken.value is the name of the property to be taken.– and into our two observer components:123imports: {value: 'componentOne:value'}And also add to BelVG/Theme/view/adminhtml/templates/index.phtml in the block.dashboard-item-content[data-bind=”scope: ‘componentOne'”]12345initObservable: function () {this._super().observe(['value']);return this;}
Change value component:
And the second component .dashboard-item-content[data-bind=”scope: ‘componentTwo'”]import from the first component:
We have the following page: When we change the value of input (defaults.value), our second component will import this value from the first. It will immediately be displayed in the second component.Now let’s move on to the exports directive:To see how we export our values, we need to remove the imports directive in our second component, and add the exports directive to the first component:Now it can be seen how we imported the values from the second to the first component. We export our values from the first to the second one. When you follow the instructions you will see it.Now move to the links directory:The links directive is used to bind properties. You will have the opportunity to change which properties are connected in any component. To implement this function, we need to redo our layout of the component to demonstrate the connection:Change in BelVG/Theme/view/adminhtml/templates/index.phtml in the block .dashboard-item-content[data-bind=”scope: ‘componentTwo'”]123exports: {value: 'componentTwo:value'}
to Tracks object is used to convert our property to an observable object. If we use the methods in question, we use this object.Consider the listens directory, delete the links directory and add:wherevalue is the name of the property to be tracked.valueChange is a function that will be called when the value changes.As a result, we get this component123listens: {'value': 'valueChanged'}The essence of this listens property is that when the value that we are listening to changes, an alert pops up. So, even if you export from the second component to the first, the property will also change, and due to this our alert will pop up.Module sources:https://github.com/m1kash/belvg-theme-module12345678910111213141516171819202122232425define(['jquery','uiComponent','Magento_Ui/js/modal/alert'],function ($, Component, alert) {'use strict';return Component.extend({defaults: {title: 'Component One',value: 'Value text',listens: {value: 'valueChanged'},tracks: {value: true}},valueChanged: function (val) {alert({content: 'value changed to ' + val + ''});}});});
6.8. Understanding string templates
Demonstrate an understanding of ES5 string literal templates like ${$.provider}.
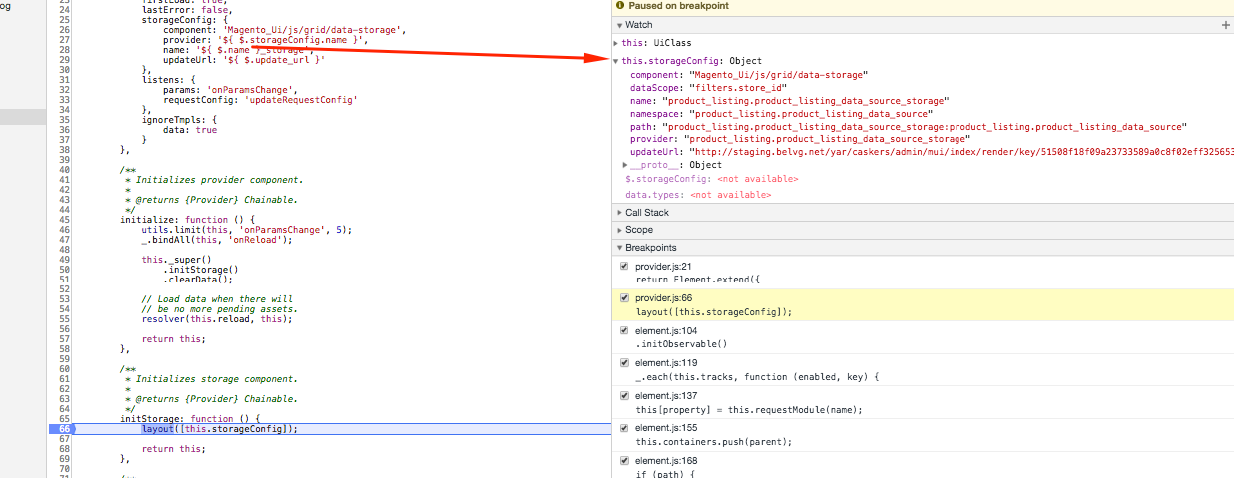
Template literals in Magento 2 are written $ {$.variable} in single quotes ‘, and in ES6 using` template literals is most often used, where $ is our component in UI Components if you look at the Listing (grid) component, for exampleAs you can see in most configuration parameters, template literals are used. We can also use the listens which we mentioned before :1234567891011121314151617181920212223242526272829303132333435363738394041defaults: {template: 'ui/grid/listing',listTemplate: 'ui/list/listing',stickyTmpl: 'ui/grid/sticky/listing',viewSwitcherTmpl: 'ui/grid/view-switcher',positions: false,displayMode: 'grid',displayModes: {grid: {},list: {}},dndConfig: {},editorConfig: {name: '${ $.name }_editor',component: 'Magento_Ui/js/grid/editing/editor',columnsProvider: '${ $.name }',dataProvider: '${ $.provider }',enabled: false},resizeConfig: {name: '${ $.name }_resize',columnsProvider: '${ $.name }',component: 'Magento_Ui/js/grid/resize',enabled: false},imports: {rows: '${ $.provider }:data.items'},listens: {elems: 'updatePositions updateVisible','${ $.provider }:reload': 'onBeforeReload','${ $.provider }:reloaded': 'onDataReloaded'},modules: {dnd: '${ $.dndConfig.name }',resize: '${ $.resizeConfig.name }'},tracks: {displayMode: true},statefull: {},Here we see when our component is restarted, the onDataReloaded method will be launched dynamically.As it can be seen from the ${ $.provider }:reloaded value, we separate the values of ${ $.provider }(target) and reloaded(property), if we work in a browser that supports (template strings ES6), then it processes them like template string ES 6 if it does not support, it is processed through the underscore template (http://underscorejs.ru/#template).If we check the back of uiComponents, we will see that all these values are dynamic and are configured in the files of the ui components. For example, product_listingproduct_listing (https://github.com/magento/magento2/blob/2.3-develop/app/code/Magento/Catalog/view/adminhtml/ui_component/product_listing.xml)12345678imports: {rows: '${ $.provider }:data.items'},listens: {elems: 'updatePositions updateVisible','${ $.provider }:reload': 'onBeforeReload','${ $.provider }:reloaded': 'onDataReloaded'}As you can see from the component Ui code, we pass the provider variable to js_config. And later these parameters are generated in json in a tag. We can also write parameters through the underscore which is then generated in camelCase12345<argument name="data" xsi:type="array"><item name="js_config" xsi:type="array"><item name="provider" xsi:type="string">product_listing.product_listing_data_source</item></item></argument>then it is all processed app.js.12345678What does $. Inside of ${ } resolve to?
$ {} Is the ES6 template literal implemented by Magento 2 to substitute properties as in ES6 templates.When we write $. We turn to this More details are here https://devdocs.magento.com/guides/v2.3/ui_comp_guide/concepts/ui_comp_template_literals.html
 More details are here