 Table of content
Magento 2 Certified Professional Developer Guide
Section 2: Request Flow Processing
2.1 Utilize modes and application initialization
Identify the steps for application initialization
Step 1
The request to index.php (entry point) in the site root or in pub/index.php. In developer mode, index.php in the website root is commonly used as an entry point, while for production mode, pub/index.php is recommended for production mode.Step 2
Connect bootstrap.php filetry { require __DIR__ . ‘/app/bootstrap.php’; } catch (\Exception $e) {where autoload.php is connected (autoloader is loaded)require_once __DIR__ . ‘/autoload.php’;Step 3
Autoloader allows to call create() method of the Bootstrap class$bootstrap = \Magento\Framework\App\Bootstrap::create(BP, $_SERVER);That returns Bootstrap object, that, in its turn, contains ObjectManagerFactory object.1 2 3 4 5 6 7 8 | public static function create($rootDir, array $initParams, ObjectManagerFactory $factory = null) { self::populateAutoloader($rootDir, $initParams); if ($factory === null) { $factory = self::createObjectManagerFactory($rootDir, $initParams); } return new self($factory, $rootDir, $initParams); } |
Step 4
Then, createApplication() of the Bootstrap object is called.$app = $bootstrap->createApplication(\Magento\Framework\App\Http::class);In this method, an instance of the Magento\Framework\App\Http class is created with the help of ObjectManager and is returned into index.php.1 2 3 4 5 6 7 8 9 10 11 12 | public function createApplication($type, $arguments = []) { try { $application = $this->objectManager->create($type, $arguments); if (!($application instanceof AppInterface)) { throw new \InvalidArgumentException("The provided class doesn't implement AppInterface: {$type}"); } return $application; } catch (\Exception $e) { $this->terminate($e); } } |
Step 5
Then, call run() method of the Bootstrap object to launch the application that will call launch() method of the application object.1 2 3 4 5 6 7 8 9 10 11 12 13 14 15 16 17 18 19 20 21 22 23 | $bootstrap->run($app); public function run(AppInterface $application) { try { try { \Magento\Framework\Profiler::start('magento'); $this->initErrorHandler(); $this->assertMaintenance(); $this->assertInstalled(); $response = $application->launch(); $response->sendResponse(); \Magento\Framework\Profiler::stop('magento'); } catch (\Exception $e) { \Magento\Framework\Profiler::stop('magento'); if (!$application->catchException($this, $e)) { throw $e; } } } catch (\Exception $e) { $this->terminate($e); } } |
Step 6
An instance of Http object performs the initial routing; as a result, it determines the area from URL and sets in$this->_state->setAreaCode($areaCode). After the area is set, the required configuration for that area is loaded.Then, an object of \Magento\Framework\App\FrontController class is created and its method – dispatch($this->_request) – is called, to which request is passed.1 2 3 4 5 6 7 8 9 10 11 12 13 14 15 16 17 18 19 20 21 22 | public function launch() { $areaCode = $this->_areaList->getCodeByFrontName($this->_request->getFrontName()); $this->_state->setAreaCode($areaCode); $this->_objectManager->configure($this->_configLoader->load($areaCode)); /** @var \Magento\Framework\App\FrontControllerInterface $frontController */ $frontController = $this->_objectManager->get(\Magento\Framework\App\FrontControllerInterface::class); $result = $frontController->dispatch($this->_request); // TODO: Temporary solution until all controllers return ResultInterface (MAGETWO-28359) if ($result instanceof ResultInterface) { $this->registry->register('use_page_cache_plugin', true, true); $result->renderResult($this->_response); } elseif ($result instanceof HttpInterface) { $this->_response = $result; } else { throw new \InvalidArgumentException('Invalid return type'); } // This event gives possibility to launch something before sending output (allow cookie setting) $eventParams = ['request' => $this->_request, 'response' => $this->_response]; $this->_eventManager->dispatch('controller_front_send_response_before', $eventParams); return $this->_response; } |
Step 7
In dispatch() method of the FrontCotroller class the current router and the current action controller are defined. Then, dispatch() method is called from action controller.1 2 3 4 5 6 7 8 9 10 11 12 13 14 15 16 17 18 19 20 21 22 23 24 25 26 27 28 29 30 31 32 33 34 | public function dispatch(RequestInterface $request) { \Magento\Framework\Profiler::start('routers_match'); $routingCycleCounter = 0; $result = null; while (!$request->isDispatched() && $routingCycleCounter++ < 100) { /** @var \Magento\Framework\App\RouterInterface $router */ foreach ($this->_routerList as $router) { try { $actionInstance = $router->match($request); if ($actionInstance) { $request->setDispatched(true); $this->response->setNoCacheHeaders(); if ($actionInstance instanceof \Magento\Framework\App\Action\AbstractAction) { $result = $actionInstance->dispatch($request); } else { $result = $actionInstance->execute(); } break; } } catch (\Magento\Framework\Exception\NotFoundException $e) { $request->initForward(); $request->setActionName('noroute'); $request->setDispatched(false); break; } } } \Magento\Framework\Profiler::stop('routers_match'); if ($routingCycleCounter > 100) { throw new \LogicException('Front controller reached 100 router match iterations'); } return $result; } |
Step 8
Dispatch() method is implemented in Magento\Framework\App\Action\Action.php. When we create custom actions, they are inherited from this class.Action controller returns the object that realizes ResultInterface via execute() method.1 2 3 4 5 6 7 8 9 10 11 12 13 14 15 16 17 18 19 20 21 22 23 24 25 26 27 28 29 30 31 32 33 34 35 | public function dispatch(RequestInterface $request) { $this->_request = $request; $profilerKey = 'CONTROLLER_ACTION:' . $request->getFullActionName(); $eventParameters = ['controller_action' => $this, 'request' => $request]; $this->_eventManager->dispatch('controller_action_predispatch', $eventParameters); $this->_eventManager->dispatch('controller_action_predispatch_' . $request->getRouteName(), $eventParameters); $this->_eventManager->dispatch( 'controller_action_predispatch_' . $request->getFullActionName(), $eventParameters ); \Magento\Framework\Profiler::start($profilerKey); $result = null; if ($request->isDispatched() && !$this->_actionFlag->get('', self::FLAG_NO_DISPATCH)) { \Magento\Framework\Profiler::start('action_body'); $result = $this->execute(); \Magento\Framework\Profiler::start('postdispatch'); if (!$this->_actionFlag->get('', self::FLAG_NO_POST_DISPATCH)) { $this->_eventManager->dispatch( 'controller_action_postdispatch_' . $request->getFullActionName(), $eventParameters ); $this->_eventManager->dispatch( 'controller_action_postdispatch_' . $request->getRouteName(), $eventParameters ); $this->_eventManager->dispatch('controller_action_postdispatch', $eventParameters); } \Magento\Framework\Profiler::stop('postdispatch'); \Magento\Framework\Profiler::stop('action_body'); } \Magento\Framework\Profiler::stop($profilerKey); return $result ?: $this->_response; } |
Step 9
FrontController returns ResultInterface into Application Instance, which puts out a response.1 2 3 4 5 6 7 8 9 10 11 12 13 14 15 16 17 18 19 20 21 | public function launch() { $areaCode = $this->_areaList->getCodeByFrontName($this->_request->getFrontName()); $this->_state->setAreaCode($areaCode); $this->_objectManager->configure($this->_configLoader->load($areaCode)); /** @var \Magento\Framework\App\FrontControllerInterface $frontController */ $frontController = $this->_objectManager->get(\Magento\Framework\App\FrontControllerInterface::class); $result = $frontController->dispatch($this->_request); // TODO: Temporary solution until all controllers return ResultInterface (MAGETWO-28359) if ($result instanceof ResultInterface) { $this->registry->register('use_page_cache_plugin', true, true); $result->renderResult($this->_response); } elseif ($result instanceof HttpInterface) { $this->_response = $result; } else { throw new \InvalidArgumentException('Invalid return type'); } // This event gives possibility to launch something before sending output (allow cookie setting) $eventParams = ['request' => $this->_request, 'response' => $this->_response]; $this->_eventManager->dispatch('controller_front_send_response_before', $eventParams); return $this->_response; |
How would you design a customization that should act on every request and capture output data regardless of the controller?
To receive data from each request, create observer for controller_action_postdispatch event (Magento\Framework\App\Action\Action::dispatch()).Realization example – class Magento\Customer\Observer\Visitor\SaveByRequestObserver.Describe how to use Magento modes
Magento 2 can be launched in one of the three modes: developer, production and default. The main difference between the modes is the way Magento will get access to static files (CSS, JavaScript files, images, etc.)There is also a maintenance mode, but it is aimed at denying access to the system. To view the current mode, use the CLI commandbin/magento deploy:mode:show. To switch modes, use bin/magento deploy:mode:setWhat are pros and cons of using developer mode/production mode?
Developer mode
In Developer mode, static view files are generated every time they are requested. The symlinks of them are written to the pub/static directory. If you will change content of JS file, it will be updated in pub/static too because of symlink.Uncaught exceptions are displayed in the browser instead of being logged. An exception is thrown whenever an event subscriber cannot be invoked.Magento 2 validates XML files using schemas in this mode.Use the Developer mode while developing customizations or extensions. The main benefit of this mode is that error messages are visible to you. It should not be used in production because it impacts the performance.Production mode
You should run Magento in Production mode once it is deployed to a production server. Production mode provides the highest performance in Magento 2.The most important aspect of this mode is that errors are logged to the file system and are never displayed to the user. In this mode, static view files are not created on the fly when they are requested; instead, they have to be deployed to the pub/static directory using the command-line tool. Any changes to view files require running the deploy tool again.When do you use default mode?
Default mode
Default mode is how the Magento software operates if no other mode is specified.In this mode, errors are logged to the files in var/reports and are never shown to the user. Static view files are materialized on the fly and then cached.In contrast to the developer mode, view file changes are not visible until the generated static view files are cleared.Default mode is not optimized for a production environment, primarily because of the adverse performance impact of static files being materialized on the fly rather than generating and deploying them beforehand. In other words, creating static files on the fly and caching them has a greater performance impact than generating them using the static file creation command line tool.How do you enable/disable maintenance mode?
bin/magento maintenance:enablebin/magento maintenance:disableDescribe front controller responsibilities
– Gathering all routers (injected into the constructor using DI)– Finding a matching controller/router– Obtaining generated HTML to the response objectIn which situations will the front controller be involved in execution, and how can it be used in the scope of customizations?
Front controllers are the first step in handling requests and work flows across all pages. Basically, the front controller controls all other controllers. In Magento 2, it gathers routes, matches controllers, and obtains the HTML generated to the response object. It is not used in the console.2.2 Demonstrate ability to process URLs in Magento
Describe how Magento processes a given URL. How do you identify which module and controller corresponds to a given URL?
Front Controller
Routing in Magento 2 is based on Front Controller Pattern. Front Controller is a design pattern, in which one component is responsible for processing all the incoming requests, redirecting them to the corresponding components, further results processing and returning the result to the browser.FrontController iterates via the available routers and, if the action responsible for the current URL is successfully found, calls the\Magento\Framework\App\Action\AbstractAction::dispatch method.Routers
All routers in Magento 2 should implement \Magento\Framework\App\RouterInterface interface and define \Magento\Framework\App\RouterInterface::match method. This method is responsible for matching and processing URL requests. In case of a successful match, router returns the corresponding action instance. When the needed action is not found, Front Controller is passed to the next router.Magento 2 has four routers:- Base Router (\Magento\Framework\App\Router\Base) – sets module front name, controller and action names, controller module and route name if found. Processes standard Magento URLs.
- CMS Router (\Magento\Cms\Controller\Router) – applied for processing CMS pages. Sets module name to “cms”, controller name to “page”, action name to “view” and page id depending on the requested page. Then, it forwards request but won’t dispatch it. This will result in the next cycle of router checks by Front Controller, where Base Router, based on the set path, will call \Magento\Cms\Controller\Page\View that will indicate the required page.
- UrlRewrite Router (\Magento\UrlRewrite\Controller\Router) – responsible for URL rewrites. Applies Url Finder to find a corresponding URL in the database and then returns forward the same way as CMS Router.
- Default Router (\Magento\Framework\App\Router\DefaultRouter) – is applied when other routers are unable to find the suitable action; it is also responsible for 404 page.
$request->getControllerModule() – get controller module (e.g. ‘Magento_Catalog’)$request->getControllerName() – get controller name (e.g. ‘product’)$request->getActionName() – get action name (e.g. ‘view’)For instance, to define the current module, controller and action, temporarily add at the end of index.php file (or pub/index.php) the following code:1 2 | $request = \Magento\Framework\App\ObjectManager::getInstance()->get('\Magento\Framework\App\Request\Http'); var_dump($request->getControllerModule(), $request->getControllerName(), $request->getActionName()); |
What is necessary to create a custom URL structure?
To create a custom router, first add it to \Magento\Framework\App\RouterList that passes into Front Controller and has all the available routers in the proper order. For this, use di.xml file in our module.1 2 3 4 5 6 7 8 9 10 11 12 13 14 | xml version="1.0"?> <config xmlns:xsi="http://www.w3.org/2001/XMLSchema-instance" xsi:noNamespaceSchemaLocation="urn:magento:framework:ObjectManager/etc/config.xsd"> <type name="Magento\Framework\App\RouterList"> <arguments> <argument name="routerList" xsi:type="array"> <item name="customrouter" xsi:type="array"> <item name="class" xsi:type="string">Vendor\Module\Controller\CustomRouter</item> <item name="disable" xsi:type="boolean">false</item> <item name="sortOrder" xsi:type="string">22</item> </item> </argument> </arguments> </type> </config> |
1 2 3 4 5 6 7 8 9 10 11 12 13 14 15 16 17 18 19 20 21 22 23 24 25 26 27 28 29 30 31 32 33 34 35 36 37 | <?php namespace Vendor\Module\Controller; use Magento\Framework\App\ActionFactory; use Magento\Framework\App\RouterInterface; class CustomRouter implements RouterInterface { protected $actionFactory; public function __construct( ActionFactory $actionFactory ) { $this->actionFactory = $actionFactory; } public function match(\Magento\Framework\App\RequestInterface $request) { $identifier = trim($request->getPathInfo(), '/'); if (strpos($identifier, ‘customrouter-test’) !== false) { $request->setPathInfo('/customrouter/index/index/'); // or $request->setModuleName('customrouter'); $request->setControllerName('index'); $request->setActionName('index'); $request->setControllerModule('Module_Vendor'); $request->setRouteName('customrouter'); $request->setParams(['param1' => 'value']); } else { return false; } return $this->actionFactory->create('Magento\Framework\App\Action\Forward'); // or return $this->actionFactory->create('Vendor\Module\Controller\Index\Index'); } } |
1 2 3 4 5 6 7 8 | xml version="1.0"?> <config xmlns:xsi="http://www.w3.org/2001/XMLSchema-instance" xsi:noNamespaceSchemaLocation="urn:magento:framework:App/etc/routes.xsd"> <router id="standard"> <route id="customrouter" frontName="customrouter"> <module name="Vendor_Module" /> </route> </router> </config> |
$request->getRouteName().Route frontName is the part of URL: {magento-base-url}/{frontName}/{controller}/{action}. To get it, use $request->getModuleName().Describe the URL rewrite process and its role in creating user-friendly URLs
URL Rewrites allow to put our catalog URLs (/catalog/product/id/123) in an easy-to-understand way (/black-tshirt.html). UrlRewrite Router (\Magento\UrlRewrite\Controller\Router) is responsible for their processing; it searches for a necessary URL in the database and, when it is found, it calls $request->setPathInfo(‘/’ . $rewrite->getTargetPath()) first, and then – Forward Action. not-user-friendly path (like catalog/product/id/123) are stored in Target Path.Finding matching URL rewrite
\Magento\UrlRewrite\Controller\Router::getRewrite method is responsible for database URL search.1 2 3 4 5 6 7 | protected function getRewrite($requestPath, $storeId) { return $this->urlFinder->findOneByData([ UrlRewrite::REQUEST_PATH => ltrim($requestPath, '/'), UrlRewrite::STORE_ID => $storeId, ]); } |
How are user-friendly URLs established, and how are they customized?
Generating URL rewrite
To create, modify or delete URL rewrites for catalog entities, apply Magento_CatalogUrlRewrite module. This module contains observers, responsible for catalog entities modification events. To clarify, let us make an example of URL Rewrite processing at the event of saving a product.The process begins in observer method \Magento\CatalogUrlRewrite\Observer\ProductProcessUrlRewriteSavingObserver, called at the catalog_product_save_after event.Events.xml1 2 3 | <event name="catalog_product_save_after"> <observer name="process_url_rewrite_saving" instance="Magento\CatalogUrlRewrite\Observer\ProductProcessUrlRewriteSavingObserver"/> </event> |
1 2 3 4 5 6 7 8 9 10 11 12 13 14 15 16 17 18 19 20 21 22 | public function execute(\Magento\Framework\Event\Observer $observer) { /** @var Product $product */ $product = $observer->getEvent()->getProduct(); if ($product->dataHasChangedFor('url_key') || $product->getIsChangedCategories() || $product->getIsChangedWebsites() || $product->dataHasChangedFor('visibility') ) { $this->urlPersist->deleteByData([ UrlRewrite::ENTITY_ID => $product->getId(), UrlRewrite::ENTITY_TYPE => ProductUrlRewriteGenerator::ENTITY_TYPE, UrlRewrite::REDIRECT_TYPE => 0, UrlRewrite::STORE_ID => $product->getStoreId() ]); if ($product->isVisibleInSiteVisibility()) { $this->urlPersist->replace($this->productUrlRewriteGenerator->generate($product)); } } } |
1 2 3 4 5 6 7 8 9 10 11 12 13 14 15 16 17 18 | public function generate(Product $product, $rootCategoryId = null) { if ($product->getVisibility() == Visibility::VISIBILITY_NOT_VISIBLE) { return []; } $storeId = $product->getStoreId(); $productCategories = $product->getCategoryCollection() ->addAttributeToSelect('url_key') ->addAttributeToSelect('url_path'); $urls = $this->isGlobalScope($storeId) ? $this->generateForGlobalScope($productCategories, $product, $rootCategoryId) : $this->generateForSpecificStoreView($storeId, $productCategories, $product, $rootCategoryId); return $urls; } |
1 2 3 4 5 6 7 8 9 10 11 12 13 14 15 16 17 18 19 20 21 22 23 24 25 26 27 28 29 | protected function generateForGlobalScope($productCategories, $product = null, $rootCategoryId = null) { return $this->getProductScopeRewriteGenerator()->generateForGlobalScope( $productCategories, $product, $rootCategoryId ); } public function generateForGlobalScope($productCategories, Product $product, $rootCategoryId = null) { $productId = $product->getEntityId(); $mergeDataProvider = clone $this->mergeDataProviderPrototype; foreach ($product->getStoreIds() as $id) { if (!$this->isGlobalScope($id) && !$this->storeViewService->doesEntityHaveOverriddenUrlKeyForStore( $id, $productId, Product::ENTITY )) { $mergeDataProvider->merge( $this->generateForSpecificStoreView($id, $productCategories, $product, $rootCategoryId) ); } } return $mergeDataProvider->getData(); } |
1 2 3 4 5 6 7 8 9 10 11 12 13 14 15 16 17 18 19 20 21 22 23 24 25 26 27 28 29 30 31 32 33 34 35 36 37 38 39 40 41 42 | public function generateForSpecificStoreView($storeId, $productCategories, Product $product, $rootCategoryId = null) { $mergeDataProvider = clone $this->mergeDataProviderPrototype; $categories = []; foreach ($productCategories as $category) { if (!$this->isCategoryProperForGenerating($category, $storeId)) { continue; } // category should be loaded per appropriate store if category's URL key has been changed $categories[] = $this->getCategoryWithOverriddenUrlKey($storeId, $category); } $productCategories = $this->objectRegistryFactory->create(['entities' => $categories]); $mergeDataProvider->merge( $this->canonicalUrlRewriteGenerator->generate($storeId, $product) ); $mergeDataProvider->merge( $this->categoriesUrlRewriteGenerator->generate($storeId, $product, $productCategories) ); $mergeDataProvider->merge( $this->currentUrlRewritesRegenerator->generate( $storeId, $product, $productCategories, $rootCategoryId ) ); $mergeDataProvider->merge( $this->anchorUrlRewriteGenerator->generate($storeId, $product, $productCategories) ); $mergeDataProvider->merge( $this->currentUrlRewritesRegenerator->generateAnchor( $storeId, $product, $productCategories, $rootCategoryId ) ); return $mergeDataProvider->getData(); } |
- \Magento\CatalogUrlRewrite\Model\Product\CanonicalUrlRewriteGenerator::generate – creates URL Rewrite that does not contain categories.
- \Magento\CatalogUrlRewrite\Model\Product\CategoriesUrlRewriteGenerator::generate – creates URL Rewrite that includes all the possible categories.
- \Magento\CatalogUrlRewrite\Model\Product\CurrentUrlRewritesRegenerator::generate – creates URL Rewrites, including all the possible URL rewrites for the current entity (e.g. custom URL rewrites)
- \Magento\CatalogUrlRewrite\Model\Product\AnchorUrlRewriteGenerator::generate – generates URL Rewrites for anchor categories.
- \Magento\CatalogUrlRewrite\Model\Product\CurrentUrlRewritesRegenerator::generateAnchor generates URL Rewrites for anchor categories taking into account the available URL rewrites.
Describe how action controllers and results function
Controllers
Controllers in Magento 2 differ from the typical MVC applications’ controllers. In MVC applications, controller is a class, while action is the method of this class. In Magento 2, controller is a folder (or php namespace), while action is a class, located in this folder (in this php namespace). Execute method of the action returns the result object and occasionally processes input POST data. All actions inherit \Magento\Framework\App\Action\Action class.Search and initialization of the needed action is performed in router. For instance, in Base Router:1 2 3 4 5 6 | public function match(\Magento\Framework\App\RequestInterface $request) { $params = $this->parseRequest($request); return $this->matchAction($request, $params); } |
1 2 3 4 5 6 7 8 9 10 11 12 13 14 15 16 17 18 19 20 21 22 23 24 25 26 27 28 29 30 31 32 33 34 35 36 37 38 39 40 41 42 43 44 45 46 47 48 49 50 51 52 53 54 55 56 57 58 59 | protected function matchAction(\Magento\Framework\App\RequestInterface $request, array $params) { $moduleFrontName = $this->matchModuleFrontName($request, $params['moduleFrontName']); if (empty($moduleFrontName)) { return null; } /** * Searching router args by module name from route using it as key */ $modules = $this->_routeConfig->getModulesByFrontName($moduleFrontName); if (empty($modules) === true) { return null; } /** * Going through modules to find appropriate controller */ $currentModuleName = null; $actionPath = null; $action = null; $actionInstance = null; $actionPath = $this->matchActionPath($request, $params['actionPath']); $action = $request->getActionName() ?: ($params['actionName'] ?: $this->_defaultPath->getPart('action')); $this->_checkShouldBeSecure($request, '/' . $moduleFrontName . '/' . $actionPath . '/' . $action); foreach ($modules as $moduleName) { $currentModuleName = $moduleName; $actionClassName = $this->actionList->get($moduleName, $this->pathPrefix, $actionPath, $action); if (!$actionClassName || !is_subclass_of($actionClassName, $this->actionInterface)) { continue; } $actionInstance = $this->actionFactory->create($actionClassName); break; } if (null == $actionInstance) { $actionInstance = $this->getNotFoundAction($currentModuleName); if ($actionInstance === null) { return null; } $action = 'noroute'; } // set values only after all the checks are done $request->setModuleName($moduleFrontName); $request->setControllerName($actionPath); $request->setActionName($action); $request->setControllerModule($currentModuleName); $request->setRouteName($this->_routeConfig->getRouteByFrontName($moduleFrontName)); if (isset($params['variables'])) { $request->setParams($params['variables']); } return $actionInstance; } |
How do controllers interact with another?
Forward Result
Forward Result (\Magento\Framework\Controller\Result\Forward) – allows to pass request processing to another controller without a redirect.1 2 3 4 5 6 7 8 9 10 11 12 | public function __construct( Magento\Framework\Controller\Result\Forward\Factory $resultForwardFactory ) { $this->resultForwardFactory = $resultForwardFactory; } public function execute() { $result = $this->resultForwardFactory->create(); $result->forward('noroute'); return $result; } |
Redirect Result
Redirect Result (\Magento\Framework\Controller\Result\Redirect) – allows to redirect the browser to another URL.1 2 3 4 5 6 7 8 9 10 11 12 | public function __construct( Magento\Framework\Controller\Result\Redirect\Factory $resultRedirectFactory ) { $this->resultRedirectFactory = $resultRedirectFactory; } public function execute() { $result = $this->resultRedirectFactory->create(); $result->setPath('*/*/index'); return $result; } |
How are different response types generated?
Responses
Action in Magento 2 can return several response types depending on its purpose and desired result.Page Result
Page Result (\Magento\Framework\View\Result\Page) is the most common response type. Returning the object, Magento calls its renderResult method that performs page rendering based on the corresponding XML layout handle.1 2 3 4 5 6 7 8 9 10 | public function __construct( $pageFactory Magento\Framework\View\Result\PageFactory ) { $this->pageResultFactory = $pageFactory } public function execute() { return $this->pageResultFactory->create(); } |
JSON Result
JSON Result (\Magento\Framework\Controller\Result\Json) – allows to return the response in JSON format. Can be applied in API or AJAX requests.1 2 3 4 5 6 7 8 9 10 11 12 13 14 15 | public function __construct( Magento\Framework\Controller\Result\JsonFactory $jsonResultFactory, ) { $this->jsonResultFactory = $jsonResultFactory; } public function execute() { $result = $this->jsonResultFactory(); $class = new Class; $class->data = value; $result->setData($class); return $result; } |
Raw Result
Raw Result (\Magento\Framework\Controller\Result\Raw) is utilized if you need to return the results to the browser.1 2 3 4 5 6 7 8 9 10 11 12 13 14 | public function __construct( Magento\Framework\Controller\Result\Raw $rawResultFactory , ) { $this->rawResultFactory = $rawResultFactory; } public function execute() { $result = $this->rawResultFactory->create(); $result->setHeader('Content-Type', 'text/xml'); $result->setContents('<root><block></block></root>); return $result; } |
2.3 Demonstrate ability to customize request routing
Describe request routing and flow in Magento. When is it necessary to create a new router or to customize existing routers?
In web applications, such as Magento, routing is the act of providing data from a URL request to the appropriate class for processing. Magento routing uses the following flow:index.php -> HTTP application -> FrontController -> Routing -> Action processing -> etcThe need to create a new router or modify the current one may appear when one needs to change the default Magento 2 URLs (processed by Base Router) for the custom ones, for instance, from /belvg/index/mypage to /mypage.How do you handle custom 404 pages?
This is how an out-of-the-box Magento 404 page looks. However, some store owners wish to have a custom 404 page, and in Magento 2, this is not a problem, for the platform provides a very flexible tool for modifying this element. To modify the “Not Found“ (404 error) page, log in to the admin panel and navigate the following path: Store -> Configuration-> General -> Web -> Default pages -> CMS No Route Page to check what CMS page is set in the configurations.
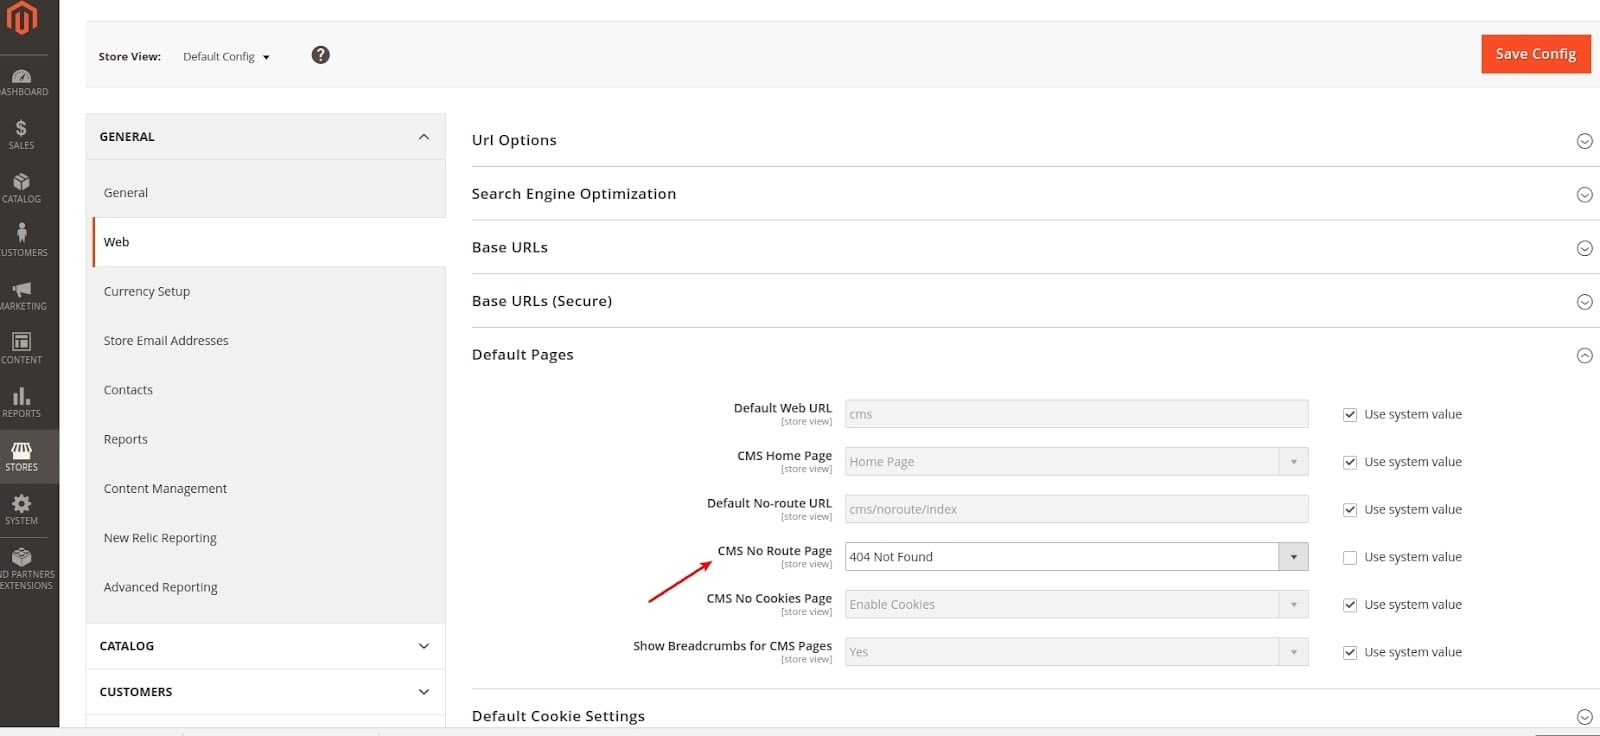 Navigate to Content -> Pages to find the 404 Not Found page settings.
 Open 404 page settings and modify the page the way you find necessary. You can also create a custom 404 page and set it up the No Route page settings. If you have a Magento multistore, a custom 404 page is a must, because for each store Not Found page contents will differ.Create a new CMS page. When creating a new page, do not forget to specify Design -> Layout. If there is a need to insert html code into the page content, disable the wysiwyg editor. Empty Page Layout is used by default.For this example, we used the following resource:https://codepen.io/sqfreakz/pen/GJRJOY.Then, copy the code into the CMS page content.
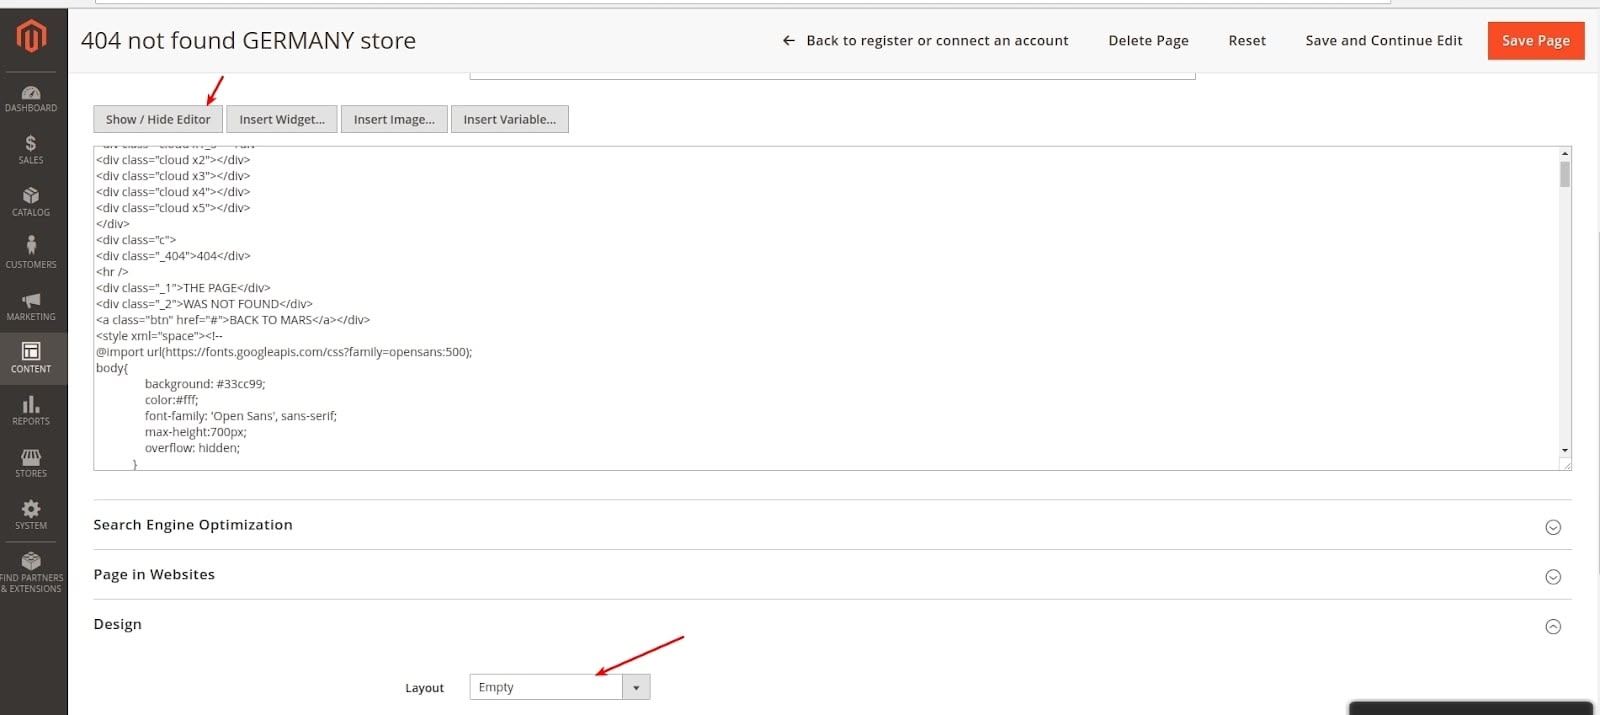 Afterward, switch to the needed store in the No Route Rage settings and select a new CMS page.
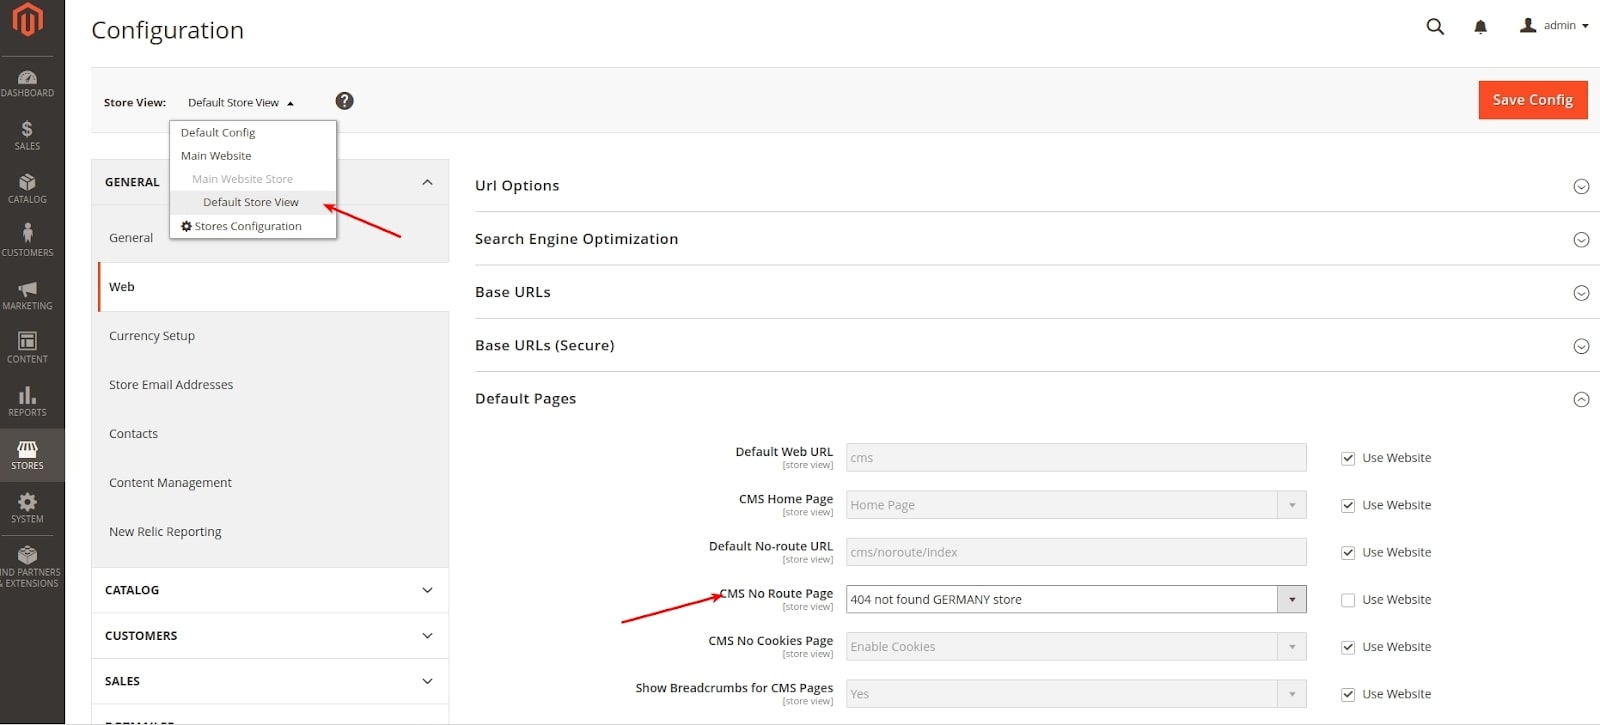 Press Save Config button. As a result, you will get the following custom 404 page.
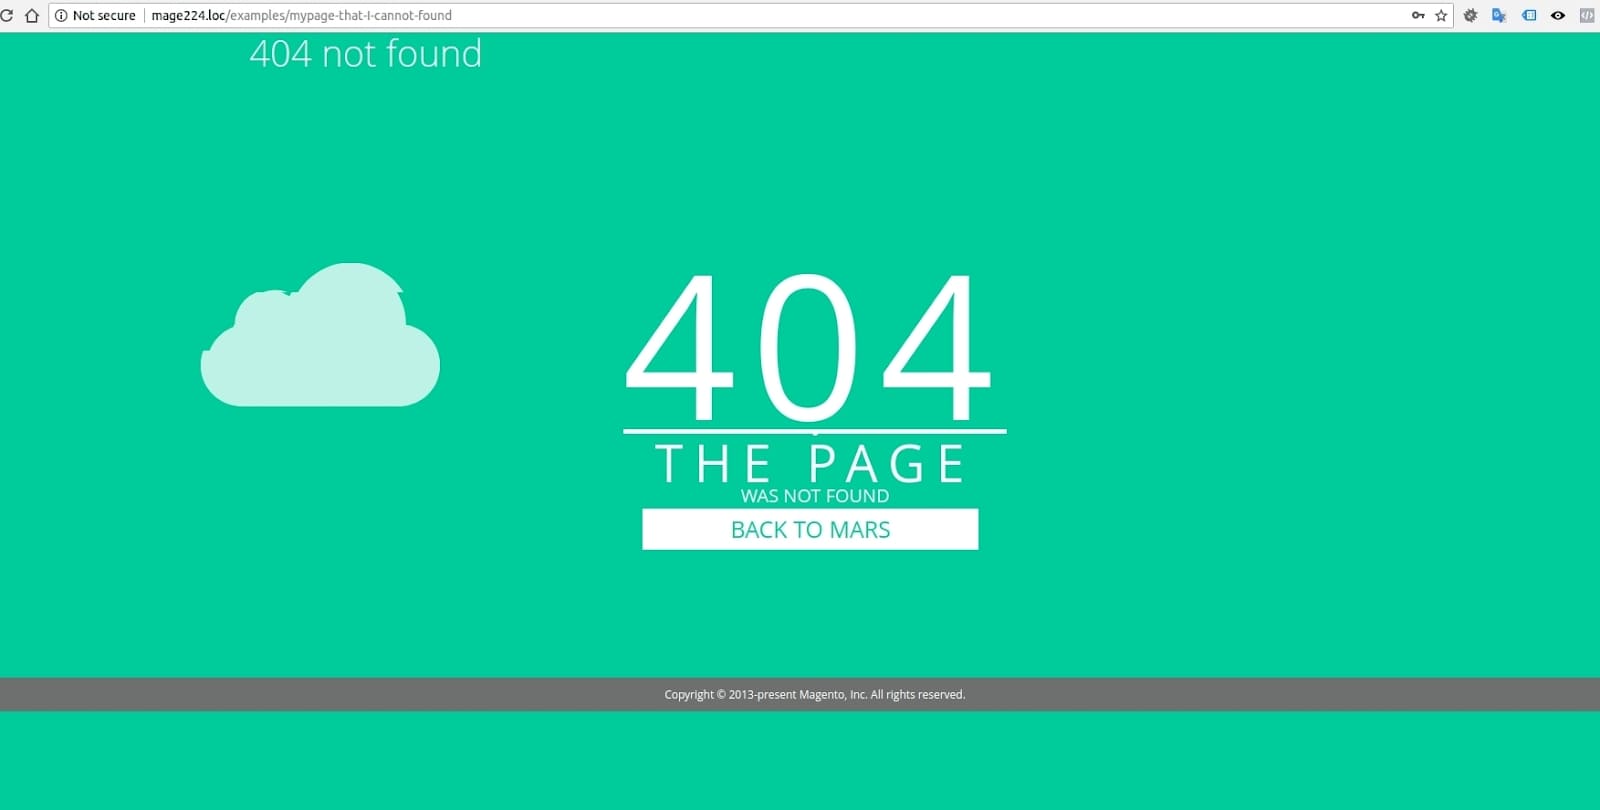 How to create a custom noRoute handlerMagento also allows to create a custom noRoute handler. Let us make an example of creating an alternative to 404 error page. This will be a noRoute page redirect to the search page, where request path will serve as a search query.To add a new “noRoute” handler, add to the etc/frontend/di.xml of your module the following:
1 2 3 4 5 6 7 8 9 10 | <type name="Magento\Framework\App\Router\NoRouteHandlerList"> <arguments> <argument name="handlerClassesList" xsi:type="array"> <item name="custombvg" xsi:type="array"> <item name="class" xsi:type="string">BelVG\CustomNoRoute\App\Router\NoRouteHandler</item> <item name="sortOrder" xsi:type="string">80</item> </item> </argument> </arguments> </type> |
2.4 Determine the layout initialization process
Determine how layout is compiled. How would you debug your layout.xml files and verify that the right layout instructions are used?
- \Magento\Framework\View\Layout::build() is called
- \Magento\Framework\View\Layout\Builder::build() is called
- \Magento\Framework\View\Model\Layout\Merge::load() is called
- Handles from the var $handles to the protected field $handles are added.
- Layout for the current handles is loaded from the cache. In case the layout is not in the cache, then it is generated for each handle the following way, united and stored in cache:
- Layout for all handles of the current theme is loaded from cache. In case there is no layout, it is generated the following way and then stored in cache:
- A physical theme, based on the current theme, is loaded. Physical is the theme that has a designated folder and which is loaded via registration.php. There are TYPE_PHYSICAL=0, TYPE_VIRTUAL=1, TYPE_STAGING=2 types. Types are stored in type column in the theme table at the database.
- The search of all *.xml files in the folders layout, page_layout in all enabled modules and current themes (current themes = current theme + all parent themes of it) is executed.
- Each found file is loaded
- {{baseUrl}} to current base url, {{baseSecureUrl}} to current base secure url is substituted
- Simplexml_load_string is called with the element class \Magento\Framework\View\Layout\Element.
- A new xml tag (handle or layout) is added into $layoutStr. The tag’s id attribute is also a filename without “.xml” suffix. It contains attributes and the contents of the xml object’s core element, loaded in the previous step.
- A new xml object, consisting of $layoutStr, is created.
- From this xml only necessary handles are loaded.
- Additional handles from the database are loaded.
- Layout for all handles of the current theme is loaded from cache. In case there is no layout, it is generated the following way and then stored in cache:
- Layout for the current handles is returned.
- Layout xml object is generated.
- Layout structure of elements from the loaded XML configuration is generated.
1 2 3 4 | header('Content-Type: text/xml'); $layoutString = $resultPage->getLayout()->getXmlString(); echo ' die; |
1 2 3 4 5 6 | xml version="1.0" encoding="UTF-8"?> <config xmlns:xsi="http://www.w3.org/2001/XMLSchema-instance" xsi:noNamespaceSchemaLocation="urn:magento:framework:Event/etc/events.xsd"> <event name="layout_generate_blocks_after"> <observer name="vendor_module_layout_generate_blocks" instance="Vendor\Module\Observer\LayoutGenerateBlockObserver" /> </event> </config> |
1 2 3 4 5 6 7 8 9 10 11 12 13 14 15 16 | <?php namespace Vendor\Module\Observer; use Magento\Framework\Event\Observer; use Magento\Framework\Event\ObserverInterface; class LayoutGenerateBlockObserver implements ObserverInterface { public function execute(Observer $observer) { header('Content-Type: text/xml'); $layoutString = $observer->getEvent()->getLayout()->getXmlString(); echo ' die; } } |
Determine how HTML output is rendered
For layout rendering, \Magento\Framework\View\Layout::getOutput() is called. This method recursively renders child elements.How does Magento flush output, and what mechanisms exist to access and customize output?
Magento flushes html output the following way:- Controller action returns certain $result
- If result is instance of \Magento\Framework\App\Response\HttpInterface, then the result is returned to the browser
- In case result is instance of \Magento\Framework\Controller\ResultInterface, then:
- $result->renderResult($response) is called, which calls $result->applyHttpHeaders($response) and $result->render($response)
- Then, $response->sendResponse() method is called. The method sends headers and body to the browser.
- \Magento\Framework\Controller\Result\Raw
- \Magento\Framework\Controller\Result\Json
- \Magento\Framework\Controller\Result\Redirect
- \Magento\Framework\View\Result\Layout
- \Magento\Framework\View\Result\Page
1 2 3 4 5 6 7 8 9 10 11 12 13 14 15 16 17 18 19 20 21 22 23 24 25 26 27 28 | protected function render(HttpResponseInterface $response) { $this->pageConfig->publicBuild(); if ($this->getPageLayout()) { $config = $this->getConfig(); $this->addDefaultBodyClasses(); $addBlock = $this->getLayout()->getBlock('head.additional'); // todo $requireJs = $this->getLayout()->getBlock('require.js'); $this->assign([ 'requireJs' => $requireJs ? $requireJs->toHtml() : null, 'headContent' => $this->pageConfigRenderer->renderHeadContent(), 'headAdditional' => $addBlock ? $addBlock->toHtml() : null, 'htmlAttributes' => $this->pageConfigRenderer->renderElementAttributes($config::ELEMENT_TYPE_HTML), 'headAttributes' => $this->pageConfigRenderer->renderElementAttributes($config::ELEMENT_TYPE_HEAD), 'bodyAttributes' => $this->pageConfigRenderer->renderElementAttributes($config::ELEMENT_TYPE_BODY), 'loaderIcon' => $this->getViewFileUrl('images/loader-2.gif'), ]); $output = $this->getLayout()->getOutput(); $this->assign('layoutContent', $output); $output = $this->renderPage(); $this->translateInline->processResponseBody($output); $response->appendBody($output); } else { parent::render($response); } return $this; } |
- Modify layout xml files.
- Override phtml templates.
- Add layout handle to \Magento\Framework\View\Result\Page.
- Override toHtml or _toHtml method of the block ( _toHtml is recommended).
- Create a custom result class that extends \Magento\Framework\View\Result\Page and apply it in controller actions.
- Call $result->renderResult($response) in execute method of controller action class, customize $response body and execute return $response.
Determine module layout XML schema. How do you add new elements to the pages introduced by a given module?
Layout instructions:– for adding a new block – for adding a new container - before and after attributes – for specifying the position of a block or container. You may use
, , in the blocks. – [deprecated] calls block method during the block generation. and – for modifying or deleting the current block and the container correspondingly.– for altering the parent or the position of a block or a container. – is used only to remove the static resources linked in a page section. – is used to include a certain layout file. – sets arguments for blocks.
- Blocks represents the end of the chain in rendering HTML for Magento.
- Containers contain blocks and can wrap them in an HTML tag.
- Containers do not render any output if there are no children assigned to them.
Demonstrate the ability to use layout fallback for customizations and debugging
Layout fallback allows to search layout files in all enabled modules and current themes (current themes = current theme + all parent themes of it). In order to perform customization, create a layout file with handle.xml name (handle is layout handle name) in one of the folders where Magento searches for layout files.For debugging, put out the merged layout for the current page by following the instructions described above.How do you identify which exact layout.xml file is processed in a given scope?
In order to determine which layouts are used for the current page, add the following code into the controller action into the execute method before return (under the condition that result page is contained in the $resultPage variable):1 2 | var_dump($resultPage->getLayout()->getUpdate()->getHandles()); die; |
How does Magento treat layout XML files with the same names in different modules?
Magento merges the layout xml files into a single one. However, this merge is different from config xml files. In config xml files, xml are merged according to tag names and $idAttributes, while in layout the tags do not merge. Merged layout stores the file contents of all layout modules, the current theme and its parent themes; therefore, merged layout will contain many tags.Identify the differences between admin and frontend scopes. What differences exist for layout initialization for the admin scope?
- layout area is changed for adminhtml
- Layout тега aclResource support is added, allowing to connect the resource to a block and hide the block is user does not have access to the resource.
- Default block class is changed for Magento\Backend\Block\Template