 Table of content
Magento 2 Certified Professional Front End Developer Guide
Section 8: Customize the Look and Feel of Specific Magento Pages
8.1. Utilize generic page elements
Demonstrate an understanding of customizing generic page elements that can be found on most pages: page header and footer, quick search, store view (language) switcher, mini cart, breadcrumbs, and sidebar menu.
Let’s pay attention to the set of tasks you need to perform the most, if you create your theme in Magento – elements customization (page header, footer, search, language switch, mini carts, breadcrumbs and sidebar menu).We will customize all these elements by overriding the php, phtml and xml templates of the stock element. For this, you need to copy the necessary file into your theme and make the necessary changes there.If you don’t know where the necessary template is – enable hintsStores -> Configuration -> Developer -> Advanced -> Debug -> Enabled Template Path Hints for Storefront (Yes)Below you can find the paths to the main most customizable files from the blocks we need (you just need to override it in your theme).If you need to write additional styles for an element, create a file by the path(/Vendor/Theme/Magento_Theme/web/css/source/_extend.less ).If you prefer scss/sass, you can create a structure convenient to you: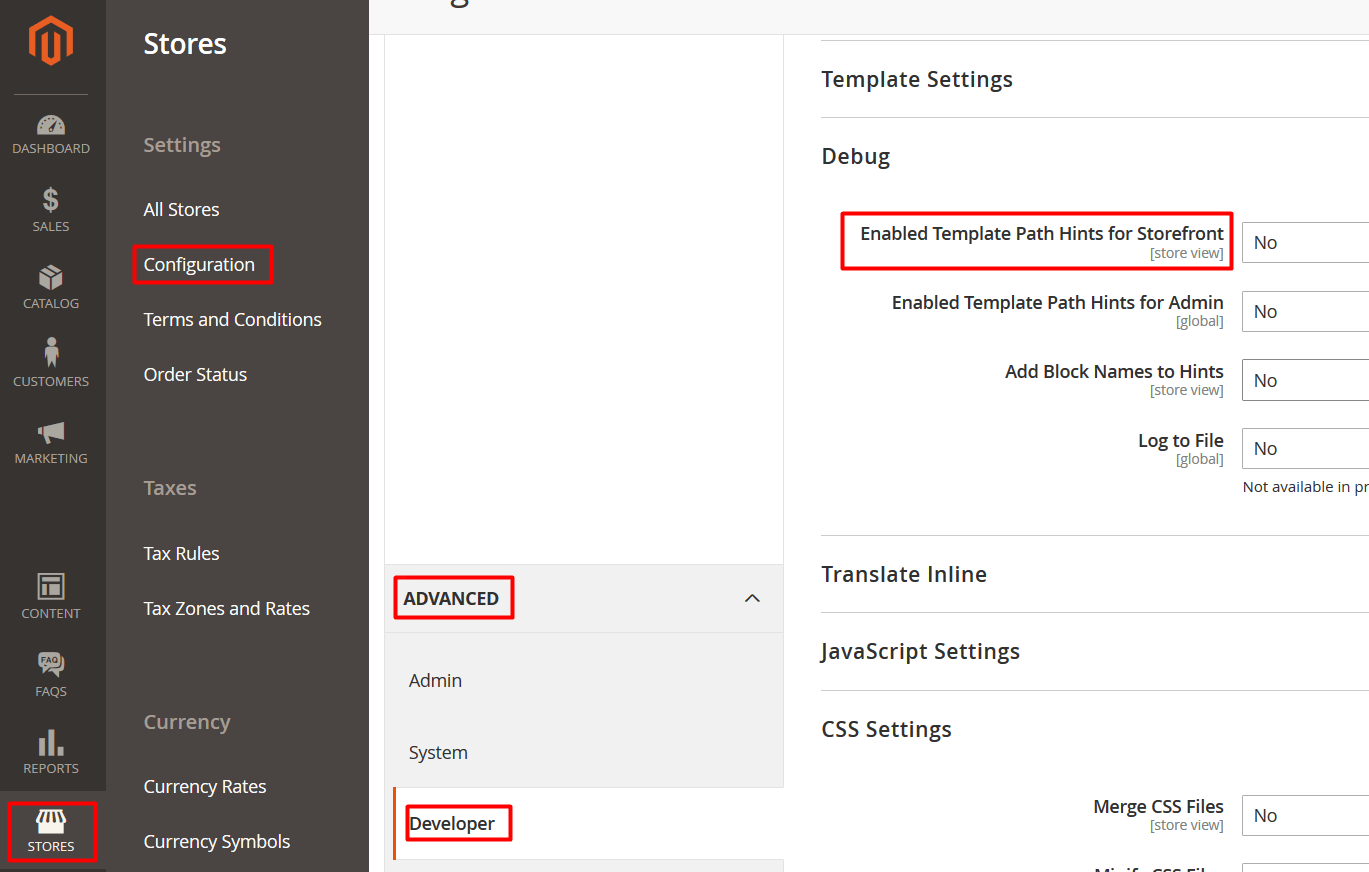 Page header
- Header block (/vendor/magento/module-theme/Block/Html/Header.php )
- Header links (/vendor/magento/module-theme/view/frontend/templates/html/header.phtml )
- Logo (/vendor/magento/module-theme/view/frontend/templates/html/header/logo.phtml )
- Menu bar (/vendor/magento/module-theme/view/frontend/templates/html/topmenu.phtml )
- Customer details UI component (/vendor/magento/module-customer/view/frontend/web/js/view/customer.js )
- Layout XML (/vendor/magento/module-theme/view/frontend/layout/default.xml )
- Footer container (/vendor/magento/module-theme/view/frontend/templates/html/footer.phtml )
- Footer block (/vendor/magento/module-theme/Block/Html/Footer.php )
- Copyright (/vendor/magento/module-theme/view/frontend/templates/html/copyright.phtml )
- Mini-search form (/vendor/magento/module-search/view/frontend/templates/form.mini.phtml )
- Block (/vendor/magento/module-store/view/frontend/templates/switch/languages.phtml )
- Minicart form (/vendor/magento/module-checkout/view/frontend/templates/cart/minicart.phtml)
- Layout XML (/vendor/magento/module-checkout/view/frontend/layout/default.xml )
- UI Component (/vendor/magento/module-checkout/view/frontend/web/js/view/minicart.js )
- Template (/vendor/magento/module-theme/view/frontend/templates/html/breadcrumbs.phtml)
- Block (/vendor/magento/module-theme/Block/Html/Breadcrumbs.php )
- sidebar.main and sidebar.additional are names of containers into which you need to put the needed blocks through xml.
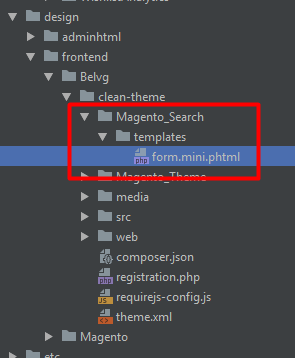 In the form.mini.phtml file we add the necessary element:
1 2 3 4 5 6 7 8 9 10 11 12 13 14 15 16 17 18 19 20 21 22 | <div class="control"> <button class="action primary" id="voice-search-trigger"> /* @escapeNotVerified */ __('Voice Search') ?></button> <input id="search" data-mage-init='{"quickSearch":{ "formSelector":"#search_mini_form", "url":" /* @escapeNotVerified */ $helper->getSuggestUrl()?>", "destinationSelector":"#search_autocomplete"} }' type="text" name=" /* @escapeNotVerified */ $helper->getQueryParamName() ?>" value=" /* @escapeNotVerified */ $helper->getEscapedQueryText() ?>" placeholder=" /* @escapeNotVerified */ __('Search entire store here...') ?>" class="input-text" maxlength=" /* @escapeNotVerified */ $helper->getMaxQueryLength() ?>" role="combobox" aria-haspopup="false" aria-autocomplete="both" autocomplete="off"/> <div id="search_autocomplete" class="search-autocomplete"></div> $block->getChildHtml() ?> </div> … |
8.2. Customizing product detail page
How can design changes (page layout) be configured on product detail pages?
To change the design (page layout) of product detail pages you need to create a folder structure in a child theme on this path:magento_root_flder/app/design/frontend/company_name/theme_name/Magento_Catalog/layoutThen copy the xml filemagento_root/vendor/magento/module-catalog/view/frontend/layout/catalog_product_view.xmlAnd add it to the path:magento_root_flder/app/design/frontend/company_name/theme_name/Magento_Catalog/layoutThen the newly copied file can be configured directly. Changes will affect all product detail pages.How can design changes be configured for specific product types?
On the path:magento_root/vendor/magento/module-catalog/view/frontend/layout/Here are layout files for different product types on Magento 2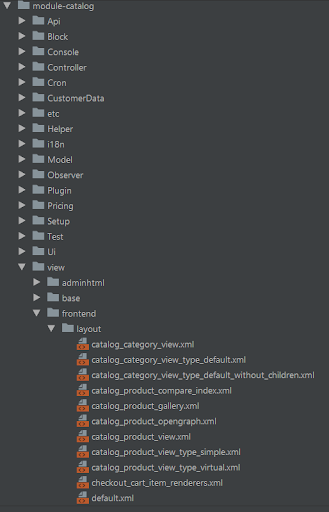
- catalog_product_view_type_simple.xml
- catalog_product_view_type_configurable.xml
- catalog_product_view_type_grouped.xml
- catalog_product_view_type_bundle.xml
- catalog_product_view_type_virtual.xml
- catalog_product_view_type_downloadable.xml
How can you use custom layout updates for specific product pages?
There are several ways to use custom layout update for a specified product.In the first case we need to enter adminpanel on the path:Catalog > Products > *choose the product*Then on the Design tab, you can expand the layout: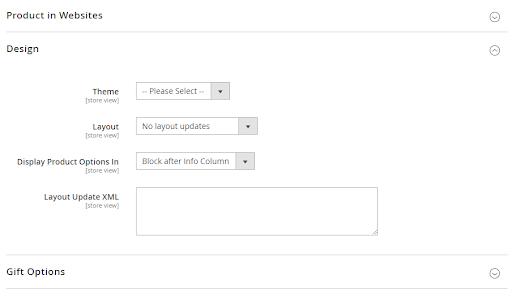 Changes apply to a specific product.The second way is to edit magento_root_flder/app/design/frontend/company_name/theme_name/Magento_Catalog/layout/catalog_product_view.xml Adding tap with the products id
 Demonstrate an understanding of how to use the container blocks provided by Magento to display additional information on category pages.
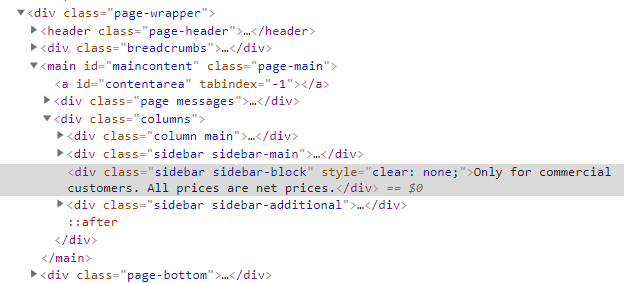
To display additional information on category pages using container blocks (for example, display a block in the sidebar product catalog, which is edited in adminpanel), you need to follow the following below:Copy the following file to the child theme:magento_root_flder/vendor/magento/module-catalog/view/frontend/layout/catalog_category_view.xmlOn the path:magento_root_flder/app/design/frontend/company_name/theme_name/Magento_Catalog/layout/catalog_category_view.xmlMake the following changes:1 2 3 4 5 6 7 8 9 | <referenceContainer name="columns"> <container name="catalog.page.sidebar" as="catalog_page_sidebar" htmlClass="sidebar sidebar-block" htmlTag="div" before="sidebar_additional" after="div.sidebar.main"> <block class="Magento\Cms\Block\Block" name="catalog-page-sidebar-block"> <arguments> <argument name="block_id" xsi:type="string">catalog-page-sidebar-block</argument> </arguments> </block> </container> </referenceContainer> |
 Where we specify the needed content
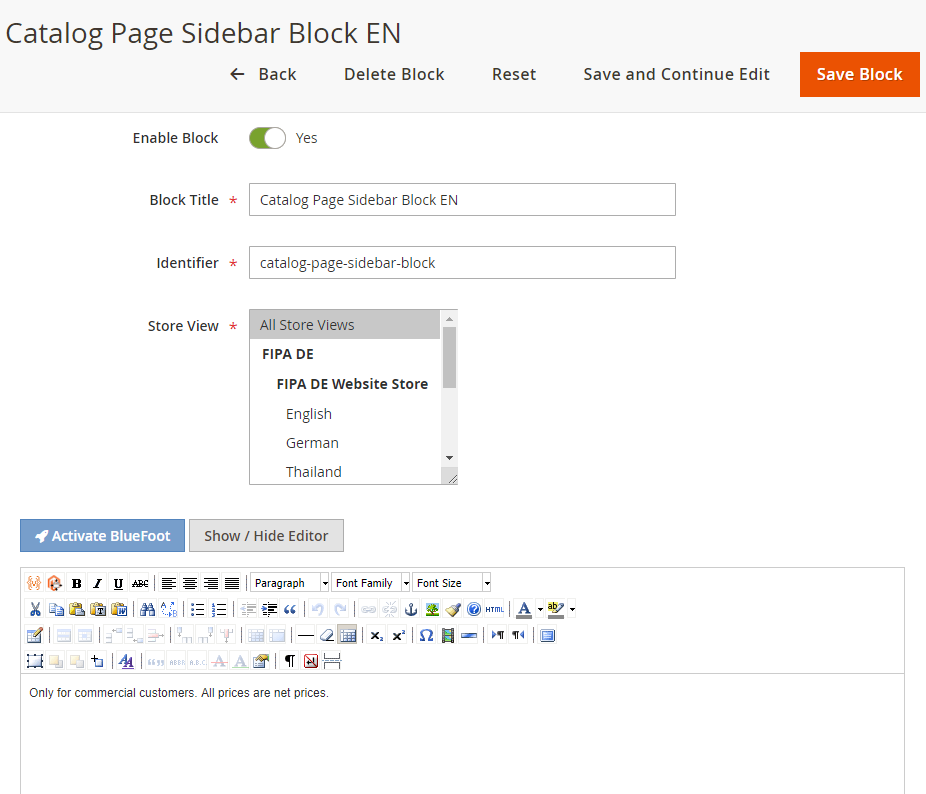 identifier – это block_id, specified in the xml file:
 It will look as follows:
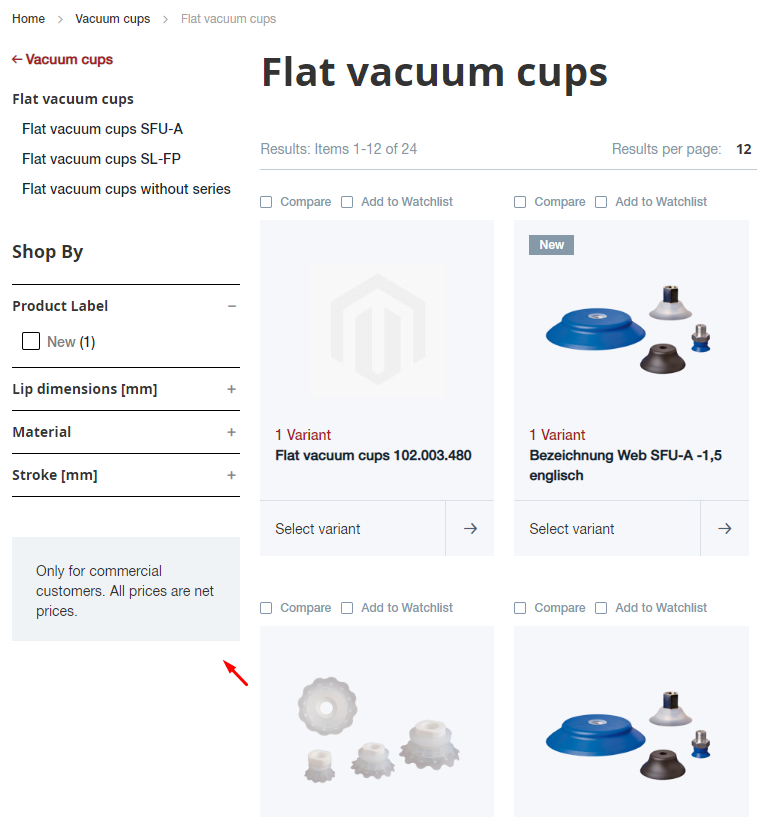
 There is a way to output phtml block in the container. It is necessary to repeat the previous steps, except for the inserted code:
1 2 3 4 5 | <referenceContainer name="columns"> <container name="catalog.page.sidebar" as="catalog_page_sidebar" htmlClass="sidebar sidebar-block" htmlTag="div" before="sidebar_additional" after="div.sidebar.main"> <block class="Magento\Framework\View\Element\Template" name="custom-content" template="Magento_Catalog::/category/custom-content.phtml" /> </container> </referenceContainer> |
8.3. Customizing category pages
How can design changes (page layout) be configured on category pages? How can the layered navigation be configured?
The category page appearance can be configured in two places – in the design section and the display settings. Let’s consider both ways:Design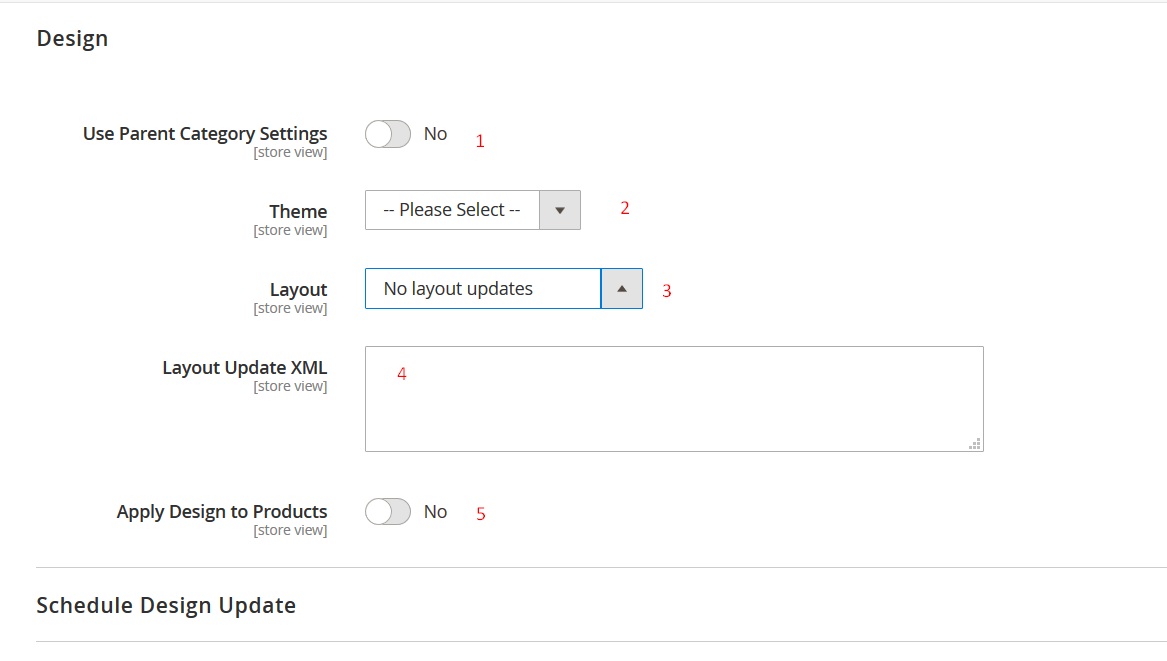
- If “Use parent category settings” is applied, the other settings are inactive (more details below).
- Theme. Choose a theme that is different from the default one for this store.
- Layout. Choose one of the described in the page_layouts.xml file.
- Layout update. If you need to remove/move/add an item of a category, you can insert the code here using1234567<referenceBlock name="block_name" remove="true" /><move element="block_name" destination="block_name" /><block class="" name="block_name"><arguments><argument>your_argument</argument></arguments></block>
- “Apply design to products” allows applying theme, layout and layout update settings with products in this category.

- Display mode. Choose between “Products Only”, “Products and Static Block” and Static Block Only”.
- Anchor. When enabled, all child products from child categories will be displayed in the category.
- Sort By. If you uncheck “all” (3.1), you can choose the parameter to sort products into categories.
- Default Products Listing Sort By parameter is here.
- Step Settings to filter price.
 Choose “use for the layered navigation” to make the attribute work like a filter and set the order to it (all attributes have a value of 0 by default).
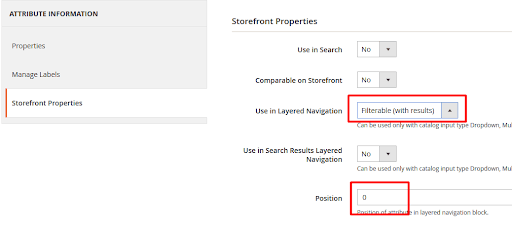 You also can change the navigation block by overdriving files/vendor/magento/module-layered-navigation/view/frontend/layout /vendor/magento/module-layered-navigation/view/frontend/templates
Demonstrate an understanding of configuring design inheritance for category pages.
Here we need to choose “Use Parent Category Setting”. As you see, the other settings are inactive since they are inherited from the higher category: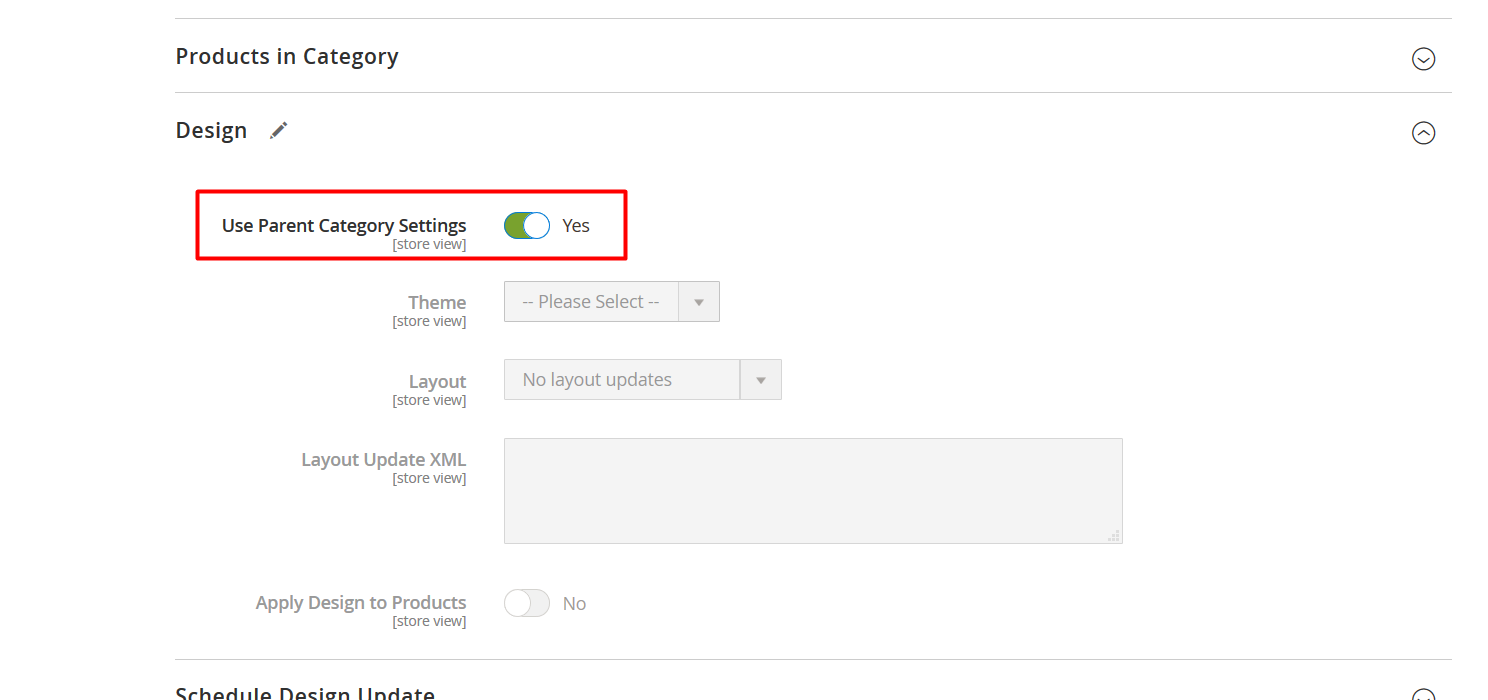
How can a CMS block be configured as a category landing page?
Select the previously created block with content in the Content section. Then select “Static block only” or “static block and products” in the display settings, depending on the design.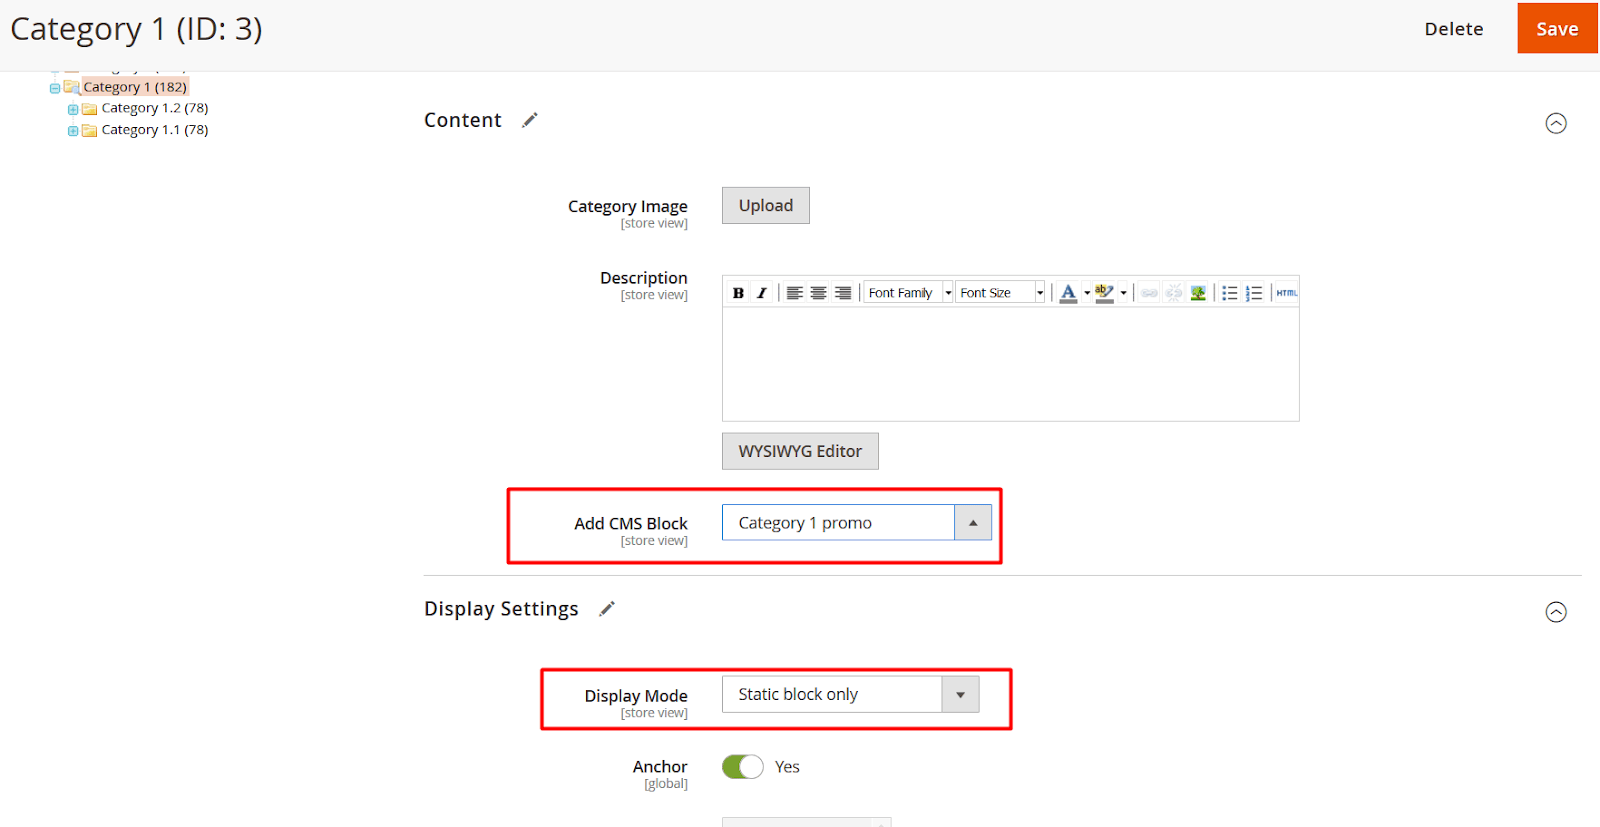
8.4. Customizing CMS pages
How can design changes (page layout) be configured on CMS pages?
Find and set up pages you can on the path: Content > Pages.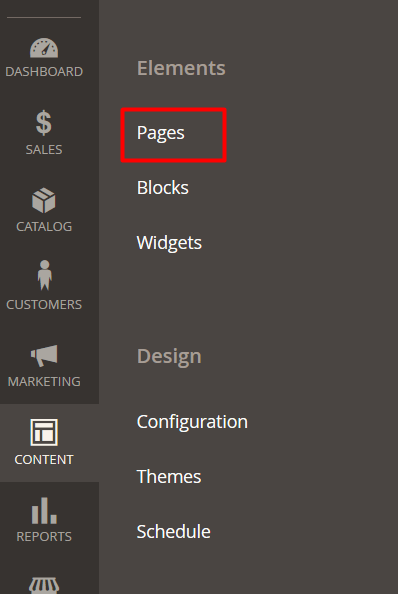 In the Design tab, you can select the layout available in the page_layouts.xml list, as well as make additional changes to it (remove, move or add an element, as was already shown above in the category settings).
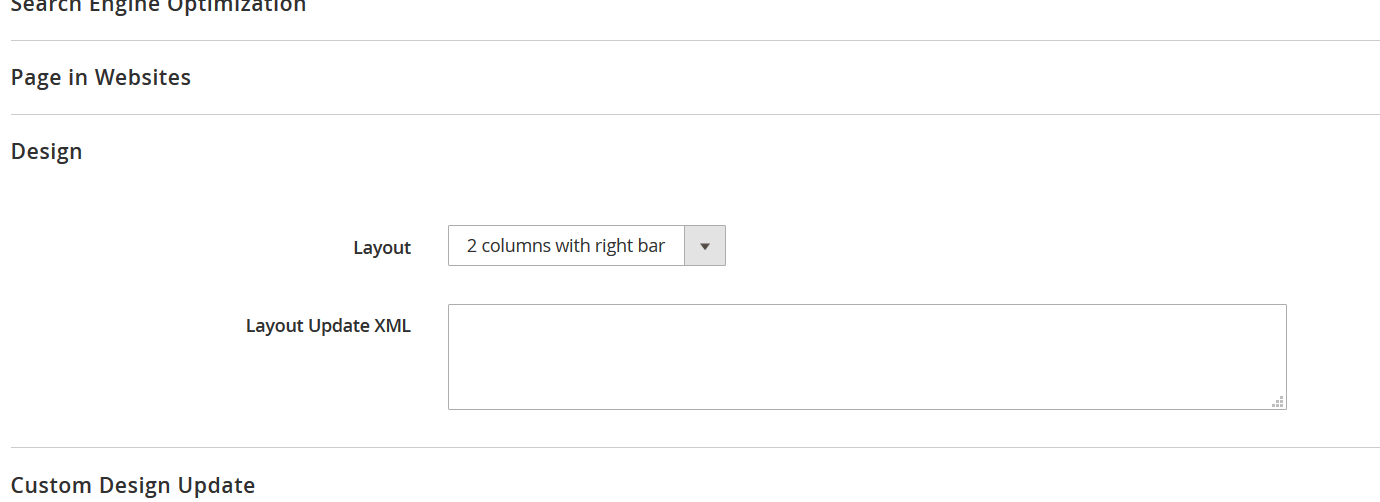 You can also create your layout. Create the Magento_Theme directory in your theme and a structure theme, copying the original one:
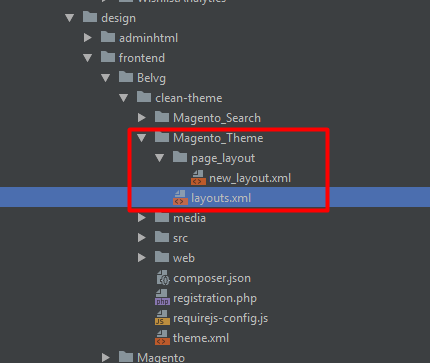 Indicate the needed containers and blocks in the new layout and register it in the layouts.xml
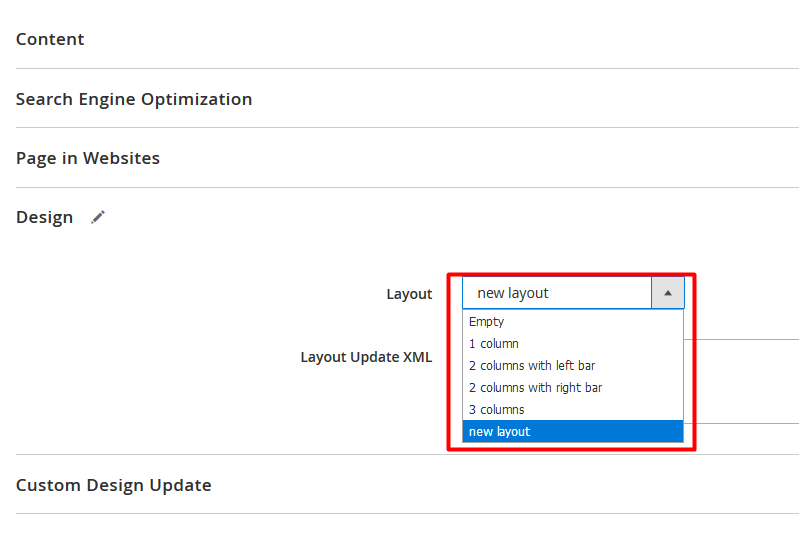
1 2 3 4 5 6 7 8 9 | <page_layouts xmlns:xsi="http://www.w3.org/2001/XMLSchema-instance" xsi:noNamespaceSchemaLocation="urn:magento:framework:View/PageLayout/etc/layouts.xsd"> ... <layout id="3columns"> <label translate="true">3 columns</label> </layout> <layout id="new_layout"> <label translate="true">new layout</label> </layout> </page_layouts> |
Demonstrate an understanding of static variables in CMS blocks and pages. Demonstrate an understanding of the use of CMS template directives (var, store, block, …).
There is a list of directives that simplify work with Magento. Applying them while making content in the editor, you won’t see the outdated information on the page. All links are up to date, the working hours and your store number are changed as soon as they are changed in settings.Let’s consider them in detail:- {{var your_variable}} is a template variable to insert the store or customer data. If the variable is not included in the template, it will not be displayed in the end.
- {{customvar code=”your_variable” }} . A full list of custom variables can be found here: System> Custom Variables. There you can create new ones.
- {{store url=”your_path” }} is used to create links. The example above will provide the following link:: https: //your.domain/your_path
- {{block}} renders the block.Specifying the class, the block type you’ve mentioned is rendered{{block class=”\Vendor\Module\Block\YourBlock” }}Or you can display the CMS block by id or identifier:{{block id=”your_block_id” }}or{{block id=”your_block_identifier” }}
- {{media url=”/icons/your_image.jpg”}} renders the link from the media folder you’ve specified, for example, https://your.domain/media/icons/your_image.jpg
- {{trans}} inserts a transatable line. Set the formatting to it or use the following construction:{{trans “Hi, %your_variable” your_variable=$method() }}
- {{css file=”css/filename.css”}} inserts the content of the stylesheet into the html of the page as
- {{inlinecss file=”css/filename.css”}} renders css file into inline. Unlike the previous directive, the style will be inserted into the style = ”” attribute of the elements to which the styles are applied.
- {{if}} renders the variable if it doesn’t have the value in template.{{if your_variable}}Some text {{var your_variable}},{{else}}Some other text{{/if}}
8.5. Customizing widgets
How is a widget instance created? Where can widgets be used?
Widgets, especially custom ones, play an important role in Magento 2, particularly in terms of functionality. Using the functionality of Custom Widget in Magento 2 allows us to create custom widget templates. A custom widget can sometimes provide a better way to edit or add quality content inside CMS blocks or pages.To use the widget and display it, for example, on the catalog page, we need to do the following:Go to Admin panel > Content > Widgets > press Add widget button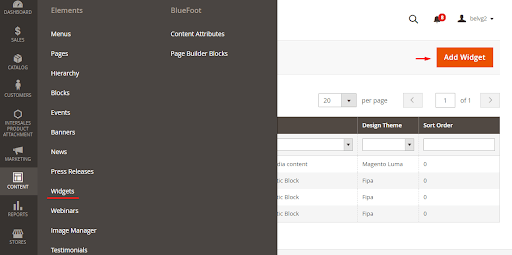 Choose the widget type (the social media link, for example) in setting and a theme to which we apply the widget and click “continue”
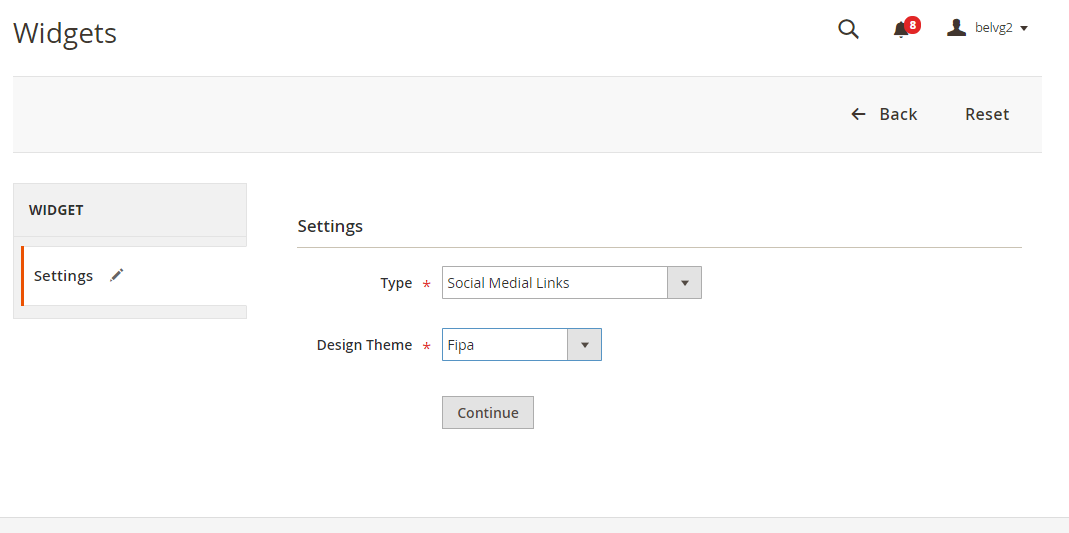 In the next section, specify the widget’s name and store view.Then layout update. Choose where to display your widget, it can be any place on the site:
 In our case, this is the sidebar on the catalog page:
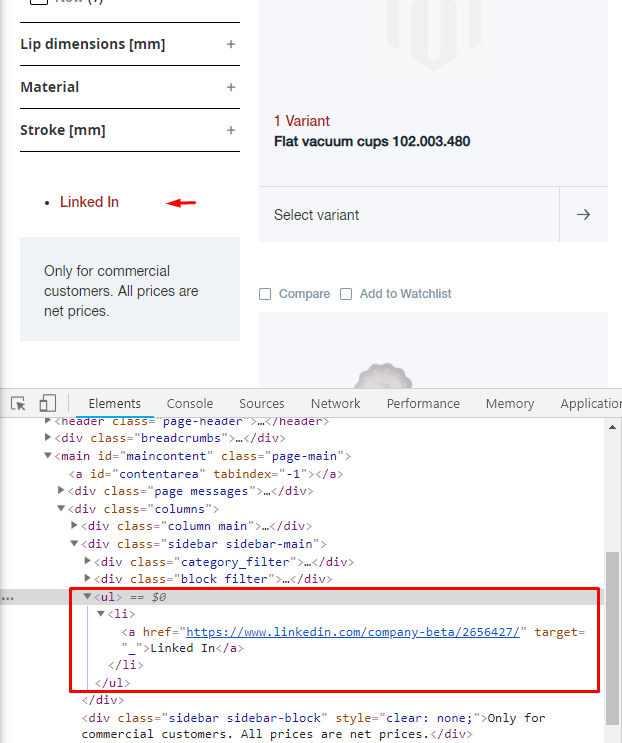
How can a custom widget target be created? Demonstrate an understanding of configuring a widget instance.
There is also an opportunity to create your widgets in Magento:First, we need to create a new module that requires the namespace and module folders. In the example, we will use Belvg for the namespace and CustomWidget for the module name.app/code/Belvg/CustomWidget/composer.jsonThis file will be loaded using Composer every time we run it. But in fact we do not use Composer with our module.Now we need to register our module in Magento. So, we create the register.php file in the following catalog:app/code/Belvg/CustomWidget/registration.php1 2 3 4 5 6 | <?php \Magento\Framework\Component\ComponentRegistrar::register( \Magento\Framework\Component\ComponentRegistrar::MODULE, 'Belvg_CustomWidget', __DIR__ ); |
1 2 3 4 | xml version="1.0" ?> <config xmlns:xsi="http://www.w3.org/2001/XMLSchema-instance" xsi:noNamespaceSchemaLocation="urn:magento:framework:Module/etc/module.xsd"> <module name="Belvg_CustomWidget" setup_version="1.0.0"/> </config> |
1 2 3 4 5 6 7 8 9 10 11 12 13 14 15 16 | xml version="1.0" ?> <widgets xmlns:xsi="http://www.w3.org/2001/XMLSchema-instance" xsi:noNamespaceSchemaLocation="urn:magento:module:Magento_Widget:etc/widget.xsd"> <widget class="Belvg\CustomWidget\Block\Widget\Samplewidget" id="belvg_customwidget_samplewidget"> <label>Belvg Sample Widget</label> <description></description> <parameters> <parameter name="widgettitle" sort_order="10" visible="true" xsi:type="text"> <label>Title</label> </parameter> <parameter name="widgetcontent" sort_order="20" visible="true" xsi:type="textarea"> <label>Content</label> </parameter> </parameters> </widget> </widgets> |
1 2 3 4 5 6 7 8 9 10 11 12 13 | <?php namespace Belvg\CustomWidget\Block\Widget; use Magento\Framework\View\Element\Template; use Magento\Widget\Block\BlockInterface; class Samplewidget extends Template implements BlockInterface { protected $_template = "widget/samplewidget.phtml"; } |
1 2 3 4 5 6 | if($block->getData('widgettitle')): ?> <h2 class='belvg-widget-title'> echo $block->getData('widgettitle'); ?></h2> endif; ?> if($block->getData('widgetcontent')): ?> <h2 class='belvg-widget-content'> echo $block->getData('widgetcontent'); ?></h2> endif; ?> |
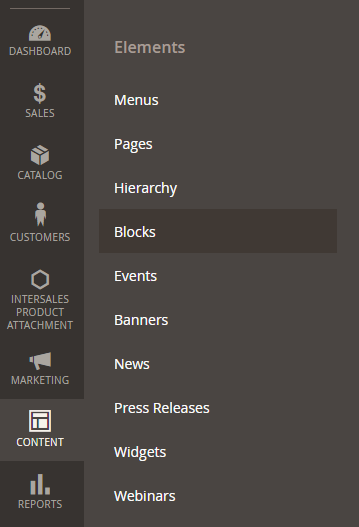
8.6. Customizing CMS blocks
How do you create and insert CMS blocks?
You can create, develop and edit blocks in the Content > Blocks section.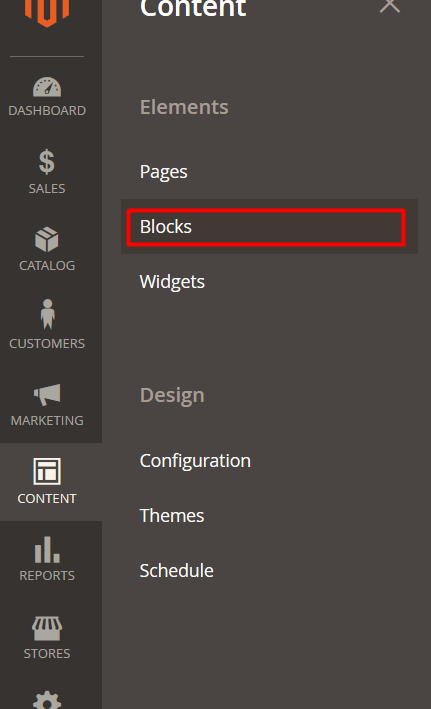 A block can be inserted using a variable in xml and in phtml.Remember that to insert a block using one of these methods, we need“Your_block_id” which can be either the block id number or its identifier.Using a variable, you can insert one block into another, on the page and more using the following construction:
1 | {{block id="your_block_id"}} |
1 2 3 4 5 | <block type="Magento\Cms\Block\Block" name="your_block_name"> <arguments> <argument name="block_id" xsi:type="string">your_block_id</argument> </arguments> </block> |
1 2 3 4 | echo $this->getLayout() ->createBlock('Magento\Cms\Block\Block') ->setBlockId('your_block_id') ->toHtml(); |
Demonstrate an understanding of the use of CMS template directives (var, store, block, …).
You can find the “insert variable” button in the content editor. It allows you to insert your site data. They will dynamically change if the information changes. There are no broken links when changing the site address or working hours!You can find some of them below:- {{var your_variable}} is the template variable used to insert store or customer data. You can also create your own custom ones and use them. If the variable is not included in the template, it will not be displayed in the end.
- {{customvar code=”your_variable” }}. A full list of custom variables you can find on the path: System > Custom Variables. There you can also create new ones.
- {{store url=”your_path” }} is used to create links The example above will give a link that will look like: https://your.domain/your_path
- {{block}} renders block.If you specify a class, the block of the type you specified is rendered.{{block class=”\Vendor\Module\Block\YourBlock” }}Or you can display the CMS block by id or identifier:{{block id=”your_block_id” }}Or{{block id=”your_block_identifier” }}
- {{media url=”/icons/your_inage.jpg”}} renders a link from the media folder that you’ve specified. For example: https://вyour.domain/media/icons/your_image.jpg
- {{trans}} is inserted into the translatable line. You need to specify formatting to it or use the following construction: {{trans “Hi, %your_variable” your_variable=$method() }}
- {{css file=”css/filename.css”}} inserts the content of the stylesheet asinto the html pages
- {{inlinecss file=”css/filename.css”}} renders a css file into inline. Unlike the previous directive, the style will be inserted into the style=”” elements attribute to which the styles are applied
- {{if}} renders the variable if it has the value in the template{{if your_variable}}Some text {{var your_variable}},{{else}}Other text{{/if}}
1 | <p>{{config path="general/store_information/name"}} want you to click to this link:</p> |
1 | <p><a href="{{store url="custom_link"}}">click me!</a></p> |
 As a result, we have the following link:https://your_domain.com/custom_link/
8.7. Customizing customer account pages
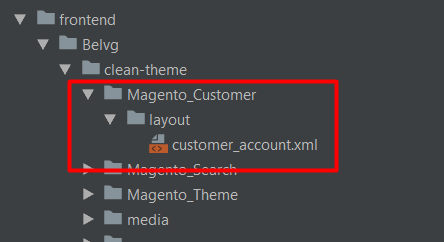
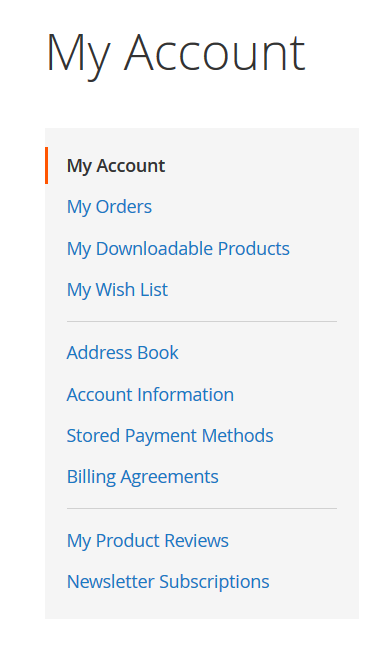
How do you remove or add an item from the customer account navigation using layout XML?
User pages inherit the design from the main customer_account.xml file (it is also possible to override less globally by writing an xml override for a specific page.We can delete/move/insert an element using the following lines:1 2 3 4 5 6 7 | <referenceBlock name="block_name" remove="true" /> to delete (<referenceContainer> for the container) <move element="block_name" destination="block_name" /> to move <block class="" name="block_name"> <arguments> <argument>your_argument</argument> </arguments> </block> to insert new element (it’s possible to insert a container using the <container> tag) |
 Add the following lines to the file:
1 2 3 4 5 6 7 8 9 10 11 12 13 14 15 16 17 18 19 20 21 22 23 24 25 | xml version="1.0"?> <page xmlns:xsi="http://www.w3.org/2001/XMLSchema-instance" layout="2columns-left" xsi:noNamespaceSchemaLocation="urn:magento:framework:View/Layout/etc/page_configuration.xsd" label="Customer My Account (All Pages)" design_abstraction="custom"> <body> <referenceBlock name="customer-account-navigation-account-edit-link"> <arguments> <argument name="label" xsi:type="string" translate="true">Change account Information</argument> </arguments> </referenceBlock> <referenceBlock name="customer-account-navigation-wish-list-link" remove="true"/> <referenceContainer name="customer_account_navigation"> <block class="Magento\Customer\Block\Account\Delimiter" name="customer-account-navigation-delimiter-3" template="Magento_Customer::account/navigation-delimiter.phtml"> <arguments> <argument name="sortOrder" xsi:type="number">20</argument> </arguments> </block> <block class="Magento\Customer\Block\Account\SortLinkInterface" name="custom-link-to-blog"> <arguments> <argument name="label" xsi:type="string" translate="true">Visit our blog!</argument> <argument name="path" xsi:type="string">https://belvg.com/blog/ <argument name="sortOrder" xsi:type="number">10</argument> </arguments> </block> </referenceContainer> </body> </page> |

Demonstrate an understanding of formatting customer addresses.
User address settings can be found along the path: Stores > Configuration > Customers >Customer Configuration > Address templates.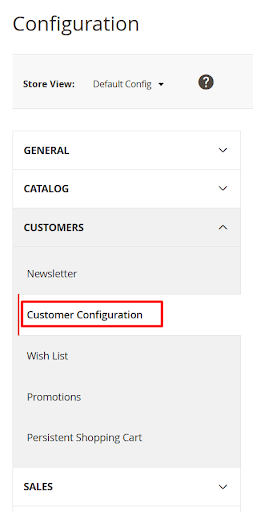
 Here you can configure the display of fields filled by the user using the following construction:
1 2 3 | {{depend variable}} {{var variable}} {{/depend}} |
8.8. Customizing one-page checkout
Demonstrate an understanding of the container blocks provided in the Magento checkout to display additional information.
Checkout in Magento 2 is made up of KnockoutJS components which are rendered using the Knockout JS template system. Magneto 2 defines all these components and their parent/child relationships in an XML file that can be expanded or redefined in your own theme or module.The XML file is along the path:vendor\magento\module-checkout/view/frontend/layout/checkout_index_index.xmlIf you want to change the Checkout (for example, add a block), you need to override the file creating a new one along the path:app/design/frontend/Vendor_Name/Theme_Name/Magento_Checkout/layout/checkout_index_index.xmlAdd the following code (to output CMS blocks) to the XML:1 2 3 4 5 6 7 8 9 | <referenceBlock name="checkout.header.wrapper"> <container name="additional-block-wrapper" label="additional-block-wrapper" htmlTag="div" htmlClass="additional-block-wrapper"> <block class="Magento\Cms\Block\Block" name="custom-block"> <arguments> <argument name="block_id" xsi:type="string">custom-block-checkout</argument> </arguments> </block> </container> </referenceBlock> |
1 2 3 4 5 | <referenceContainer name="page.bottom.container"> <container name="custom-footer-wrapper" label="custom-footer-wrapper" htmlTag="div" htmlClass="custom-footer-wrapper"> <block class="Magento\Framework\View\Element\Template" name="custom-footer" template="Magento_Theme::checkout-footer-custom.phtml" /> </container> </referenceContainer> |
8.9. Understand customization of transactional email templates
How do you create and assign custom transactional email templates?
Email templates creation and edition in Magento 2 is similar to the process in Magento 1. The main difference between Magento 1 and Magento 2 is that these templates have been renamed from “Transactional Emails” to “Email Templates”. You can still find and customize Magento 2 email templates by default, as well as add new templates to your store.Go to the magento admin > Marketing tab > Email Templates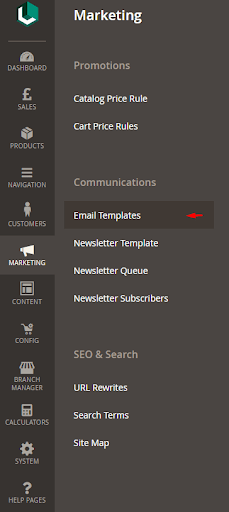 Push the “Add New Template” button
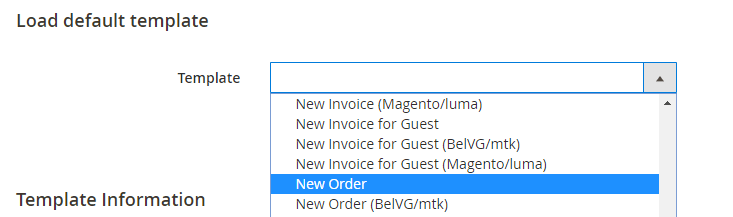 Push the “Load template” button
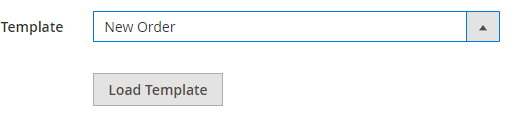 Write the new name for the email template
 Save the template pushing on “Save Template”
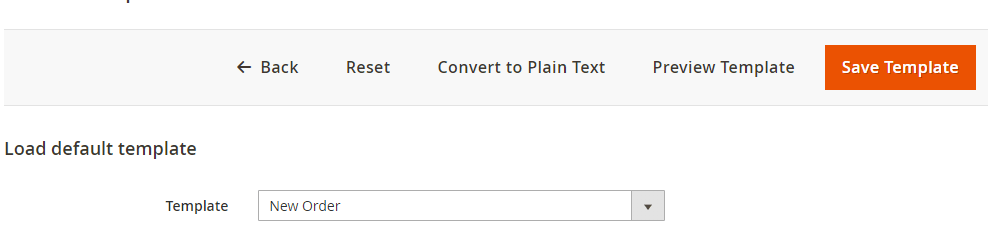
How do you use template variables available in all emails?
You can add a variable to any email template by placing the cursor right where you want to add the variable and clicking “Insert Variable”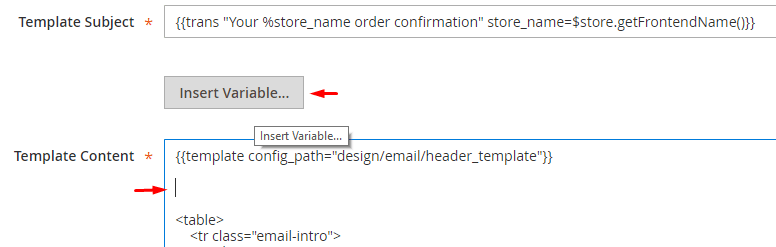 A list of variables:
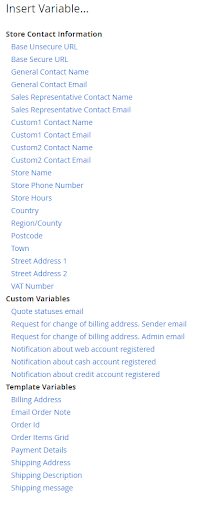 For example, choose Quote statuses email:
How do you access properties of variable objects (for example, var order.getCustomer.getName)?
To access the value of any variable in the letter template, you need to put the desired variable in double curly braces {{}} and insert it in the desired place in the template, in the Template Content field.For example, var order.getCustomer.getName:(this variable doesn’t work) ( {{var order.getCustomerName()}} works ):
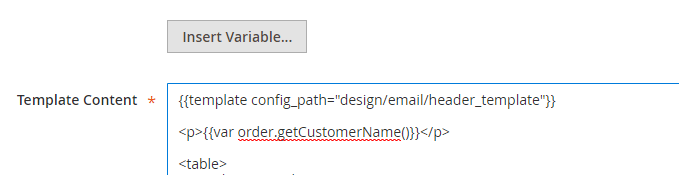 Note that different email templates can display different variables depending on the value.
How can you create a link to custom images from transactional email templates?
If you don’t want to create a plugin, you can add your images from the folder – web/images – module level and themes and specify the path to the images1 | <img src="{{view url='Package_Modulename/images/custom-image.png'}}" height="60" width="60" alt="{{trans 'Custom image'}}" /> |
img src="{{media url="custom-image.png"}}" where the value of the url parameter is the path as to the media folder. You can add an image through the wysiwyg editor and then add a link to it img src="{{media url="wysiwyg/custom-image.png"}}"How do you create links to store pages in transactional email templates?
You need to do is insert thea link in the Template Content field and in the href attribute specify the variable on the Base Unsecure URL: {{config path="web/unsecure/base_url"}} or Base Secure URL: {{config path="web/secure/base_url"}}after the brackets indicate the page id:For example, the link to the help page (www.site.com/help)1 | <a href="{{config path='web/secure/base_url'}}/help">go to the help page</a> |
1 | <a href="{{store url=’’}}">go to home</a> |