 Table of content
Magento 2 Certified Professional Developer Guide
Section 4: Working with Databases in Magento
4.1 Demonstrate ability to use data-related classes
Describe repositories and data API classes. How do you obtain an object or set of objects from the database using a repository?
Repository can be applied for working with collections in Magento 2. It realizes the Repository pattern that allows to work with collections and entities regardless of their storage place (storing or caching are the implementation of details). The pattern itself is located between Domain and Application Service Layer.In Magento 2, five basic repository functions are realized. They are save, getById, getList, delete, deleteById. Yet, each Repository realization in Magento has a custom interface and the functions are not always implemented in it. For example, in Magento\Quote\Api\GuestCartTotalRepositoryInterface, only get($cartId) method is realized. Therefore, it is recommended to pay attention to a certain Repository class implementation.Let us examine the Repository case using the \Magento\Catalog\Api\ProductRepositoryInterface example and its realization\Magento\Catalog\Model\ProductRepository.1 2 3 4 5 6 7 8 9 10 11 | <?php namespace Magento\Catalog\Api; interface ProductRepositoryInterface { public function save(\Magento\Catalog\Api\Data\ProductInterface $product, $saveOptions = false); public function get($sku, $editMode = false, $storeId = null, $forceReload = false); public function getById($productId, $editMode = false, $storeId = null, $forceReload = false); public function delete(\Magento\Catalog\Api\Data\ProductInterface $product); public function deleteById($sku); public function getList(\Magento\Framework\Api\SearchCriteriaInterface $searchCriteria); } |
1 2 3 4 5 6 7 8 9 10 11 12 13 14 15 16 17 18 19 20 21 | <?php … protected $productRepository; public function __construct( … \Magento\Catalog\Api\ProductRepositoryInterface $productRepository) { $this->productRepository = $productRepository; } ... public function someMethod() { $product = $this->productRepository->getById(1); return $product->getSku(); } … ... public function someDeleteMethod() { $this->productRepository->deleteById(1); } … |
1 2 3 4 5 6 7 8 9 10 11 12 13 | ... public function someMethod() { $product = $this->productRepository->getById(1); $product->setSku(‘test-sku-1’); $this->productRepository->save($product); } … ... public function someDeleteMethod() { $product = $this->productRepository->getById(1); $this->productRepository->delete($product); } … |
How do you configure and create a SearchCriteria instance using the builder?
In this context, getList method is realized with SearchCriteriaInterface. The interface realizes conditions for requests (for example, it is where in MySQL query). All conditions fall into two categories: Filter and FilterGroup.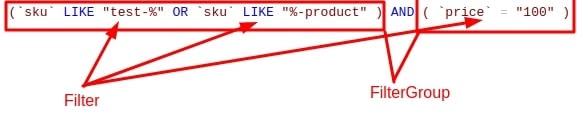 We implement the conditions mentioned above using SearchCriteria:
1 2 3 4 5 6 7 8 9 10 11 12 13 14 15 16 17 18 19 20 21 22 23 | ... public function someMethod() { $filter = $this->objectManager->create('Magento\Framework\Api\Filter'); $filter->setField(‘sku’); $filter->setValue(‘test-%’); $filter->setConditionType(‘like’); $filter2 = $this->objectManager->create('Magento\Framework\Api\Filter'); $filter2->setField(‘sku’); $filter2->setValue(‘%-product’); $filter2->setConditionType(‘like’); $filterGroup = $this->objectManager->create('Magento\Framework\Api\Search\FilterGroup'); $filterGroup>setFilters([$filter, $filter2]); $filter3 = $this->objectManager->create('Magento\Framework\Api\Filter'); $filter3->setField(‘price’); $filter3->setValue(‘100’); $filter3->setConditionType(‘eq’); $filterGroup2 = $this->objectManager->create('Magento\Framework\Api\Search\FilterGroup'); $filterGroup2>setFilters([$filter3]); $searchCriteria- = $this->objectManager->create('Magento\Framework\Api\SearchCriteriaInterface'); $searchCriteria->setFilterGroups([$filterGroup, $filterGroup2]); $result = $this->productRepository>getList($searchCriteria-); return $result->getItems(); } |
How do you use Data/Api classes?
Api in Magento 2 is commonly used to describe interfaces, further used in Model, Helper, Data and other Magento classes. Also, API interfaces can be applied for WebAPI requests (when they are described in webapi.xml). Api directory is located in modules roots, similarly to etc, Model and other directories.Unlike Api, Api/Data directory contains interfaces for the data, for example, store data or customer data.An excellent example for explaining the difference between Api and Api/Data is the implementation of \Magento\Catalog\Api\ProductRepositoryInterface and \Magento\Catalog\Api\Data\ProductInterface.ProductRepository implements a get method that loads a Product object (using ProductFactory) that implements ProductInterface for working with data.Describe how to create and register new entities
In Magento 2, entities are unique objects that contain a number of various attributes and/or parameters. Products, orders, users, etc. are all examples of entities.To create a new entity type, use \Magento\Eav\Setup\EavSetup class. Entity creation and registration is realized via installEntities($entities = null) method, specifying the entity settings as a parameter. For example:1 2 3 4 5 6 7 8 9 10 11 12 13 14 15 16 17 18 19 | ... $eavSetup>installEntities([ \Belvg\Test\Model\Test::ENTITY => [ 'entity_model' => Belvg\Test\Model\ResourceModel\Test', 'table' => \Belvg\Test\Model\Test::ENTITY . '_entity', 'attributes' => [ 'test_id' => [ 'type' => 'static', ], 'first_attribute' => [ 'type' => 'static', ], 'second_attribute' => [ 'type' => 'static', ], ], ] ]); ... |
How do you add a new table to the database?
To add a new table, create a Setup script that realizes Magento\Framework\Setup\InstallSchemaInterface or Magento\Framework\Setup\UpgradeSchemaInterface interface, or realize install or upgrade method in it correspondingly. For example:1 2 3 4 5 6 7 8 9 10 11 12 13 14 15 16 17 18 19 20 21 22 23 | ... public function install(SchemaSetupInterface $setup, ModuleContextInterface $context) { $setup->startSetup(); $table = $setup->getConnection()->newTable( $setup->getTable('belvg_test') )->addColumn( 'entity_id', \Magento\Framework\DB\Ddl\Table::TYPE_INTEGER, null, ['identity' => true, 'unsigned' => true, 'nullable' => false, 'primary' => true], 'EntityID' )->addColumn( 'first_attribute', \Magento\Framework\DB\Ddl\Table::TYPE_TEXT, 64, [], 'FirstAttribute' ); $setup->getConnection()->createTable($table); $setup->endSetup(); } … |
Describe the entity load and save process
To load and store entity in Magento\Eav\Model\Entity\AbstractEntity model, load and save methods are realized; they carry the logic of saving and loading from the database.1 2 3 4 5 6 7 8 9 10 11 12 13 14 15 16 17 18 19 20 21 22 23 24 25 26 27 28 29 30 31 32 33 34 35 36 37 38 39 40 41 42 43 44 45 46 47 48 49 50 51 52 53 54 55 56 57 58 59 60 61 62 63 64 65 66 67 68 69 70 71 72 73 74 75 76 77 78 79 80 | ... public function load($object, $entityId, $attributes = []) { \Magento\Framework\Profiler::start('EAV:load_entity'); /** * Load object base row data */ $object->beforeLoad($entityId); $select = $this->_getLoadRowSelect($object, $entityId); $row = $this->getConnection()->fetchRow($select); if (is_array($row)) { $object->addData($row); $this->loadAttributesForObject($attributes, $object); $this->_loadModelAttributes($object); $this->_afterLoad($object); $object->afterLoad(); $object->setOrigData(); $object->setHasDataChanges(false); } else { $object->isObjectNew(true); } \Magento\Framework\Profiler::stop('EAV:load_entity'); return $this; } ... public function save(\Magento\Framework\Model\AbstractModel $object) { /** * Direct deleted items to delete method */ if ($object->isDeleted()) { return $this->delete($object); } if (!$object->hasDataChanges()) { return $this; } $this->beginTransaction(); try { $object->validateBeforeSave(); $object->beforeSave(); if ($object->isSaveAllowed()) { if (!$this->isPartialSave()) { $this->loadAllAttributes($object); } if ($this->getEntityTable() == \Magento\Eav\Model\Entity::DEFAULT_ENTITY_TABLE && !$object->getEntityTypeId() ) { $object->setEntityTypeId($this->getTypeId()); } $object->setParentId((int)$object->getParentId()); $this->objectRelationProcessor->validateDataIntegrity($this->getEntityTable(), $object->getData()); $this->_beforeSave($object); $this->processSave($object); $this->_afterSave($object); $object->afterSave(); } $this->addCommitCallback([$object, 'afterCommitCallback'])->commit(); $object->setHasDataChanges(false); } catch (DuplicateException $e) { $this->rollBack(); $object->setHasDataChanges(true); throw new AlreadyExistsException(__('Unique constraint violation found'), $e); } catch (\Exception $e) { $this->rollBack(); $object->setHasDataChanges(true); throw $e; } return $this; } ... |
Describe how to extend existing entities. What mechanisms are available to extend existing classes, for example by adding a new attribute, a new field in the database, or a new related entity?
To extend the existing classes, you can create additional EAV attributes and new fields, as well as create the connected classes that realize their interface.To create additional fields in the database, apply Setup scripts. Let us examine how to create a field in the database using InstallSchema class as an example:1 2 3 4 5 6 7 8 9 10 11 12 13 14 15 16 17 18 19 20 | ... public function install(SchemaSetupInterface $setup, ModuleContextInterface $context) { $installer = $setup; $installer->startSetup(); $table = $installer->getTable('custom_table'); $columns = [ 'custom_field' => [ 'type' => \Magento\Framework\DB\Ddl\Table::TYPE_TEXT, 'nullable' => false, 'comment' => 'custom_field', ], ]; $connection = $installer->getConnection(); foreach ($columns as $name => $definition) { $connection->addColumn($table, $name, $definition); } $installer->endSetup(); } |
1 2 3 4 5 6 7 8 9 10 11 12 13 14 15 16 17 18 19 20 21 22 23 24 25 26 27 28 29 30 31 32 33 34 35 36 | ... public function __construct(EavSetupFactory $eavSetupFactory) { $this->eavSetupFactory = $eavSetupFactory; } public function install(ModuleDataSetupInterface $setup, ModuleContextInterface $context) { $eavSetup = $this->eavSetupFactory->create(['setup' => $setup]); $eavSetup->addAttribute( \Magento\Catalog\Model\Product::ENTITY, 'custom_attribute', [ 'type' => 'text', 'backend' => '', 'frontend' => '', 'label' => 'custom attribute', 'input' => 'text', 'class' => '', 'source' => '', 'global' => \Magento\Eav\Model\Entity\Attribute\ScopedAttributeInterface::SCOPE_GLOBAL, 'visible' => true, 'required' => true, 'user_defined' => false, 'default' => '', 'searchable' => false, 'filterable' => false, 'comparable' => false, 'visible_on_front' => false, 'used_in_product_listing' => true, 'unique' => false, 'apply_to' => '' ] ); } ... |
1 2 3 | <extension_attributes for="Magento\Sales\Api\Data\OrderInterface"> <attribute code="custom_extension_attribute" type="Belvg\Extension\Api\Data\CustomExtensionAttributeInterface" /> </extension_attributes> |
1 2 3 | <type name="Magento\Sales\Api\OrderRepositoryInterface"> <plugin name="custom_extension_attribute" type="Belvg\Extension\Plugin\OrderPlugin"/> </type> |
Describe how to filter, sort, and specify the selected values for collections and repositories. How do you select a subset of records from the database?
Use addFieldToSelect and addAttributeToSelect methods to specify in the collection the fields for selection.For example:$productCollection->addFieldToSelect("custom_field");To apply filters to collections, useaddAttributeToFilter($field, $condition) and addFieldToFilter($field, $condition) methods.Conditions can be the following:“eq” => equalValue“neq” => notEqualValue“like” => likeValue“nlike” => notLikeValue“is” => isValue“in” => inValues“nin” => notInValues“notnull” => valueIsNotNull“null” => valueIsNull“moreq” => moreOrEqualValue“gt” => greaterValue“lt” => lessValue“gteq” => greaterOrEqualValue“lteq” => lessOrEqualValue“finset” => valueInSet“from” => fromValue, “to” => toValueExample:$productCollection->addFieldToFilter('entity_id', array('in' => [1,2,3])setOrder method is used for sorting and processes both filter and direction fields. For instance:$productCollection>setOrder('position','ASC');searchCriteria is used for applying filters in repositories.Describe the database abstraction layer for Magento. What type of exceptions does the database layer throw? What additional functionality does Magento provide over Zend_Adapter?
Database abstraction layer realized in Magento 2 in the capacity of \Magento\Framework\Model\ResourceModel\Db\AbstractDb class, realizing such core methods, as save, delete, load.Also, the following additional methods are realized atop Zend_Adapter:addUniqueField, unserializeFields, serializeFields, hasDataChanged, prepareDataForUpdate, isObjectNotNew, saveNewObject, afterSave, beforeSave, isModified, afterLoad, beforeDelete, afterDelete and others.Database layer can have put our exceptions depending on its realization. For example, PDO/Mysql can put out the following exceptions: Zend_Db_Adapter_ExceptionZend_Db_Statement_ExceptionZend_Db_ExceptionZend_Db_Statement_PdoPDOExceptionLocalizedExceptionInvalidArgumentExceptionExceptionDuplicateException4.2 Demonstrate ability to use install and upgrade scripts
Describe the install/upgrade workflow. Where are setup scripts located, and how are they executed?
Magento 2 applies schema/data migrations to provide data persistence and database updatability. The migrations contain instructions for:- The necessary tables creation and their completion at the initial installation
- Database scheme and its information conversion for each available application version.
Running setup scripts
Use CLI command to run migration scripts:$ php bin/magento setup:upgradeIf Magento detects a new module, then it will instantiate objects from the Vendor\Module\Setup\InstallSchema and Vendor\Module\Setup\InstallData classes.In case the module version has changed, then Vendor\Module\Setup\UpgradeSchema and Vendor\Module\Setup\UpgradeData will be instantiated. Afterward, the corresponding upgrade methods will be executed.Versioning
Unlike Magento 1, Magento 2 does not contain the inbuilt migration versioning tools, meaning that a developer must check the current module version manually.1 2 3 4 5 6 7 8 9 10 11 12 13 14 15 16 17 18 19 | class UpgradeSchema implements UpgradeSchemaInterface { public function upgrade( \Magento\Framework\Setup\SchemaSetupInterface $setup, \Magento\Framework\Setup\ModuleContextInterface $context ) { $setup->startSetup(); if (version_compare($context->getVersion(), '1.5.1') < 0) { //code to upgrade to 1.5.1 } if (version_compare($context->getVersion(), '1.5.7') < 0) { //code to upgrade to 1.5.7 } $setup->endSetup(); } } |
Which types of functionality correspond to each type of setup script?
InstallSchema class
This setup script is used for modifying database structure at the module’s first installation.1 2 3 4 5 6 7 8 9 10 11 12 13 14 15 16 17 18 19 20 21 22 23 24 25 26 27 28 29 30 31 32 33 | <?php namespace Vendor\Module\Setup; class InstallSchema implements \Magento\Framework\Setup\InstallSchemaInterface { public function install( \Magento\Framework\Setup\SchemaSetupInterface $setup, \Magento\Framework\Setup\ModuleContextInterface $context) { $setup->startSetup(); $table = $setup->getConnection()->newTable( $setup->getTable('custom_table') )->addColumn( 'custom_id', \Magento\Framework\DB\Ddl\Table::TYPE_INTEGER, null, ['identity' => true, 'unsigned' => true, 'nullable' => false, 'primary' => true], 'Custom Id' )->addColumn( 'name', \Magento\Framework\DB\Ddl\Table::TYPE_TEXT, 255, [], 'Custom Name' )->setComment( 'Custom Table' ); $setup->getConnection()->createTable($table); $setup->endSetup(); } |
InstallData class
This setup script is applied for adding and modifying the data at the module’s first installation.1 2 3 4 5 6 7 8 9 10 11 12 13 14 15 16 17 | <?php namespace Vendor\Module\Setup; class InstallData implements \Magento\Framework\Setup\InstallDataInterface { public function upgrade( \Magento\Framework\Setup\ModuleDataSetupInterface $setup, \Magento\Framework\Setup\ModuleContextInterface $context) { $setup->startSetup(); // data installation code $setup->endSetup(); } } |
UpgradeSchema class
The setup script is applied for modifying database structure at the module update.1 2 3 4 5 6 7 8 9 10 11 12 13 14 15 16 17 | <?php namespace Vendor\Module\Setup; class UpgradeSchema implements \Magento\Framework\Setup\UpgradeSchemaInterface { public function upgrade( \Magento\Framework\Setup\SchemaSetupInterface $setup, \Magento\Framework\Setup\ModuleContextInterface $context ) { $setup->startSetup(); if (version_compare($context->getVersion(), '2.3.1') < 0) { // upgrade schema to version 2.3.1 } $setup->endSetup(); } } |
UpgradeData class
This setup script is applied for adding and modifying the data in the event of module upgrade.1 2 3 4 5 6 7 8 9 10 11 12 13 14 15 16 17 | <?php namespace Vendor\Module\Setup; class UpgradeData implements \Magento\Framework\Setup\UpgradeDataInterface { public function upgrade( \Magento\Framework\Setup\ModuleDataSetupInterface $setup, \Magento\Framework\Setup\ModuleContextInterface $context ) { $setup->startSetup(); if (version_compare($context->getVersion(), '2.3.1') < 0) { // upgrade data to version 2.3.1 } $setup->endSetup(); } } |
Recurring scripts
Recurring scripts are run each time setup:upgrade command is launched and depend on the module’s version.1 2 3 4 5 6 7 8 9 10 11 12 13 | <?php namespace Vendor\Module\Setup; class Recurring implements \Magento\Framework\Setup\InstallSchemaInterface { public function install( \Magento\Framework\Setup\SchemaSetupInterface$setup, \Magento\Framework\Setup\ModuleContextInterface$context ) { echo ‘Running’; } } |