 Table of content
Magento 2 Certified Professional Front End Developer Guide
Section 7: Use LESS/CSS to Customize the Magento Look and Feel
7.1. Explain core concepts of LESS
LESS is a CSS addon that significantly extends its functionality by adding certain programming functions – logic, variables, calculation operations, reusable pieces of code and others (we will talk more about this additional functionality in this section).LESS, first of all, is for developers and allows you to significantly speed up the process of creating styles for the site. It also allows you to quickly change and expand the ready made styles.LESS files have the .less extension. Browsers do not recognise files with the .less extension and cannot apply styles from them to the pages. So, all .less files must be precompiled into familiar css files. Thus, we use so called compilers. For example, Magento has built in compilers for these purposes,allowing you to compile LESS files into CSS files both on the server side and on the client side (you can read more about this here –https://devdocs.magento.com/guides/v2.3/frontend-dev-guide/css-topics/css-preprocess.html#less_modes).Magento also allows to compile LESS into CSS using a powerful tool like Grunt (you can read more about it here https://devdocs.magento.com/guides/v2.3/frontend-dev-guide/css-topics/css_debug.html).More information about style files structure, UI libraries, style files connecting and others in Magento you can find in the articles below. But here we will pay attention to the work of LESS and show its benefits.Describe features like file import via @import directive, reusable code sections via mixins together with parameters and the usage of variables.
As we mentioned before, LESS is a CSS addon. So, all the rules and syntax from a .css file work in a .less one. In other words, writing a regular CSS code in a .less file, the code will work without any issues after compilation.Let’s consider additional functions of LESS and ways to use them in work.@import directiveOther .less or .css files can be imported into the .less file ( the same can be done with CSS files, but there are more additional parameters in LESS). So, here we use the @import directive. It has the following structure:@import ‘path_to_file/file_name’; wherepath_to_file is a path to the imported file as on whether to which file it is added;file_name is the name of the imported file with the .less or .css extension, respectively (if the file has the .css extension, it will be processed as a .css file. If there is a .less extension or any other or not specified, it will be processed as a .less file)The @import directive allows adding third-party files (from other sites). It has the following structure:@import url(‘path_to_file/file_name’);The @import directive has additional parameters. It has the following structure:@import (parameter) ‘path_to_file/file_name’;The following parameters are available:reference uses a less file, but does not display it at compilation if there is no link to itinline – includes the source file in the output, but does not compile it (similarly to files with the .css extension)less treats the file as a less one, regardless of what the file extension is (the same happens when files have the .less extension or any other or it is not specified)css treats the file as a css file, no matter what the file extension isonce adds a file only once by defaultmultiple adds a file several times during multiple importoptional allows you to continue compilation if the file is not found (if there is no this parameter, there will be an error and compilation will stop in case the imported file is not found)More information about parameters you can find here –http://lesscss.org/features/#import-atrules-featureMagento has a finalized @magento_import directive that allows adding files from several places (more details you can find in the article below).Magento also requires to name pasted files putting underscores at the beginning. For example, _example.less.VariablesVariables in LESS have similar functionality with variables in programming. They are used to save some value and use it later in other places.For example, we can create a variable for the shade of red and use the variable value in different styles (for example, set the color of text, borders, background and others). It might be not clear why we use the variable in this case, because you can simply set the color for the properties. But if you decide to change the shade of red, you just need to change the variable value. So, it will be automatically changed in all places of files where it’s used (if you do not use the variable, you will have to change this color for all properties in all files manually. It will take more time, especially when there are lots of styles).Now you understand why variables are used in LESS and how convenient it is. Let’s see how the variables look in .less files.The variable begins with @ icon and then goes the variable’s name.@example-variableThe example of a variable’s usage:1 2 3 4 | @color-example: #222222; a { color:@color-example; } |
1 2 3 | a { color:#222222; } |
1 2 3 4 5 6 7 8 | .example-1 { color:@color-example; } @color-example: red; .example-2 { color:@color-example; } @color-example: green; |
1 2 3 4 5 6 | .example-1 { color:green; } .example-2 { color:green; } |
1 2 3 4 5 6 7 | .example-1 { @color-example: yellow; color:@color-example; } .example-2 { color:@color-example; } |
1 2 3 4 5 6 | .animation-1 { transition: 300ms ease-in-out; -moz-transition: 300ms ease-in-out; -webkit-transition: 300ms ease-in-out; -o-transition: 300ms ease-in-out; } |
1 2 3 4 | .example-1 { .animation-1(); width: 100%; } |
1 2 3 4 5 6 7 8 9 10 11 12 13 | .animation-1 { transition: 300ms ease-in-out; -moz-transition: 300ms ease-in-out; -webkit-transition: 300ms ease-in-out; -o-transition: 300ms ease-in-out; } .example-1 { transition: 300ms ease-in-out; -moz-transition: 300ms ease-in-out; -webkit-transition: 300ms ease-in-out; -o-transition: 300ms ease-in-out; width: 100%; } |
1 2 3 4 5 6 7 8 9 10 11 12 13 14 | .animation-1 ( @animation-speed: 300ms, @animation-type: ease-in-out ) { transition: @animation-speed @animation-type; -moz-transition: @animation-speed @animation-type; -webkit-transition: @animation-speed @animation-type; -o-transition: @animation-speed @animation-type; } .example-1 { .animation-1( @animation-speed: 1500ms ); } |
1 2 3 4 5 6 | .example-1 { transition: 1500ms ease-in-out; -moz-transition: 1500ms ease-in-out; -webkit-transition: 1500ms ease-in-out; -o-transition: 1500ms ease-in-out; } |
Demonstrate your understanding of the special variable @arguments.
Inside the mixin, we can use a special variable – @arguments. It displays all the mixin one parameters in the order in which they are set.For example, a mixin to set the border using the @arguments variable will look as follows:1 2 3 4 5 6 7 8 9 10 | .border-example( @width: 2px, @type: solid, @color: red ){ border:@arguments; } .example-1 { .border-example(5px); } |
1 2 3 | .example-1 { border: 5px solid red; } |
Demonstrate how to use the nesting code formatting, and the understanding of media queries together with nesting.
CSS uses cascading styles everywhere. For example, to apply one style to all links, another one to all paragraphs and the third one to all span tags in a block with an .error class, we need to write the following rules inside an .example-1 block:1 2 3 4 5 6 7 8 9 10 | .example-1 a { color: green; } .example-1 p { background: grey; } .example-1 .error span { color: red; border: 1px solid red; } |
1 2 3 4 5 6 7 8 9 10 11 12 13 14 | .example-1 { a { color: green; } p { background: grey; } .error { span { color: red; border: 1px solid red; } } } |
1 2 3 4 5 6 7 | .element-selector { padding: 20px; @media screen and (max-width: 768px) { padding: 10px; } } |
1 2 3 4 5 6 7 8 | .element-selector { padding: 20px; } @media screen and (max-width: 768px) { .element-selector { padding: 10px; } } |
Describe how the & (Ampersand) works and its function.
To refer to the current selector in LESS we use & (Ampersand). It is useful when we need to set styles for various element states, its pseudo-elements, the next element in a row and more.. Let’s see how it looks on an example:1 2 3 4 5 6 7 8 9 10 11 12 13 14 15 16 17 18 19 20 | .example-1 { color: red; &:hover{ color: green; } &:before { content: "!!!"; display: inline-block; } & + * { background: grey; } &.disabled { opacity: 0.5; } &_modify { font-size: 2rem; } } |
1 2 3 4 5 6 7 8 9 10 11 12 13 14 15 16 17 18 19 | .example-1 { color: red; } .example-1:hover { color: green; } .example-1:before { content: "!!!"; display: inline-block; } .example-1 + * { background: grey; } .example-1.disabled { opacity: 0.5; } .example-1_modify { font-size: 2rem; } |
Describe how calculations are possible as well.
There is another one function in LESS – arithmetic calculations for properties like addition, subtraction, multiplication and division operations. It is especially useful to make calculations with variables.For example:1 2 3 4 5 6 | .example-1 { @unit: 3px; border:@unit solid #ddd; padding: @unit * 3; margin: 20px + 30px; } |
1 2 3 4 5 | .example-1 { border: 3px solid #dddddd; padding: 9px; margin: 50px; } |
1 2 3 | .example-1 { width: calc(50% + 10px); } |
1 2 3 | .example-1 { width: calc(60%); } |
1 2 3 | .example-1 { width: ~"calc(50% + 10px)"; } |
7.2. Explain Magento’s implementation of LESS (@magento_directive)
As it was mentioned before, Magento uses LESS. As a result, all the main style files have the .less extension.Style files in Magento have the following structure (the path is specified as to the theme folder):- style files for various modules are in the respective module folders:
- main theme style files are in the folder:
- styles-m.less contains basic website styles and styles for mobile devices. The file contains other files (for example, _styles.less).
- styles-l.less contains styles for desktops. The file contains other files (for example, _styles.less).
- _styles.less is a compound file that contains other files with styles. According to Magento’s file naming standard, the underscore (“_”) in the file name means that the file is not used as a separate file, but is part of other files.
- /source is a folder with configuration files which call Magento UI library mixins (more information about UI library in you can find in the articles below).
- /source/_theme.less is a file in which new values are set for standard variables of the Magento UI library.
- print.less are styles for a printed version of a site’s page.
- /source/_variables.less is a file in which custom variables are placed.
1 2 3 4 5 | <head> <link src="https://fonts.googleapis.com/css?family=Roboto:300,700" src_type="url" /> <css src="Magento_Theme::css/source/lib/test1.css" /> <css src="css/test2.css" /> </head> |
Demonstrate the process from magento-less files via php preprocessing into real LESS files with extracted @import directives.
Loading the page, Magento searches for all the .css files declared in the- Server-side Less compilation is a server-side compilation with Less PHP library (https://github.com/oyejorge/less.php). It is a compilation mode by default. It’s available in any site mode (default, developer, production).
- Client-side Less compilation is a client-side compilation with native less.js library (http://lesscss.org/usage/#using-less-in-the-browser). It’s available only in default and developer site modes.
- Compile LESS using Grunt is a compilation using Grunt. More information on how to use Grunt for such purposes you can find here –https://devdocs.magento.com/guides/v2.3/frontend-dev-guide/css-topics/css_debug.html
Where can the intermediate files be found?
During compilation, all intermediate files get to the var/view_preprocessed directory. In these files, all special @magento_import directives are replaced by the standard @import.Then, all .less files from the var/view_preprocessed directory will be compiled into .css files.What do you have to remember, when you change a less file? Which files will be re-processed on file changes?
Changing .less file, remember that after that you need to compile this file and files which are included directly or through several occurrences (when a file is included into another file which is also in another one – you need to recompile all these files). The same should be done when you create a new one, rename or delete an existing .less file. You need to recompile this file and all the files in which it’s included.If you use Server-side Less compilation, having changed the .less file, we recommend to do the following:- Clear the folder with static files – “pub/static/frontend/
/ ”, “var/cache” – and a folder with intermediate files – “var/view_preprocessed”./ - Start compilation and publication of static files. It can be done, having reloaded the site’s page. But we recommend using static files deployment tool (https://devdocs.magento.com/guides/v2.3/config-guide/cli/config-cli-subcommands-static-view.html) since in the first case there will be compilation and publication only of those files that are used on the reloaded page. Besides, you won’t get information on errors.
Are the original files copied or symlinked in developer environments?
Symlinks files are symbolic links to files (like Windows shortcuts) i.e. when a system uses a symlink file, it opens a file to which it refers by a link. A symlink file doesn’t take the place what is very convenient. It doesn’t clutter a server with additional copies of files.Depending on the compilation mode (client or server-side) you choose, the original files can be copied or there will be created symlinks to them. Let’s consider the process in detail – here will be described the system with disabled cache.When we use Server-side Less compilation, all our .less files (including those which will be compiled into .css files and those included in other .less files with @import and @magento_import directives) are firstly copied to the var/view_preprocessed directory where these files are compiled into the resulting .css files located the same folders. Then, the resulting .css files are copied to the pub/static/frontend/7.3. Describe the purpose of _module.less, _extend.less, _extends.less
Demonstrate LESS has no fallback capabilities and therefor magento created @magento_import directives to enable FE devs to inject or replace parts of existing less structures of modules and themes.
As it was mentioned before, there is a special LESS directive in Magento – @magento_import.This directive allows adding several files from different places for the name template what expands the functionality of the standard @import directive (read more about it in the previous article – 7.2.).Let’s consider the main files that are added by @magento_import directive in the main style files – – styles-l.less, styles-m.less. and understand what they are used for:_module.less file contains the main styles for the module where it is located. In this file, using @import directives, other additional style files of this module are connected. As a rule, we need to create this file in theme in case we want to change the styles of the module significantly._widgets.less contains the basic styles for the module widgets where it is located. This file is connected after the _module.less file and therefore the styles from it have a higher priority than the last._extend.less contains additional styles for the module in which it is located. As a rule, we create this file to make minor changes in the module or add styles for new elements that have not been stylized in the current module before. When we do not want to rewrite existing module styles, it’s better to create such a file. This file is connected after the _module.less and _widgets.less files. So, the styles from it have a higher priority than in them._extends.less contains lots of abstract selectors. During development, these selectors can be used through mixins and extensions. Unlike the files above, this file is connected using the @import (reference) ‘source/_extends.less‘.module.less, _widgets.less and _extend.less files are located in modules folders along the following path:7.4. Show configuration and usage of CSS merging and minification
Demonstrate the primary use case for merging and minification
CSS merging is a process when multiple css files merge into one common CSS file. The main goal of merging is to reduce the number of HTTP requests. Instead of sending many requests to each file individually, there will be only one request to the resulting file. More about the file merging process you can find in the “Understand the implications merging has in respect to folder traversal” section.CSS minification is a process of the final CSS file reduction by removing extra spaces and duplicate styles. The main goal of the minification is to reduce the weight of the final CSS file.CSS merging and minification allow adding site pages faster and as a result increase site performance.Magento 2 has built-in functionality responsible for CSS merging and minification. Keep reading to know how to turn these options.If you’re not satisfied with built-in Magento functionality and need more flexibility working with files, you can use task runners like Grunt and Gulp.Determine how these options can be found in the backend
You can enable or disable CSS merging and minification in the admin panel only in Default or Developer mode.For this, in the admin of the site we go to Store > Configuration > Advanced > Developer > CSS SettingsHere we enable or disable CSS merging и CSS minification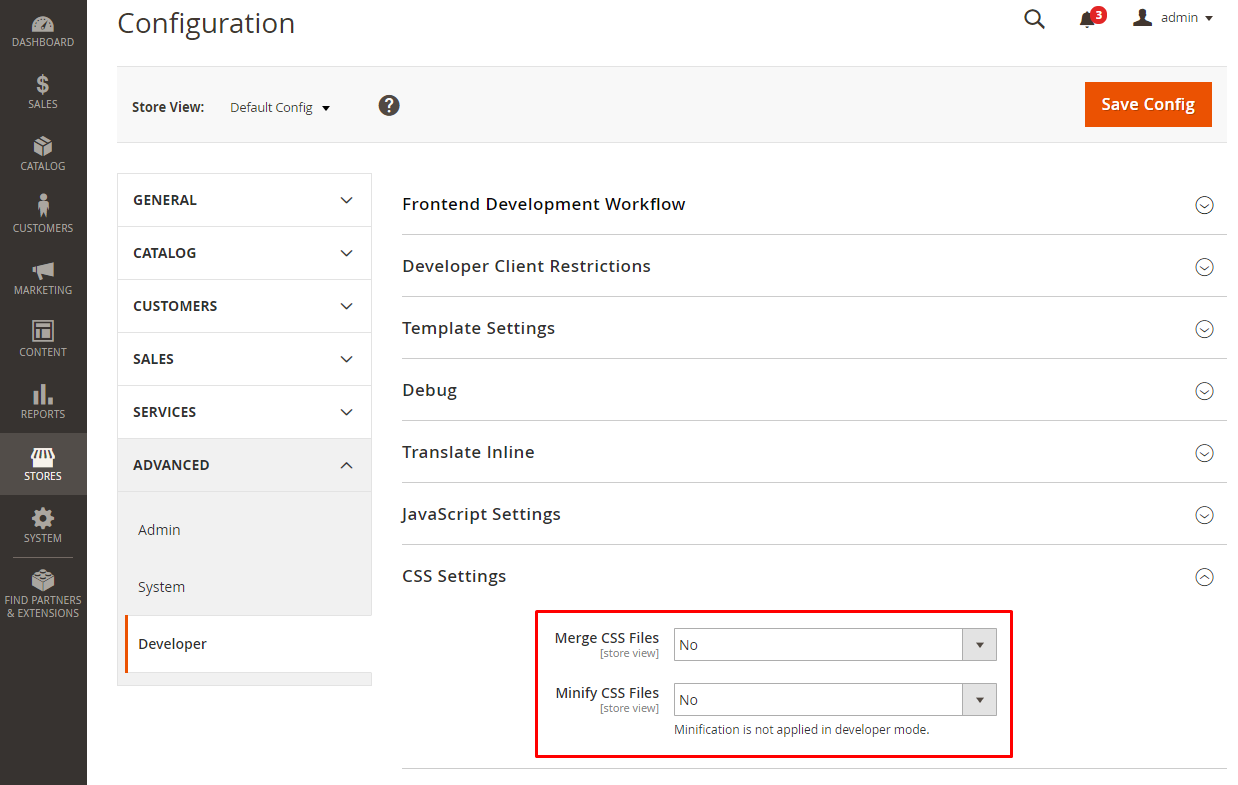 It should be noted that CSS minification won’t work in the Developer mode.Pay attention that CSS merging and minification can only be enabled in case of the server-side compilation (with the client-side compilation, there will be an error on the site’s workflow). To run server-side compilation, you need to go toIn order to enable compilation on the server side, go to Store > Configuration > Advanced > Developer > Frontend Development WorkflowHere we choose the “Server side less compilation” value for the “Workflow type” parameter.
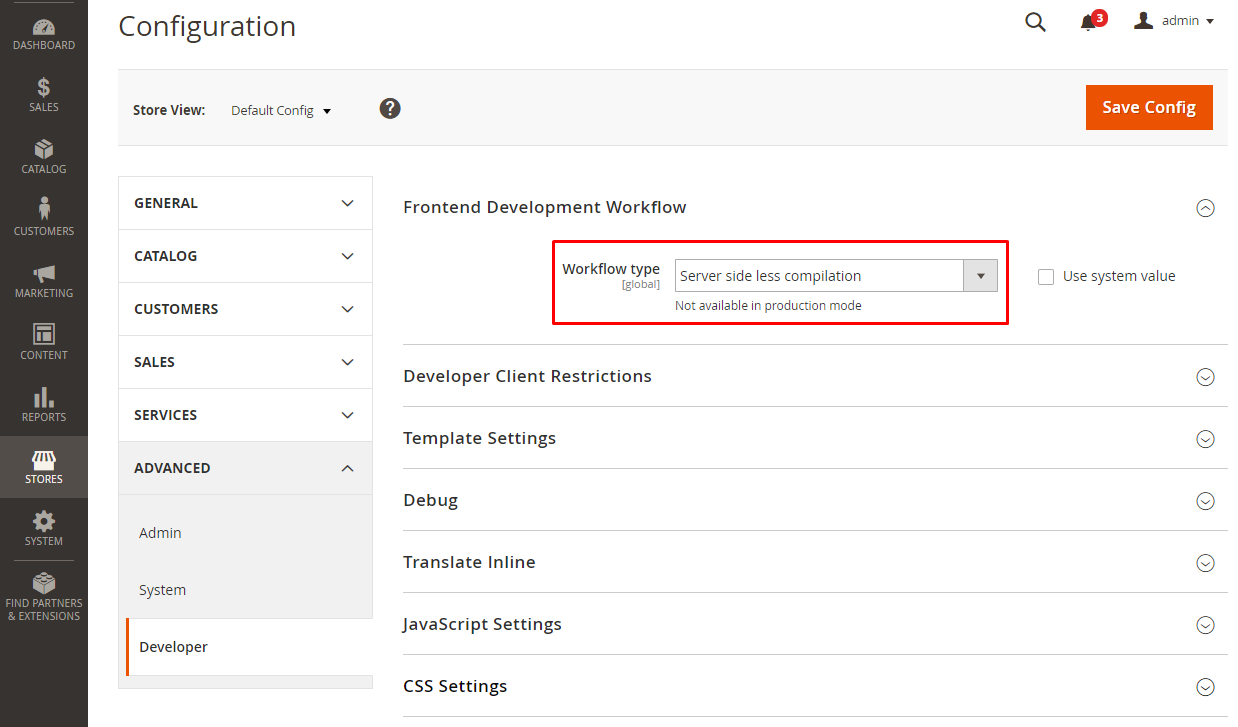 In the Production mode, CSS merging and minification is automatic with no need to install the parameters above (there is no such parameters in the admin in the Production mode).
Understand the implications merging has in respect to folder traversal
As it was mentioned in previous articles, in the Blank default theme are used 3 main style files which apply on all pages of the sit (there are also added style files that may differ for for different pages of the site):styles-m.css contains common styles of the site and styles for mobile devices styles-l.css contains styles for devices with a screen width from 768 pixels print.css is pages’ styles for printed versionThese files are generated from the same name less-files – styles-m.less, styles-l.less and print.less – which are gathered from many other files.We want to pay attention to 2 files – styles-m.css and styles-l.css. Magento 2 follows the “mobile first” principle. So, the styles-m.css file is connected first, then the styles-l.css. The last one is available only on devices with a screen width from 768 pixels.There are two ways to add our custom styles to our theme.In our topic, we can add our own custom styles in two ways.Method 1. Place custom styles in files that are included in the resulting styles-m.less and styles-l.less files, and as a result in styles-m.css and styles-l.css files (for this, you can supplement or overwrite the default theme style files. It was described in the 7.3. section.Method 2. Add your .less file and plug the same name resulting file in layout. For this, in the file1 2 3 4 5 6 7 | … <head> ... <css src="css/your_custom_style_file.css" /> ... </head> ... |
1 2 3 4 5 6 7 | … <head> ... <css src="css/your_custom_style_file.css" media="screen and (min-width: 768px)" /> ... </head> ... |
7.5. Magento UI library usage
Demonstrate your understanding of magento’s UI library, a LESS-based library of mixins and variables for many different standard design elements on website
Magento 2 has a useful thing – UI library. It uses the LESS processor and consists of a set of LESS files. These files use a set of mixins and variables to style the main site’s elements (such as buttons, forms, navigation and others).The UI library simplifies the theme creation and customization for a developer. In this article, we provide more information about the library and describe how to use it in your theme.How can you take advantage of the UI library?
The UI library, as it was mentioned before, contains a set of variables and mixins that you can use in your theme to speed up the development process. Let’s view some examples on how it can be used. I suggest looking at practical examples of how this can be used.For example, you have a button with “example-button” class and you need to make it look standard. For that, we can use the .lib-button() mixin what looks as follows:1 2 3 | .example-button { .lib-button(); } |
1 2 3 4 5 6 | .example-button { .lib-button( @_button-color: red, @_button-padding: 25px ); } |
1 2 3 | .example-block { font-size: @button__font-size; } |