Magento 2 Certified Professional Front End Developer Guide
Section 5: Static Asset Deployment
5.1. Describe the static asset deployment process for different file types
What commands must be executed to deploy static file types?
Static files are the ones that can be cached on the website (caching increases page load speed). CSS, fonts, images and javaScript used by the theme are static files. These cached files are stored in “
/pub/static” and “
/var/view_preprocessed/pub/static” folders. They get in there after the deployment.In order to execute the deployment process manually, you need to execute the following command (make sure that your user has enough rights for it and you are in the site’s core).
php bin/magento setup:static-content:deployIt was an example of a standard command without additional variables. As a result, all the static files of all the themes, areas and so on will be deployed. There are many different variables for this command that correct the deployment process.The line with variables will look like this:
php bin/magento setup:static-content:deploy [] [–theme[=””]] [–exclude-theme[=””]] [–language[=””]] [–exclude-language[=””]] [–area[=””]] [–exclude-area[=””]] [–jobs[=””]] [–no-javascript] [–no-css] [–no-less] [–no-images] [–no-fonts] [–no-html] [–no-misc] [–no-html-minify] [–dry-run] [–force] [–verbose]Where
is a space-separated list of language codes. Static content deploys only for the specified languages. By default, it deploys only for en_US (if variable is not specified). For example,
en_US fr_FR.
–theme [=””] is a list of themes for which static content deploys (if variable is not specified, static content deploys for all themes). For example,
–theme Magento/blank –theme Magento/luma.
–exclude-theme [=””] is a list of themes for which static content does not deploy. For example,
–exclude-theme Magento/blank –exclude-theme Magento/luma.
–language[=””] is a list of languages for which static content deploys (if variable is not specified, the static content will deploy for all the languages). For example,
–language en_US –language es_ES. If you specify this variable and the
variable (described above), then the variable will have the priority. For shortening, instead of –language, you can use -l (for example: -l es_ES)–exclude-language[=””] is a list of languages for which static content does not deploy. For example, –exclude-language en_US –exclude-language es_ES.–area[=””] is a list of areas for which static content deploys, (if variable is not specified, the static content will deploy for all the areas). For example, –area adminhtml. For shortening, instead of –area, you can use -a (for example: -a adminhtml)–exclude-area[=””] is a list of areas for which static content does not deploy. For example, –exclude-area adminhtml.–jobs[=””] is a variable that allows you to use a certain number of jobs during parallel processing (by default, it is 4). For example, –jobs 1. For shortening, instead of –jobs, you can use -j (for example: -j 1).–no-javascript is a variable that prevents JavaScript files deployment.–no-css is a variable that prevents CSS files deployment.–no-less is a variable that prevents LESS files deployment.–no-images is a variable that prevents images deployment.–no-fonts is a variable that prevents font files deployment.–no-html is a variable that prevents HTML files deployment.–no-misc is a variable that does not allow other file types (for example, .md, .jbf, .csv, .json, .txt, .htc, .swf) to deploy.–no-html-minify is a variable that does not allow the HTML files to minify.–dry-run is a variable that allows you to look at the output files without any changes.–force is a variable that deploys files at any mode. For shortening, instead of –force, you can use -f–verbose is a variable that changes the amount of information that outputs while deploying. Usually, the short form of this variable is used where -v is for minimum information about deployment (default), -vv is for more information about deployment, -vvv is used for debugging.You can see the full list of variables if you execute this command:php bin/magento --help setup:static-content:deploy All these variables are not required but using them, you will be able to configure the deployment process according to the tasks that you need to manage.We also would like to remind you of clearing the static cache files before deployment. There are two ways how this can be done:
- In the admin panel, you should proceed to System > Tools > Cache Management and choose Flush Static Files Cache.
- Manually, we delete what is inside the folders “/pub/static” and “/var/view_preprocessed/pub/static” (do not delete the folders themselves and the .htaccess files).
- On the command line, using the rm -rf pub/static/frontend/* command
You can get more details about it here:https://devdocs.magento.com/guides/v2.1/frontend-dev-guide/cache_for_frontdevs.html#clean_static_cache)What are common mistakes during the process?
The following mistakes are common during file deployment:
- Sometimes developers forget about deployment for some of the languages. Default deployment command deploys only the files for the current language version (by default, en_US) and if there are several language versions, they will not be deployed. In order to deploy the content of other language versions, you should use the variable or –language[=””] described above.
- Sometimes developers try to carry out deployment not having enough rights to record files. Before the deployment process, it is recommended to execute the following commands:
- cd
find . -type f -exec chmod 644 {} \;
find . -type d -exec chmod 755 {} \;
find ./var -type d -exec chmod 777 {} \;
find ./pub/media -type d -exec chmod 777 {} \;
find ./pub/static -type d -exec chmod 777 {} \;
chmod 777 ./app/etc
chmod 644 ./app/etc/*.xml
chown -R : .
chmod u+x bin/magento
- Sometimes developers forget to clear the static cache files. It can lead to the issue when the old unnecessary static cache files remain after the deployment and interfere with the correct website view.
- Sometimes developers try to manage deployment not from the website core.
- Finally, there may also be ordinary mistakes in a team’s syntax.
5.2. Describe the effect of deploy modes on frontend development
What are the differences between development and production mode in regard to frontend development?
There are 3 website operating modes: Default, Developer and Production.Default mode is a default Magento mode when no other mode is selected. It allows you to deploy Magento on one server without changing any settings. At the same time, this mode does not provide such a level of website optimization as production mode. That is why later developers usually switch the default mode to developer or production mode depending on a task.These are the special features of the default mode:
- The link is generated for every requested static view file in pub/static catalog;
- The static files are generated dynamically and because of it, website loading will take much more time than in the production mode;
- The user cannot see the mistakes (on frontend) but these mistakes are recorded to server reports.
To make website configuration more convenient, you should turn on developer mode, and to maximize production optimization, use production mode. Below you can find the information on how to change developer mode.Developer mode is the mode that should be used when you develop new functionality or customize the existing one as it allows you to get feedback from the system much faster than in other modes.These are the special features of the developer mode:
- Static view files are not caching. They are recorded to the pub/static folder every time when they are requested
- Static files are generated dynamically and because of it, website loading will take much more time than in the production mode;
- Uncaught exceptions and errors are visible in browser;
- Exceptions and mistakes are recorded in var/log and /var/reports _;
- Exceptions are generated in the error handler rather than being logged
- Exceptions are generated when an event subscriber cannot be invoked.
Production mode is used when the website has already been deployed to a production server. This website will be available to all the users and in this mode, the website has maximum performance and load speed. The production mode should be switched on only when website development is over and you are ready to go. Before you switch it on, you should manage all the necessary configurations on the production server where the website is hosted (optimize server environment).After the website has been deployed, you should run the static view files deployment tool to generate static files which will be recorded to pub/static folder (it increases the performance as all the necessary static files are immediately available instead of generating them when needed as in other modes).These are the special features of the production mode:
- Static view files are served from cache. They do not have formed links in the pub/static catalog, the links are created along the way. New or updated files are not recorded to the file system.
- The errors are not shown to a user (on frontend), but they are recorded to the report files on the server.
It is clear from the description of modes that the main difference between development and production modes is that the first one is used while developing and configuring the website, and the second one is when the development is over and the highest website performance is required.There is also Maintenance mode which is used to temporar close the website from users. When users visit the website, they will be redirected to the “Service Temporarily Unavailable” page (you can find out how to create a custom maintenance page here – https://devdocs.magento.com/guides/v2.2/comp-mgr/trouble/cman/maint-mode.htm). This mode is useful when you configure some website features which can affect website’s functionality or design. Then, it is better to make sure that the user will not come to the website and encounter broken design or incorrect functionality.To find out which mode is used at the moment, execute this command:bin/magento deploy:mode:showIn order to enable the production mode, execute this command:bin/magento deploy:mode:set productionIn order to enable the developer mode, execute this command:bin/magento deploy:mode:set developerIn order to enable the maintenance mode, execute this command:bin/magento maintenance:enableIn order to disable the maintenance mode, execute this command:bin/magento maintenance:disableYou get more information about changing the mode here: https://belvg.com/blog/how-to-switch-between-deploy-modes-in-magento-2.html5.3. Demonstrate your understanding of LESS > CSS deployment and its restrictions in development
Which LESS compilation options are available in Magento?
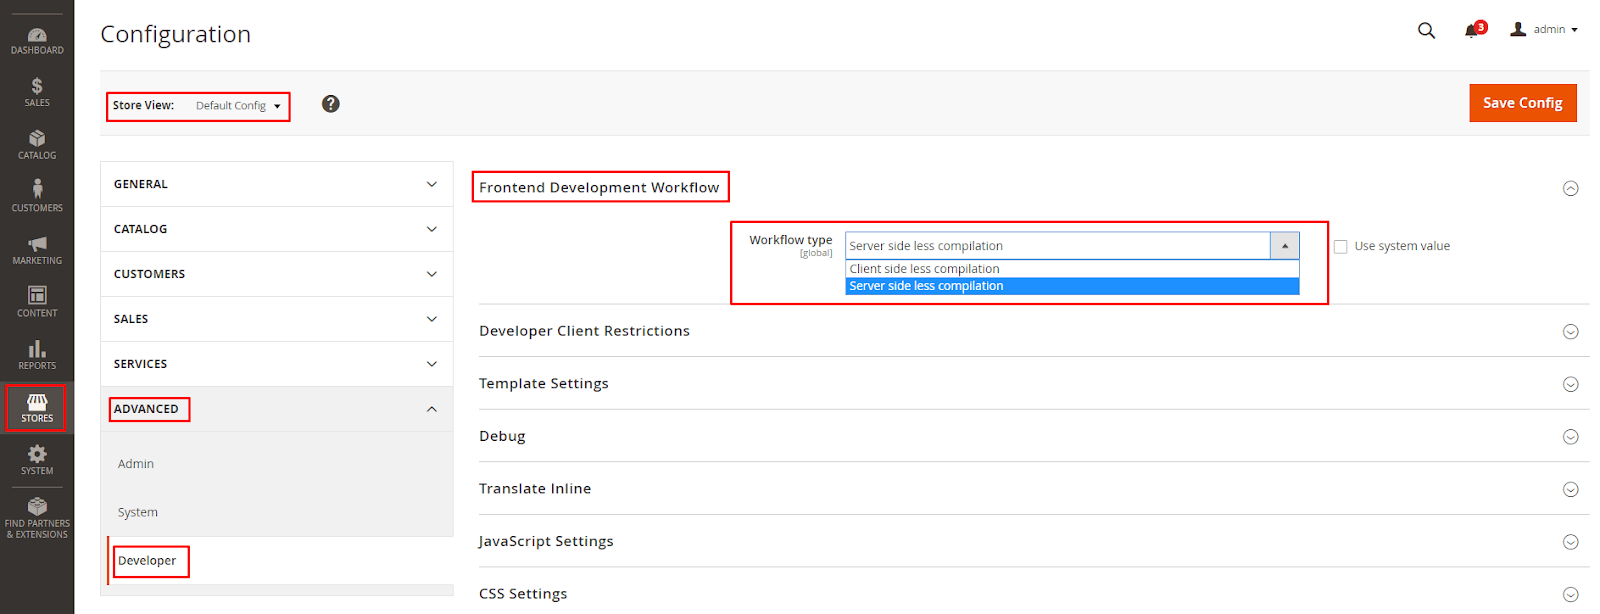
In Magento, there are two LESS compilation options in CSS:
- server-side LESS compilation (default option)
- client-side LESS compilation
You can change the compilation option in the following way (It can be done only if the website is not in the Production mode. You can find how to change website modes in the 5.2 section):
- Click on “Stores > Configuration > ADVANCED > Developer” in the admin panel.
- In the dropdown menu “Store View” choose “Default Config”.
- In the “Frontend Development Workflow” tab in the “Workflow type” field choose the needed mode.
Save the changes pushing on the “Save Config” button.How are they different?
To understand the differences between compilation options, we need to consider both of them in detail.Server-side LESS compilation
This compilation is done on the server side with Less PHP library (more details about the library are here https://github.com/oyejorge/less.php). As it was mentioned before, only this compilation option is available for the Production mode.During server-side Less compilation, there is a compilation of the files which the system can’t find in cache and static files.As a result, changing something in the .less file of your theme, we need to clear the folders “pub/static/frontend///”, “var/cache” and “var/view_preprocessed” (more information about static files you can find here https://devdocs.magento.com/guides/v2.0/frontend-dev-guide/cache_for_frontdevs.html#clean_static_cache). After that, we need either to reload the page or make a deploy (about which it was written above). If we reload the page, only the files related to this page are recompiled. Making a deploy, we recompile all the sites’ styles (it’s easier to track errors during a deploy, if they occur). The changes in the .less file are applied to the site page only after that.Use Grunt to simplify and speed up the process. In short, Grunt compiles only those files which have changed (there is no need to clean the folders yourself and make a deploy). More information about Less compilation with Grunt you can find here (https://devdocs.magento.com/guides/v2.2/frontend-dev-guide/css-topics/css_debug.html).Client-side LESS compilation
This compilation is done on the client’s side – in browser – using native less.js library (more information about the library you can find here http://lesscss.org/usage/#using-less-in-the-browser). This compilation option isn’t available in the Production mode.Each time the page is refreshed, there starts a file compilation process in a browser whether you’ve changed .less theme files or not.Sometimes it’s necessary to clear the folder “pub/static/frontend///” (more information about this and a detailed analysis of the both compilation types processes you can find here https://devdocs.magento.com/guides/v2.2/frontend-dev-guide/css-topics/css-preprocess.html#css_exception). However, it’s unnecessary in most cases. You only need to reload the page to start a client-side compilation.Thus, the main differences between server-side LESS compilation and client-side LESS compilation are as follows:
- server-side LESS compilation is done on the server side, while client-side LESS compilation on a client side (in a browser).
- client-side LESS compilation is run every time the page is reloaded, while server-side LESS compilation only after cleaning the “pub/static/frontend///”, “var/cache”, “var/view_preprocessed” folders, the page refreshment or deploy.
- client-side Less compilation is not available in the Product mode, while server-side LESS compilation is available.
How do they influence the developer workflow during theming?
In theory, client-side LESS compilation should speed up a theme development process since files will be compiled every time we refresh the page. If we make changes in the .less styles files of our theme, they will be immediately seen on the client side when the page is refreshed without static files pre-cleaning and so on. In practice, each page refreshment takes a lot of time. The more complex the site is, the more styles’ files it has, the more weighty JavaScript files are loaded on the page, it takes more time to load the page and, as a result, each page might be loading several minutes. You can’t deny that it’s a doubtful way to speed up a theme development.On the other hand, server-side LESS compilation requires cleaning the folders of static files when changing .less files before loading each page (it’s better to make a deploy after cleaning folders with static files). As a result, we make additional actions before refreshing each page which doesn’t simplify the theme development process.Here it’s better to use Grunt to track the source .less files and recompile the output when these files are changing (more information about how to use Grunt you can find here https://devdocs.magento.com/guides/v2.2/frontend-dev-guide/css-topics/css_debug.html)Grunt will keep tracking changes in the source files and run compilation, if necessary. So, we don’t need to do unnecessary actions before each page reload. In the end, this helps to simplify and speed up the development process. Table of content
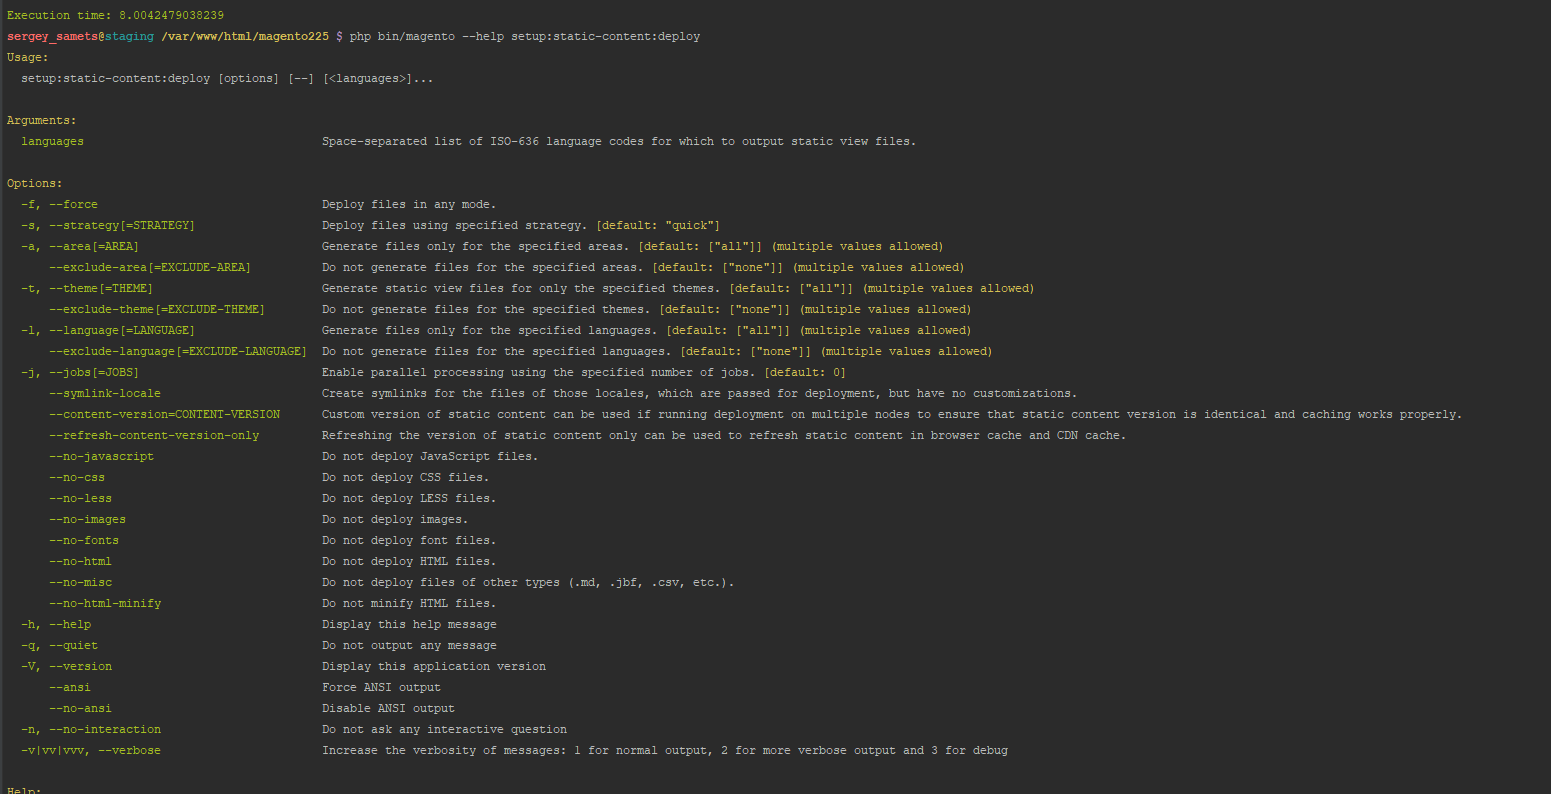 All these variables are not required but using them, you will be able to configure the deployment process according to the tasks that you need to manage.We also would like to remind you of clearing the static cache files before deployment. There are two ways how this can be done: