 Table of content
Magento 2 Certified Professional Developer Guide
Section 3: Customizing the Magento UI
3.1 Demonstrate ability to utilize themes and the template structure
Demonstrate the ability to customize the Magento UI using themes. When would you create a new theme?
In case there is a need to modify the web store layout, you can create a new theme to achieve this. To learn how to create a Magento theme, follow the linkhttps://belvg.com/blog/magento-2-creating-a-new-theme.htmlHow do you define theme hierarchy for your project?
To define theme hierarchy for your project, specify the parent theme in theme.xml file inside the theme:1 2 3 4 5 | <theme xmlns:xsi="http://www.w3.org/2001/XMLSchema-instance" xsi:noNamespaceSchemaLocation="urn:magento:framework:Config/etc/theme.xsd"> ... <parent>Magento/blank</parent> ... </theme> |
Demonstrate the ability to customize/debug templates using the template fallback process
In order to customize a certain view file, override it in the current theme. Template fallback process is when Magento 2 searches for a file in the child theme, then in the parent themes and finally in modules. To learn more about this, follow the link:https://devdocs.magento.com/guides/v2.3/frontend-dev-guide/themes/theme-inherit.htmlThere are the following methods of template debugging:- XDebug (The main peculiarity of this method are breakpoints as well as the ability to view and modify variables at any time)
- Developer mode (the mode for development, displays errors directly on screen)
- Logs in folder var/logs and reports in folder var/reports
- Display Magento reports in browser
- Template path hints (displays templates’ paths and names)
How do you identify which exact theme file is used in different situations?
To easier identify what template file is used in a certain place at the website, enable path hints for it.First, log in to the admin panel and navigate to “Stores -> Configuration”.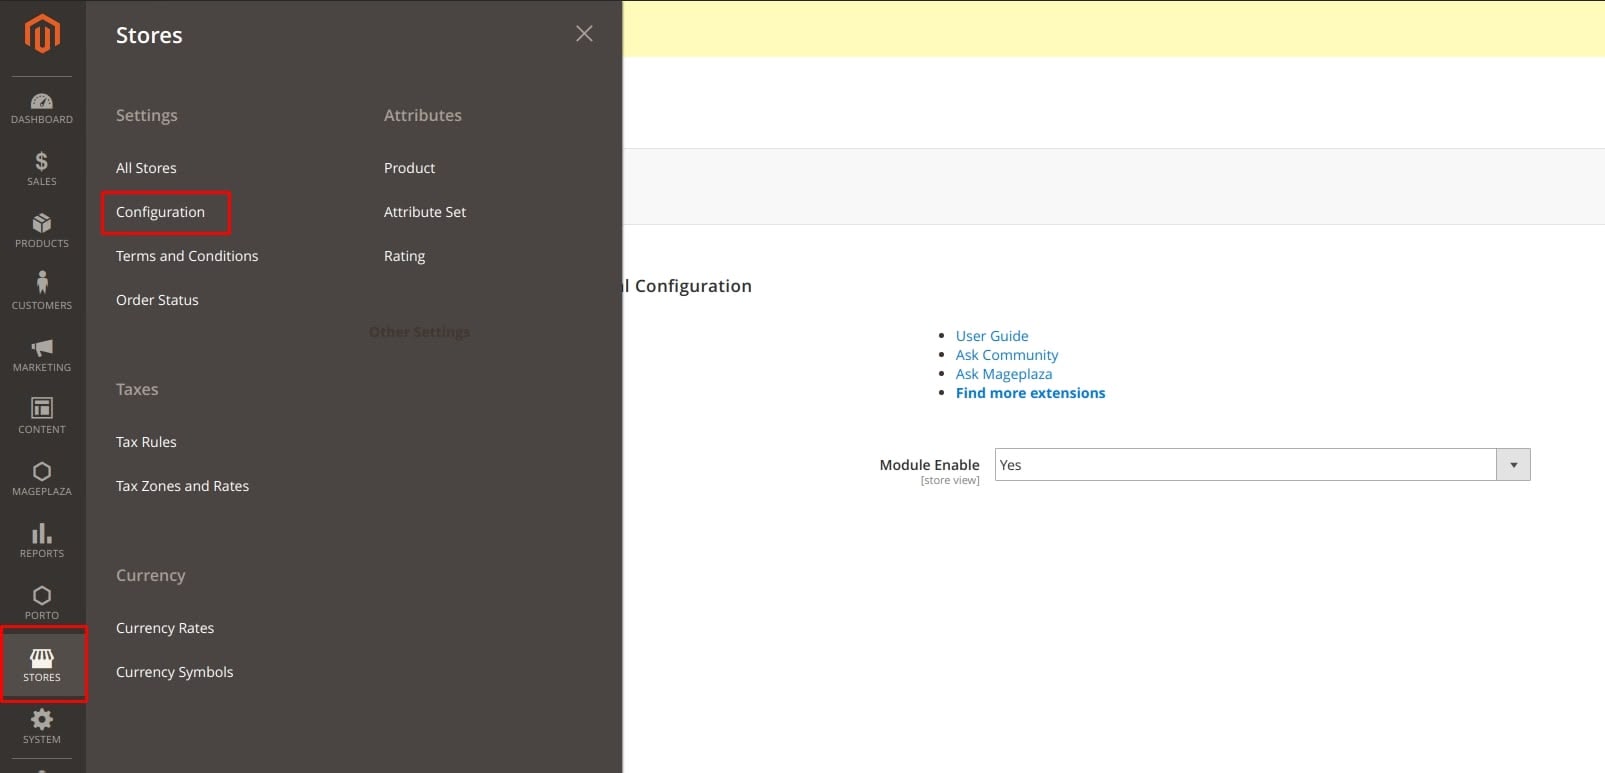 Then, go to “Advanced -> Developer”. Expand the “Debug” tab and set “Enabled Template Path Hints for Storefront” attributes at Yes.
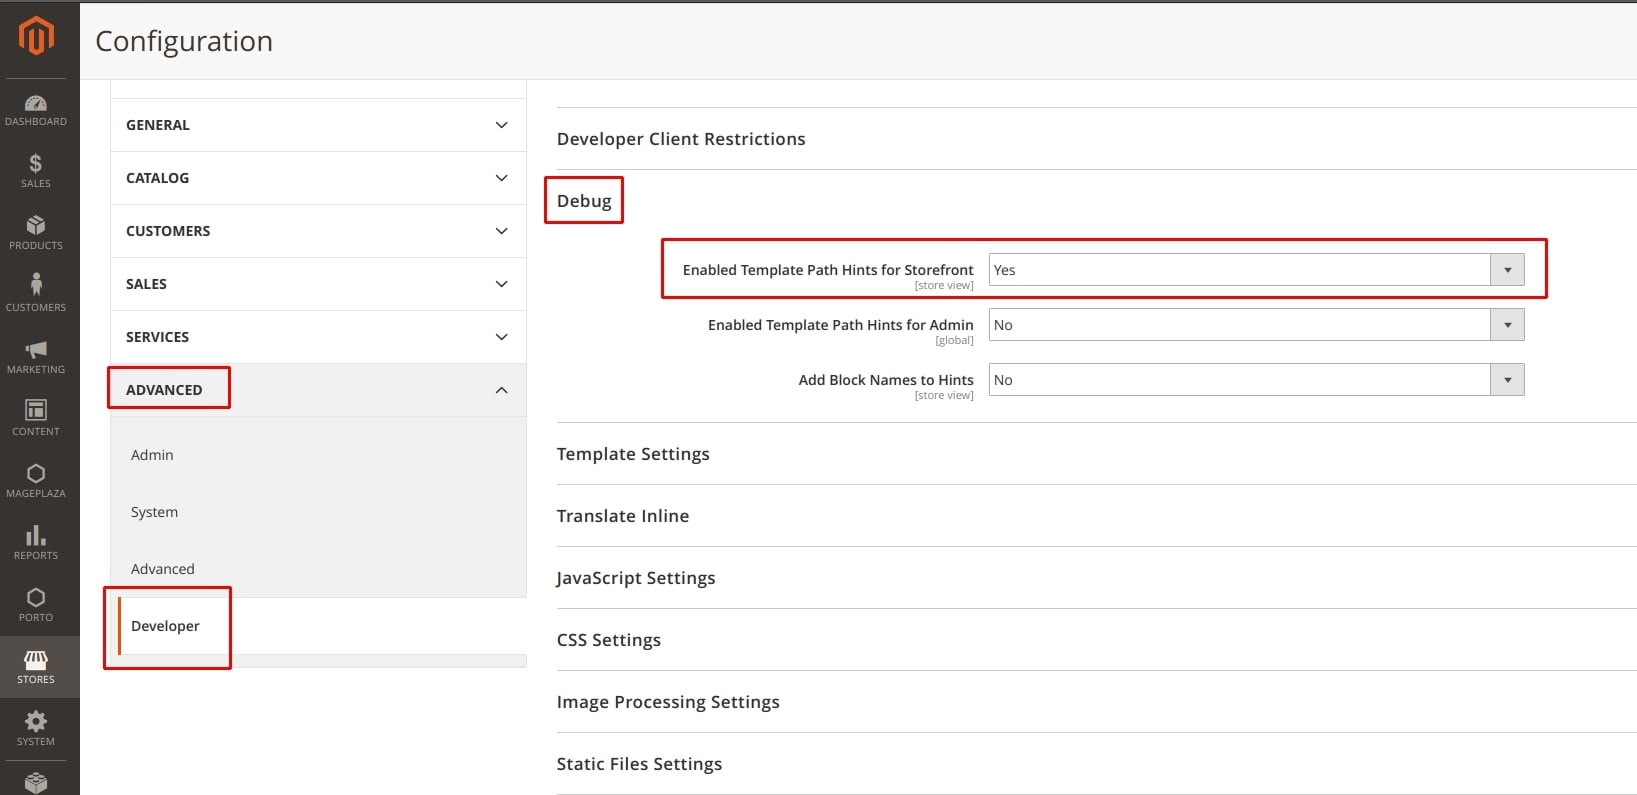 In case you have multiple stores, set in the upper right menu the one for which you enable path hints.When there is a need to enable hints for a certain ip-address, expand the “Developer Client Restrictions” tab and enter the IP-address into the “Allowed IPs (comma separated)” field. If you need to enter several IP-addresses, separate them with commas.
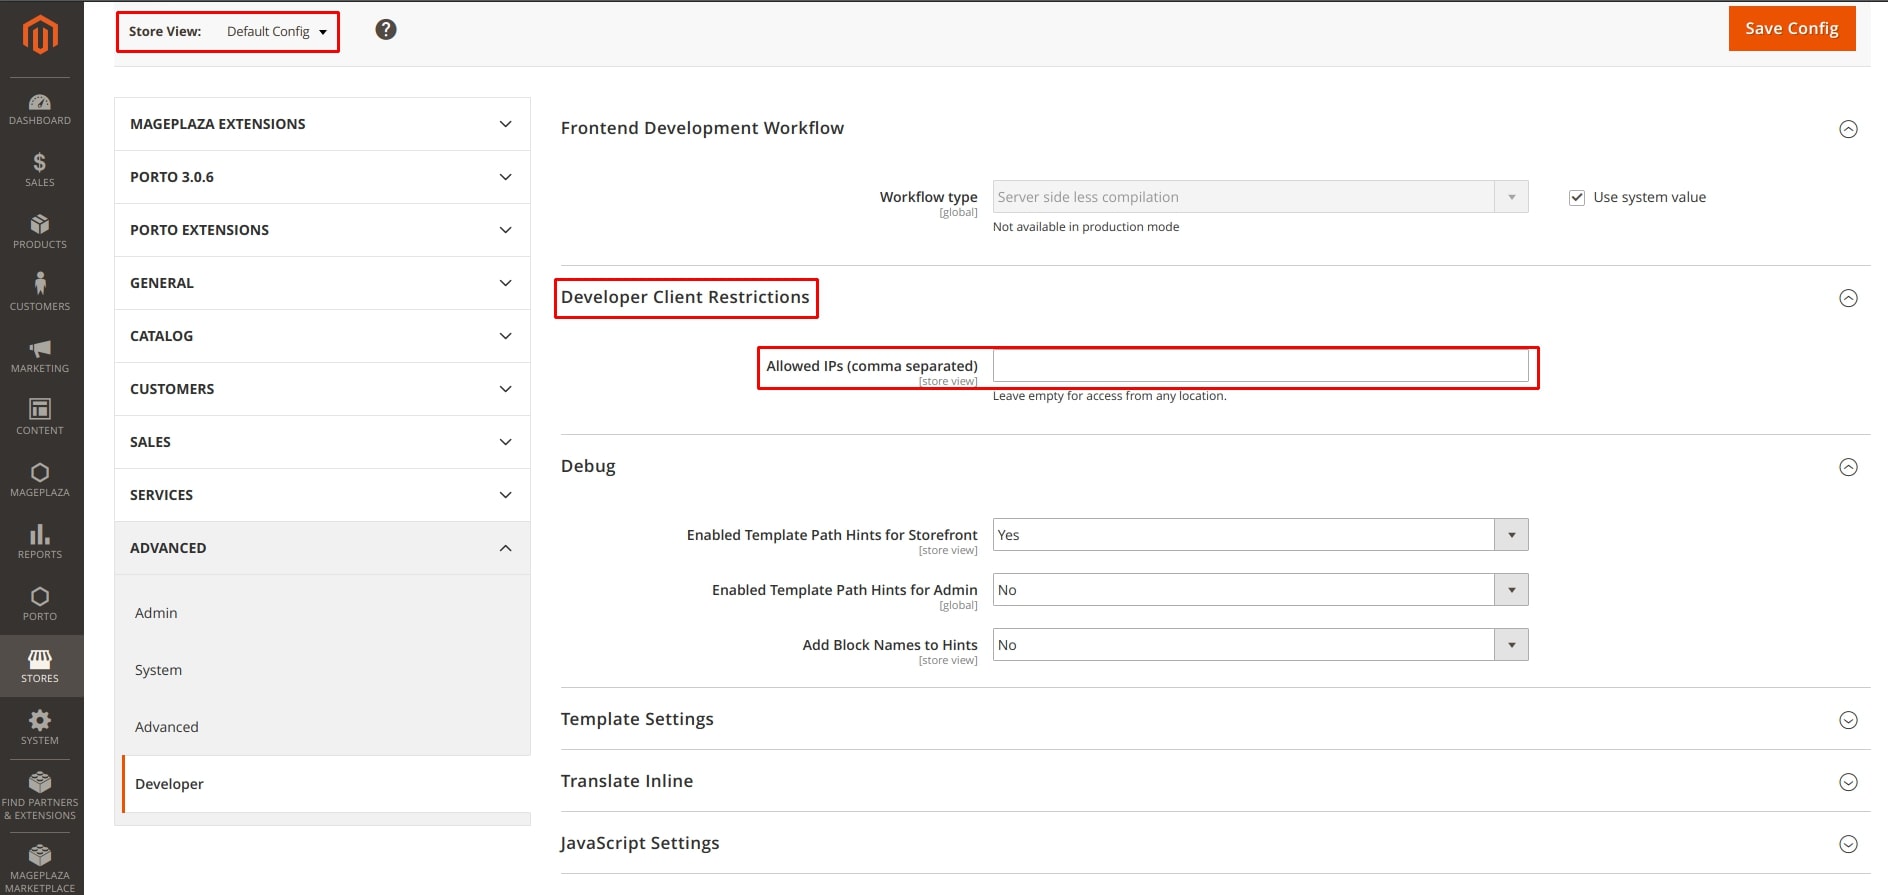 Another way to enable or disable path hints is via CLI:
bin/magento dev:template-hints:enablebin/magento dev:template-hints:disable
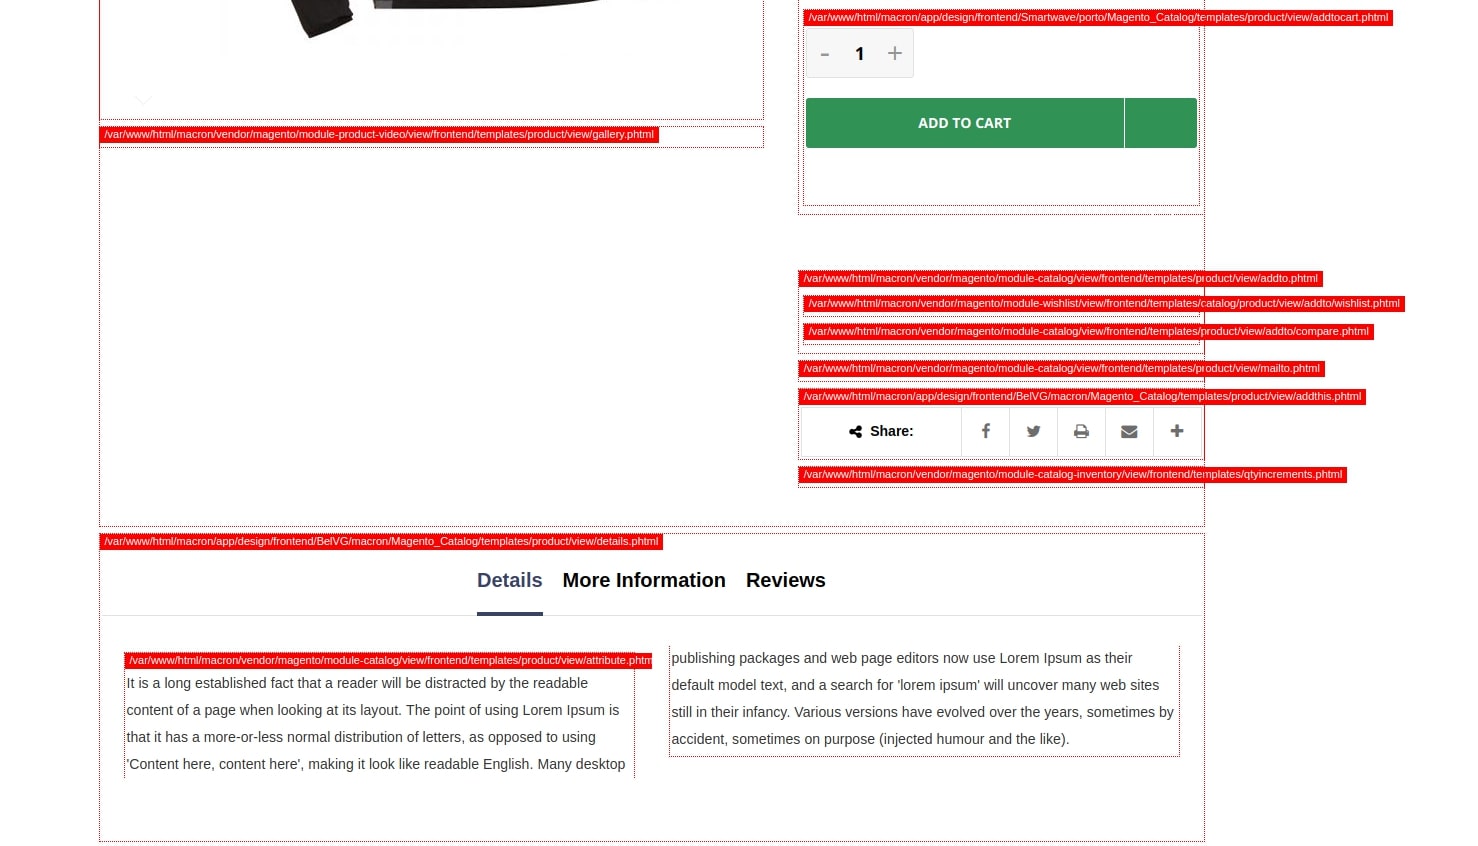 Following the highlighted paths, we can easily find the needed templates files.If you know the needed file’s unique line (for example, class name, attributes, etc.), then you can search for it among the project files. In PhpStorm, find the project files folder, click the right mouse button, select “Find in Path…” and insert the unique line in the appeared window.Another way to search for files is using grep command:
 grep -R "" vendorHow can you override native files?
In order to override the parent theme files, put the file in the current theme folder at the same path it was located in the parent theme. Example:If you need to override a file in the parent theme /Magento_Catalog/templates/product/view/gallery.phtml, then create a file in the child theme /Magento_Catalog/templates/product/view/gallery.phtml.In order to override module’s view files, create them at the same path as they were located in the module’s view folder, but deleting from the path and adding the module name. Example:If we want to override the module file vendor/magento/module-catalog/view/frontend/templates/product/view/gallery.phtml, create a file in the theme/Magento_Catalog/templates/product/view/gallery.phtmlThis method overrides templates files and all the files in web folder. However, if you try to override the layout file the following way, instead of overriding the parent theme file will be added up to. To learn more about the layout files override in Magento 2, follow the link(https://belvg.com/blog/override-a-layout-in-magento-2.html)3.2 Determine how to use blocks
Demonstrate an understanding of block architecture and its use in development
Blocks are PHP classes that provide data for template files (.phtml) and implement rendering. Also, blocks can cache the results of template rendering.Which objects are accessible from the block?
All blocks extend \Magento\Framework\View\Element\Template, so by default blocks are injected with a \Magento\Framework\View\ Element\Template\Context object and support getters and setters for returning and storage of any objects or data. This object contains a number of other objects that are loaded into the instance:
- $this->validator: \Magento\Framework\View\Element\Template\File\Validator
- $this->resolver: \Magento\Framework\View\Element\Template\File\Resolver
- $this->_filesystem: \Magento\Framework\Filesystem
- $this->templateEnginePool: \Magento\Framework\View\TemplateEnginePool
- $this->_storeManager: \Magento\Store\Model\StoreManagerInterface
- $this->_appState: \Magento\Framework\App\State
- $this->pageConfig: \Magento\Framework\View\Page\Config
What is the typical block’s role?
Separation of blocks and templates allows you to divide design related logic and design. Blocks are usually, but not always, connected to PHTML template files. Blocks can be thought of as data containers for a template, which represents a piece of the HTML on the page. In layouts XML, you can manage blocks on page and add new ones, set templates to move and delete.Identify the stages in lifecycle of a block
The block life cycle consists of two phases: generating blocks and rendering blocks. Blocks are instantiated at the moment the layout is created. They are not executed at that time, just instantiated. Also during this phase, the structure is built, the children of blocks are set, and for each block, the prepareLayout() method is called. However, rendering occurs in the later rendering phase.Generating phase:
- Magento\Framework\View\Page\Config::publicBuild()
- Magento\Framework\View\Page\Config::build()
- Magento\Framework\View\Layout\Builder::build()
- Magento\Framework\View\Layout\Builder::generateLayoutBlocks()
- Magento\Framework\View\Layout::generateElements()
- Magento\Framework\View\Layout\GeneratorPool::process()
GeneratePool goes through all generators and generates all scheduled elements. It has generators with the following elements:Magento\Framework\View\Page\Config\Generator\HeadMagento\Framework\View\Page\Config\Generator\BodyMagento\Framework\View\Layout\Generator\BlockMagento\Framework\View\Layout\Generator\ContainerMagento\Framework\View\Layout\Generator\UiComponentRendering phase:
- Magento\Framework\View\Result/Page::render()
- Magento\Framework\View\Layout::getOutput()
At this moment, we already have all the layout xml for the generated page, and all block classes are created.
- Magento\Framework\View\Layout::renderElement()
- Magento\Framework\View\Layout::renderNonCachedElement()
In this method, we check the type of rendered elements. It creates them and returns html using toHtml() method. This method is not recommended to override. If you want to change block rendering, override _toHtml() method.In what cases would you put your code in the _prepareLayout(), _beforeToHtml(), and _toHtml() methods?
_prepareLayout() – most often used for:
- adding child’s Magento\Eav\Block\Adminhtml\Attribute\Edit\Options\AbstractOptions::_prepareLayout()
- adding tabs on backend Magento\Backend\Block\System\Design\Edit\Tabs::_prepareLayout()
- set title Magento\Wishlist\Block\Customer\Sharing::_prepareLayout()
- adding pager, breadcrumbs and so on Magento\Sales\Block\Order\History::_prepareLayout()
- set renderer Magento\Catalog\Block\Adminhtml\Form::_prepareLayout()
_beforeToHtml()
- data preparing Magento\Catalog\Block\Product\ProductList\Related::_beforeToHtml()
- assign values Magento\Backend\Block\Widget\Form\Element::_beforeToHtml()
- adding child’s
Magento\Shipping\Block\Adminhtml\Create\Items::_beforeToHtml()_toHtml()Using this method, you can manipulate block rendering, complement the condition, make wrappers for html, change the template for the block, etc.Magento\GroupedProduct\Block\Order\Email\Items\Order\Grouped::_toHtml() , Magento\Sales\Block\Reorder\Sidebar::_toHtml()How would you use events fired in the abstract block?
view_block_abstract_to_html_before – use for editing params:
- templates
- caches
- grids
view_block_abstract_to_html_after – use for html manipulation – editing, adding conditions, wrappersDescribe how blocks are rendered and cached
The most important method for rendering a block is Magento\Framework\View\Element\AbstractBlock::toHtml(). First, it runs _loadCache(), and if the cache is missing, then it run _beforeToHtml() after the block is rendered by the method_toHtml(). Afterward, the cache is saved _saveCache($html) and run _afterToHtml($html).Method _loadCache() uses cache_key return by getCacheKey() and _saveCache($html) – cache_tags obtained by the method getCacheTags(). Cache_key each block is added up like BLOCK_CLASS::CACHE_KEY_PREFIX. $cache_key , if this property not defined – BLOCK_CLASS::CACHE_KEY_PREFIX . sha1(implode(‘|’, $this->getCacheKeyInfo())). Cache_tags is an array and consists of a property $cache_tags, if it defined in block and if block instance of Magento\Framework\DataObject\IdentityInterface values returned by the method getIdentities() are added to the array. We can manage $cache_lifetime variable. Value will be in seconds, if you want to disable cache, you can set value to 0 or not set the value at all, because all blocks are non-cacheable by default.Identify the uses of different types of blocks
- Magento\Framework\View\Element\AbstractBlock – parent block for all custom blocks
- Magento\Framework\View\Element\Template – block with template
- Magento\Framework\View\Element\Text – just rendering text
- Magento\Framework\View\Element\FormKey – return hidden input with form key
- Magento\Framework\View\Element\Messages – rendering notification message by type
When would you use non-template block types?
Applying non-template block types is wise when we use simple renderers. Another reason for using such block types is when block content is dynamic generated or stored in database or in containers. For example, if you want form_key in template, you can insert block Magento\Framework\View\Element\FormKey.In what situation should you use a template block or other block types?
Using a template block or other block types is recommended when complicated renderers are used, or when you want to customize themes or add new blocks. А prime example is a breadcrumbs block Magento\Catalog\Block\Breadcrumbs. If you want to customize breadcrumbs, you can set template in layout.3.3 Demonstrate ability to use layout and XML schema
Describe the elements of the Magento layout XML schema, including the major XML directives. How do you use layout XML directives in your customizations?
Magento layouts contain instructions that allow to:
- Add and delete static resources (JavaScript, CSS, fonts) into the head section of the page;
- Create and modify containers;
- Create and modify blocks;
- Set the templates for blocks;
- Pass arguments into blocks;
- Change the location of the elements (blocks and containers);
- Change elements’ order (blocks and containers);
- Delete elements (blocks and containers).
Let us examine the cases of each instruction application:Adding and deleting static resources
To add static resources to the page, first create default_head_blocks.xml file at the following path: /Magento_Theme/layout/default_head_blocks.xml.Add a CSS file with the following instruction:12 <scriptsrc="Magento_Catalog::js/sample1.js"/><linksrc="js/sample.js"/>
In order to connect an external resource,add src_type attribute with “url” value.For example:12 <csssrc="https://maxcdn.bootstrapcdn.com/bootstrap/3.3.4/css/bootstrap-theme.min.css"src_type="url"/><scriptsrc="https://maxcdn.bootstrapcdn.com/bootstrap/3.3.4/js/bootstrap.min.js"src_type="url"/>
To add a font,apply link tag and add attributes rel=”stylesheet” and type=”text/css”:1 <linkrel="stylesheet"type="text/css"src="http://fonts.googleapis.com/css?family=Montserrat"src_type="url"/>
Adding or modifying containers
To add a new container,use the following instructions:1 <containername="you.container"as="youContainer"label="My Container"htmlTag="div"htmlClass="my-container"/>
To modify a container(to add a block,for example),apply referenceContainer instruction:123 <referenceContainername="header.panel"> <blockclass="YouVendor\YouModule\Block\YouBlock"name="new.block"/></referenceContainer>
Adding or modifying blocks.Modifying block template and parameters
To create a block,apply block instruction.For example:1 <blockclass="Magento\Catalog\Block\Product\View\Description"name="product.info.sku"template="product/view/attribute.phtml"after="product.info.type"/>
To modify a block,apply referenceBlock instruction.Let us use the following block as an example:12345 <blockclass="Namespace_Module_Block_Type"name="block.example"> <arguments> <argumentname="label"xsi:type="string">BlockLabel</argument> </arguments></block>
To modify its argument and add a new one,apply the following instruction:12345678 <referenceBlockname="block.example"> <arguments> <!--Modifiedargument--> <argumentname="label"xsi:type="string">NewBlockLabel</argument> <!--Newargument--> <argumentname="custom_label"xsi:type="string">CustomBlockLabel</argument> </arguments></referenceBlock>
In case you need to set a template for a block,there are two ways to do this.Method 1:usingtemplateattribute:1 <referenceBlockname="new.template"template="Your_Module::new_template.phtml"/>
Method 2:using an argument with a name template:12345 <referenceBlockname="new.template"> <arguments> <argumentname="template"xsi:type="string">Your_Module::new_template.phtml</argument> </arguments></referenceBlock>
In our examples,new_template.phtml is the path to the template file,relatively to template folder(/view//templates or//templates).It should be noted that the templates,set with template attribute,have a higher priority.Therefore,the value in the template attribute will rewrite the one,specified with the help of argument.Changing of the order or the location of blocks and containers.Deleting blocks and containers
Before and after attributes allow to change the element order inside the parent.Set the name of the element,before or after which we want to place the needed element,as the attributes’ values.Using move instruction,we can not only change the element’s order,but also modify the parent’s order.For example,the following construction will relocate the block named product.info.review into the container with the name product.info.main,and will place it before the container named product.info.price:Describe how to create a new layout XML file
To create a layout file,you first need to create an XML file with the name layout handle at one of the following paths:/view//layout/.xml or/_/layout/.xml with the contents:1234 xmlversion="1.0"?><pagexmlns:xsi="http://www.w3.org/2001/XMLSchema-instance"xsi:noNamespaceSchemaLocation="urn:magento:framework:View/Layout/etc/page_configuration.xsd"> ...</page>
Describe how to pass variables from layout to block
To pass the variables’ values from layout to block,applyinstruction inside the block.For instance,if we want to pass cache_lifetime:12345 <referenceBlockname="my_block_name"> <arguments> <argumentname="cache_lifetime"xsi:type="string">3600</argument> </arguments></referenceBlock>
How to modify existing layout files
Magento 2 has a number of instructions,allowing to modify layout in nearly any way.But first,we need to find out how to modify a layout for a particular page.This can be done in configuration XML file of the page,using layout attribute of the page root node.For instance,to modify page Advanced Search layout from the default 1-column to 2-column with left bar,place at the following path/Magento_CatalogSearch/layout/catalogsearch_advanced_index.xml a file with the such contents:123 <pagelayout="2columns-left"xmlns:xsi="http://www.w3.org/2001/XMLSchema-instance"xsi:noNamespaceSchemaLocation="urn:magento:framework:View/Layout/etc/page_configuration.xsd">...</page>
3.4 Utilize JavaScript in Magento
Describe different types and uses of JavaScript modules.Which JavaScript modules are suited for which tasks?
Javascript module is a separate*.js file that can import other require.js modules.It has the similar contents:12345 define(['jquery'],function($) returnfunction(...){ ... };});
12345678910 define([ 'jquery', 'Vendor_Module/js/script'],function($,myModule) returnfunction(...){ ... myModule(...); ... };});
Plain modules
Plain module is a common module that is not inherited from others.You will find an example of a plain module above(Vendor_Module/js/script).In the examples below we will use modules that are inherited with jQuery.widget,uiElement.extend functions.This type of modules should be used when instances of the module are not connected to any element.jQuery UI widgets
jQuery UI widget allows to create a custom jQuery UI widget with a custom handler.This type of module should be used when instances of the module are connected to certain elements that are not UI components.Let us examine this case using the following file:vendor/magento/module-multishipping/view/frontend/web/js/payment.js:123456789101112131415161718192021 define([ 'jquery', 'mage/template', 'Magento_Ui/js/modal/alert', 'jquery/ui', 'mage/translate'],function($,mageTemplate,alert){ 'use strict'; $.widget('mage.payment',{ options:{ ... }, _create:function(){ ... }, }); return$.mage.payment;});
UiComponents
UiComponents allow to create a custom widget with a custom handler,inherited from uiElement.This type of module is recommended to use when instances of the module are connected to UI components.Let us examine this case using the following file:vendor/magento/module-catalog/view/frontend/web/js/storage-manager.js:123456789101112131415161718192021222324 define([ 'underscore', 'uiElement', 'mageUtils', 'Magento_Catalog/js/product/storage/storage-service', 'Magento_Customer/js/section-config', 'jquery'],function(_,Element,utils,storage,sectionConfig,$){ 'use strict'; ... returnElement.extend({ defaults:{ ... }, initialize:function(){ ... returnthis; }, });});
Describe UI components.In which situation would you use UiComponent versus a regular JavaScript module?
UI components are realized using XML configuration+PHP modifiers and data providers+HTML knockout templates+JS module,based on uiElement+CSS/LESS/SASS styles.They allow to simplify development and significantly decrease code duplication.Out-of-the-box UI components are heavily used in adminhtml,while at the frontend – only in checkout(the UI components are added into checkout via layout).If JS module is a component inside checkout or in form or grid in adminhtml,then apply UI components.Otherwise,use regular JS module.Describe the use of requirejs-config.js,x-magento-init,and data-mage-init
Requirejs-config.js files(located at the/view//requirejs-config.js and/requirejs-config.js paths)contain the configuration for RequireJS.To pass the configuration to browser,Magento unites all requirejs-config.js files into one.To learn more about the configuration options for RequireJS,follow the link:https:To insert a JS component into a PHTML template,use one of the following variants:- using the data-mage-init attribute
- using the
1234567
1 | <div id="element-id" data-mage-init='{"Vendor_Module/js/myfile":{"parameter":"value"}}'></div> |
1 2 3 4 5 6 7 |
1 2 3 4 5 6 7 8 9 10 | … $('[data-role=swatch-visual-options-container]').sortable({ distance: 8, tolerance: 'pointer', cancel: 'input, button', axis: 'y', .... } }); ... |