 Table of content
Magento 2 Certified Professional JavaScript Developer Guide
Section 5: Checkout
5.1 Demonstrate understanding of checkout architecture
Describe key classes in checkout JavaScript: Actions, models, and views
What are actions, models, and views used for in checkout?
Actions, models and views in checkout implement the MVC pattern and are located in the vendor/magento/module-checkout/view/frontend/web/js folder. They are used to separate data-related logic (Model) from UI-related logic (View) from business logic (Action).How does Magento store checkout data?
Checkout data (Magento_Checkout/js/checkout-data) is stored in Customer data and localStorage. At the checkout initialization, the Magento_Checkout/js/model/quote module is initialized from which you can get the latest data about the quote. Quote contains knockout observables that you can subscribe to in order to receive up-to-date information.What type of classes are used for loading/posting data to the server?
Rest API is used for uploading and sending data to the server. Both actions and models execute fetching.How does a view file update current information?
You need to change the information in two places:- checkoutData (Magento_Checkout / js / checkout-data) so that the data remains after the checkout page reloads.
- quote (Magento_Checkout / js / model / quote) so that the data changes at the current page without reloading.
Demonstrate the ability to use the checkout steps for debugging and customization
How do you add a new checkout step?
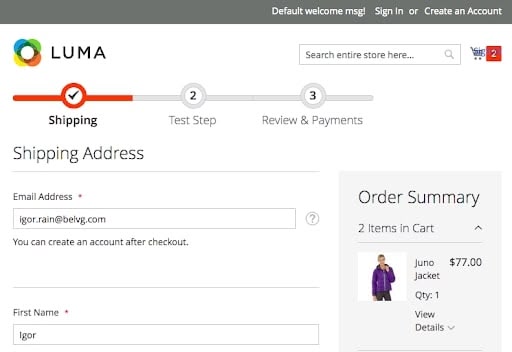
Consider the example of creating a checkout step that contains a text field and a button for going to the next step.Create files for layout, uiComponent and template:- Create the uiComponent file:
1 2 3 4 5 6 7 8 9 10 11 12 13 14 15 16 17 18 19 20 21 22 23 24 25 26 27 28 29 30 31 32 | define( [ 'ko', 'uiComponent', 'underscore', 'Magento_Checkout/js/model/step-navigator' ], function (ko, Component, _, stepNavigator) { return Component.extend({ defaults: { template: 'Rain_Step/step' }, isVisible: ko.observable(true), textField: ko.observable(""), initialize: function () { this._super(); stepNavigator.registerStep('test_step', null,'Test Step', this.isVisible, _.bind(this.navigate, this), 15); return this; }, navigate: function () { }, navigateToNextStep: function () { stepNavigator.next(); } }); } ); |
1 2 3 4 5 6 7 8 9 10 11 12 13 14 15 16 17 18 | <li id="test_step" data-bind="fadeVisible: isVisible"> <div class="step-title" data-bind="i18n: 'Test Step'" data-role="title"></div> <div id="checkout-step-title" class="step-content" data-role="content"> <form data-bind="submit: navigateToNextStep" novalidate="novalidate"> <div> <textarea class="input-text" rows="3" data-bind="{value: textField}"></textarea> </div> <div class="actions-toolbar"> <div class="primary"> <button data-role="opc-continue" type="submit" class="button action continue primary"> <span><!-- ko i18n: 'Next'--><!-- /ko --></span> </button> </div> </div> </form> </div> </li> |
1 2 3 4 5 6 7 8 9 10 11 12 13 14 15 16 17 18 19 20 21 22 23 24 | xml version="1.0"?> <page xmlns:xsi="http://www.w3.org/2001/XMLSchema-instance" layout="1column" xsi:noNamespaceSchemaLocation="urn:magento:framework:View/Layout/etc/page_configuration.xsd"> <body> <referenceBlock name="checkout.root"> <arguments> <argument name="jsLayout" xsi:type="array"> <item name="components" xsi:type="array"> <item name="checkout" xsi:type="array"> <item name="children" xsi:type="array"> <item name="steps" xsi:type="array"> <item name="children" xsi:type="array"> <item name="test_step" xsi:type="array"> <item name="component" xsi:type="string">Rain_Step/js/step</item> </item> </item> </item> </item> </item> </item> </argument> </arguments> </referenceBlock> </body> </page> |
How do you modify the order of steps?
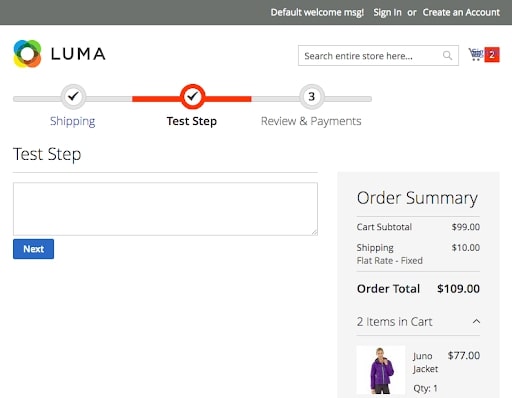
To modify the order of steps, change the sortOrder parameter in the stepNavigator.registerStep method (code, alias, title, isVisible, navigate, sortOrder). If you specify sortOrder <10, then the Test Step will be displayed before the Shipping step.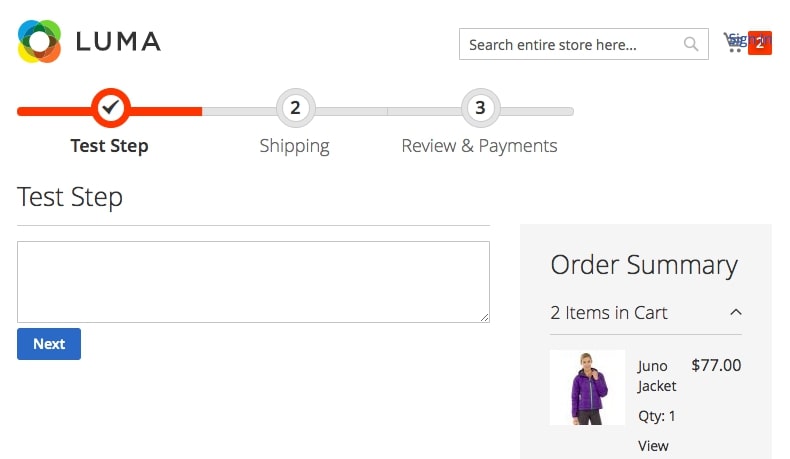 If sortOrder is more than 10 and less than 20, then it will be reflected between the Shipping step and Review & Payments step
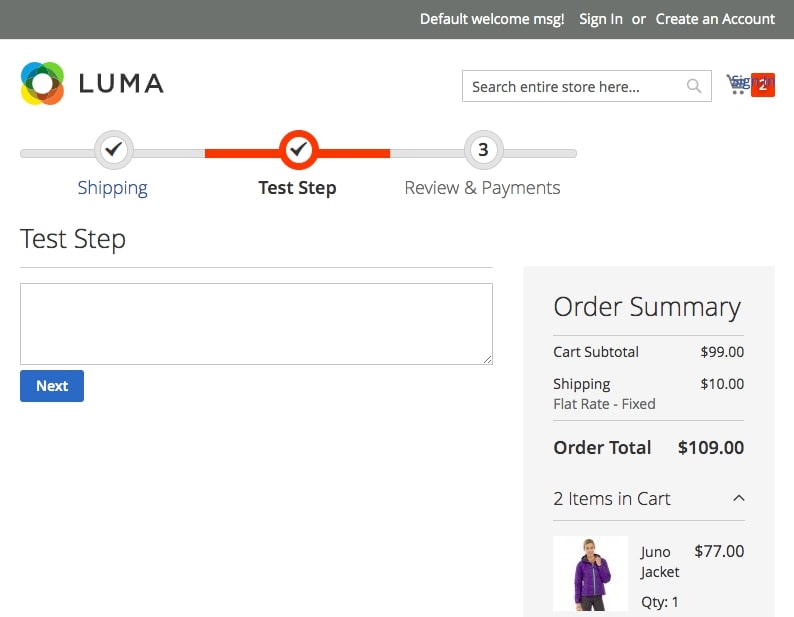 If sortOrder is more than 20, then it will be displayed after the Review & Payments step
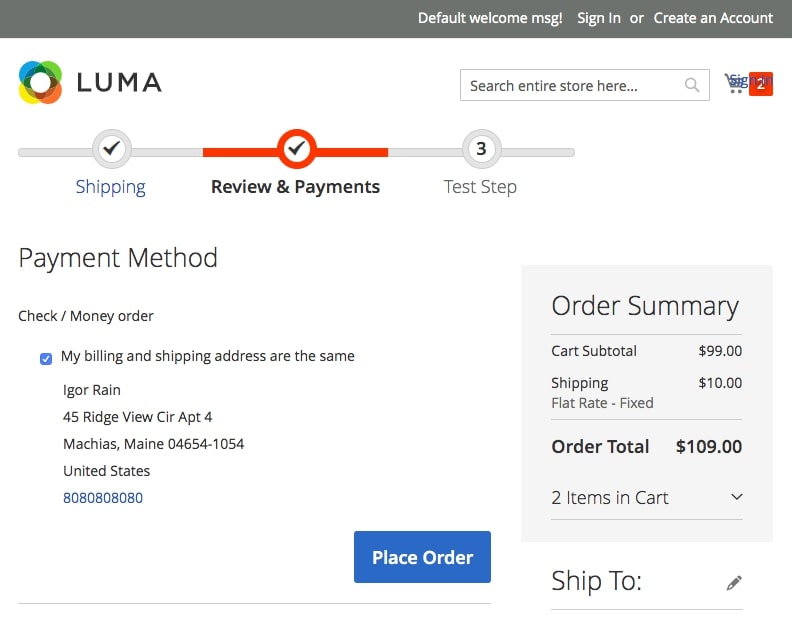 However, the Review & Payments step does not have a Next button, but a Place Order button instead. In order to give the user an opportunity to switch to Test Step from the Review & Payments step, make a modification in the Review & Payments step.
Debug the data flow of each step
To achieve this, open the Network tab in the Chrome Dev Tools and enter “rest” in the search field.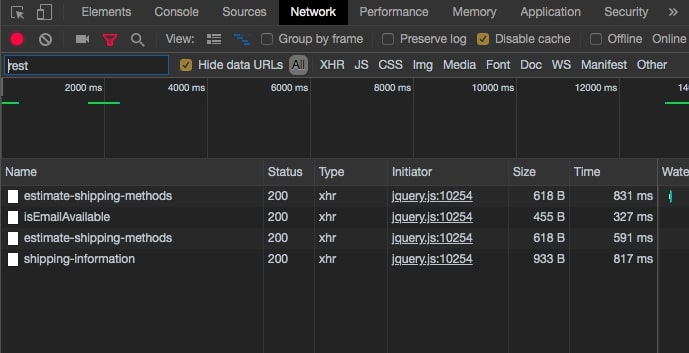 Then, point the cursor at Initiator and expand the call stack of ajax queries.
How do you customize a step’s logic?
You can find the customization instructions at DevDocs.- Add a new checkout step
- Customize the view of an existing step
- Add a custom payment method to checkout
- Add custom validations before order placement
- Add custom shipping carrier validations
- Add custom input mask for ZIP code
- Add a custom template for a form field on Checkout page
- Add a new input form to checkout
- Add a new field in address form
- Add custom shipping address renderer
Customize the shipping step rendering and saving
How does Magento save information about the shipping address for different types of checkout (logged in with default address, without default address, not logged in)?
The information is saved in quote after moving from Shipping to Review & Payments step.In order to save information about the shipping address for different types of checkout, the POST request to REST resource is executed with the shipping_address, billing_address, shipping_method_code, shipping_carrier_code, extension_attributes information:- With default address: /V1/carts/mine/shipping-information
- Without default address: /V1/carts/mine/shipping-information
- Not logged in: /V1/guest-carts/:cartId/shipping-information
How does Magento obtain the list of available shipping methods?
POST request to REST resource is executed after shipping address is changed:- Logged in, for already saved address: /V1/carts/mine/estimate-shipping-methods-by-address-id
- Logged in, for new address: /V1/carts/mine/estimate-shipping-methods
- Not logged in: /V1/guest-carts/:cartId/estimate-shipping-methods
Which events can trigger this process?
In vanilla Magento 2.3 estimate-shipping-methods are called if another shipping address is selected for State/Province, Zip/Postal Code or Country attributes are altered in the current shipping address.How does Magento save a selected address and shipping method?
As it was mentioned above, Magento calls shipping-information after moving from Shipping to Review & Payments step.5.2 Demonstrate understanding of payments
Add new payment method and payment methods renderers
Payment method declaration. Payment.xml file contains method name and type (online or offline) information./app/code/Vendor/Module/etc/payment.xml1 2 3 4 5 6 7 8 9 10 11 12 13 14 | xml version="1.0" ?> <payment xmlns:xsi="http://www.w3.org/2001/XMLSchema-instance" xsi:noNamespaceSchemaLocation="urn:magento:module:Magento_Module:etc/payment.xsd"> <groups> <group id="offline"> <label>Custom Payment Method</label> </group> </groups> <methods> <method name="custom"> <allow_multiple_address>1</allow_multiple_address> </method> </methods> </payment> |
1 2 3 4 5 6 7 8 9 10 11 12 13 14 15 16 | xml version="1.0" ?> <config xmlns:xsi="http://www.w3.org/2001/XMLSchema-instance" xsi:noNamespaceSchemaLocation="urn:magento:module:Magento_Store:etc/config.xsd"> <default> <payment> <custom> <active>1</active> <model>Vendor\Payment\Model\Payment\Custom</model> <order_status>pending</order_status> <title>Custom Payment Method</title> <allowspecific>0</allowspecific> <group>Offline</group> </custom> </payment> </default> </config> |
1 2 3 4 5 6 7 8 9 10 11 12 13 14 15 16 17 18 19 | <?php namespace Vendor\Module\Model\Payment; class Custom extends \Magento\Payment\Model\Method\Cc { public function authorize(\Magento\Payment\Model\InfoInterface $payment, $amount) { //authorize logic } public function capture(\Magento\Payment\Model\InfoInterface $payment, $amount) { //capture logic } public function refund(\Magento\Payment\Model\InfoInterface $payment, $amount) { //refund logic } } |
1 2 3 4 5 6 7 8 9 10 11 12 13 14 15 16 17 18 19 20 21 22 23 24 25 26 27 28 29 30 31 32 33 34 35 36 37 38 39 40 41 42 | xml version="1.0" ?> <page layout="1column" xmlns:xsi="http://www.w3.org/2001/XMLSchema-instance" xsi:noNamespaceSchemaLocation="urn:magento:framework:View/Layout/etc/page_configuration.xsd"> <body> <referenceBlock name="checkout.root"> <arguments> <argument name="jsLayout" xsi:type="array"> <item name="components" xsi:type="array"> <item name="checkout" xsi:type="array"> <item name="children" xsi:type="array"> <item name="steps" xsi:type="array"> <item name="children" xsi:type="array"> <item name="billing-step" xsi:type="array"> <item name="children" xsi:type="array"> <item name="payment" xsi:type="array"> <item name="children" xsi:type="array"> <item name="renders" xsi:type="array"> <item name="children" xsi:type="array"> <item name="custom-payment" xsi:type="array"> <item name="component" xsi:type="string">Vendor_Module/js/view/payment/custom</item> <item name="methods" xsi:type="array"> <item name="custom" xsi:type="array"> <item name="isBillingAddressRequired" xsi:type="boolean">true</item> </item> </item> </item> </item> </item> </item> </item> </item> </item> </item> </item> </item> </item> </item> </argument> </arguments> </referenceBlock> </body> </page> |
1 2 3 4 5 6 7 8 9 10 11 12 13 14 15 16 17 | define( [ 'uiComponent', 'Magento_Checkout/js/model/payment/renderer-list' ], function (Component, rendererList) { 'use strict'; rendererList.push( { type: 'custom', component: 'Vendor_Module/js/view/payment/method-renderer/custom-method' } ); return Component.extend({}); } ); |
1 2 3 4 5 6 7 8 9 10 11 12 13 | define( [ 'Magento_Checkout/js/view/payment/default' ], function (Component) { 'use strict'; return Component.extend({ defaults: { template: 'Vendor_Module/payment/custom' }, }); } ); |
1 2 3 4 5 6 7 8 9 10 11 12 13 14 15 16 17 18 19 20 21 22 23 24 25 26 27 28 29 30 31 32 33 34 35 36 37 38 39 | <div class="payment-method" data-bind="css: {'_active': (getCode() == isChecked())}"> <div class="payment-method-title field choice"> <input type="radio" name="payment[method]" class="radio" data-bind="attr: {'id': getCode()}, value: getCode(), checked: isChecked, click: selectPaymentMethod, visible: isRadioButtonVisible()"/> <label data-bind="attr: {'for': getCode()}" class="label"><span data-bind="text: getTitle()"></span></label> </div> <div class="payment-method-content"> <!-- ko foreach: getRegion('messages') --> <!-- ko template: getTemplate() --><!-- /ko --> <!--/ko--> <div class="payment-method-billing-address"> <!-- ko foreach: $parent.getRegion(getBillingAddressFormName()) --> <!-- ko template: getTemplate() --><!-- /ko --> <!--/ko--> </div> <div class="checkout-agreements-block"> <!-- ko foreach: $parent.getRegion('before-place-order') --> <!-- ko template: getTemplate() --><!-- /ko --> <!--/ko--> </div> <div class="actions-toolbar"> <div class="primary"> <button class="action primary checkout" type="submit" data-bind=" click: placeOrder, attr: {title: $t('Place Order')}, css: {disabled: !isPlaceOrderActionAllowed()}, enable: (getCode() == isChecked()) " disabled> <span data-bind="i18n: 'Place Order'"></span> </button> </div> </div> </div> </div> |
Modify an existing payment method
You can modify an existing payment method using Magento JS mixins to modifying/adding the existing methods. You can also completely replace the model or renderer by changing the jsLayout parameter through layout XML files, or by using the plug-in to \Magento\Checkout\Block\Checkout\LayoutProcessor::process.How does a payment method send its data to the server?
Magento 2 API method rest/default/V1/guest-carts/payment-information or rest/default/V1/carts/mine/payment-information is used to send payment method data to the server. The choice between the two depends on whether the current customer a guest or is logged-in to the store.Example request:1 2 3 4 5 6 7 8 9 10 11 12 13 14 15 16 17 18 19 20 21 22 23 24 25 26 27 28 29 30 31 32 33 34 | { "cartId": "CART_ID", "billingAddress": { "countryId": "CODE", "regionCode": null, "region": null, "customerId": "CUSTOMER_ID", "street": [ "STREET_1", "STREET_2" ], "telephone": "PHONE", "postcode": "POSTCODE", "city": "CITY", "firstname": "FIRSTNAME", "lastname": "LASTNAME", "saveInAddressBook": null }, "paymentMethod": { "method": "PAYMENT_METHOD_CODE", "additional_data": { "cc_cid": "", "cc_ss_start_month": "", "cc_ss_start_year": "", "cc_ss_issue": "", "cc_type": "", "cc_exp_year": "", "cc_exp_month": "", "cc_number": "", "is_active_payment_token_enabler": false, "alias": "" } } } |
What is the correct approach to deal with sensitive data?
Local storage is unsuitable for storing sensitive data, for user browsers can be easily compromised. Server, in its turn, is also not the best choice of sensitive data storage place. Therefore, the most correct approach is to integrate with a payment provider and further application of tokenization to reference a payment.Describe the data flow during order placement
Each available payment method renderer has its own Place Order button realization. Click binding at this button leads to the payment method model, where the method is inherited from Magento_Checkout/js/view/payment/default module./vendor/magento//module-checkout/view/frontend/web/js/view/payment/default.js1 2 3 4 5 6 7 8 9 10 11 12 13 14 15 16 17 18 19 20 21 22 23 24 25 26 27 28 29 | placeOrder: function (data, event) { var self = this; if (event) { event.preventDefault(); } if (this.validate() && additionalValidators.validate()) { this.isPlaceOrderActionAllowed(false); this.getPlaceOrderDeferredObject() .fail( function () { self.isPlaceOrderActionAllowed(true); } ).done( function () { self.afterPlaceOrder(); if (self.redirectAfterPlaceOrder) { redirectOnSuccessAction.execute(); } } ); return true; } return |
1 2 3 4 5 6 7 8 9 10 11 12 13 14 15 16 17 18 19 20 21 22 23 24 | function (quote, urlBuilder, customer, placeOrderService) { 'use strict'; return function (paymentData, messageContainer) { var serviceUrl, payload; payload = { cartId: quote.getQuoteId(), billingAddress: quote.billingAddress(), paymentMethod: paymentData }; if (customer.isLoggedIn()) { serviceUrl = urlBuilder.createUrl('/carts/mine/payment-information', {}); } else { serviceUrl = urlBuilder.createUrl('/guest-carts/:quoteId/payment-information', { quoteId: quote.getQuoteId() }); payload.email = quote.guestEmail; } return placeOrderService(serviceUrl, payload, messageContainer); }; } |
1 2 3 4 5 6 7 8 9 10 11 12 13 14 15 16 17 18 19 20 21 22 23 | define( [ 'mage/storage', 'Magento_Checkout/js/model/error-processor', 'Magento_Checkout/js/model/full-screen-loader' ], function (storage, errorProcessor, fullScreenLoader) { 'use strict'; return function (serviceUrl, payload, messageContainer) { fullScreenLoader.startLoader(); return storage.post( serviceUrl, JSON.stringify(payload) ).fail( function (response) { errorProcessor.process(response, messageContainer); fullScreenLoader.stopLoader(); } ); }; } ); |