 Table of content
Magento 2 Certified Professional Developer Guide
Section 1: Magento Architecture and Customization Techniques
1.1. Describe Magento’s module-based architecture
Magento 2 modules are realized with MVVM architecture: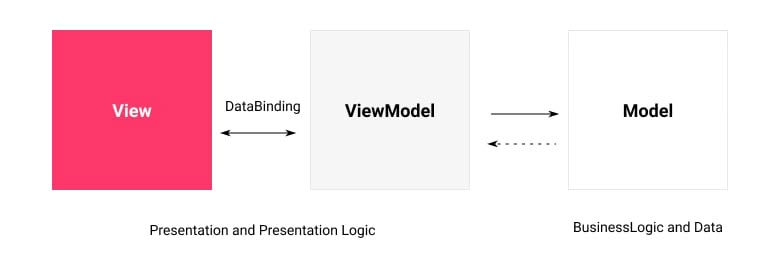 MVVM has three layers:
- Model The Model contains the application’s business logic and depends on an associated class—the ResourceModel – for database access. Models depend on service contracts to disclose their functionality to other application layers.
- View The View is both structure and layout of what is seen on a screen – the actual HTML. This is achieved in the PHTML files distributed with modules. Such files are associated with each ViewModel in the Layout XML files, sometimes referred to as binders. The layout files can as well assign JavaScript files to be used on the final page.
- ViewModel The ViewModel works together with the Model layer and exposes only necessary information to the View layer. In Magento 2, this is handled by the module’s Block classes. Note that this was usually part of the Controller role of an MVC system. On MVVM, the controller is only responsible for handling the user flow, meaning that it receives requests and either tells the system to render a view or to redirect the user to another route.
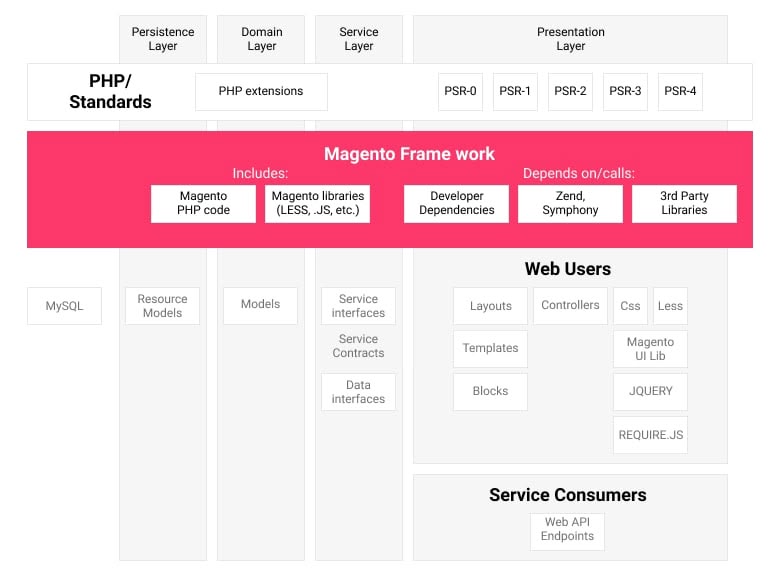 Magento 2 architecture consists of 4 layers:
- Presentation Layer Presentation Layer is the top layer that contains view elements (layouts, blocks, templates) and controllers. Presentation Layer usually calls the service layer using service contracts. But, depending on the implementation, it may cross over with the business logic.
- Service layer Service layer is the layer between presentation and domain layers. It executes service contracts, which are implemented as PHP interfaces. Service contracts allow to add or change the business logic resource model using the dependency injection file (di.xml). The service layer is also used to provide API access (REST / SOAP or other modules). The service interface is declared in the / API namespace of the module. Data (entity) interface is declared inside / Api / Data. Data entities are the structures of data passed to and returned from service interfaces.
- Domain layer The domain layer is responsible for business logic that does not contain information about resources and the database. Also, the domain layer may include the implementation of service contracts. Each data model at the domain layer level depends on the resource model, which is responsible for the database access.
- Persistence layer The persistence layer describes a resource model that is responsible for retrieving and modifying data in a database using CRUD requests. It also implements additional features of business logic, such as data validation and the implementation of database functions.
Describe module limitations
- Certain modules can come in conflict with each other if the dependencies in module.xml (sequence) are specified incorrectly.
- Not all classes can be overridden with modules.
How do different modules interact with each other?
Different modules interact with each other via dependency injection and service contracts. They can also be dependent on other modules when they apply other modules’ logic.What side effects can come from this interaction?
If modules contain di.xml files, such files may sometimes load in the wrong order or try to override the already overridden module functionality. To resolve this situation, use sequence in module.xml. When modules use other modules’ logic and this very module is deleted, the dependencies would be unable to load and an error at the code execution will occur.1.2 Describe Magento’s directory structure
Determine how to locate different types of files in Magento. Where are the files containing JavaScript, HTML, and PHP located?
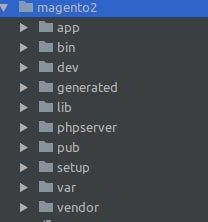 The whole Magento structure can be divided into the following types:
- Magento root structure
- Modules structure
- Themes structure
- app – the directory recommended for Magento components development. It consists of:
- design – contains themes
- code – contains modules
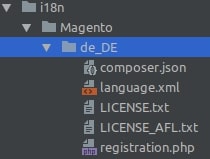
- etc – contains Magento framework settings
- i18n – contains the language package. Example:
- bin – there the executed Magento file is located that allows to manage the website via CLI.
- dev – the directory for Magento test scripts (for more information, follow the link https://devdocs.magento.com/guides/v2.3/mtf/mtf_quickstart.html).
- generated – contains the generated php files (Factories, Proxies, Interceptors, DI configuration).
- lib – used for Magento library files.
- phpserver – contains the router file “router.php” for the php Built-in web server. Allows to use Magento without a third-party web server, like nginx and apache. Here is the example of php Built-in web server launch: php -S 127.0.0.1:8082 -t ./pub/ ./phpserver/router.php
- pub – the directory used to access Magento static files. It contains the following directories:
- errors – stores the error pages,
- media – stores all media files (product, pages, etc.),
- static – stores Magento themes generated files. This directory can be specified as web root in nginx config or in apache config. Numerous Magento directories contain “.htaccess” files (including root and pub), which allow you to configure apache for a specific directory. Nginx does not support .htaccess. For nginx, Magento has a nginx.conf.sample file, which is an example of Magento configuration for nginx. This file can be copied, modified, and include the main nginx configuration file.
- setup – contains Setup Wizard
- update – contains Magento Updater
- var – contains all the temporary files. Consists of:
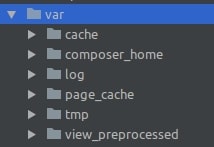
- cache – contains cache files if cache utilizes file system as a storage
- page_cache – contains FPC (Full Page Cache) files, if FPC utilizes file system as a storage
- log – contains Magento logs
- report – contains Magento error/exception files that were not intercepted by code
- session – contains session files
- view_preprocessed – contains style generated files and minified HTML
- vendor – contains the installed composer packages. When Magento is installed via composer or using official site’s archive, then all the standard Magento modules and Magento Framework are located in this folder. In case you install via the official GIT repository, which is recommended only for contributing, then Magento Framework will be located in lib/internal folder, while the default modules – in app/code folder.
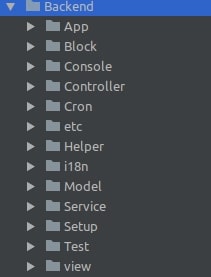 Inside the module directory, the following directories and files are located:
- etc – required directory where the module configuration is stored.
- Block – the directory with php class blocks.
- Model – the directory with models and resource models
- Controller – contains all actions for the module. Controller\
\ is the php classes template for all module actions. For instance, for / / / query the Controller/ / .php file will be requested. - Helper – contains helper classes
- Console – contains php classes for CLI calls via /bin/magento.
- Api – contains API interfaces.
- Observer – contains php files of observer classes.
- i18n – localization files directory
- Setup – php classes directory that executes certain actions during module installation, upgrade, refresh or deletion. From Magento 2.3 version and further, the directory also contains data and schema patches.
- Plugins – the directory, containing plugins for classes and interfaces.
- Ui – contains auxiliary php classes for UI components, like modifies, data providers, etc.
- view – contains templates, CSS, JS, images, layouts, UI components files. The internal structure of this directory consists of and base, with base storing the files that relate to all areas. and base have the similar file structures.
 This is the internal structure of the directories:
- email – contains email templates. For example, order_new.html
- layout – contains layouts xml files. Commonly, the layout name is formed according to this template: {route_id}_{controller}_{action}.xml
- templates – contains phtml templates’ files
- page_layout – contains files, describing Magento page types (1column.xml, 2columns-left.xml, etc,)
- ui_component – contains .xml files with UI components description
- web – contains static files, template files for KnockoutJS, JS, theme files and images. Below is web directory example:
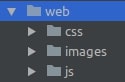 css – contains css stylesimages – contains imagesjs – contains JavaScript filestemplate – contains .html templates for KnockoutJS
n. registration.php – the required file that registers the module in Magento.o. composer.json – contains composer package configuration.Next we will describe the design structure.Magento 2 templates are located in app/design/ and vendor folders. Each Magento 2 theme is connected to a certain area.Themes for admin panel are located at app/design/adminhtml folder, while app/design/frontend contains themes for frontend.
css – contains css stylesimages – contains imagesjs – contains JavaScript filestemplate – contains .html templates for KnockoutJS
n. registration.php – the required file that registers the module in Magento.o. composer.json – contains composer package configuration.Next we will describe the design structure.Magento 2 templates are located in app/design/ and vendor folders. Each Magento 2 theme is connected to a certain area.Themes for admin panel are located at app/design/adminhtml folder, while app/design/frontend contains themes for frontend.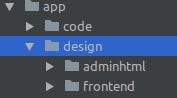 Themes in app/design are located at/
_ – common template for override view module files. For example, BelVG_CustomModule. Inside the directories and files, the structure is similar to view// folder inside the module (for example, app/code/BelVG/CustomModule/view/frontend). - etc – contains theme configuration files.
- media – contains theme media files.
- web – contains theme css/js/fonts files.
- file theme.xml – a mandatory file with the theme configurations, like the name of the theme and its parent.
- requirejs-config.js – contains RequireJS config
- registration.php – a mandatory file that registers a theme in Magento.
- composer.json – contains composer package configuration.
How do you find the files responsible for certain functionality?
To find the files responsible for certain functionality, search among di.xml files (Dependency Injection configuration). Another way is to search in a module or theme layout files, if you need to find certain blocks. The hints, enabled in the store settings (Stores -> Configuration -> Advanced -> Developer), can also prove helpful for this type of search.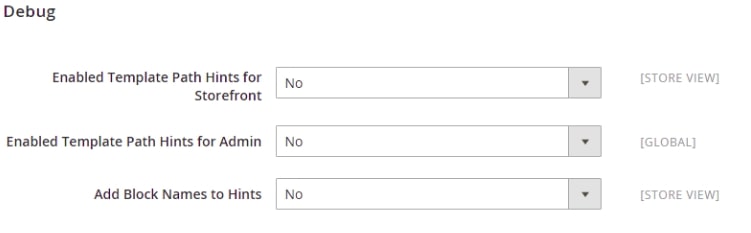 For actions search, use the directories structure, because actions are located at the module directory the following way:
 grep to search files with particular content:grep -r 'String that you are looking' [path/to/search]Example (search files with content “Catalog\Model\ProductRepository” in vendor/magento/module-catalog folder):grep -r 'Catalog\\Model\\ProductRepository' vendor/In case you know the file name, you can use find:find [path/to/search] -name 'FileNameMask'Example (search all webapi.xml files in vendor folder):find vendor/ -name webapi.xmlWhen you know both the filename and its contents:find [path/to/search] -name 'FileNameMask' -exec grep 'String that you are looking' {} +Example (search *.xml files with content “Catalog\Model\ProductRepository” in vendor folder):find vendor/ -name '*.xml' -exec grep 'Catalog\\Model\\ProductRepository' {} +1.3 Utilize configuration XML and variables scope
Determine how to use configuration files in Magento 2. Which configuration files correspond to different features and functionality?
In Magento 2, the configuration is stored at the following locations:- In xml files of modules, themes, languages and app/etc folder.
- In the database in core_config_data table.
- In app/etc/config.php and app/etc/env.php files.
- In the framework variables.
 app/etc/config.php and app/etc/env.php files contain Magento basic configuration (for instance, modules list, scopes, themes, database credentials, cache config, override core_config_data config and other). They are generated at the Magento 2 installation. app/etc/config.php file has shared configuration settings, while app/etc/env.php contains settings that are specific to the installation environment. As of the 2.2 release, the app/etc/config.php file is no longer an entry in the .gitignore file. This was done to facilitate pipeline deployment.Below is the list of xml files inside the module:
- etc/config.xml – contains the default values of the options from Stores > Configuration in admin panel menu, as well as other options, like class names (for instance,
Amazon\Payment\Model\Method\AmazonLoginMethod ) and attributes (for example,). - etc/di.xml and etc//di.xml – contains the configuration for dependency injection
- etc/events.xml and etc//events.xml – the list of the events and observers
- etc//routes.xml – routers’ list.
- etc/acl.xml – adds module resources into the resource tree, allowing to set up access for different users.
- etc/crontab.xml – adds and configures tasks for cron.
- etc/module.xml – declares module name and version, as well as its dependencies from other modules.
- etc/widget.xml – stores widget configuration.
- etc/indexer.xml – declares a new indexation type. There, view_id is specified, which denotes the views described in etc/mview.xml.
- etc/mview.xml – is used to track database changes for a certain entity.
- etc/webapi.xml – stores configurations for WEB API (REST/SOAP).
- etc/view.xml – stores product images’ values.
- etc/product_types.xml – describes product types in a store.
- etc/product_options.xml – describes the types of options that products can have and the classes that render options in the admin.
- etc/extension_attributes.xml – the ability to add custom attribute, introduced in Magento 2 version. The file describes the attribute and its type, which can be simple, or complex, or have the form of an interface.
- etc/catalog_attributes.xml – adds attributes to the groups. quote_item, wishlist_item, catalog_product, catalog_category, unassignable, used_in_autogeneration are the standard groups. To learn more, follow the link: https://www.atwix.com/magento-2/how-to-access-custom-catalog-attributes/
- etc/adminhtml/system.xml – can relate to admin section solely, adds Stores > Configuration settings and describes form sections and fields.
- etc/adminhtml/menu.xml – can relate to admin area solely, adding the menu option in the admin panel.
- System level configurations upload. Loading of the files, necessary for Magento 2 launch (like config.php).
- Global area configurations upload. Loading of the files, located in app/etc/ Magento 2 directory, such as di.xml, as well as files that relate to the global area and are directly located in modules’ etc/ folders.
- Specific areas configurations upload. Loading of the files, located at etc/adminhtml or etc/frontend folders.
- \Magento\Framework\Config\DataInterface – allows to get configuration value and merge two configurations together. \Magento\Framework\Config\Data class realizes this interface and saves the configuration in cache in order to speed up the repeated website upload.
- \Magento\Framework\Config\ScopeInterface – allows to specify and get the current scope.
- \Magento\Framework\Config\FileResolverInterface – runs the config files search, returns the array or iterator. Keys are the absolute paths, the value is their content.
- \Magento\Framework\Config\ReaderInterface – reads configuration data. \Magento\Framework\Config\Reader\Filesystem is the standard reader.
- \Magento\Framework\Config\ConverterInterface – converts Merged DOM object into the array.
- \Magento\Framework\Config\SchemaLocatorInterface – specifies the path to validation schemes.
- \Magento\Framework\Config\ValidationStateInterface – defines whether DOM validation with schema is needed.
- XML file
- XSD schema
- Config PHP file
- Config reader
- Schema locator
- Converter
- XML file
- XSD schema
- Converter
- We begin with XSD file creation. Before the merger, Magento_Catalog uses product_types.xsd validation scheme and product_types_merged.xsd scheme for the merged XML file.
- Create the configuration PHP file for access to the file data; in our case, it will be Config.php. To provide access to the product_types.xml file data, it implements the Magento\Catalog\Model\ProductType\ConfigInterface interface and realizes all its methods.
- We should get reader class in Config.php in the constructor. In our case, it’s Magento\Catalog\Model\ProductType\Config\Reader. This is a small class with a certain $_idAttributes attribute. In $fileName variable at the constructor we define the XML file name.
- Magento\Catalog\Model\ProductType\Config\SchemaLocator implements two methods: getSchema and getPerFileSchema return the path to merged XSD and common XSD files. In the constructor, we define these paths in $_schema and $_perFileSchema attributes.
- Convertor class creation. In our case: Magento\Catalog\Model\ProductType\Config\Converter it implements \Magento\Framework\Config\ConverterInterface and realizes convert method that converts the merged DOM tree of nodes into the array.
1.4 Demonstrate how to use dependency injection
Describe Magento’s dependency injection approach and architecture. How are objects realized in Magento?
Dependency Injection is a design pattern based on the inversion of control principle. This pattern centers around relations between the objects and its dependencies. Instead of creating dependencies manually, all the necessary dependencies are passed into the object with the help of external container. This approach allows to avoid strong components coupling, for the object is not required to create custom dependencies. The dependencies container, in its turn, determines which implementations should be passed to the objects at their creation, depending on the necessary behavior or configuration.Dependency inversion principle claims that high-level classes should use low level objects’ abstractions instead of working with them directly.Object Manager
Magento 2 applies dependency injection for the functionality, which was offered by Mage class in Magento 1.1 2 3 4 5 6 7 8 9 10 11 | namespace Magento\Backend\Model\Menu; class Builder { public function __construct( Magento\Backend\Model\Menu\ItemFactory $menuItemFactory, Magento\Backend\Model\Menu $menu ) { $this->_itemFactory = $menuItemFactory; $this->_menu = $menu; } } |
- Objects’ creation in factories and proxys
- Return of one and the same object instance at the continuous requests*
- Selection of the suitable implementation at the interface query
- Automatic class creation depending on constructor arguments.
Why is it important to have a centralized process creating object instances?
A centralized process creating object instances decreases code coherency and lowers the incompatibility risk in case the object realization changes.Identify how to use DI configuration files for customizing Magento
Each module can have a global and an area-specific di.xml file. Area-specific di.xml files are recommended to be applied for dependencies configuration for presentation layer, while global file – for all the rest.How can you override a native class, inject your class into another object, and use other techniques available in di.xml (such as virtualTypes)?
Abstraction-implementation mappings and class rewrites
Abstraction-implementation mappings and class rewrites are applied in case the constructor requests the object by its interface. ObjectManager utilizes this configuration to resolve which implementation should be used for the current area.1 2 3 | <config> <preference for="Magento\Core\Model\UrlInterface" type="Magento\Core\Model\Url" /> </config> |
1 2 3 | <config> <preference for="Magento\Core\Model\Url" type="Vendor\Module\Model\NewUrl" /> </config> |
Virtual Types
Virtual Type allows to modify any dependencies arguments and therefore modify class behavior without changing the operation of other classes that depend on the original.1 2 3 4 5 6 7 | <config xmlns:xsi="http://www.w3.org/2001/XMLSchema-instance" xsi:noNamespaceSchemaLocation="urn:magento:framework:ObjectManager/etc/config.xsd"> <virtualType name="moduleConfig" type="Magento\Core\Model\Config"> <arguments> <argument name="type" xsi:type="string">system</argument> </arguments> </virtualType> </config> |
Dependencies compilation
bin/magento setup:di:compileMagento 2 applies a specific utilita for compiling dependencies of all classes. The utilita creates a file that contains the dependencies of all objects for ObjectManager, based on constructor arguments with the help of php reflection features. Such service classes as factories, proxies and plugins, are generated as well.1.5 Demonstrate ability to use plugins
Demonstrate how to design complex solutions using the plugin’s life cycle. How do multiple plugins interact, and how can their execution order be controlled?
Magento 2 Plugin (Interceptor) is the class that allows to alter the behavior of other classes by calling the custom mode before, after or instead of conflict method call, allowing to minimize the probability of conflicts between various pieces of code that concern the same functionality.Plugin Configuration
1 2 3 4 5 | <config xmlns:xsi="http://www.w3.org/2001/XMLSchema-instance" xsi:noNamespaceSchemaLocation="urn:magento:framework:ObjectManager/etc/config.xsd"> <type name="{ObservedType}"> <plugin name="{PluginName}" type="{PluginClassName}" sortOrder="1" disabled="false"/> </type> </config> |
Plugin Methods
Before Methods
Before methods allow to modify target class method arguments before the method is called.Namespace Vendor\Module\Plugin;1 2 3 4 5 6 7 | class Plugin { public function beforeMethodName(\Vendor\Module\Model\TargetClass $subject, $arg1, $arg2, $arg3 = null) { return [$arg1, $arg2, $arg3]; } } |
1 2 3 4 | public function beforeMyMethod($subject, ...$args) { return $args; } |
After Methods
After methods allow to modify the result of the target method.Namespace Vendor\Module\Plugin;1 2 3 4 5 6 7 | class Plugin { public function afterMethodName(\Vendor\Module\Model\TargetClass $subject, $result) { return $result; } } |
Around Methods
Namespace Vendor\Module\Plugin;1 2 3 4 5 6 7 8 | class Plugin { public function aroundMethodName(\Vendor\Module\Model\TargetClass $subject, callable $proceed, $arg1, $arg2, $arg3) { $result = $proceed($arg1, $arg2, $arg3); return $result; } } |
Plugin Sorting
Plugin sortOrder parameter allows to identify what the order plugin methods will be called in case multiple plugins are observing the same method.| Plugin1 | Plugin2 | Plugin3 | |
| sort order | 10 | 20 | 30 |
| before | beforeMethod() | beforeMethod() | beforeMethod() |
| around | aroundMethod() | aroundMethod() | |
| after | afterMethod() | afterMethod() | afterMethod() |
- Plugin1::beforeMethod()
- Plugin2::beforeMethod()
- Plugin2::aroundMethod() (Magento calls the first half until callable)
- Plugin3::beforeMethod()
- Plugin3::aroundMethod() (Magento calls the first half until callable)
- TargetClass::method()
- Plugin3::aroundMethod() (Magento calls the second half after callable)
- Plugin3::afterMethod()
- Plugin2::aroundMethod() (Magento calls the second half after callable)
- Plugin1::afterMethod()
- Plugin2::afterMethod()
How do you debug a plugin if it doesn’t work? Identify strengths and weaknesses of plugins
Magento 2 generates an Interceptor class for each class that has plugins. This class inherits the original plugins and contains the code that calls the plugins in the assigned order. Therefore, any plugin debug can be started with the Interceptor class.Plugins enable to modify the application behavior without the need to modify or substitute the original classes, which allows to flexibly impact the application flow.On the other hand, application of plugins, around methods in particular, complicates code readability and increases stack trace, as well as the non-functioning application, if the plugins are applied without due accuracy. If you do not call $proceed() in around plugin, the plugins whose sortOrder is larger than the current plugin will not be called. The original method will not be called as well.What are the limitations of using plugins for customization? In which cases should plugins be avoided?
Compared to Magento 1, class rewrites plugins do not inherit the target class, allowing several plugins that modify one and the same method to have no conflicts with each other. However, due to the same reasons, plugins have certain limitations.Plugins can not be used with:- Final methods and classes
- Protected/private methods
- Static methods
- __construct methods
- Virtual types
- Objects that are instantiated before Magento\Framework\Interception is bootstrapped
- Objects that were initialized not with ObjectManager
1.6 Configure event observers and scheduled jobs
Events are commonly used in applications to handle external actions or input. Each action is interpreted as an event.Events are part of the Event-Observer pattern. This design pattern is characterized by objects (subjects) and their list of dependents (observers). It is a very common programming concept that works well to decouple the observed code from the observers. Observer is the class that implements Magento\Framework\Event\ObserverInterface interface.According to https://devdocs.magento.com/guides/v2.3/coding-standards/technical-guidelines.html:All values (including objects) passed to an event MUST NOT be modified in the event observer. Instead, plugins SHOULD BE used for modifying the input or output of a function.Therefore, if there is a need to modify the input data, use plugins instead of events.Demonstrate how to configure observers. How do you make your observer only be active on the frontend or backend?
In Magento 2 there is a special event manager class – Magento\Framework\Event\Manager that fires events. This class can be obtained through dependency injection by defining the dependency in your constructor.Look for the mentioned notes in the code Magento 2:$this->eventManager->dispatch(‘event_name’, ['myEventData' => $event_arguments]);Event Observers in Magento 2 can be configured in a separate file events.xml. It should be created in 1 2 3 4 5 6 | xml version="1.0" encoding="UTF-8"?> <config xmlns:xsi="http://www.w3.org/2001/XMLSchema-instance" xsi:noNamespaceSchemaLocation="urn:magento:framework:Event/etc/events.xsd"> <event name="my_module_event"> <observer name="observer_name" instance="Namespace\Modulename\Observer\MyObserver" /> </event> </config> |
$observer->getEvent()), which contains the event’s parameters.1 2 3 4 5 6 7 8 9 10 11 12 13 14 15 | namespace Namespace\Modulename\Observer; use Magento\Framework\Event\ObserverInterface; use Magento\Framework\Event\Observer; class MyObserver implements ObserverInterface { public function __construct() { //You can use dependency injection } public function execute(Observer $observer) { ... } } |
Demonstrate how to configure a scheduled job
To demonstrate how to configure a scheduled job, we create in the module a crontab.xml file with the similar content:1 2 3 4 5 6 7 8 9 10 | xml version="1.0" encoding="UTF-8"?> <config xmlns:xsi="http://www.w3.org/2001/XMLSchema-instance" xsi:noNamespaceSchemaLocation="urn:magento:module:Magento_Cron:etc/crontab.xsd"> <group id="default"> <job name="my_module_cron_job" instance="Vendor\Module\Model\Cron" method="run"> <!-- Use schedule or config_path, not both --> <schedule>0 * * * *</schedule> <config_path>my_module/my_group/my_setting</config_path> </job> </group> </config> |
1 2 3 4 5 6 7 8 9 10 11 12 | xml version="1.0" encoding="UTF-8"?> <config xmlns:xsi="http://www.w3.org/2001/XMLSchema-instance" xsi:noNamespaceSchemaLocation="urn:magento:module:Magento_Cron:etc/cron_groups.xsd"> <group id="default"> <schedule_generate_every>15</schedule_generate_every> <schedule_ahead_for>20</schedule_ahead_for> <schedule_lifetime>15</schedule_lifetime> <history_cleanup_every>10</history_cleanup_every> <history_success_lifetime>60</history_success_lifetime> <history_failure_lifetime>4320</history_failure_lifetime> <use_separate_process>0</use_separate_process> </group> </config> |
Which parameters are used in configuration, and how can configuration interact with server configuration?
Magento 2 stores database configuration in core_config_data table. This configuration can be overridden:- In app/etc/config.php file
- In app/etc/env.php file
- In the area variables
Identify the function and proper use of automatically available events, for example *_load_after, etc.
In Magento1 we can use of automatically available events. For example:1 2 3 4 5 6 7 8 9 10 11 12 13 | protected function _beforeSave() { ... Mage::dispatchEvent($this->_eventPrefix.'_save_before', $this->_getEventData()); ... } protected function _getEventData() { return array( 'data_object' => $this, $this->_eventObject => $this, ); } |
1 2 3 4 5 6 | public function beforeSave() { ... $this->_eventManager->dispatch($this->_eventPrefix . '_save_before', $this->_getEventData()); …. } |
1.7 Utilize the CLI
Describe the usage of bin/magento commands in the development cycle. Which commands are available? How are commands used in the development cycle?
Magento 2 allows to execute numerous operations using command line interface. It also contains a large number of commands that allow to flush the cache, change deployment mode or reindex the necessary index quickly. To apply the following commands, you should:- Login into your Magento 2 server via SSH as Magento file system owner
$ ssh magento_user@server.com- Change directory to Magento 2 installation directory
$ cd /var/www/magento/Afterward, we can use Magento CLI the following way:$ bin/magento COMMANDFor example, list command will put out a list of available actions:$ bin/magento listDemonstrate an ability to create a deployment process
A standard Magento 2 deployment process includes the following steps and commands:- Enable maintenance mode –
$ bin/magento maintenance:enable - Perform database migrations –
$ bin/magento setup:upgrade - Compile necessary code –
$ bin/magento setup:di:compile - Publish static files –
$ bin/magento setup:static-content:deploy - Disable maintenance mode –
$ bin/magento maintenance:disable
How does the application behave in different deployment modes, and how do these behaviors impact the deployment approach for PHP code, frontend assets, etc.?
Magento 2 can operate in three possible modes:- Default – is enabled by default. It is aimed for neither development nor production use. This is an average mode between developer and production modes.
- At the request, static files are copied into pub/static directory and afterwards are put out from it.
- Exceptions are not put out at the screen and not recorded in log files
- Enabled automatic code compilation
- X-Magento-* HTTP response headers are hidden.
- Developer – the mode for development. Static files are generated on demand. The mode also increases the amount of debug information. Static files caching is also disabled and static files are put out with symlinks.
- Exception and backtraces are put out at the screen
- Automatic code compilation is enabled
- X-Magento-* HTTP response headers are enabled
- XML schema validation is enabled
- Slow application operation due to automatic code compilation on the fly.
- Production – is applied for working in production environment. Only in this mode, the maximum operation speed is available due to the required static files generation during the deployment, not at the request, like in other modes.
- Exceptions are recorded only in log files and not put out at the screen
- Static files are put out from cache (the files are generated in advance with
$ php bin/magento setup:static-content:deploy command) - Automatic code compilation is disabled (it is executed in advance with
$ php bin/magento setup:di:compile command) - X-Magento-* HTTP response headers are hidden.
$ bin/magento deploy:mode:showChanging Deployment Mode
To change the current deployment mode, enter the command:$ bin/magento deploy:mode:set {mode} [-s|--skip-compilation]where:- {mode} is the required mode (default, developer or production)
- –skip-compilation – is an optional parameter that allows to skip code compilation after the deployment mode is changed.
1.8 Demonstrate the ability to manage the cache
Describe cache types and the tools used to manage caches. How do you add dynamic content to pages served from the full page cache?
Magento stores several cache types to prevent repeated data calculation or loading:- config – Various XML configurations that were collected across modules and merged
- layout – Layout building instructions
- block_html – Page blocks HTML
- collections – Collection data files
- reflection – API interfaces reflection data
- db_ddl – Results of DDL queries, such as index list, foreing keys, columns
- compiled_config – Compilation configuration. It is used for caching by Magento\Framework\Interception\PluginList\PluginList class and works with the compiled di configuration only (generated/metadata/.php).
- eav – Entity types declaration cache. Stores information about entity types and their attributes.
- customer_notification – Customer Notification. At the moment, it is applied to provide the customer with updated session.
- config_integration – stores information about php interfaces
- config_integration_api – stores the information about integrations (deprecated)
- full_page – stores full html code of the pages with http headings
- config_webservice – REST and SOAP configurations, generated WSDL file
- translate – applied for data caching for Magento 2 Translate library
1 2 3 4 | <referenceContainer name="content"> <block class="Magento\Checkout\Block\Onepage\Success" name="checkout.success" template="success.phtml" cacheable="false"/> <block class="Magento\Checkout\Block\Registration" name="checkout.registration" template="registration.phtml" cacheable="false"/> </referenceContainer> |
- Public. Public content is stored server side in your reverse proxy cache storage (e.g., file system, database, Redis, or Varnish) and is available to multiple customers. Examples of public content include header, footer, and category listing.
- Private. Private content is stored client side (e.g., browser) and is specific to an individual customer. Examples of private content include shopping cart, message and customer. The data is loaded from the server and saved to localStorage of user’s browser. In case the sections are invalidateв, they are loaded from the server repeatedly. This is realized by customer data JS module.
1 2 3 4 5 6 7 8 9 10 | <li class="greet welcome" data-bind="scope: 'customer'"> <!-- ko if: customer().fullname --> <span class="logged-in" data-bind="text: new String(' $block->escapeHtml(__('Welcome, %1!', '%1')) ?>').replace('%1', customer().fullname)"> </span> <!-- /ko --> <!-- ko ifnot: customer().fullname --> <span class="not-logged-in" data-bind='html:" $block->escapeHtml($welcomeMessage) ?>"'></span> $block->getBlockHtml('header.additional') ?> <!-- /ko --> </li> |
Describe how to operate with cache clearing. How would you clean the cache?
There are three ways to clean the cache:- From Admin
- Use bin/magento CLI
bin/magento cache:cleanbin/magento cache:flushExecute thebin/magento setup:config:set --http-cache-hosts=SOME_HOST1,SOME_HOST2:PORT2command beforehand in order to enable cache clearing in varnish. In this command, SOME_HOST1,SOME_HOST2:PORT2 are the addresses of varnish services, divided by a comma.
- Clean manually
- File cache: “rm -rf var/cache/*”, “rm -rf var/page_cache/*”
- Redis: “redis-cli flushall”
- Restart services (Varnish, Redis)
In which case would you refresh cache/flush cache storage?
When you clean cache, you do it by tags, and if in cache item is not associated with cache type tag, it will never be removed from storage.When you flush cache, you remove all cache records in storage. Sometimes it’s more preferred than clean cache.Describe how to clear the cache programmatically
To clean cache for specific model object, you can use:\Magento\Framework\Event\ManagerInterface->dispatch(‘clean_cache_by_tags’, [‘object’ => $model]);To clean entire cache type, you can use:\Magento\Framework\App\Cache\TypeListInterface->cleanType($typeCode)To invalidate entire cache type, you can use:\Magento\Framework\App\Cache\TypeListInterface->invalidate($typeCode)The cache tags are generated at block level, with each block class implementing the IdentityInterface which means they must implement a getIdentities method, which must return a unique identifier. For example:1 2 3 4 5 6 7 8 9 10 11 12 13 14 15 | ... namespace Magento\Cms\Block; ... use Magento\Framework\View\Element\AbstractBlock; use Magento\Framework\DataObject\IdentityInterface; ... class Page extends AbstractBlock implements IdentityInterface { ... public function getIdentities() { return [\Magento\Cms\Model\Page::CACHE_TAG . '_' . $this->getPage()->getId()]; } ... } |
What mechanisms are available for clearing all or part of the cache?
You can clean cache from admin panel. System->Cache Management In this page you can clean/enable/disable cache by cache types or full cache. Also you can clean cache from console:
bin/magento cache:clean – clean cache,bin/magento cache:clean – clean cache only for bin/magento cache:status – you could see statuses and types of cachebin/magento cache:enable – enable cachebin/magento cache:flush – flush cache