 Table of content
Magento 2 Certified Professional Developer Guide
Section 10: Customer Management
10.1 Demonstrate ability to customize My Account
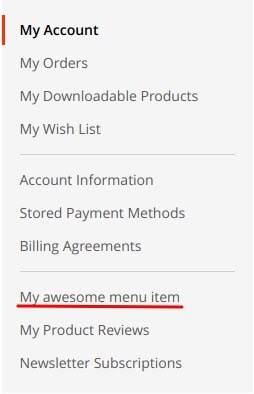
Magento_Customer module is responsible for the user account functioning. If you need to modify in some way the user account (for instance, add new elements, delete the existing ones or change the position of blocks), you need to modify the Magento_Customer module components. We can do this using the modules or our own theme. For the sake of clarity, we will demonstrate everything that we describe on our custom theme; the procedures will be similar for modules as well. We will use the side menu modification in the user account as an example.Describe how to customize the “My Account” section. How do you add a menu item?
In order to modify the side menu, we need to modify the customer_account_navigation block from customer_account.xml layout-file. For this, we need to create a customer_account.xml file and place it in our theme at the following path: Magento_Customer/layout/. Adding instructions in this file, we can add or delete new menu item, and change their position. To add a new menu item, add the following instruction into customer_account.xml file:1 2 3 4 5 6 7 8 9 | <referenceBlock name="customer_account_navigation"> <block class="Magento\Customer\Block\Account\SortLinkInterface" name="customer-account-navigation-address-link"> <arguments> <argument name="label" xsi:type="string" translate="true">My awesome menu item</argument> <argument name="path" xsi:type="string">path/i/need</argument> <argument name="sortOrder" xsi:type="number">100</argument> </arguments> </block> </referenceBlock> |
 To delete the existing menu item, apply the following instruction:
1 2 3 4 5 | <referenceBlock name="customer-account-navigation-wish-list-link"> <arguments> <argument name="sortOrder" xsi:type="number">500</argument> </arguments> </referenceBlock> |
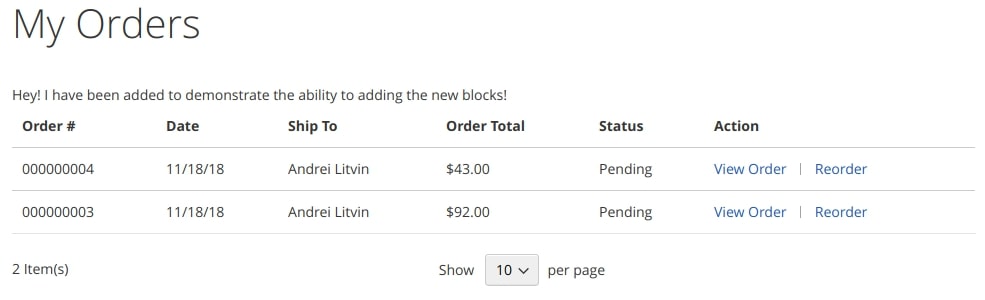
How would you customize the “Order History” page?
To customize My Orders page, modify the layout-file sales_order_history.xml of the Magento_Sales module. For this, create a sales_order_history.xml file and place it in our theme at the following path: Magento_Sales/layout/. Then, apply any instructions, provided in Magento 2 for layout customization. For example, let us add a text block before the orders list:1 2 3 4 5 6 7 | <referenceContainer name="sales.order.history.info"> <block class="Magento\Framework\View\Element\Text" name="my_text"> <arguments> <argument name="text" xsi:type="string">Hey! I have been added to demonstrate the ability to adding the new blocks!</argument> </arguments> </block> </referenceContainer> |
 To modify the order table contents (for example, add a new column), we need to override the vendor/magento/module-sales/view/frontend/templates/order/history.phtml template.
10.2 Demonstrate ability to customize customer functionality
Describe how to add or modify customer attributes
To create a new customer attribute, use setup scripts. This is the example of customer attribute creation:1 2 3 4 5 6 7 8 9 10 11 12 13 14 15 16 17 18 19 20 21 22 23 24 25 26 27 28 29 30 31 32 33 34 35 36 37 | ... class InstallData implements \Magento\Framework\Setup\InstallDataInterface { private $customerSetupFactory; private $attributeSetFactory; public function __construct( \Magento\Customer\Setup\CustomerSetupFactory $customerSetupFactory, \Magento\Eav\Model\Entity\Attribute\SetFactory $attributeSetFactory ) { $this->customerSetupFactory = $customerSetupFactory; $this->attributeSetFactory = $attributeSetFactory; } public function install( \Magento\Framework\Setup\ModuleDataSetupInterface $setup, \Magento\Framework\Setup\ModuleContextInterface $context ) { $installer = $setup; $installer->startSetup(); $customerSetup = $this->customerSetupFactory->create(['setup' => $setup]); $customerSetup->addAttribute(\Magento\Customer\Model\Customer::ENTITY, 'new_attribute', [ 'type' => 'varchar', 'label' => 'new attribute', 'input' => 'text', 'required' => false, 'visible' => true, 'user_defined' => true, 'system' => false, 'used_in_forms' => [ 'adminhtml_customer', 'adminhtml_checkout', 'checkout_register', 'customer_account_create', 'customer_account_edit', ] ]); } ... |
1 2 | $customerSetup = $this->customerSetupFactory->create(['setup' => $setup]); $customerSetup->updateAttribute(\Magento\Customer\Model\Customer::ENTITY, 'new_attribute', 'visible', false); |
1 2 3 4 5 6 | $customerSetup = $this->customerSetupFactory->create(['setup' => $setup]); $attribute = $customerSetup->getEavConfig()->getAttribute( \Magento\Customer\Model\Customer::ENTITY, 'new_attribute') ->setData('used_in_forms', ['adminhtml_customer']); $attribute->save(); |
Describe how to extend the customer entity. How would you extend the customer entity using the extension attributes mechanism?
Module developers can not modify API Data interfaces, described in core Magento 2, but the majority of the modules have the extension attributes mechanism. Extension attributes are set and stored separately from the data object of the initial class, so everything, connected with data storage and extraction, must be realized by the developer himself.To create extension attribute, declare it in the etc/extension_attribute.xml file of the module:1 2 3 4 5 | <config xmlns:xsi="http://www.w3.org/2001/XMLSchema-instance" xsi:noNamespaceSchemaLocation="urn:magento:framework:Api/etc/extension_attributes.xsd"> <extension_attributes for="Magento\Customer\Api\Data\CustomerInterface"> <attribute code="new_attribute" type="string" /> </extension_attributes> </config> |
1 2 3 4 5 6 7 | xml version="1.0" encoding="utf-8" ?> <config xmlns:xsi="http://www.w3.org/2001/XMLSchema-instance" xsi:noNamespaceSchemaLocation="urn:magento:framework:Api/etc/extension_attributes.xsd"> <extension_attributes for="Magento\Customer\Api\Data\CustomerInterface"> <attribute code="ext_customer_attribute" type="string" /> </extension_attributes> </config> |
1 2 3 4 5 6 | xml version="1.0"?> <config xmlns:xsi="http://www.w3.org/2001/XMLSchema-instance" xsi:noNamespaceSchemaLocation="urn:magento:framework:ObjectManager/etc/config.xsd"> <type name="Magento\Customer\Api\CustomerRepositoryInterface"> <plugin name="extensionAttributeExtCustomerAttribute" type="Belvg\CustomExtAttribute\Model\Plugin\CustomerRepository" /> </type> </config> |
1 2 3 4 5 6 7 8 9 10 11 12 13 14 15 16 17 18 19 20 21 22 23 24 25 26 | <?php namespace Belvg\CustomExtAttribute\Model\Plugin\CustomerRepository; ... class CustomerRepository { … public function afterGet(CustomerRepositoryInterface $subject, CustomerInterface $result) { $extensionAttributes = $this->getExtensionAttributes($result); //custom logic $extCustomerAttribute = $this->customGetExtCustomerAttribute(); $extensionAttributes->setExtCustomerAttribute($extCustomerAttribute) return $result; } public function aroundSave( CustomerRepositoryInterface $subject, callable $proceed, CustomerInterface $customer, $passwordHash = null ) { $extCustomerAttribute = $customer->getExtensionAttributes()->getExtCustomerAttribute(); $result = $proceed($customer, $passwordHash); $this->customSetExtCustomerAttribute($extCustomerAttribute); return $result; } |
Describe how to customize the customer address. How would you add another field into the customer address?
Magento has a standard set of attributes for the address, stored in customer_address_entity table. Other attributes of the address need to be added as EAV attributes. They will work via Custom Attributes.To add new fields into customer address, create an EAV attribute using \Magento\Customer\Setup\CustomerSetupFactory.1 2 3 4 5 6 7 8 9 10 11 12 13 14 15 16 17 18 19 20 21 22 23 24 25 26 27 28 29 30 31 32 33 | $customerSetup->addAttribute(\Magento\Customer\Api\AddressMetadataInterface::ENTITY_TYPE_ADDRESS, 'custom_address_attribute', [ 'type' => 'varchar', 'label' => 'Custom address attribute', 'input' => 'text', 'required' => false, 'visible' => true, 'user_defined' => true, 'sort_order' => 100, 'position' => 100, 'system' => 0, ]); $customerEntity = $customerSetup->getEavConfig()->getEntityType(\Magento\Customer\Api\AddressMetadataInterface::ENTITY_TYPE_ADDRESS); $attributeSetId = $customerEntity->getDefaultAttributeSetId(); $attributeSet = $this->attributeSetFactory->create(); $attributeGroupId = $attributeSet->getDefaultGroupId($attributeSetId); $attribute = $customerSetup->getEavConfig()->getAttribute(\Magento\Customer\Api\AddressMetadataInterface::ENTITY_TYPE_ADDRESS, 'district'); $attribute->addData([ 'attribute_set_id' => $attributeSetId, 'attribute_group_id' => $attributeGroupId, 'used_in_forms' => [ 'adminhtml_customer_address', 'customer_address_edit', 'customer_register_address', ] ] ); $attribute->save(); |
Describe customer groups and their role in different business processes. What is the role of customer groups? What functionality do they affect?
User groups allow to modify taxes and discounts, create separate price rules for different product groups, as well as separate their rights at the store side. Different product groups have different cache for blocks.There are the following default user groups:- NOT LOGGED IN
- General
- Wholesale
- Retailer
Describe Magento functionality related to VAT. How do you customize VAT functionality?
Magento is a built-in functionality for working with VAT. VAT depends on seller’s country and buyer’s address. When a downloadable product is purchased, VAT depends solely on the delivery destination. To configure VAT, you can navigate to the following path:Stores > Configuration > General > General > Store InformationVAT Number – this is where you set the seller’s VAT number.Customers > All Customers > Edit CustomerAccount Information > Tax/VAT Number – if set, then VAT will be calculated based on the given field.Addresses > VAT Number – if selected, VAT will be calculated with VAT taken into account.Configure > Customers > Customer ConfigurationShow VAT Number on Storefront – allows a customer to set VAT Number when the account is created or edited.Default Value for Disable Automatic Group Changes Based on VAT ID – when selected, it automatically changes the user group after the VAT Number is validated.The parameters you see at the screenshot below are responsible for group selection after the validation, if the “Default Value for Disable Automatic Group Changes Based on VAT ID” parameter is active.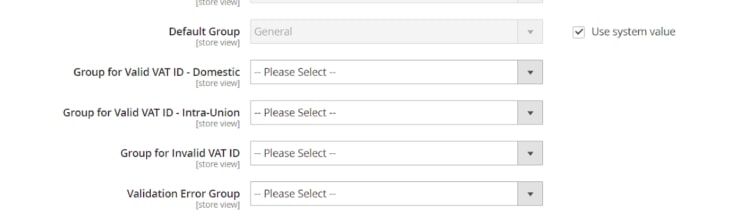 For the correct functioning of VAT in Magento, set the user groups and create the rules and rates for TAX.Tax can be applied separately to products and users with Product Tax Classes and Customer Tax Classes (Stores > Tax Rules); you can also create taxes for certain areas with Tax Zones and Rates( Stores > Tax Zones and Rates).To modify Tax, apply sales_quote_collect_totals_before event that calculates the order’s total cost.