7.1 Demonstrate ability to use products and product types
Identify/describe standard product types (simple, configurable, bundled, etc.). How would you obtain a product of a specific type?
In the out-of-the-box Magento 2 Community Edition, there are six product types:
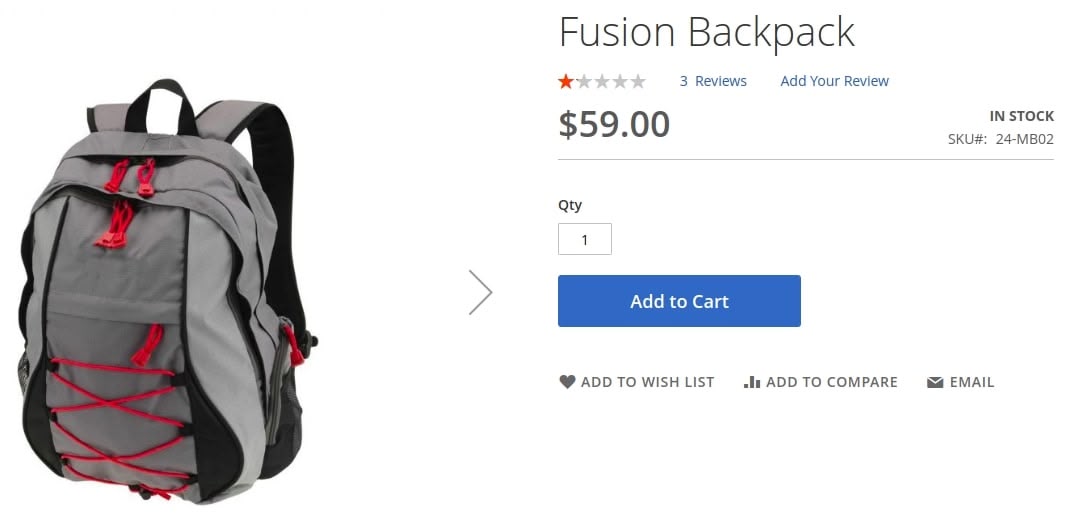
Simple Product. This is a basic and the most popular product type. A single simple product corresponds to a single physically existing product to a unique SKU (Store Keeping Unit).Simple product
Virtual Product. This product type is for the products that do not exist physically. Paid subscriptions, services, insurances, etc. are examples of Virtual products.Virtual Product
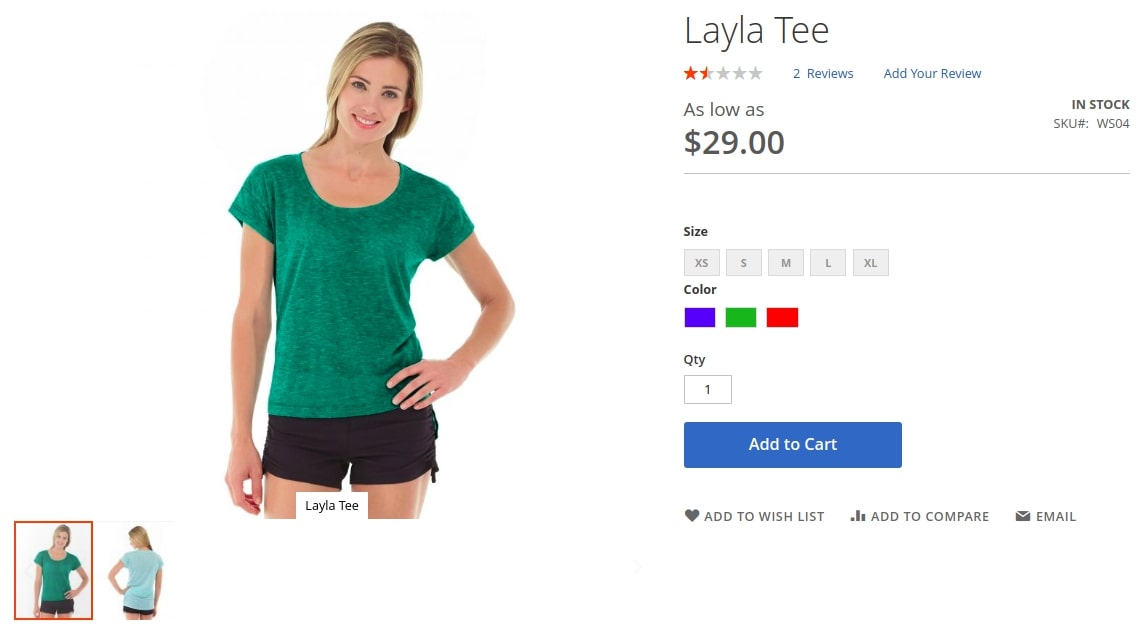
Configurable Product. The type allows to create products with a list of options, for example, for example, a T-shirt in different colors and sizes. Each product option of such configurable product corresponds to a single Simple Product with a unique SKU, allowing the retailer to keep track of each product option stock balance.Configurable Product
Grouped Product. This product type allows to group single Simple or Virtual Products into bundles. Therefore, the customer can buy all the needed items at once, without adding them to the cart separately. Moreover, the customer gets to decide which products from the bundle he wants to purchase and in what amount. The products he or she selected are added to the cart separately.Grouped Product
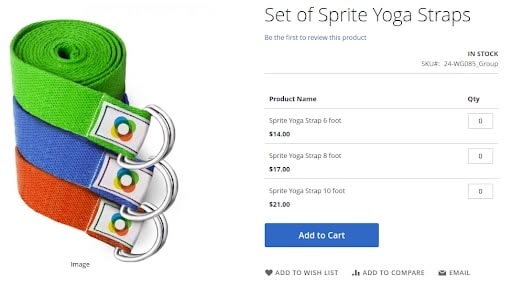
Bundle Product. This product type allows customers to create a bundle at their wish, using a set of options (for example, a yoga kit).Bundle product
Each option is a Simple Product or a Virtual Product. Before adding a bundle product to the cart, a customer must customize it with the provided options. The final price will depend on the chosen configuration.Bundle Product parameters
SKU and Weight attributes can be fixed or dynamic. The price for Bundle Product can be set as Price Range (from minimum to maximum) or As Low As (the lowest price possible). The admin can set how the products will be delivered – together or separately.
Downloadable Product. This product type is aimed at digital products that can consist of one or several files, downloaded by the customer after the purchase is made.Downloadable Product
Virtual and Downloadable Products weight nothing, which means there is no need to deliver them and no need to select a delivery option at the checkout. Also, Virtual and Downloadable Products do not have In Stock attribute.To get all products of a certain type, use the Magento\Catalog\Model\ResourceModel\Product\Collection: $collection->addFieldToFilter(‘type_id’, ‘bundle’); class.As the second parameter, pass the product type name: bundle, configurable, downloadable, grouped, simple или virtual.
What tools (in general) does a product type model provide?
Basic methods, available for different product types:
getChildrenIds – returns the list of child products’ IDs;
getParentIdsByChild – returns the list of parent products’ IDs;
assignProductToOption – assigns options to a product.
What additional functionality is available for each of the different product types?
Configurable:
getConfigurableAttributes – gets the attributes, used for subproducts;
getUsedProductIds – gets id subproducts;
getProductByAttributes – gets products by their attribute values;
getConfigurableOptions – gets options list;
setImageFromChildProduct – sets the image of a child product for a parent product, if it was not set previously.
Bundle:
getOptions – gets the list of options;
getSelectionsCollection – gets the selections collection by their id;
getSpecifyOptionMessage – gets the customer message with the request to specify options;
checkIsAllRequiredOptions – checks whether all the required options are selected;
checkSelectionsIsSale – checks if all the options are available for sale.
Downloadable:
getLinks – checks the links for downloading the product;
hasLinks – checks if all the downloadable products have links;
getLinkSelectionRequired – checks if the product can be bought without the selected links;
getSamples – gets the downloadable product samples;
hasSamples – checks if the product has samples for downloading.
It is worth mentioning that getRelationInfo, getAssociatedProducts, getChildrenIds, getParentIdsByChild, etc. methods return empty arrays, even though they are shared by all product types, not only compound ones, like Simple and Virtual. The logic of these methods is realized in the compound types’ classes, taking into account this type’s specifics.
7.2 Describe price functionality
Identify the basic concepts of price generation in Magento
As a rule, each product in Magento 2 can have several prices: regular, special, final, etc. Each price type has a class, accountable for calculating the final value of a certain price type. Some price types are available for all the products, while others are specific to a certain product type.Let us examine the basic price types, available for all product types:
base_price – product price at the default exchange rate;
regular_price – product price at the chosen exchange rate;
final_price – final product price;
special_price – product price with a discount;
tier_price – product price depending on the number of products in the cart and customer group;
custom_option_price – if the product has options, option price can be displayed in percentage (except for configurable products);
configured_price – product price together with options;
catalog_rule_price – product price after catalog rules are applied.
Basic classes, accountable for different price types realization, are located in Magento\Catalog\Pricing\Price names area and extend the Magento\Framework\Pricing\Price\AbstractPrice class. Different product types, as a rule, override the calculation logic for various price types. In this case, the corresponding classes are located in the names area of the corresponding product types. Also, several product types add custom price types:
downloadable products:
link_price – price when the product is downloaded from the link provided;
bundle products:
bundle_option – price of bundle product option.
Each price type has getValue() and getAmount() methods. getValue() method returns the price value, while getAmount() method returns the final price with all the taxes added.
How would you identify what is composing the final price of the product?
final_price depends on the product type.For simple and virtual product types, final_price corresponds to the minimal regular_price, catalog_rule_price, special_price, tier_price values.For configurable products, the price of each option is selected as a minimal value from base_price, tier_price, index_price, catalog_rule_price.At the same time, when choosing the minimum price, the status of the configurable product option, its availability for a particular site and availability in stock are checked. After determining the final_price of all options, the final price of the configurable product is determined, which will be equal to the lowest cost of its options.final_price of grouped product equals the minimal final_prices of all the products from the group.For bundle products, the price is calculated in the same way as for simple products + bundle_option – the cost of all required options multiplied by their number.
How can you customize the price calculation process?
There are several ways to customize the price calculation process:
Create a new price type and add it to the basic price set. For this, create a custom module with the class that will realize Magento\Framework\Pricing\Price\BasePriceProviderInterface interface Magento\Framework\Pricing\Price\BasePriceProviderInterface and expand Magento\Framework\Pricing\Price\AbstractPrice class; also, add the necessary instructions in the module’s di-file:
Completely override the price class using the preference instruction in di-file of the module.
Describe how price is rendered in Magento
Let us examine how the price is rendered, using the process of final_price formatting and display. Magento\Catalog\Pricing\Render\FinalPriceBox class is accountable for the price display. Magento_Catalog::product/price/final_price.phtml is the template used for displaying the block content. In case the product has a special price, by calling the renderAmount() block method, you can display both old and new price. Otherwise, only the final, lowest price is displayed. Then, if the product has options (for example, size), the block with the lowest price option is displayed.
How would you render price in a given place on the page, and how would you modify how the price is rendered?
To render price in a given place, add you layout block of the Magento\Catalog\Pricing\Render class by passing price_type_code parameter as an argument.
Using data-arguments, you can modify the price box, amount renders and adjustment renders, by modifying their сss-classes, id_suffix, id_prefix, etc.To modify price display template, create a custom catalog_product_prices.xml. There, you can modify render.product.prices block by passing the name of class, block and your template as parameters for the required price type.
7.3 Demonstrate ability to use and customize categories
Describe category properties and features
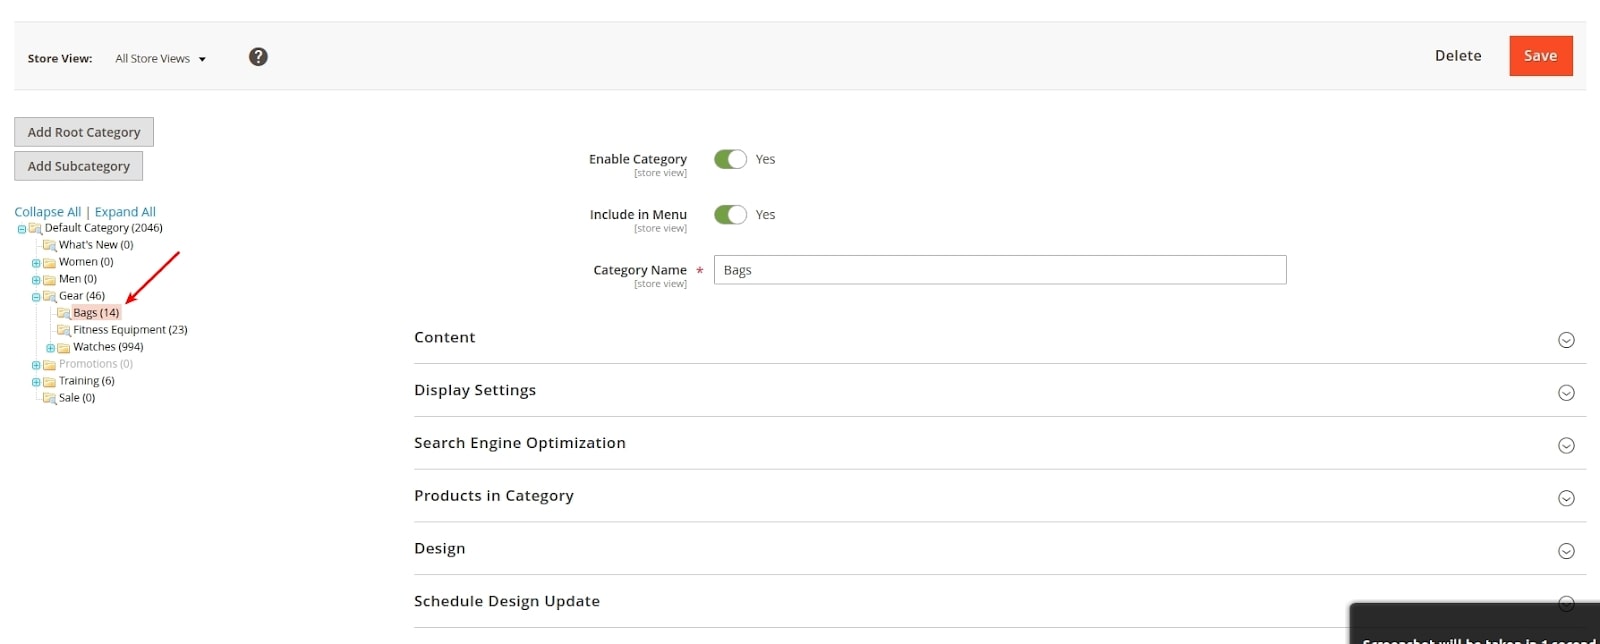
Magento 2 categories were created to conveniently group products according to their types and bundles, as well as to enhance products display. The categories are also used for building top menu. Categories have their own settings, and to modify them, navigate to Catalog -> Categories page and select a category for editing.Below are the major settings:
Enable Category – enables and disables category display at the frontend.
Include in Menu – determines whether the category is included in the top menu.
The next tab is Display SettingsDisplay mode – allows to switch the category display mode. There are three modes available:
Products only – only category / product description will be displayed.
Static block only – only description and static block, selected in Tab Content above, will be displayed; the products will not.
Static block and Products – both static and products blocks will be displayed.
Anchor – sets the display of the layered navigation in the given category.The settings from Search Engine Optimization and Products in Category tabs are rather intuitive. The first allows to add meta descriptions to the categories, while the second allows to add the products, displayed in the given category.Tabs Design and Schedule Design UpdateWith Use Parent Category Settings, you can set whether the parent category theme will be applied; you can also choose which theme or layout will be applied for the given category (Theme and Layout settings).Layout Update Xml is aimed at adding xml instructions via the admin interface.Schedule Update From – sets the period, during which the altered Design settings will apply to the category.
How do you create and manage categories?
To create a category, navigate to Catalog -> CategoriesSelect the category type – either Root Category or Subcategory.Add Root Category button creates a new category in the categories tree root. All the root categories are further used for the multistore settings.Add Subcategory button creates a subcategory inside the active category.
Describe the category hierarchy tree structure implementation (the internal structure inside the database). What is the meaning of parent_id 0? How are paths constructed?
Magento 2 categories are presented in the form of a tree and can have any nesting.To realize category tree in Magento, the following logic is used. The picture below demonstrates the catalog_category_entity table structure, where the information about categories structure is stored.The main columns are accountable for category structure:entity_id – the category ID.parent_id – parent category ID.path – path to the category in the categories tree. This is a record with a path to the category in the categories tree. Represents a record in the form of a sequential arrangement of entity_id categories, separated by a slash (/).The construction of the category tree begins with an entry with the parent_id = 0 value. This entry has a value of entity_id = 1. Categories whose parent_id = 1 act as Root Categories. And then the construction of the category tree is implemented through the connection parent_id <—> entity_id.
Which attribute values are required to display a new category in the store?
When creating a category, the only required value is Category name. Based on this name, the URL Key is automatically generated, which is the path by which the category will be displayed in the browser.
What kind of strategies can you suggest for organizing products into categories?
In most cases, the strategy for organizing products into categories depends on the particular business that will be presented at the webshop.One of the organizing products alternatives is to categorize products according to the set of attributes or attribute sets used. Therefore, the products that have the same set of additional attributes will be categorized. This will allow you to get a more intuitive product filter (layered navigation). For example, in a filter for bicycles there will be no size options, etc. Further, the separation of products can be made based on the attributes’ values and customers target group (children, adults, men, women).But in most cases, the marketing department of the company decides on the products structure and organization.
7.4 Determine and manage catalog rules
Identify how to implement catalog price rules. When would you use catalog price rules?
Catalog price rules would be used to set a discount, depending on conditions, for a product or product group. To create them in the admin panel, navigate to Marketing – Catalog Price Rule. Here, the administrator can specify the conditions, under which catalog price rules can be applied to products, actions to be performed, and other parameters.
How do they impact performance?
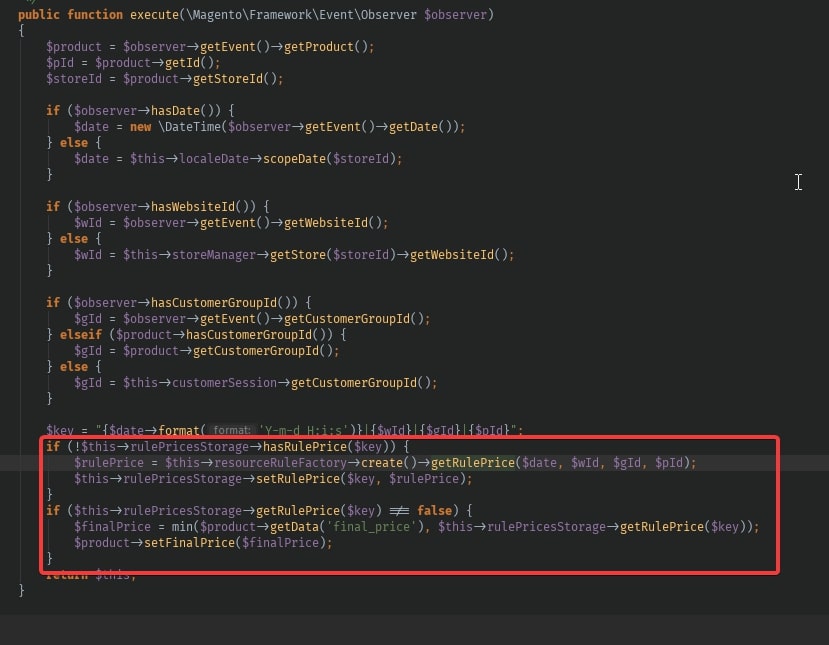
The impact on page loading is relatively small, since all price calculations occur during reindex. The speed of reindex is affected by: the number of catalog rules, customer groups, products and websites affected. In the worst case, if all catalog price rules affect all customer groups, products and websites, then the number of rows in the catalogrule_product table will be CATALOG_RULES_QTY * CUSTOMER_GROUPS_QTY * PRODUCTS_QTY * WEBSITES_QTY. The catalogrule_product_price table contains 3 times more rows than the catalogrule_product table.Let us examine one configuration example:We have one catalog rule that applies to 4 customer groups, one website and 247 products. In this case, the number of lines in the tables will be the following:catalogrule_product: 1 * 4 * 1 * 247 = 988Catalogrule_product_price: 988 * 3 = 2964.Another example:We have 5 catalog rules, each applies to 4 customer groups, 5 websites and 2000 products. Then, the number of lines will be the following:catalogrule_product: 5 * 4 * 5 * 2000 = 200000catalogrule_product_price: 200000 * 3 = 600000.Now, we will examine the reason why the influence on the page upload is relatively insignificant. Let us turn to Magento code.In vendor\magento\module-catalog-rule\etc\frontend\events.xml file, set the observer for catalog_product_get_final_price event.
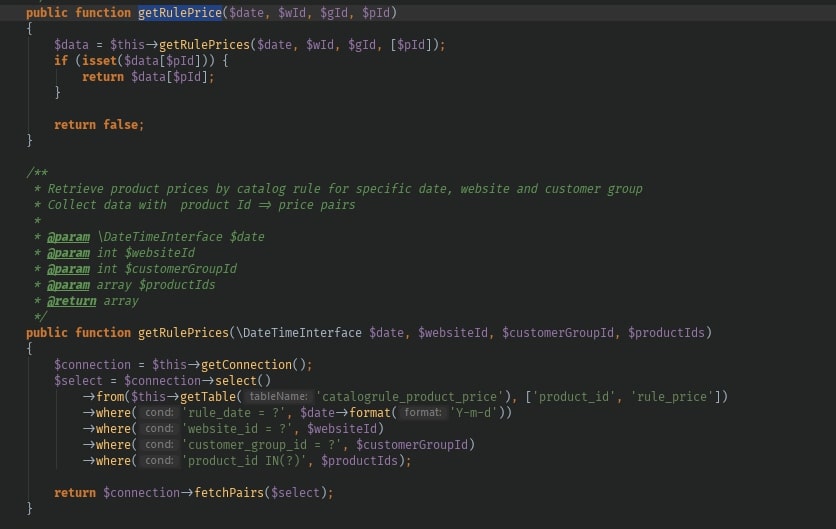
Then, let’s examine what is happening in getRulePrice() method. Navigate to vendor\magento\module-catalog-rule\Model\ResourceModel\Rule.php file and find the method. It will call getRulePrices() method, where the simplest request into the database to catalogrule_product_price table is performed. This is how we get the price.
How would you debug problems with catalog price rules?
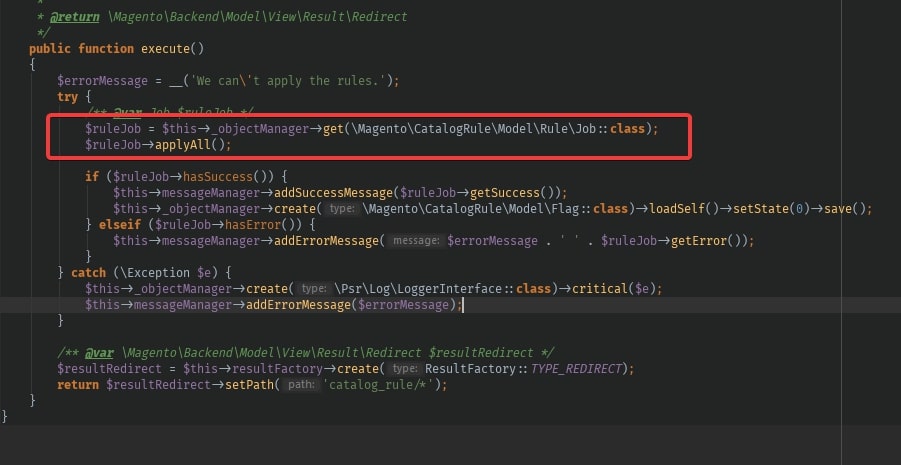
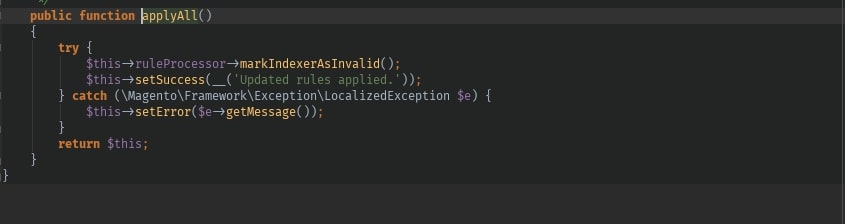
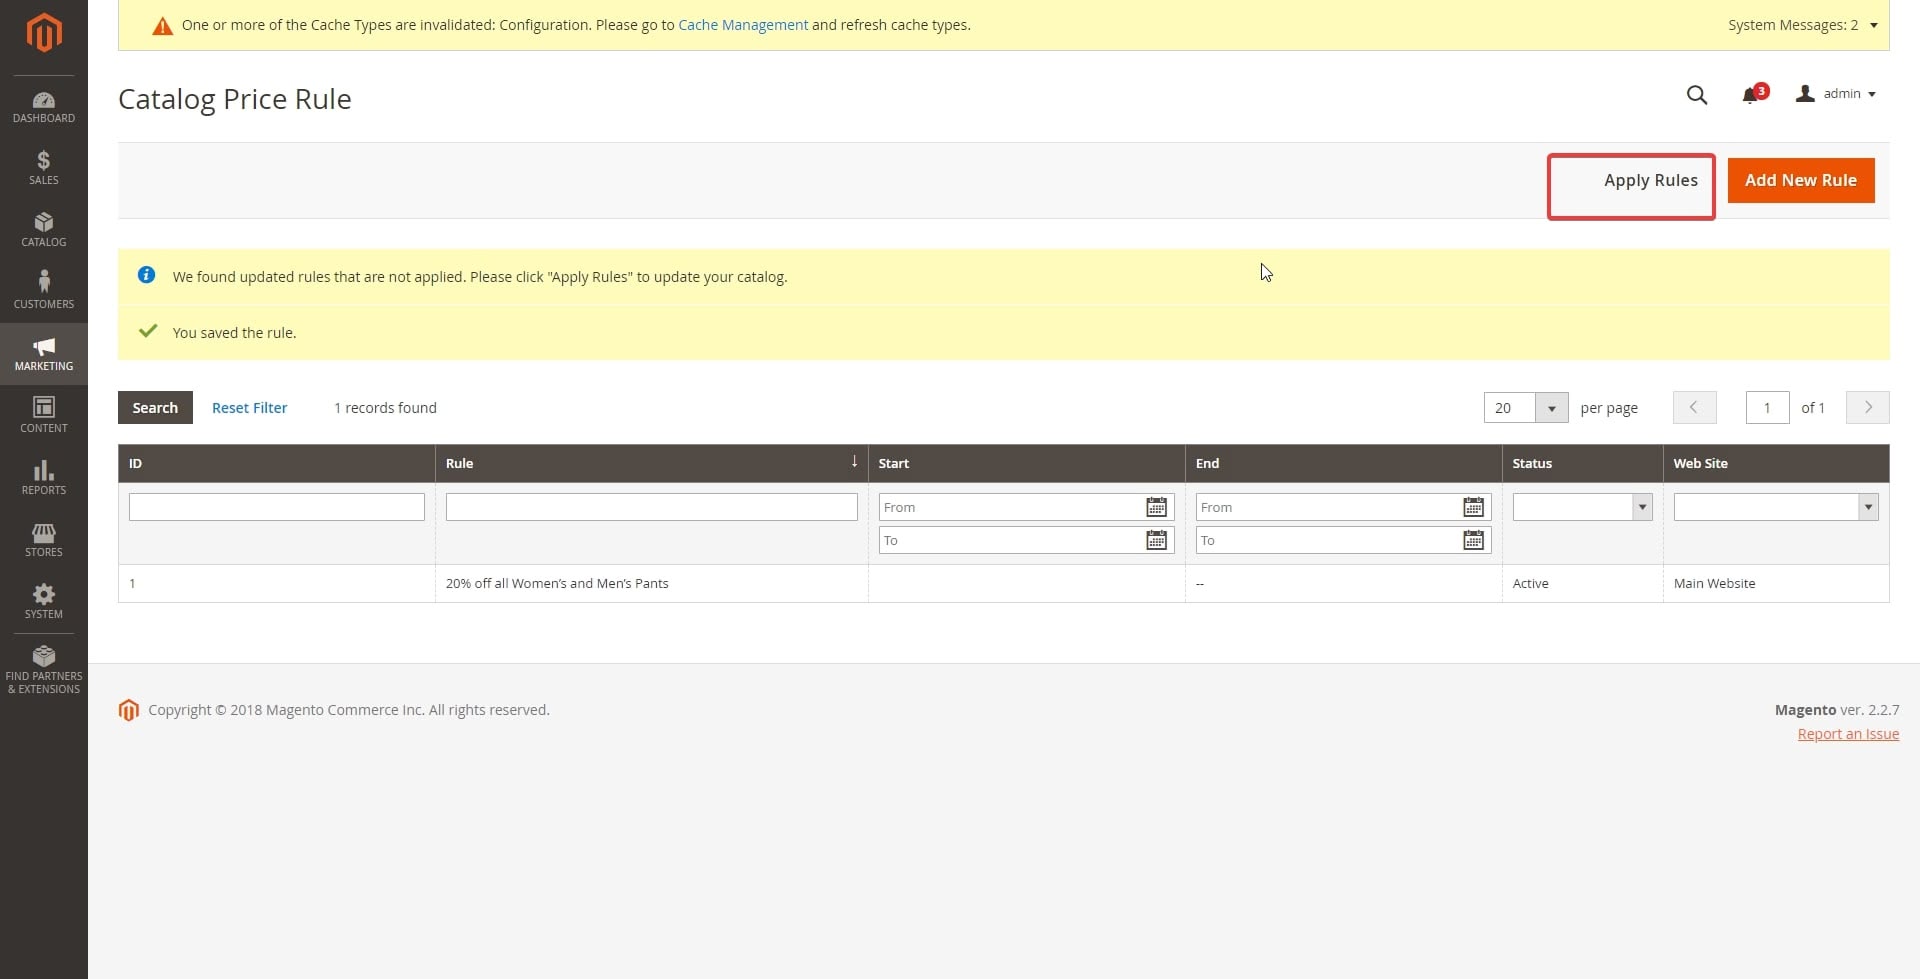
First, make sure that price rule is active. Navigate to Marketing > promotions > Catalog Price Rule and make sure that the status is set at active.The, apply the rules by pressing the corresponding button Apply RulesAfter that, Catalog Rule Product indexes and Product Price, connected to it, are set as invalid.In action vendor\magento\module-catalog-rule\Controller\Adminhtml\Promo\Catalog\ApplyRules.php, a copy of\Magento\CatalogRule\Model\Rule\Job class is created, in which applyAll() method is called.
Then, launch reindex and flush the cache.bin/magento indexer:reindexbin/magento cache:flushAfter all these actions and if the price rule is configured correctly (if date range and conditions are both correct), the rules will work.In case the rules do not work, navigate to catalogrule_product_price table and check the product price there. If the data is incorrect, try checking the logs, disconnecting third-party modules or review the Catalog Price Rule reindex process with xDebug.
Copyright BelVG
We use cookies on our website to enhance your user experience and make our services better for you. For more information, please read our privacy policy.
This website uses cookies to improve your experience while you navigate through the website. Out of these cookies, the cookies that are categorized as necessary are stored on your browser as they are as essential for the working of basic functionalities of the website. We also use third-party cookies that help us analyze and understand how you use this website. These cookies will be stored in your browser only with your consent. You also have the option to opt-out of these cookies. But opting out of some of these cookies may have an effect on your browsing experience.
Necessary cookies are absolutely essential for the website to function properly. This category only includes cookies that ensures basic functionalities and security features of the website. These cookies do not store any personal information.
 Table of content


 Below are the major settings:
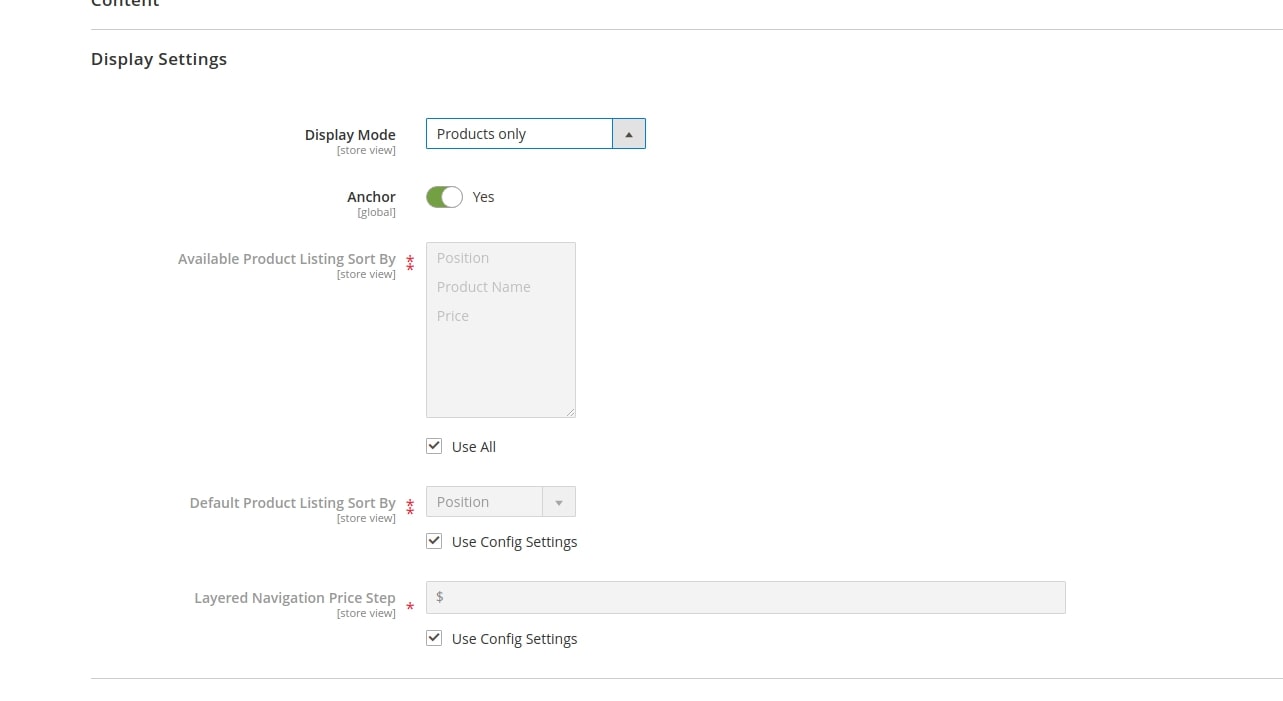 Display mode – allows to switch the category display mode. There are three modes available:
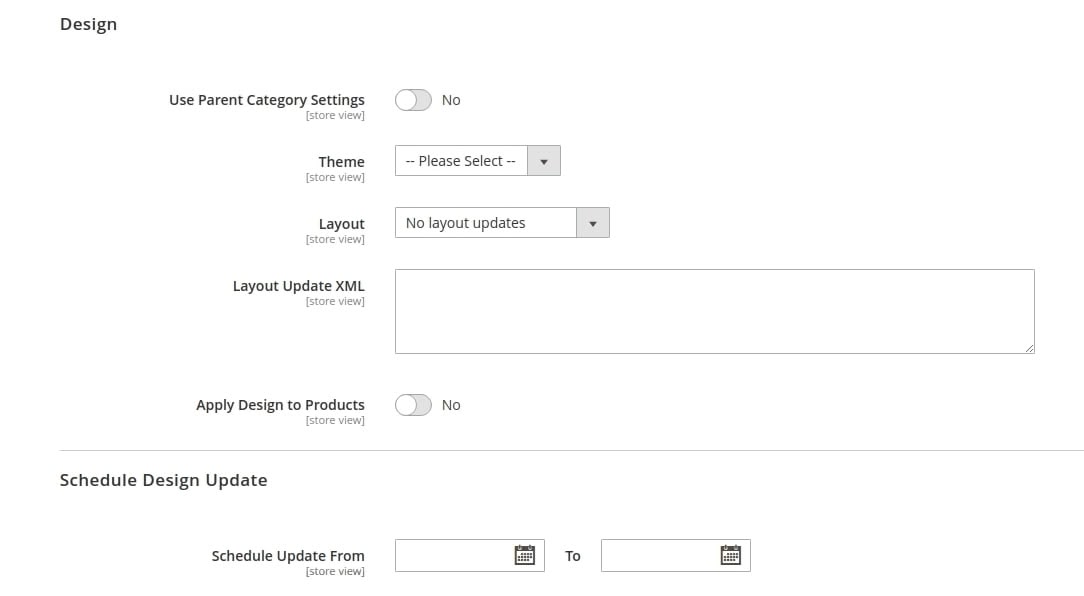 With Use Parent Category Settings, you can set whether the parent category theme will be applied; you can also choose which theme or layout will be applied for the given category (Theme and Layout settings).Layout Update Xml is aimed at adding xml instructions via the admin interface.Schedule Update From – sets the period, during which the altered Design settings will apply to the category.
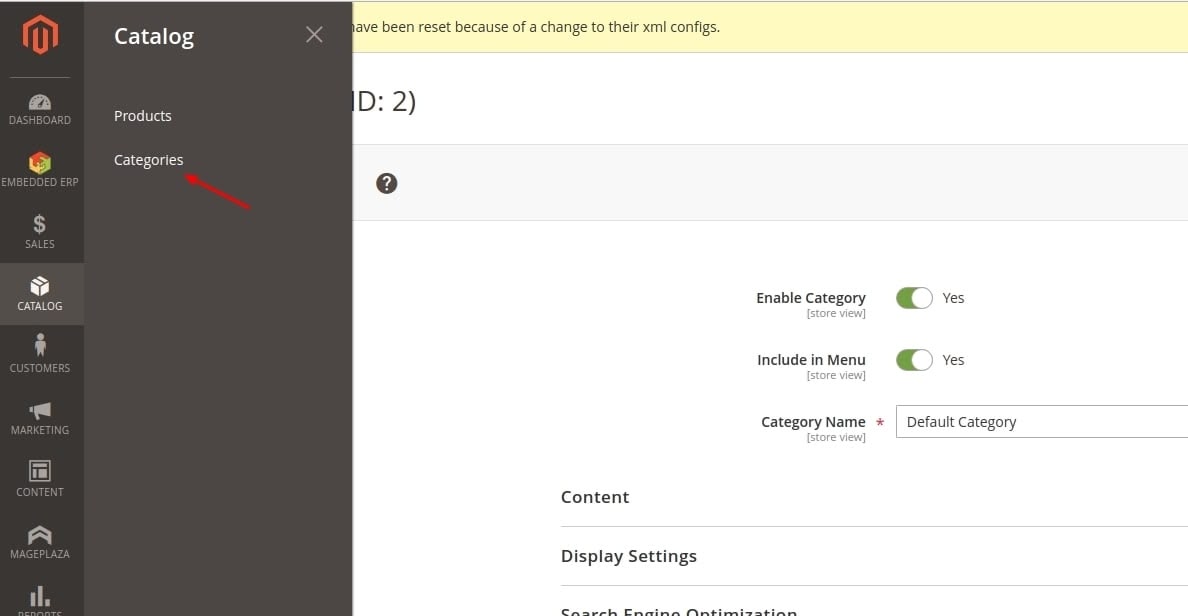 Select the category type – either Root Category or Subcategory.
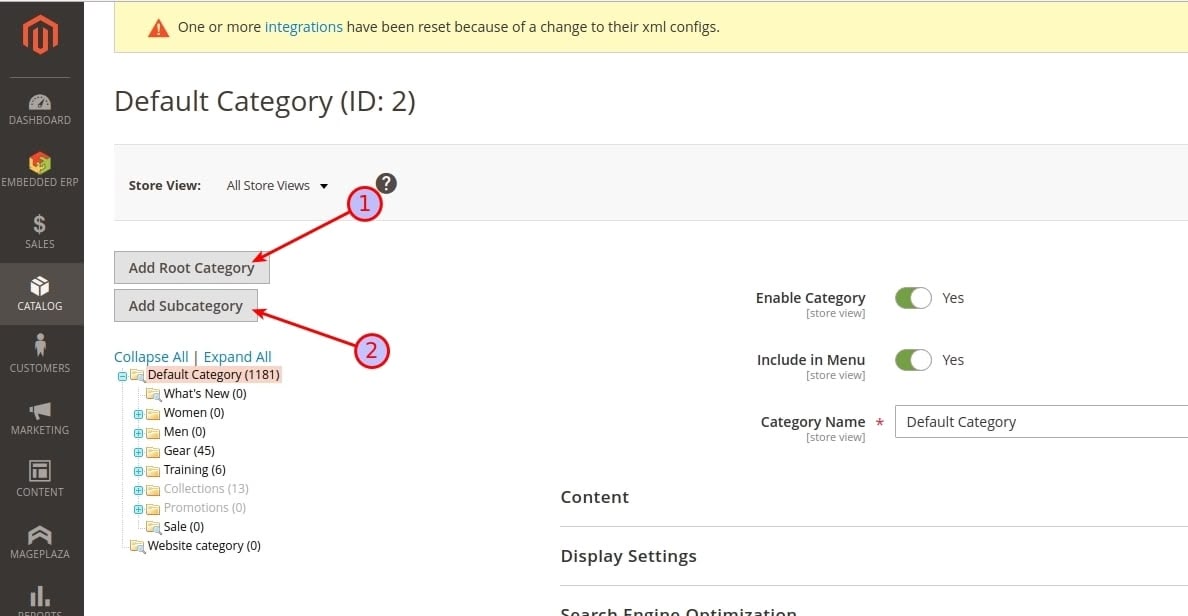 Add Root Category button creates a new category in the categories tree root. All the root categories are further used for the multistore settings.Add Subcategory button creates a subcategory inside the active category.
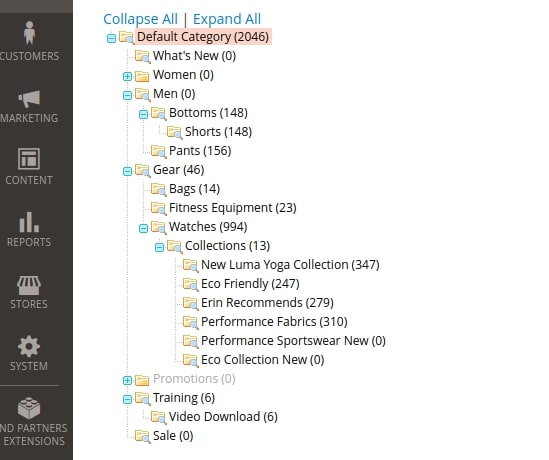 To realize category tree in Magento, the following logic is used. The picture below demonstrates the catalog_category_entity table structure, where the information about categories structure is stored.
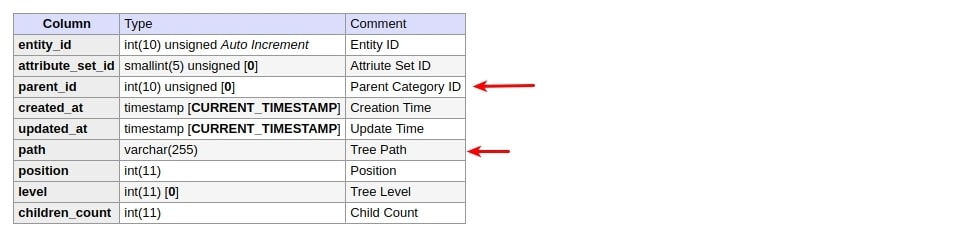 The main columns are accountable for category structure:entity_id – the category ID.parent_id – parent category ID.path – path to the category in the categories tree. This is a record with a path to the category in the categories tree. Represents a record in the form of a sequential arrangement of entity_id categories, separated by a slash (/).
 The construction of the category tree begins with an entry with the parent_id = 0 value. This entry has a value of entity_id = 1. Categories whose parent_id = 1 act as Root Categories. And then the construction of the category tree is implemented through the connection parent_id <—> entity_id.


 After that, Catalog Rule Product indexes and Product Price, connected to it, are set as invalid.
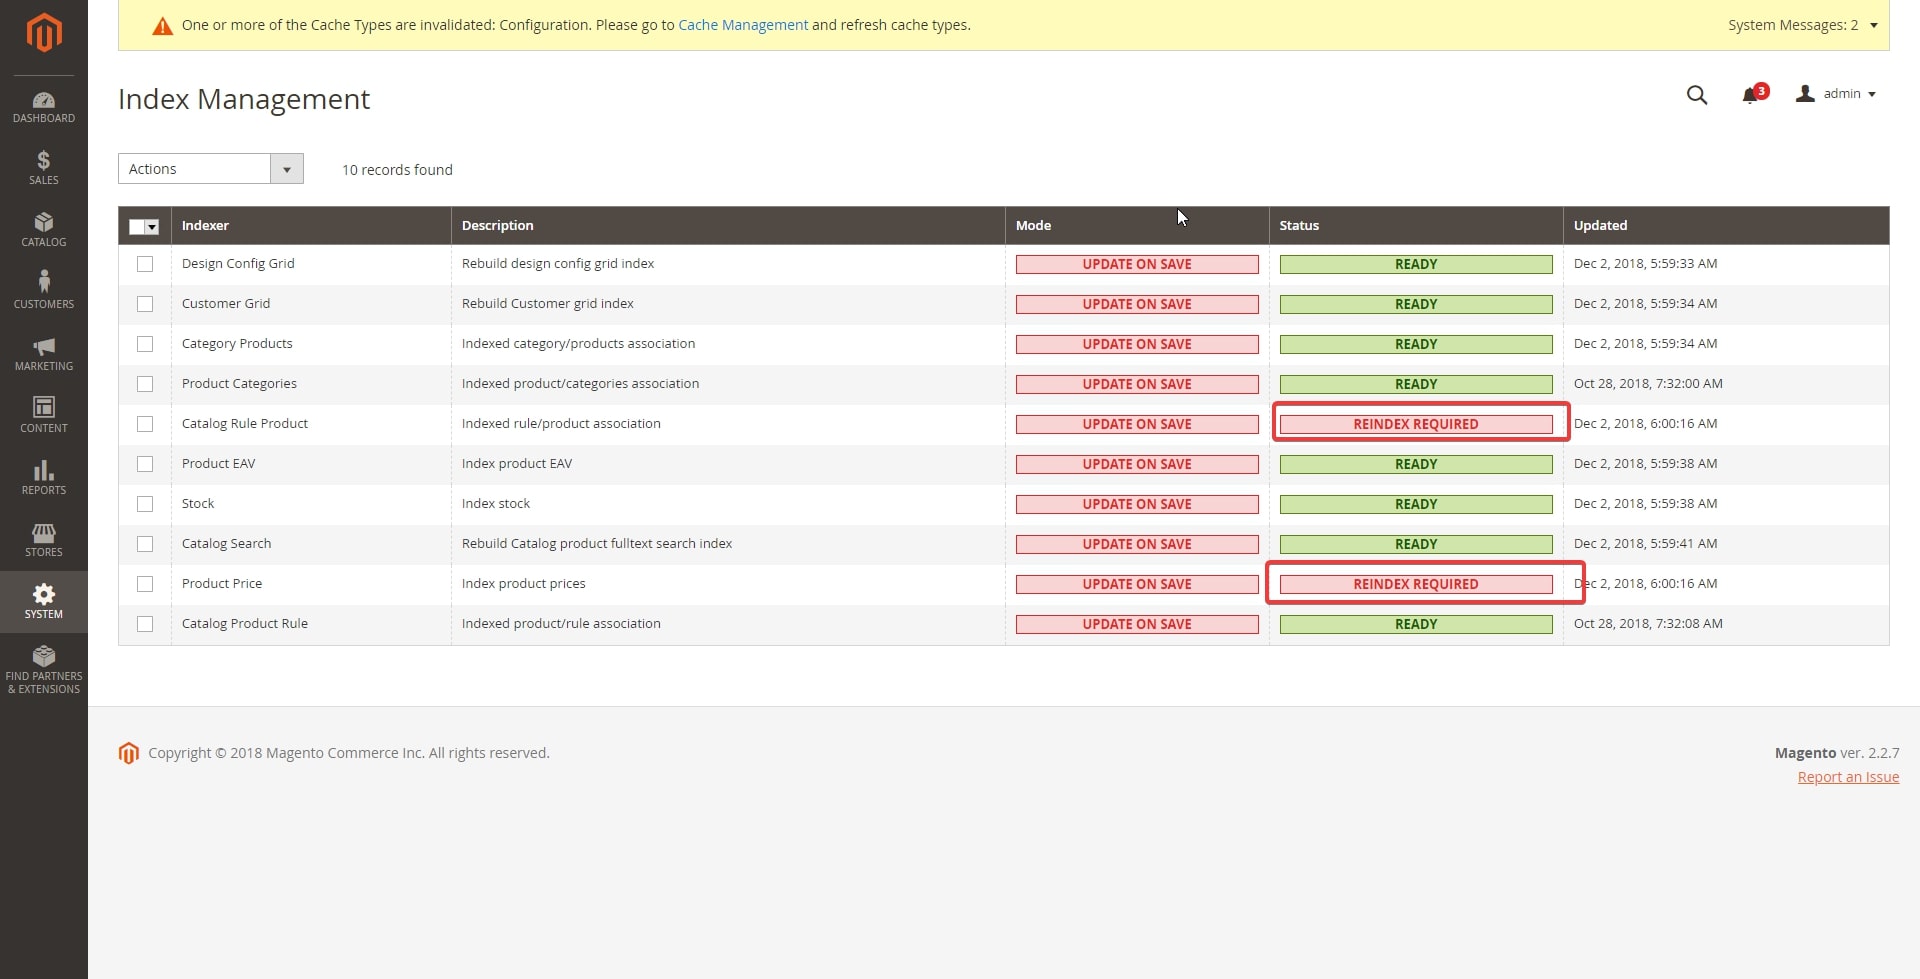 In action vendor\magento\module-catalog-rule\Controller\Adminhtml\Promo\Catalog\ApplyRules.php, a copy of\Magento\CatalogRule\Model\Rule\Job class is created, in which applyAll() method is called.