 Table of content
Magento 2 Certified Professional Developer Guide
Section 6: Developing with Adminhtml
6.1 Describe common structure/architecture
Describe the difference between Adminhtml and frontend. What additional tools and requirements exist in the admin?
Adminhtml and frontend are areas. Frontend displays the website to a user, while adminhtml is the website admin panel, aimed at those who manage it. In adminhtml, you can create / modify / delete objects and categories, manage orders and customers, configure the website, etc.To log in to the admin panel, you need to know its basic URL (for example, https://www.website.com/admin_1pf3534g/) and then pass authentication.Controller actions and blocks in adminhtml are located in the Adminhtml subfolder of Controller and Block folders respectively.Controller actions and blocks in adminhtml inherit the classes, different from those inherited by actions and blocks in frontend.In adminhtml:Block inherits Magento\Backend\Block\TemplateAction inherits Magento\Backend\App\AbstractActionIn frontend:Block inherits Magento\Framework\View\Element\TemplateAction inherits Magento\Framework\App\Action\ActionUI Components
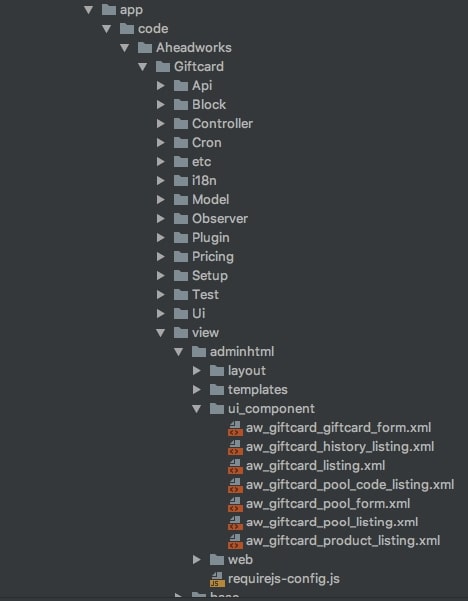
Adminhtml components in the module view folder can contain an additional ui_component directory. The directory contains UI Components that speed up and simplify development, as well as minimize code duplicates. UI Components are also used in the out-of-the-box frontend in Checkout, but UI Components configuration is written in layout xml files, not in ui components xml files.ui component file name matches the ui component name (except for the .xml suffix), that can be added into layout using the following instructions: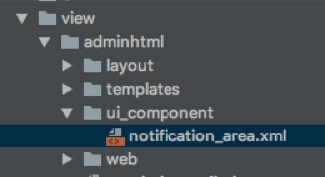 Ui_component folder contains one or several XML declarations for grids or forms.Standard UI components come in two types:
- Basic
- Secondary
 On the screenshot, you can see .xml file for template definition. It contains a link to the listing basic component connection, aimed at displaying grids, lists and fragments. Sorting, search and dividing into pages is added to the built-in functions, which are very helpful for new components and modules development.Below is the list of extensions for the basic components listing:
- Filters
- Pagination
- Tabs
- Buttons and their functional load
- Tables
- Multiselectors
- Loaders
- Editors
- Headings
- Create a unified and clear interface
- Simplify and speed up the development process
- Create a simple and intellectually clear environment for support and expansion.
 Then, depending on Magento version (we use Magento 2.2 for demonstration), we set up the necessary components in xml configuration:
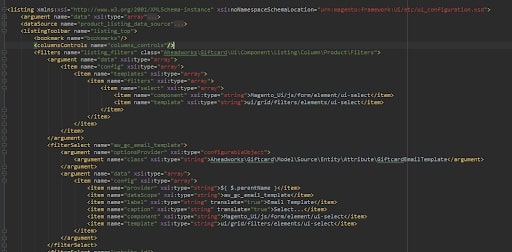 Configuration file has access to ListingToolbar component, introduced Magento 2.1 version. It is located in the area of Magento_Ui/grid names and is related to listing classes components. Listing Toolbar contains a number of additional components, configured directly in configuration file.For example, Bookmark is responsible for displaying and saving the positions of all current elements, forms and buttons states in the component. It also accounts for saving and comparing information through the database, directly in ui_bookmark table.Columns Control is responsible for displaying and hiding active list columns.Filters component receives the information about the required secondary elements; in this case, it is an element of select form.
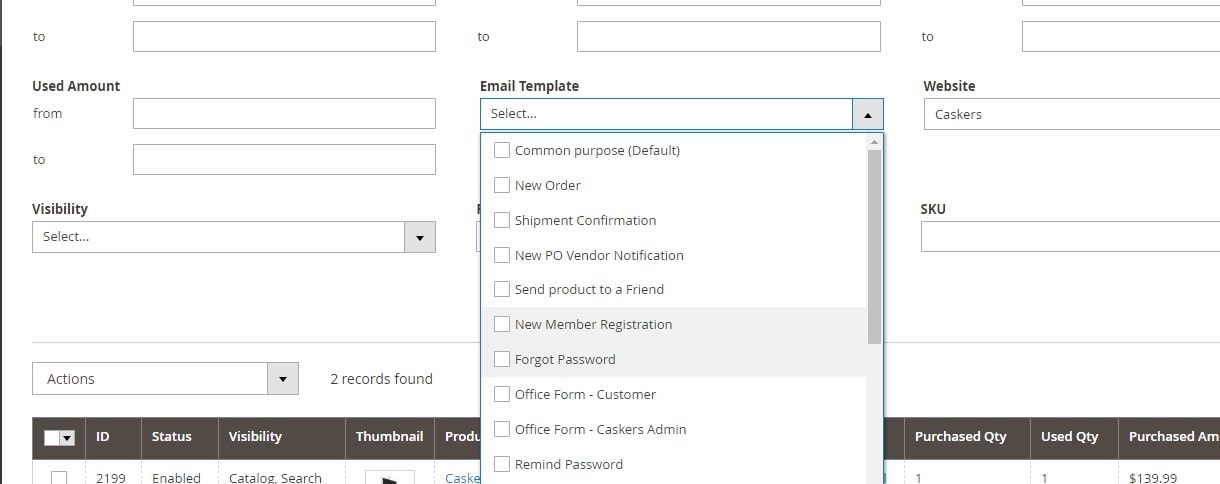 Using
Using 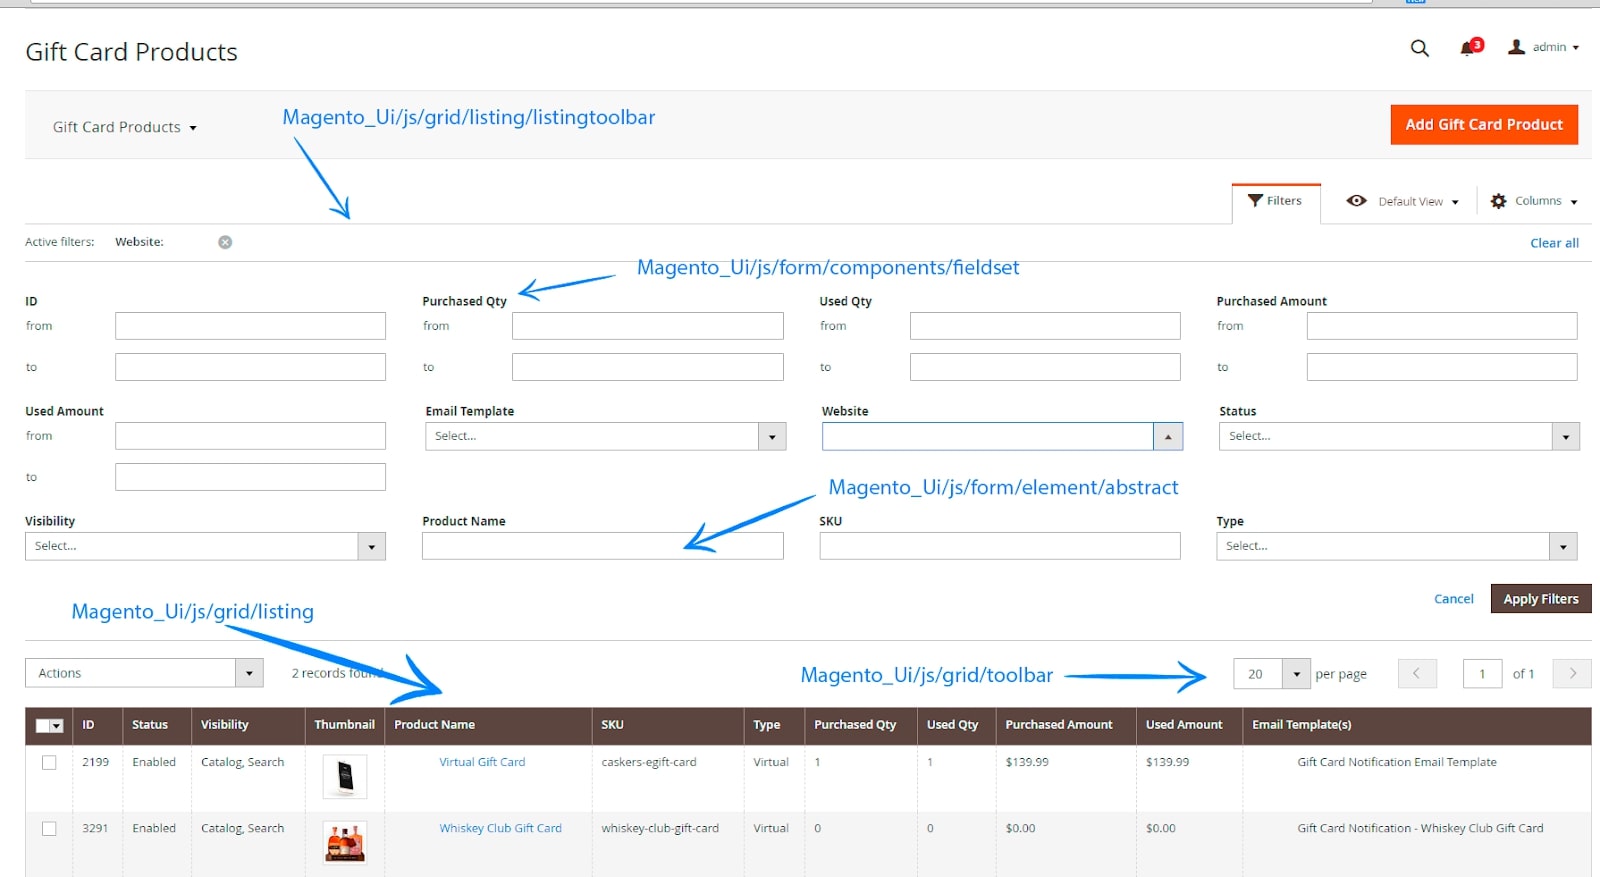 Obtaining UI components skills allows to significantly speed up development and expansion of Magento store interface, as well as to unify its structure for creating a more intuitive area for further support and development.
6.2 Define form and grid widgets
Define form structure, form templates, grids, grid containers, and elements. What steps are needed to display a grid or form?
Form
Contains modified fields of a certain entity. To create a form, you need to:- Create form xml file of ui component configuration:
/view//ui_component/ .xml - Create DataProvider class in the module and define this class in XML configuration file of UI component.
- Add a set of fields (the Fieldset component with the component of the Field) for entity or to implement the upload of meta info in the DataProvide
- Add UI component в layout:
”/>
Grid
Contains the list of entities, filters, bookmarks, paging, columns controls. Allows to search entity, modify list sorting, hide and add columns, change their order. To create a grid, you need to:- Create listing xml file of UI component configuration:
/view//ui_component/ .xml - Set DataSource
- Add filter, columns, toolbar, …
- Add ui component into layout:
”/>
Describe the grid and form workflow. How is data provided to the grid or form?
At the server:- Layout loads UI component
- XML files of UI component are searched in each enabled module (
/view//ui_component/ .xml) - All found files of UI components are merged in a single configuration object
- Configuration and definition.xml are merged. Objects from definition.xml have lower priority than single configuration object, received in the previous step
- The received configuration is transformed into JSON and embedded into the page with Magento\Ui\TemplateEngine\Xhtml\Result class
1 2 3 4 5 6 7 8 9 10 |
- RequireJS loads Magento_Ui/js/core/app and passes configuration as a parameter
- Magento_Ui/js/core/app calls Magento_Ui/js/core/renderer/layout and passes it the configuration
- layout.js creates instances of UI components and applies the configuration to it
- HTML template rendering with knockout.js and binding of the component to the template is performed
How can this process be customized or extended?
You can change the form data the following ways:- Create a custom DataProvider and specify it in xml file of UI compoment.
- Create a plugin for DataProvider::getData() method
- Create Modifier class and set it in di.xml, if this DataProvider support Modifiers (for example, like \Magento\Catalog\Ui\DataProvider\Product\Form\ProductDataProvider)
“Describe how to create a simple form and grid for a custom entity. Given a specific entity with different types of fields (text, dropdown, image, file, date, and so on) how would you create a grid and a form?”
Let us consider the examine of a form. It includes text, textarea, select, multiselect, image. The data is loaded via the Vendor\Module\Model\MyEntity\DataProvider class.1 2 3 4 5 6 7 8 9 10 11 12 13 14 15 16 17 18 19 20 21 22 23 24 25 26 27 28 29 30 31 32 33 34 35 36 37 38 39 40 41 42 43 44 45 46 47 48 49 50 51 52 53 54 55 56 57 58 59 60 61 62 63 64 65 66 67 68 69 70 71 72 73 74 75 76 77 78 79 80 81 82 83 84 85 86 87 88 89 90 91 92 93 94 95 96 97 98 99 100 101 102 103 104 105 106 107 108 109 110 111 112 113 114 115 116 117 118 119 120 121 122 123 124 125 126 127 128 129 130 | xml version="1.0" ?> <form xmlns:xsi="http://www.w3.org/2001/XMLSchema-instance" xsi:noNamespaceSchemaLocation="urn:magento:module:Magento_Ui:etc/ui_configuration.xsd"> <argument name="data" xsi:type="array"> <item name="js_config" xsi:type="array"> <item name="provider" xsi:type="string">my_form.my_entity_form_data_source</item> <item name="deps" xsi:type="string">my_form.my_entity_form_data_source</item> </item> <item name="label" translate="true" xsi:type="string">General Information</item> <item name="config" xsi:type="array"> <item name="dataScope" xsi:type="string">data</item> <item name="namespace" xsi:type="string">my_form</item> </item> <item name="template" xsi:type="string">templates/form/collapsible</item> <item name="buttons" xsi:type="array"> <item name="back" xsi:type="string">Vendor\Module\Block\Adminhtml\MyEntity\Edit\BackButton</item> <item name="delete" xsi:type="string">Vendor\Module\Block\Adminhtml\MyEntity\Edit\DeleteButton</item> <item name="save" xsi:type="string">Vendor\Module\Block\Adminhtml\MyEntity\Edit\SaveButton</item> <item name="save_and_continue" xsi:type="string">Vendor\Module\Block\Adminhtml\MyEntity\Edit\SaveAndContinueButton</item> </item> </argument> <dataSource name="my_entity_form_data_source"> <argument name="dataProvider" xsi:type="configurableObject"> <argument name="class" xsi:type="string">Vendor\Module\Model\MyEntity\DataProvider</argument> <argument name="name" xsi:type="string">my_entity_form_data_source</argument> <argument name="primaryFieldName" xsi:type="string">id</argument> <argument name="requestFieldName" xsi:type="string">id</argument> <argument name="data" xsi:type="array"> <item name="config" xsi:type="array"> <item name="submit_url" path="*/*/save" xsi:type="url"/> </item> </argument> </argument> <argument name="data" xsi:type="array"> <item name="js_config" xsi:type="array"> <item name="component" xsi:type="string">Magento_Ui/js/form/provider</item> </item> </argument> </dataSource> <fieldset name="General"> <argument name="data" xsi:type="array"> <item name="config" xsi:type="array"> <item name="label" xsi:type="string"/> </item> </argument> <field name="name"> <argument name="data" xsi:type="array"> <item name="config" xsi:type="array"> <item name="dataType" xsi:type="string">text</item> <item name="label" translate="true" xsi:type="string">Name</item> <item name="formElement" xsi:type="string">input</item> <item name="source" xsi:type="string">MyEntity</item> <item name="sortOrder" xsi:type="number">50</item> <item name="validation" xsi:type="array"> <item name="required-entry" xsi:type="boolean">true</item> </item> </item> </argument> </field> <field name="about"> <argument name="data" xsi:type="array"> <item name="config" xsi:type="array"> <item name="dataType" xsi:type="string">text</item> <item name="label" translate="true" xsi:type="string">About</item> <item name="formElement" xsi:type="string">textarea</item> <item name="source" xsi:type="string">MyEntity</item> <item name="sortOrder" xsi:type="number">65</item> </item> </argument> </field> <field name="country_id"> <argument name="data" xsi:type="array"> <item name="options" xsi:type="object">Magento\Directory\Model\Config\Source\Country</item> <item name="config" xsi:type="array"> <item name="dataType" xsi:type="string">text</item> <item name="label" xsi:type="string" translate="true">Country</item> <item name="formElement" xsi:type="string">select</item> <item name="source" xsi:type="string">MyEntity</item> <item name="sortOrder" xsi:type="number">70</item> <item name="component" xsi:type="string">Magento_Ui/js/form/element/country</item> <item name="validation" xsi:type="array"> <item name="required-entry" xsi:type="boolean">true</item> </item> </item> </argument> </field> <field name="region_ids"> <argument name="data" xsi:type="array"> <item name="options" xsi:type="object">Magento\Directory\Model\ResourceModel\Region\Collection</item> <item name="config" xsi:type="array"> <item name="dataType" xsi:type="string">int</item> <item name="dataScope" xsi:type="string">region_ids</item> <item name="label" xsi:type="string" translate="true">States</item> <item name="formElement" xsi:type="string">multiselect</item> <item name="source" xsi:type="string">MyEntity</item> <item name="sortOrder" xsi:type="number">80</item> <item name="validation" xsi:type="array"> <item name="required-entry" xsi:type="boolean">true</item> </item> <item name="filterBy" xsi:type="array"> <item name="target" xsi:type="string"> <![CDATA[${ $.provider }:${ $.parentScope }.country_id]]></item> <item name="field" xsi:type="string">country_id</item> </item> </item> </argument> </field> <field name="image"> <argument name="data" xsi:type="array"> <item name="config" xsi:type="array"> <item name="label" xsi:type="string">Image</item> <item name="visible" xsi:type="boolean">true</item> <item name="source" xsi:type="string">MyEntity</item> <item name="formElement" xsi:type="string">fileUploader</item> <item name="elementTmpl" xsi:type="string">ui/form/element/uploader/uploader</item> <item name="previewTmpl" xsi:type="string">Caskers_MyEntity/image-preview</item> <item name="sortOrder" xsi:type="number">90</item> <item name="uploaderConfig" xsi:type="array"> <item name="url" xsi:type="url" path="vendor_module/upload/image"/> </item> </item> </argument> </field> </fieldset> </form> |
 Let us consider the grid. As DataProvider, Magento\Framework\View\Element\UiComponent\DataProvider\DataProvider is used. The collection for grid is set in di.xml:
1 2 3 4 5 6 7 8 9 10 11 12 13 14 15 16 17 18 19 | xml version="1.0" ?> <config xmlns:xsi="http://www.w3.org/2001/XMLSchema-instance" xsi:noNamespaceSchemaLocation="urn:magento:framework:ObjectManager/etc/config.xsd"> <type name="Magento\Framework\View\Element\UiComponent\DataProvider\CollectionFactory"> <arguments> <argument name="collections" xsi:type="array"> <item name="my_listing_grid_data_source" xsi:type="string"> Vendor\Module\Model\ResourceModel\MyEntity\Grid\Collection </item> </argument> </arguments> </type> <virtualType name="Vendor\Module\Model\ResourceModel\MyEntity\Grid\Collection" type="Magento\Framework\View\Element\UiComponent\DataProvider\SearchResult"> <arguments> <argument name="mainTable" xsi:type="string">vendor_my_entity</argument> <argument name="resourceModel" xsi:type="string">Vendor\Module\Model\ResourceModel\MyEntity\Collection</argument> </arguments> </virtualType> </config> |
1 2 3 4 5 6 7 8 9 10 11 12 13 14 15 16 17 18 19 20 21 22 23 24 25 26 27 28 29 30 31 32 33 34 35 36 37 38 39 40 41 42 43 44 45 46 47 48 49 50 51 52 53 54 55 56 57 58 59 60 61 62 63 64 65 66 67 68 69 70 71 72 73 74 75 76 77 78 | xml version="1.0" ?> <listing xmlns:xsi="http://www.w3.org/2001/XMLSchema-instance" xsi:noNamespaceSchemaLocation="urn:magento:module:Magento_Ui:etc/ui_configuration.xsd"> <argument name="context" xsi:type="configurableObject"> <argument name="class" xsi:type="string">Magento\Framework\View\Element\UiComponent\Context</argument> <argument name="namespace" xsi:type="string">my_listing_index</argument> </argument> <argument name="data" xsi:type="array"> <item name="js_config" xsi:type="array"> <item name="provider" xsi:type="string">my_listing_index.my_listing_grid_data_source</item> <item name="deps" xsi:type="string">my_listing_index.my_listing_grid_data_source</item> </item> <item name="spinner" xsi:type="string">my_listing_columns</item> <item name="buttons" xsi:type="array"> <item name="add" xsi:type="array"> <item name="name" xsi:type="string">add</item> <item name="label" translate="true" xsi:type="string">Add new Entity</item> <item name="class" xsi:type="string">primary</item> <item name="url" xsi:type="string">*/*/new</item> </item> </item> </argument> <dataSource name="my_listing_grid_data_source"> <argument name="dataProvider" xsi:type="configurableObject"> <argument name="class" xsi:type="string"> Magento\Framework\View\Element\UiComponent\DataProvider\DataProvider </argument> <argument name="name" xsi:type="string">my_listing_grid_data_source</argument> <argument name="primaryFieldName" xsi:type="string">id</argument> <argument name="requestFieldName" xsi:type="string">id</argument> <argument name="data" xsi:type="array"> <item name="config" xsi:type="array"> <item name="component" xsi:type="string">Magento_Ui/js/grid/provider</item> <item name="update_url" path="mui/index/render" xsi:type="url"/> <item name="storageConfig" xsi:type="array"> <item name="indexField" xsi:type="string">id</item> </item> </item> </argument> </argument> </dataSource> <listingToolbar name="listing_top"> <argument name="data" xsi:type="array"> <item name="config" xsi:type="array"> <item name="sticky" xsi:type="boolean">true</item> </item> </argument> <bookmark name="bookmarks"/> <columnsControls name="columns_controls"/> <filters name="listing_filters"/> <paging name="listing_paging"/> </listingToolbar> <columns name="my_listing_columns"> <selectionsColumn name="ids"> <argument name="data" xsi:type="array"> <item name="config" xsi:type="array"> <item name="indexField" xsi:type="string">id</item> </item> </argument> </selectionsColumn> <column name="name"> <argument name="data" xsi:type="array"> <item name="config" xsi:type="array"> <item name="filter" xsi:type="string">text</item> <item name="sorting" xsi:type="string">asc</item> <item name="label" translate="true" xsi:type="string">Name</item> </item> </argument> </column> <actionsColumn class="Vendor\Module\Ui\Component\Listing\Column\MyEntityActions" name="actions"> <argument name="data" xsi:type="array"> <item name="config" xsi:type="array"> <item name="indexField" xsi:type="string">id</item> </item> </argument> </actionsColumn> </columns> </listing> |

6.3 Define system configuration XML and configuration scope
Define basic terms and elements of system configuration XML, including scopes. How would you add a new system configuration option?
Magento 2 allows to extend the system configuration with modules and integrate the custom module configuration into the Magento 2 system menu.To add such custom configurations, use1 2 3 4 5 6 7 8 9 10 11 12 13 14 15 16 17 18 19 20 21 22 23 24 25 26 27 28 29 30 31 32 33 34 35 36 37 38 39 40 41 42 43 44 45 46 47 48 49 50 51 52 53 | xml version="1.0"?> <config xmlns:xsi="http://www.w3.org/2001/XMLSchema-instance" xsi:noNamespaceSchemaLocation="urn:magento:module:Magento_Config:etc/system_file.xsd"> <system> <tab id="custom_tab" translate="label" sortOrder="100"> <label>Custom Tab</label> </tab> <section id="custom_section" translate="label" type="text" sortOrder="100" showInDefault="1" showInWebsite="1" showInStore="1"> <label>Custom Config Section</label> <tab>custom_tab</tab> <group id="general" translate="label" type="text" sortOrder="10" showInDefault="1" showInWebsite="1" showInStore="1"> <label>General</label> <field id="yesno_dropdown" translate="label" type="select" sortOrder="10" showInDefault="1" showInWebsite="1" showInStore="1"> <label>Custom Yes/No Dropdown</label> <source_model>Magento\Config\Model\Config\Source\Yesno</source_model> </field> <field id="custom_dropdown" translate="label" type="select" sortOrder="10" showInDefault="1" showInWebsite="1" showInStore="1"> <label>Dropdown with custom source model example</label> <source_model>Vendor\Module\Model\Config\Source\Custom</source_model> </field> <field id="custom_text" translate="label" type="text" sortOrder="20" showInDefault="1" showInWebsite="1" showInStore="1"> <label>Custom Text</label> </field> <field id="logo" translate="label" type="image" sortOrder="30" showInDefault="1" showInWebsite="1" showInStore="1"> <label>Custom Image</label> <backend_model>Magento\Config\Model\Config\Backend\Image</backend_model> <upload_dir config="system/filesystem/media" scope_info="1">logo</upload_dir> <base_url type="media" scope_info="1">logo</base_url> <comment><![CDATA[Allowed file types: jpeg, gif, png.]]></comment> </field> <field id="depends_example" translate="label" type="text" sortOrder="40" showInDefault="1" showInWebsite="1" showInStore="1"> <label>Dependant text field example with validation</label> <depends> <field id="*/*/custom_dropdown">1</field> </depends> <validate>validate-no-empty</validate> </field> <field id="custom_textarea" translate="label" type="textarea" sortOrder="50" showInDefault="1" showInWebsite="1" showInStore="1"> <label>Custom Textarea</label> </field> <field id="custom_secret" type="obscure" translate="label" sortOrder="70" showInDefault="1" showInWebsite="1" showInStore="1"> <label>Custom Secret Field</label> <backend_model>Magento\Config\Model\Config\Backend\Encrypted</backend_model> </field> </group> </section> </system> </config> Now let us examine the code details: <tab id="custom_tab" translate="label" sortOrder="100"> <label>Custom Tab</label> </tab> |
 Then
Then1 2 3 4 5 | <section id="custom_section" translate="label" type="text" sortOrder="100" showInDefault="1" showInWebsite="1" showInStore="1"> <label>Custom Config Section</label> <tab>custom_tab</tab> ... </section> |
Setting Default Value
To set default value for any of the custom settings, create a1 2 3 4 5 6 7 8 9 10 11 | xml version="1.0"?> <config xmlns:xsi="http://www.w3.org/2001/XMLSchema-instance" xsi:noNamespaceSchemaLocation="urn:magento:module:Magento_Store:etc/config.xsd"> <default> <custom_section> <general> <yesno_dropdown>1</enable> <custom_text>Test Value</display_text> </general> </helloworld> </default> </config> |
What is the difference in this process for different option types (secret, file)?
Simple Text Field
1 2 3 | <field id="custom_text" translate="label" type="text" sortOrder="20" showInDefault="1" showInWebsite="1" showInStore="1"> <label>Custom Text</label> </field> |
Yes/No Dropdown
1 2 3 4 | <field id="yesno_dropdown" translate="label" type="select" sortOrder="10" showInDefault="1" showInWebsite="1" showInStore="1"> <label>Custom Yes/No Dropdown</label> <source_model>Magento\Config\Model\Config\Source\Yesno</source_model> </field> |
Dropdown With The Custom Source model
1 2 3 4 | <field id="custom_dropdown" translate="label" type="select" sortOrder="10" showInDefault="1" showInWebsite="1" showInStore="1"> <label>Dropdown with custom source model example</label> <source_model>Vendor\Module\Model\Config\Source\Custom</source_model> </field> |
1 2 3 4 5 6 7 8 9 10 11 12 13 14 15 16 17 18 19 | <?php namespace Vendor\Model\Model\Config\Source; class Custom implements \Magento\Framework\Option\ArrayInterface { /** * @return array */ public function toOptionArray() { return [ ['value' => 0, 'label' => __('Zero')], ['value' => 1, 'label' => __('One')], ['value' => 2, 'label' => __('Two')], ]; } } |
File Upload
1 2 3 4 5 6 7 | <field id="logo" translate="label" type="image" sortOrder="30" showInDefault="1" showInWebsite="1" showInStore="1"> <label>Custom Image</label> <backend_model>Magento\Config\Model\Config\Backend\Image</backend_model> <upload_dir config="system/filesystem/media" scope_info="1">logo</upload_dir> <base_url type="media" scope_info="1">logo</base_url> <comment><![CDATA[Allowed file types: jpeg, gif, png.]]></comment> </field> |
Dependent Field
1 2 3 4 5 6 7 | <field id="depends_example" translate="label" type="text" sortOrder="40" showInDefault="1" showInWebsite="1" showInStore="1"> <label>Dependant text field example with validation</label> <depends> <field id="*/*/yesno_dropdown">1</field> </depends> <validate>validate-no-empty</validate> </field> |
Textarea
1 2 3 | <field id="custom_textarea" translate="label" type="textarea" sortOrder="50" showInDefault="1" showInWebsite="1" showInStore="1"> <label>Custom Textarea</label> </field> |
Secret Field
1 2 3 4 | <field id="custom_secret" type="obscure" translate="label" sortOrder="70" showInDefault="1" showInWebsite="1" showInStore="1"> <label>Custom Secret Field</label> <backend_model>Magento\Config\Model\Config\Backend\Encrypted</backend_model> </field> |
Describe system configuration data retrieval. How do you access system configuration options programmatically?
To access system configuration options programmatically, create a class. Inside it, create a method for obtaining the value of the needed configuration and determine the constant that contains the path to the configuration value. Example:1 2 3 4 5 6 7 8 9 10 11 12 13 14 15 16 17 18 19 | <?php namespace BelVG\Test\Helper; use Magento\Framework\App\Helper\AbstractHelper; use Magento\Store\Model\ScopeInterface; class Config extends AbstractHelper { const XML_PATH_TEST_VALUE = 'belvg/settings/test_value'; /** * @return string */ public function getTestValue() { return (string) $this->scopeConfig->getValue(self::XML_PATH_TEST_VALUE, ScopeInterface::SCOPE_STORE); } } |
1 2 3 4 5 6 7 8 9 10 | xml version="1.0"?> <config xmlns:xsi="http://www.w3.org/2001/XMLSchema-instance" xsi:noNamespaceSchemaLocation="urn:magento:module:Magento_Store:etc/config.xsd"> <default> <belvg> <settings> <test_value backend_model="Magento\Config\Model\Config\Backend\Encrypted"/> </settings> </belvg> </default> </config> |
6.4 Utilize ACL to set menu items and permissions
Describe how to set up a menu item and permissions. How would you add a new menu item in a given tab?
Magento 2 allows to customize and add new points to backend menu.To add new menu, use the following file1 2 3 4 5 6 7 | xml version="1.0"?> <config xmlns:xsi="http://www.w3.org/2001/XMLSchema-instance" xsi:noNamespaceSchemaLocation="urn:magento:module:Magento_Backend:etc/menu.xsd"> <menu> <add id="Vendor_Module::second_level" title="Second Level Menu" module="Vendor_Module" sortOrder="10" action="Vendor_Module/action_path" resource="Magento_Backend::content" parent="Magento_Backend::system_design l"/> </menu> </config> |
- id – record identifier; should be unique. {Vendor_Module}::{menu_description}.
- title – displayed title
- module – sets the module that module item belongs to in Vendor_Module format.
- sortOrder – sets the position of a menu item. The options with smaller values will be displayed higher.
- parent – id of other menu item. Defines the menu as embedded.
- action – url pages, which the menu item refers to.
- resource – sets ACL rule, necessary for viewing a certain menu item.
How would you add a new tab in the Admin menu?
The process of adding a new tab is similar to adding a new item, but the item, responsible for a new tab, does not contain a parent item.1 2 3 4 5 6 7 | xml version="1.0"?> <config xmlns:xsi="http://www.w3.org/2001/XMLSchema-instance" xsi:noNamespaceSchemaLocation="urn:magento:module:Magento_Backend:etc/menu.xsd"> <menu> <add id="Vendor_Module::first_level" title="First Level Menu" module="Vendor_Module" sortOrder="51" resource="Magento_Backend::content"/> <add id="Vendor_Module::second_level" title="Second Level Menu" module="Vendor_Module" sortOrder="10" action="Vendor_Module/action_path" resource="Magento_Backend::content" parent="Vendor_Module::first_level"/> </menu> </config> |
How do menu items relate to ACL permissions?
To restrict access to a certain menu item with a certain ACL rule, insert it in the resource parameter during the menu configuration:1 2 3 4 5 6 7 8 | <module_dir>/etc/adminhtml/menu.xml xml version="1.0"?> <config xmlns:xsi="http://www.w3.org/2001/XMLSchema-instance" xsi:noNamespaceSchemaLocation="urn:magento:module:Magento_Backend:etc/menu.xsd"> <menu> <add id="Vendor_Module::first_level" title="First Level Menu" module="Vendor_Module" sortOrder="51" resource="Vendor_Module::acl1"/> <add id="Vendor_Module::second_level" title="SEcond Level Menu" module="Vendor_Module" sortOrder="10" action="Vendor_Module/action_path" resource="Vendor_Module::acl2" parent="Vendor_Module::first_level"/> </menu> </config> |
Describe how to check for permissions in the permissions management tree structures. How would you add a new user with a given set of permissions?
Magento 2 allows to separate the Admin Users permissions and create admin users groups with a variety of permissions.Defining ACL
Use1 2 3 4 5 6 7 8 9 10 11 12 | xml version="1.0"?> <config xmlns:xsi="http://www.w3.org/2001/XMLSchema-instance" xsi:noNamespaceSchemaLocation="urn:magento:framework:Acl/etc/acl.xsd"> <acl> <resources> <resource id="Magento_Backend::admin"> <resource id="Vendor_Module::acl1" title="ACL Parent Rule" sortOrder="51"> <resource id="Vendor_Module::acl2" title="ACL Child Rule" sortOrder="10"/> </resource> </resource> </resources> </acl> </config> |
- id – resource identifier. Applied in menu and actions configuration for identifying the resource. It should be unique and set in the following format: Vendor_Module::resource_name.
- title – resource title
- sortOrder – resource order in resource tree
How can you do that programmatically?
To restrict permissions to actions with ACL, override _isAllowed method or ADMIN_RESOURCE constant in the class of this action.1 2 3 4 | protected function _isAllowed() { return $this->_authorization->isAllowed(‘Vendor_Module::acl2'); } |
const ADMIN_RESOURCE = 'Vendor_Module::acl2';To create user role, use classes Magento\Authorization\Model\RoleFactory and Magento\Authorization\Model\RulesFactory1 2 3 4 5 6 7 8 9 10 11 12 13 14 15 16 | $role = $this->roleFactory->create(); $role->setParentId(0) ->setTreeLevel(1) ->setSortOrder(1) ->setRoleType(Group::ROLE_TYPE) ->setUserId(0) ->setUserType(UserContextInterface::USER_TYPE_ADMIN) ->setRoleName('Example Administrator'); $role->save(); /** @var \Magento\Authorization\Model\Rules $rule */ $rule = $this->rulesFactory->create(); $rule->setRoleId($role->getId()) ->setResourceId($this->rootResource->getId()) ->setPrivilegies(null) ->setPermission('allow'); $rule->save(); |
1 2 3 4 5 6 7 8 9 | $adminUser = $this->userFactory->create(); $adminUser->setRoleId(ROLE_ID) ->setEmail('admin' . $i . '@example.com') ->setFirstName('Firstname') ->setLastName('Lastname') ->setUserName('admin' . $i) ->setPassword('123123q') ->setIsActive(1) ->save(); |