

The following information will be very helpful for beginners and everyone who just installed Prestashop 1.7 and doesn’t know what to do next. Here I will cover the questions regarding what do you need to start with, to create your own Prestashop template. Well, that’s what you definitely should have before starting:
- Sound knowledge of CSS, Js, HTML, Smarty 3 template engine, localization, data model and modularization in Prestashop;
- Sound knowledge of webpack bundling process;
- Understanding of node.js, node.js modules, NPM package manager;
- Fundamental knowledge of GIT
Not long ago Prestashop 1.7 has been released and as you know there are many
changes in it. Here is the short list of the most important changes:
- Old themes are not compatible with new 1.7 version;
- Theme files structure has been changed;
- Now it’s possible to connect various styles and scripts, depending on pages and priority (it can be configured by theme.yml);
- Bootstrap 4;
- Ability to create and use custom hooks;

PrestaShop Development
Take your online store to the next level with BelVG PrestaShop Development
Visit the page1. Initial configuration
It’s required to have a fundamental GIT knowledge. Let’s clone Prestashop repository to our global directory on web server:
|
1 |
$ git clone https://github.com/PrestaShop/PrestaShop <folder_name> |
Further it’s necessary to switch from the current dev branch to the stable version. To do that, let’s follow to the directory with repository and run the following commands:
|
1 2 |
$ cd <folder_name> $ git tag |
After that you will face the list of available versions:

Let’s switch to 1.7.x.x version (in my case it’s 1.7.0.3)
|
1 |
$ git checkout 1.7.0.3 |
So now everything is ready for installation.
- At first Install Composer;
- Navigate to the root directory of the cloned repository and run the command:
1composer install
It’s important, that in order to use this installation method you should already have enabled Dev Mode in Prestashop.
2. Starting template as a prototype

After the first step is completed, we should decide which template is the best fit for creating your new one. At the moment there are two themes provided for developers: classic and StarterTheme. The difference between them is only that StarterTheme has only basic functionality, rather then Classic is a default theme (you can find source files on the official repository). As for me, I prefer to use Classic one. And after you cloned Prestashop, I’m sure you already have source files and Classic theme itself in themes/ directory, but what concerns how to install and configure StarterTheme, all this information you can find on github.
3. Environment configuration
After you decide what theme to use as a prototype, let’s start operational environment installation:
For Windows users:
|
1 |
$ npm i -g webpack |
For others:
|
1 |
$ sudo npm i -g webpack |
After that let’s navigate to <theme_folder>/_dev/ directory, and if you have already read our article about template files structure, then you should know that all source files are carried in this directory, as well as assembler config file and of course package.json, in which all the dependencies are described. So let’s define these dependencies:
|
1 |
<theme_folder>/_dev$ npm install |
Here we almost completed indispensable minimum of required configurations and now we’re ready to start the most important part – theme creation. And if you are not familiar with the technologies described above, it is highly recommended to read more about node.js, npm/yarn and webpack. Or just request a consultation.

Now you can run the bundler. In order to do that just navigate to <theme_folder>/_dev and run:
|
1 |
$ webpack |
– bundling all the Prestashop theme source files;
|
1 |
$ webpack -w |
– tracking mode: bundler doesn’t stop its work, but is waiting for any changes and performs recompilation (very fast by means of caching);
Webpack is a pretty powerful bundler, and if you are still not familiar with it, it’s time to get into. No matter what pre(post)processor you use, webpack will work properly with any type, as long as you configure it before. The same with js, you can use everything you want: es – 2015, coffeescript, typescript.
Additionally it would be great to set up livereload to speed up development process. We will cover this point in the next part of the article and will start first steps of the theme editing.
Need a great PrestaShop site? Visit our store with modules.

Partner With Us
Looking for a partner to grow your business? We are the right company to bring your webstore to success.
Talk to Andrey
You are welcome! :)
OK, thank you very much for everything!!
Ananda, the third part of the article is at work. Unfortunately, I can’t announce the certain date, when it’s ready because all of our authors are creating a huge tutorial according to the certification exam right now.
Subscribe to our blog and follow us on social media (Tw, FB) to stay tuned.
Thank you very much Iryna!
Perfect !!!!
I installed prestashop by console and everything working !!
Do you know more about this tutorial?
I’m standing in part2, I need part 3
What to do after? How to start editing the template? I have Stylus install, what to do now?
Thank you very much!!
Sure!
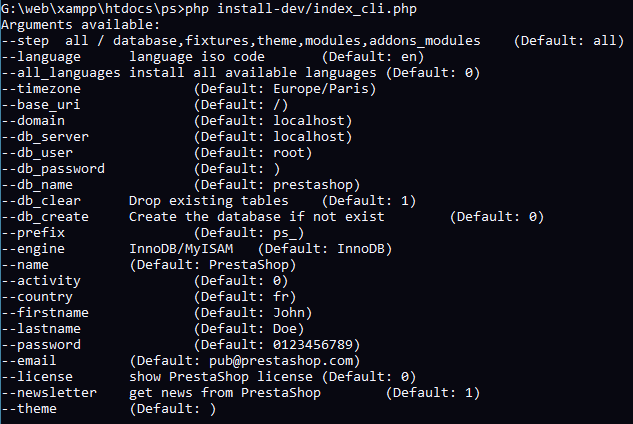
Let me also remind that there are two ways to install Prestashop. The first one is to do an ordinary installation within web version. The second one is to use the console. In my opinion, the second option is faster and more convenient.
Run the following command to install Prestashop via console:
php install-dev\index_cli.phpBy default, you’ll get the Help information with all the arguments necessary for installation.
David kindly shares his script for speedy Prestashop installation:
//mysqladmin -h %DB_SERVER% -P %DB_PORT% -u %DB_USER% -p %DB_PASS% create %DB_NAME% --force

mysqladmin -h localhost -P 3306 -u root create prestashop_17-local --force  // Data Base creating
php install-dev/index_cli.php --base_uri="/path_to_prestashop/" --domain="localhost:80" --db_server="localhost:3306" --db_name="prestashop_17-local" --db_user=root --db_password="" --firstname="Fn" --lastname="Ln" --password="mySuperSercretPassword" --email="admin@localhost" --language="en" --country="us" --newsletter=0 --send_email=0
Hi Iryna
Thanks for your answer. Perfect, I understand what to do with the file theme.yml
thank you very much!
But, I have the doubt of before.
After doing all the steps of the first tutorial with success, do I have to install prestashop on my route?
Sorry for my English :(
Hi Ananda!
It doesn’t matter when to edit theme.yml, just be sure that the theme is active.
However, sometimes you don’t see the recent changes while editing the theme.yml file. In this case, you should switch the theme. Firstly, select any other theme, and then switch again to the theme, where you’ve just edited theme.yml file.
Thanks for this tutorial!
Everything installed and working in my laptop.
But I have a concern, I have now to install prestashop on, for example my route:
C: \ xampp \ htdocs \ prestashop172 ?
Do I have to run prestashop install before or after modifying the theme.yml file?
I’m waiting impatiently for part 3 of this tutorial
Thank you
ok after making this completly your way it is working! :) Thank you. Previously i was using downloaded files from prestashop site.