While working on your theme, we may often need to change modules, specifically their templates, appearance and scripts. Of course, theoretically we can do it right in the module folder, but after you update Prestashop, all of the changes will be overwritten by new files. Therefore, it is better to rewrite the module files in your theme. We can do this by placing the overridden module files at a specific path in our theme. In Prestashop 1.6 and 1.7 this happens in a similar way, but there are some nuances of which I’ll tell you below.
Overriding templates and assets
Let’s say we want to override the files of the module “expample_module”, which are located in the root folder of the module: template file (“example.tpl”), styles file (“example.css”), scripts file (“example.js”).
For this purpose, we should copy these files into the following folders of your theme (“our_theme”) in Prestashop 1.6:
- themes/our_theme/css/modules/expample_module/example.css
- themes/our_theme/js/modules/expample_module/example.js
- themes/our_theme/modules/expample_module/example.tpl
While in Prestashop 1.7 this path is a little different:
- themes/our_theme/modules/expample_module/example.css
- themes/our_theme/modules/expample_module/example.js
- themes/our_theme/modules/expample_module/example.tpl
As we can see, working with the overridden files of the module is much easier in Prestashop 1.7 than in 1.6, since all the overridden files are collected in one module folder.
Here is a curious fact. If we create an empty overriding style file (for example, “example.css”), it will overwrite the existing one and the module will not have any predefined styles. This is very convenient if we want to set our module’s appearance from scratch, rather than reworking the preinstalled one.
Overriding using the “include” method
When you override module template files, there are some peculiarities that you should know about. For example, we redefine the “example.tpl” file of the “example_module” module, then the system will initially search this file in our theme at themes/our_theme/modules/expample_module /example.tpl.
If it doesn’t find it there, it will look for it in the module’s folder at modules/expample_module /example.tpl.
Here everything is clear. However, if this template file “example.tpl” includes another template file (for example, “example-include.tpl”), we will have to override the “example-include.tpl” file even if we do not plan to change it, otherwise, the module will not work correctly. But that’s not all. If you want to override the “example-include.tpl” file which the “example.tpl” file refers to, you will have to override the “example.tpl” file, even if you did not plan to change it, otherwise, the module will not work correctly.
Pay attention to the inclusions of module template files when you decide to override them.
For reference, the module files are included into each other using the following code:
|
1 |
{include file='./included-template.tpl'} |
Prestashop 1.7 has a new cool way to include module template files, which solves the issue described above:
|
1 |
{include file = 'module: MODULE_NAME / views / templates / front / included-template.tpl'} |
Where MODULE_NAME is the name of the module (folders with the module).
SmartyDev helps you debug
Prestashop 1.7 has one convenient tool — SmartyDev. It helps to find a path to the module templates files. This is especially useful when multiple modules can be overridden and it’s not clear where to find their related files.
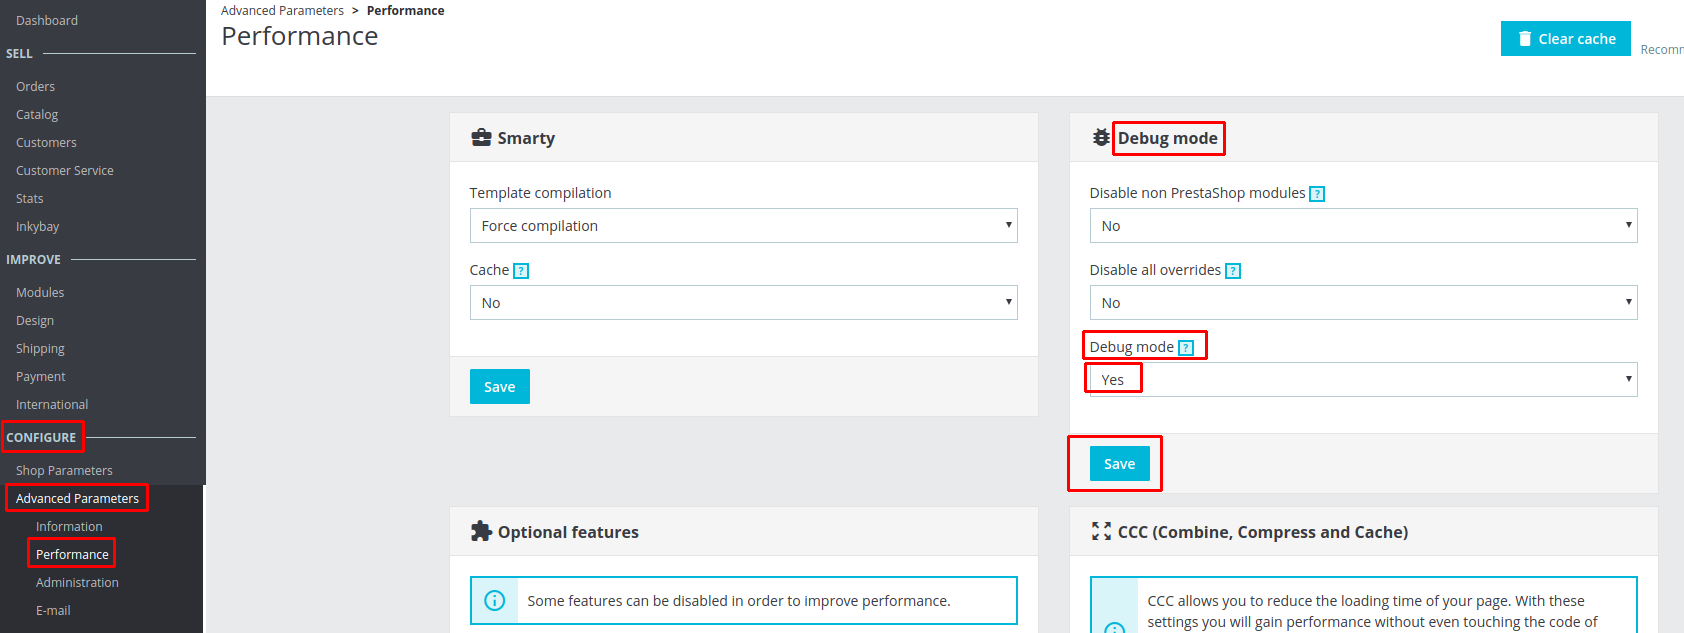
You can enable this tool on the Admin page. To do this, go to “CONFIGURE ➜ Advanced Parameters ➜ Performance”. In the “Debug mode” section select “Yes” for the “Debug mode” parameter and click “Save”.
After enabling this tool, the following entries appear on the site layout:
|
1 2 3 4 5 6 7 8 9 10 11 12 13 |
... <nav class="header-nav-top"> <!-- begin module:ps_contactinfo/nav.tpl --> <!-- begin /var/www/uniccustom.com/themes/unicwear/modules/ps_contactinfo/nav.tpl --> <div id="_desktop_contact_link" style="display: none"> <div id="contact-link"> <a href="http://uniccustom.com/en/contact-us">Contact us</a> </div> </div> <!-- end /var/www/uniccustom.com/themes/unicwear/modules/ps_contactinfo/nav.tpl --> <!-- end module:ps_contactinfo/nav.tpl --> </nav> ... |
As we can see, the path to the module’s template file “ps_contactinfo” is specified in the comments.
Check out our recent article Prestashop 1.6 vs 1.7 Comparison to learn more about the differences between the two versions of Prestashop.
Need a quality webstore design? Find a suitable theme at BelVG store.


