When it comes to Prestashop 1.7, it should be mentioned that the developers have implemented the additional features to deal with Smarty.
{url}
{url} function is meant for working with URL addresses. It works via the standard class PrestaShop «Link». For example,
|
1 2 3 4 5 |
<div class="test-url"> {url entity=address id=$id_address} {url entity=address params=['id_address' => $id_address]} {url entity=address id=$id_address params=['delete' => 1]} </div> |
The result,
example.com/en/address
example.com/en/address
example.com/en/address?delete=1
In Prestashop 1.6, there’s no such function for Smarty, that’s why you have to collect URL into an array and do it for your needs. For example,
|
1 |
$link-> getCMSLink('pagenamehere') |
– template code.
|
1 |
$this->context->link->getCMSLink('namehere') |
– php file code.
*Be careful while dealing with “Link”. If you have to make a friendly URL, there can be some problems, if something is done incorrectly.
{widget}
{widget} allows considering the module connection in a different way. Instead of using standard hook, you can use {widget}. For example,
|
1 2 3 |
<div id="sedibar" class="left-sidebar" > { widget name="ps_contactinfo" } </div> |
If your standard module template is replaced, you can put the link to the necessary hook into {widget}. For example,
|
1 2 3 4 5 |
< div id="main" class="main"> <div class="main__contact-block"> { widget name="ps_contactinfo" hook="displayMainContact" } </div> </div> |
Pay attention to the fact that all {widget} work only with modules for Prestashop 1.7 the names of which start from «ps_».
In Prestashop 1.6 you need to go to the folder that contains the module \modules\blockcontactinfos and add your custom hook in the file blockcontactinfos.php. For example,
|
1 2 3 |
public function hookMyCustomHook($params){ return $this->display(__FILE__, 'mymodule.tpl'); } |
Then you can call it anywhere. For example,
|
1 2 3 4 5 |
<div id="main" class="main"> <div class="main__contact-block"> {hook h='myCustomHook'} </div> </div> |
Actually, in Prestashop 1.6 there’s one more method. You can go to the module directly. But this method is better to use if you are master of complex structures (e. x. hook in hook and one more hook is implied). For example,
|
1 |
{Module::getInstanceByName('blockcontactinfos')->hookFooter([])} |
The result is that the store data is displayed in the created block.
{widget_block}
Using {widget_block}, you can rewrite the template. The module will use your written code as well as the template file code.
As an example, let’s consider the module ps_imageslider \modules\ps_imageslider\views\templates\hook\list.tpl.
|
1 2 3 4 5 6 7 8 9 10 11 12 13 14 15 16 17 18 19 20 |
{widget_block name="ps_imageslider"} <div class="panel"> <h3><iclass="icon-list-ul"></i> {l s='Slides list' d='Modules.Imageslider.Admin'} <span class="panel-heading-action">****</span> </h3> <div id="wrapper-sliders"> <div id="slides"> {foreach from=$slides item=slide} <div id="slides_{$slide.id_slide}" class="panel"> <div class="row"> <div class="col-md-12"> <img src="{$image_baseurl {$slide.image}" alt="{$slide.title}" class="img-thumbnail" /> </div> </div> </div> {/foreach} </div> </div> {/widget_block} |
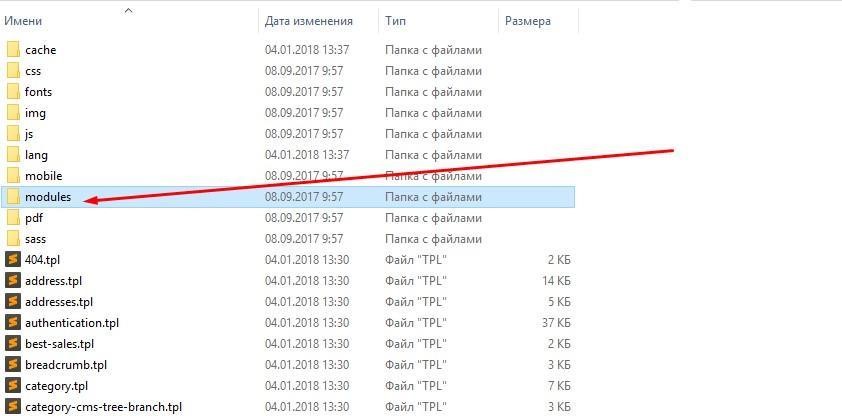
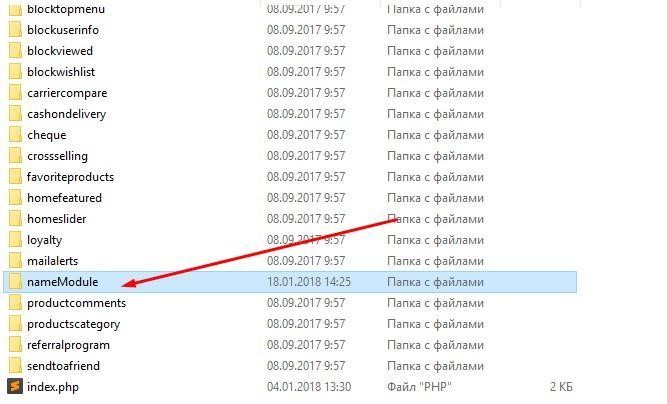
In Prestashop 1.6 in your theme template (pic 1) of the modules folder you need to create a folder (pic 2) with the name of module structure you want to change (pic 3) and there create *.tpl (pic 4) and make its own structure.
Picture 1
Picture 2
Picture 3
Picture 4
{render}
The function allows selecting a variable from the template. For example,
|
1 |
{render file='customer/_partials/login-form.tpl' ui=$login_form} |
In the template login-form.tpl, the variable «UI» is described and can be used with the help of {render}. {render} is the PrestaShop function which has been added in Smarty.
In Prestashop 1.6 “include” is used. So you can put the part of the code, function or variable somewhere according to the user’s needs. But you need to specify the pathname of the code file being used.
NOTE! It can lead to negative consequences. Your website may be hacked, as the hacker is provided with significant files data.
For example,
— mymodule.php
— views
—- templates
—— hook
—— displayFooBarTemplate.tpl
——– inc
———- foo.tpl
———- bar.tpl
The absolute pathname:
|
1 2 3 4 5 6 7 |
protected function displayFooBarTemplate() { global $smarty ... $smarty->assign('module_templates', dirname(__FILE__).'/views/templates/'); return $this->display(__FILE__, 'displayFooBarTemplate.tpl'); } |
Then in your file tpl (displayFooBarTemplate.tpl):
|
1 2 |
{include file="{$module_templates}hook/inc/modal/foo.tpl"} {include file="{$module_templates}hook/inc/modal/bar.tpl"} |
The relative pathname:
|
1 2 |
{include './inc/foo.tpl'} {include './inc/modal/bar.tpl'} |
{form_field}
The function allows form elements to have the common design. Before there was misunderstanding between frontend and backend developers when they had to use form fields differently. Now the developer can apply almost the same parameters for form fields. For example,
|
1 2 |
_partials/form-fields.tpl. {form_field field=$field} |
$field – array where parameters are specified.
|
1 2 3 4 5 6 7 8 |
$ field = [ 'name' => 'user_email', 'type' => 'email', 'required' => 1, 'label' => 'Email', 'value' => null, 'availableValues' => [], 'errors' => [], ] |
In Prestashop 1.6 you have to do it manually. For example,
|
1 2 3 4 5 6 7 8 9 10 11 12 13 |
<label class="radio-inline"> <span class="custom-radio"> <input name="{$field.name}" type="radio" value="{$value}" {if $field.required}required{/if} {if $value eq $field.value} checked {/if} > <span></span> </span> {$label} </label> |
NOTE: if it’s necessary to add a custom attribute to the form, it can’t be performed via {form_field} and you’ll have to do it manually also.
Classname
It’s a modifier that helps to avoid making mistakes when creating class or line. It allows the following:
1. to make your class or line lowercase.
2. to replace all characters different to ASCII.
3. to replace all characters (!@#$%^&*()) to dash (–).
4. to replace all spaces as well as low lines (_) and make class (line) the same.
For example,
|
1 2 3 4 |
<div class="test-classname"> {assign var=attr value='WiDzaClassname'} {$attr|classname} </div> |
|
1 2 3 4 |
<div class="test-classname"> {assign var=attr value='WiDźaClàssnåme'} {$attr|classname} </div> |
|
1 2 3 4 5 |
<div class="test-classname"> {assign var=attr value='WiDźaClàssnåmederrddddss--!&&?$@ˆ*(&-----'} {$attr|classname} </div> |
|
1 2 3 4 5 |
<div class="test--classname"> {assign var=attr value='widź_a-Clàssnåme derrr__ddddss--!&&?$@ˆ*(&-----'} {$attr|classname} </div> |
If you want to use BEM methodology in your project, so there’s no need to use this modifier. In Prestashop 1.6 you have to put class names as well as correctness checking.
Classnames
The modifier takes array where the key is class name and parameters take on boolean value (true/false) in order to define the necessity to get it displayed. For example,
\controllers\front\listing\CategoryController.php
|
1 2 3 4 |
$page['main_classess']['category-id-'.$this->category->id] = true; $page['main_classes']['category-'.$this->category->name] = true; $page['main_classes']['category-id-parent-'.$this->category->id_parent] = true; $page['main_classes']['category-depth-level-'.$this->category->level_depth] = true; |
Go the template where we need to display the necessary class:
\themes\classic\templates\catalog\listing\product-list.tpl
|
1 |
<section id="main" class = "{$page.main_classes|classnames}"> |
The result,
|
1 |
<section id="main" class = "category-women category-id-parent-2 category-depth-level-2"> |
NOTE: Every classname is passed via classname modifier. In Prestashop 1.6 there is no such function.
Now let us take a look at the differences of module development between the two versions of Prestashop.
Module development in Prestashop 1.6 vs 1.7
As you may know, the folder structure has been changed in PrestaShop 1.7. This means that the modules written on Prestashop 1.6 may not work on its 1.7 version.
Why this happens
This happens because Prestashop 1.7 can lack at least some hooks, which you could have used while writing your own module (addProduct, displayCartTotalPriceLabel, deleteProduct, etc. Check out the full list here).
Be careful, these are just a few examples of hooks that are no longer supported in 1.7 version, check your modules before migrating to Prestashop 1.7.
Of course, there are new hooks for creating new modules such as displayCheckoutSummaryTop, actionCartUpdateQuantityBefore, etc (full list of the new hooks). These hooks are only used in the 1.7 version.
How to update the modules from Prestashop 1.6 to 1.7
- Adapt product page modules (js and css files);
- Adapt modules of module pages (js and css files).
Prestashop developers have made the following changes.
- All the variables that are transferred to Smarty have been changed. We recommend that you check whether they are still used in your module.
- Massives are transmitted in Smarty instead of objects.
- The Smarty lines are automatically escaped:
- Delete |escape:‘html‘:’UTF-8’ , but only in front office templates.
- Use nofilter to output HTML.
- It is recommended to use the {URL} function instead of $link, since developers will remove $link in future updates.
- Use the new template call fetch(module:modulename/views/template.tpl).
Payment API update changes the parameters sent to the hooks: hookPaymentReturn and hookDisplayOrderConfirmation
Before:
| Key | Value |
| total_to_pay | The result of $order->getOrdersTotalPaid(). |
| currency | The currency sign (string). |
| currencyObj | The loaded currency (Currency class). |
| objOrder | The current order object (Order class). |
After:
| Key | Value |
| order | The current order object (Order class). |
Here is a codesample that will help you find all the orders.
|
1 2 |
$currency = new Currency($params['order']->id_currency); $total_to_pay = $params['order']->getOrdersTotalPaid() |
Changes made to the product page modules in Prestashop 1.7
The product page has been completely rewritten for version 1.7 to simplify the creation of a product. If you compare version 1.6 with version 1.7, you will notice that in 1.7 there are 8 tabs instead of 12 in 1.6. Here is what the Prestashop 1.6 Admin page looks like:
Now take a look at the new Prestashop 1.7 Admin page:
Meanwhile, the amount of information has increased (combination of generator/manager; new shortcuts; an in-page catalog browser and other niceties). Below you can find the basic information that you will need to create a module for the product page.
Tabs processing
In Prestashop 1.6 you could make a separate tab for each module on the product page. In version 1.7, developers removed it but added a special tab where all modules are placed using the hookDisplayAdminProductsExtra hook.
Back office hook parameters
The parameters no longer come from the query, an array of methods is passed to hookDisplayAdminProductsExtra.
|
1 2 3 4 5 6 7 8 |
public function hookDisplayAdminProductsExtra($params) $params [ "_ps_version", "id_product", "cookie", "cart", "altern" ] |
Assets
URLs for CSS, JS, images, etc. should start with http:// or https://. You can use the method Tools::getCurrentUrlProtocolPrefix () for this purpose.
Form fields
Field names must be created in the array of the hook in [MODULE_NAME][INPUT_NAME] format.
Folder structure in the module
Let’s take a look at the module and its structure. Here is the basic structure:
├── css
│ ├── external-lib.css
│ └── style.css
├── js
│ └── app.js
├── moduledemo.php
└── views
└── templates
└── front
├── included-template.tpl
└── moduledemo.tpl
Redefinition of the module with its assets files in version 1.7 looks like this:
└── modules
├── css
│ ├── external-lib.css
│ └── style.css
├── js
│ └── app.js
└── views
└── templates
└── front
├── included-template.tpl
└── moduledemo.tpl
Everything looks much simpler in version 1.7 compared with 1.6, where we had to create module folders in CSS and JS root folders. Here is the folder structure in Prestashop 1.6:
├── css
│ └── modules
│ └── css
│ ├── external-lib.css
│ └── style.css
├── js
│ └── modules
│ └── js
│ └── app.js
└── modules
└── views
└── templates
└── front
├── included-template.tpl
└── moduledemo.tpl
That is the end of the in-depth review of the differences between Prestashop 1.6 and 1.7. Leave your questions below if you have any, I’ll be glad to answer them.
Looking for a quality PrestaShop solution? Find a suitable one at BelVG store.


Hi David,
Thanks for your questions. We will try to answer them, but before we need some more information on the issue:
1. Could you please specify what do you mean by subscription here? Do you mean modules subscription or the services of our developers?
2. Could provide ftp and admin access for us to take a closer look on the issue?
Cheers!
Hi Ivan,
Very interesting set up you have. I have two questions for you:
1. How much to subscribe and what do I get for my money?
2. Just migrated from 1.6 to 1.7.4.2 and the following functions aren’t working. I get a message saying; “No input file specified.”
• CATALOG -> Products.
• CATALOG -> Stocks.
• CATALOG-> Monitoring-> View.
• MODULES -> Modules & Services.
• MODULES -> Catalog.
• SHOP PARAMETERS -> General
• SHOP PARAMETERS -> Product Settings.
• SHOP PARAMETERS -> Customer Settings.
• ADVANCED PARAMETERS -> Information.
• SHOP PARAMETERS -> Performance.
• SHOP PARAMETERS -> Administration.
• SHOP PARAMETERS -> Import.
I host on Godaddy. Can you please help?
Kind regards,
Jason & David.
Thanks for sharing Ivan!