
When designing an online store, most of the effort is dedicated to the homepage and product pages. And such a seemingly tiny and inconsiderable element as the footer is, in most cases, neglected and poorly, if not entirely overlooked.
In reality, the footer is a very important element, as it’s the final thing your customers see as they scroll down a page, and what comes last always leaves an impression. Therefore, the footer design must be approached with a proper amount of attention and reasoning.
Yet, if your Magento 2 webstore already has a footer and you are dissatisfied with its menu, we offer you three ways of editing the footer menu.
Table of contents:
Method #1: Add the menu to the cms block
Method #2: Edit a footer menu with layout
Method #3: Create a menu template from scratch
Method #1: Add the menu to the cms block
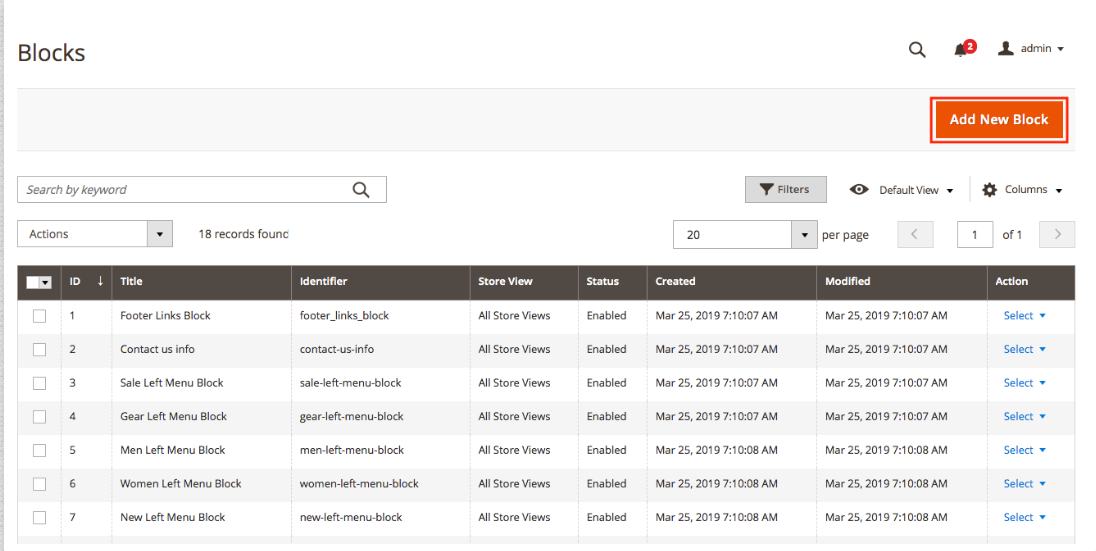
1. Log into the admin panel of Magento 2 and navigate to Content -> Blocks. Press the Add new block button.
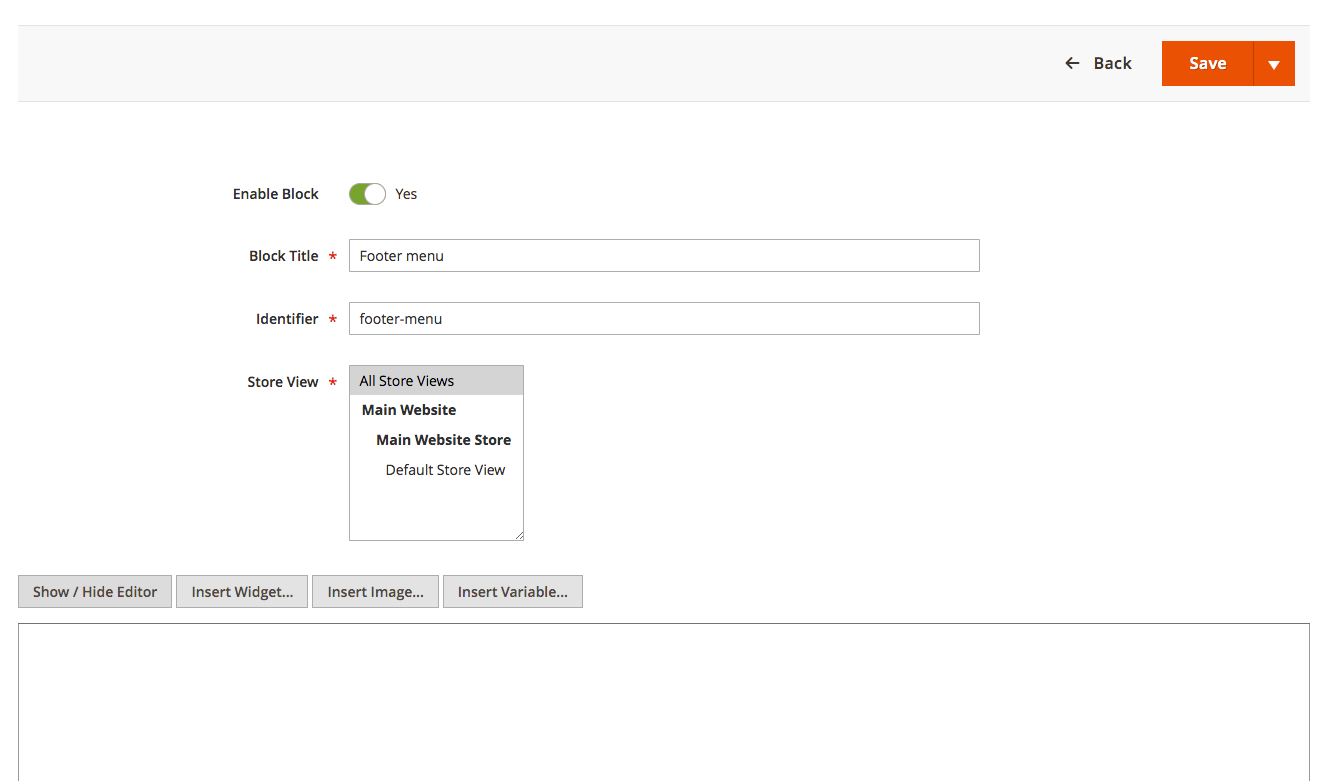
The following menu will appear, where you need to fill in the block title and identifier you specified in the previous step (it is a footer-menu in my case).
To prevent any breakdowns, press the Show/Hide Editor and add the following code:
|
1 2 3 4 5 6 7 8 9 10 |
<div class="menu"> <h4>Menu</h4> <ul> <li><a href="#">link #1</a></li> <li><a href="#">link #2</a></li> <li><a href="#">link #3</a></li> <li><a href="#">link #4</a></li> <li><a href="#">link #5</a></li> </ul> </div> |
Save the block.
2. Next, go to Content -> Widgets to add a new widget. Press Add Widget, set the Type field at CMS Static Block and select your theme name in the Design Theme field. When finished, press Continue.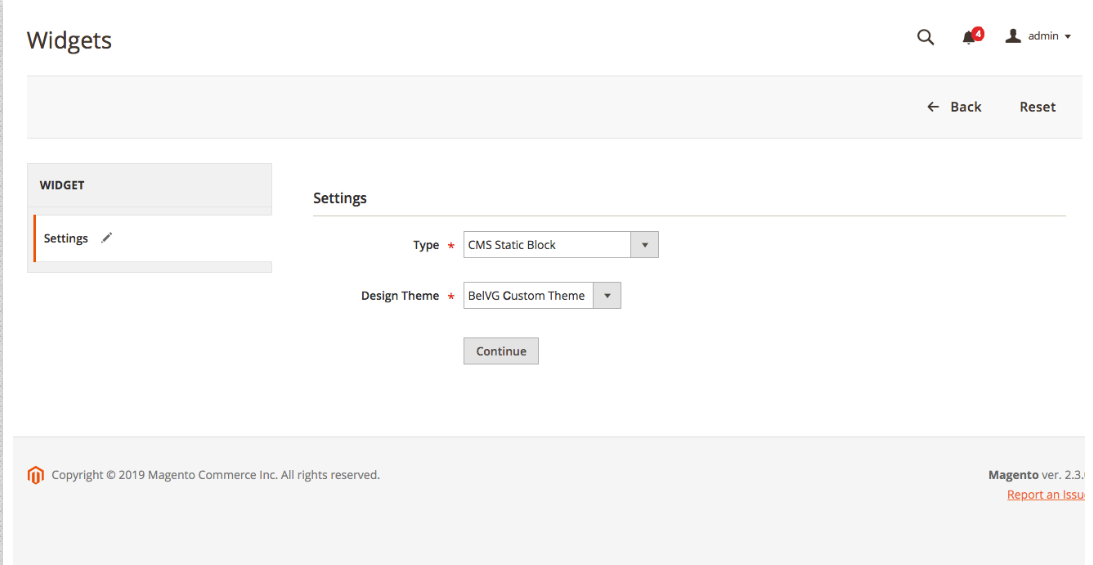
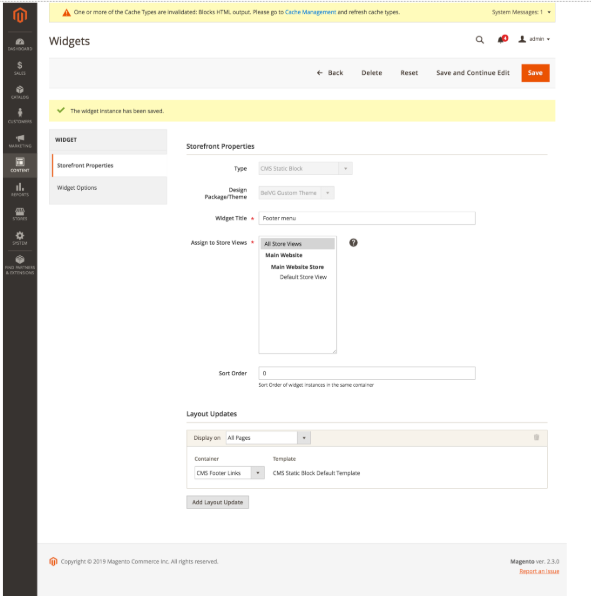
The following fields will appear; fill them in the way it is in the screenshot below. You can learn more about widgets in Magento 2 here.
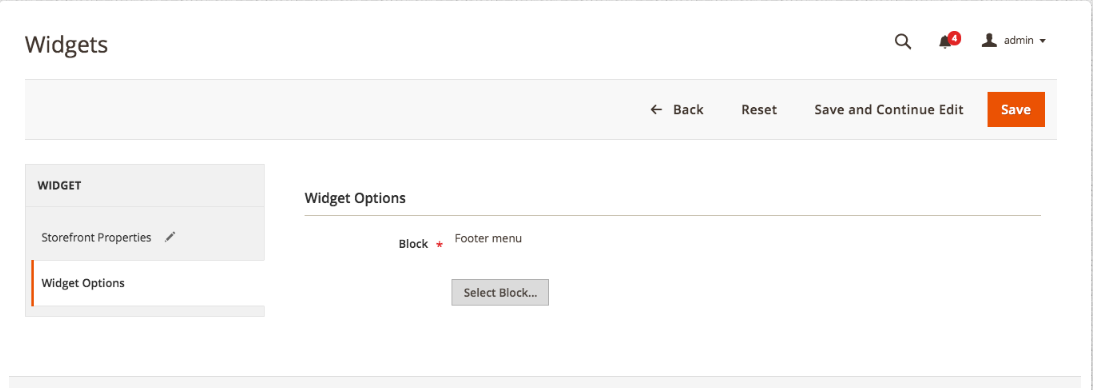
Go to the Widget Options tab and select the CMS block we have created.
Press the Save button in the upper right corner. If the following menu appears, it means you have done everything correctly.
3. Elaborate your menu by creating:
– folders and files for the styles:
|
1 2 |
mkdir -p app/design/frontend/BelVG/Name of the theme you created/Magento_Theme/web/css/source/ touch app/design/frontend/BelVG/Name of the theme you created/Magento_Theme/web/css/source/_extend.less |
– basic style for our menu:
|
1 2 3 4 5 6 7 8 9 10 11 12 13 14 15 16 17 18 19 20 21 22 23 24 25 26 27 28 29 30 31 32 33 34 35 36 37 38 39 40 41 42 43 44 45 46 47 48 49 |
@menu__font-color: #666; @menu__transition: all 0.1s ease-out; & when (@media-common = true) { .footer { &.content { .menu { float: left; width: 100%; color: @menu__font-color; padding: 30px; h4 { margin: 0; padding-bottom: 5px; font-size: 22px; font-weight: 300; line-height: 1.2; } ul { margin: 0; padding: 20px 0; } li { font-size: 14px; line-height: 1.5; } a { padding: 3px 0 3px 10px; color: @menu__font-color; .lib-css(transition, @menu__transition); &:hover { padding-left: 20px; color: @color-blue1; text-decoration: none; } } } } } } |
You will get the following style:
Method #2: Edit footer menu with layout
I would advise relying on this method in case you do not need to change the whole menu structure but simply add or delete a block.
To edit the footer menu with layout, you need to know whether the theme is installed in the app/design directory or vendor. Go to FTP, proceed to the Magento folder, and then to the app/design folder. If the latter is empty, you have a standard or a third-party theme installed in the vendor folder.
In my case, I use the Luma theme as an example (vendor/magento/theme-frontend-luma). Before you edit, create a custom theme and perform theme inheriting.
1. Create the folders and files you will need
|
1 |
mkdir app/design/frontend/BelVG/Name of the theme you created/Magento_Theme/{layout,templates} |
This is how you create folders for our layout and templates.
|
1 |
touch app/design/frontend/BelVG/Name of the theme you createdMagento_Theme/layout/default.xml |
This is how to create a layout file to add and delete menu sections.
2. Add the initial layout for default.xml
|
1 2 3 4 5 6 7 8 9 10 11 12 13 14 |
<?xml version="1.0"?> <!-- /** * Copyright © Magento, Inc. All rights reserved. * See COPYING.txt for license details. */ --> <page xmlns:xsi="http://www.w3.org/2001/XMLSchema-instance" xsi:noNamespaceSchemaLocation="urn:magento:framework:View/Layout/etc/page_configuration.xsd"> <body> <referenceBlock name="footer_links"> </referenceBlock> </body> </page> |
3. Delete all the unnecessary links from the footer (I will delete Advanced Search as an example). Add the following line into the footer_links block:
|
1 |
<referenceBlock name="catalog-search-advanced-link" remove="true"/> |
where name is the name of the block we delete.
Clear the cache memory and see the menu block was deleted:
This is the list of the standard menu block names:
- Search Terms — search-term-popular-link,
- Privacy and Cookie Policy — privacy-policy-link,
- Advanced Search — catalog-search-advanced-link,
- Orders and Returns — sales-guest-form-link,
- Contact Us — contact-us-link.
4. Add a custom link to the About us page. Add the following code to the footer_links block:
|
1 2 3 4 5 6 7 8 9 |
<block class="Magento\Framework\View\Element\Html\Link\Current" name="about-us" before="search-term-popular-link"> <arguments> <argument name="label" xsi:type="string" translate="true">About Us</argument> <argument name="path" xsi:type="string">about-us</argument> <argument name="attributes" xsi:type="array"> <item name="target" xsi:type="string">_blank</item> </argument> </arguments> </block> |
where:
- label — the name of the link,
- path — path to our page (either absolute or relative),
- attributes — block responsible for tag attributes.
This is the list of the most common tag attributes:
- name — sets up the anchor name in the document;
- rel — the relationship between the current documents and the one we link to;
- target —by default, when you click a link, the document opens in the current window or frame. If necessary, this condition can be changed by this attribute;
- title — adds a tooltip to the link text.
To establish the order, we use the block attributes after and before.
Clear the cache and see the changes:
Method #3: Create a menu template from scratch
If you want to alter the footer menu structure completely, creating a separate menu template is the best way.
Before we proceed, create the theme as described in method #1 and complete steps 1 and 2.
1. Navigate to app/design/frontend/BelVG/Name of the theme you created/Magento_Theme/layout/default.xml and add the following layout:
|
1 2 3 4 5 6 7 8 9 10 11 12 13 14 15 |
<?xml version="1.0"?> <!-- /** * Copyright © Magento, Inc. All rights reserved. * See COPYING.txt for license details. */ --> <page xmlns:xsi="http://www.w3.org/2001/XMLSchema-instance" xsi:noNamespaceSchemaLocation="urn:magento:framework:View/Layout/etc/page_configuration.xsd"> <body> <referenceContainer name="footer"> <referenceBlock name="footer_links" remove="true" /> <block class="Magento\Framework\View\Element\Template" name="footer.navigation.menu" before="-" template="Magento_Theme::footer_menu.phtml"/> </referenceContainer> </body> </page> |
where
|
1 |
<referenceBlock name="footer_links" remove="true" /> |
deletes the previous menu.
|
1 |
<block class="Magento\Framework\View\Element\Template" name="navigation.sections" before="-" template="Magento_Theme::footer_menu.phtml"/> |
adds our custom block with Magento_Theme::footer_menu.phtml template.
Create the template:
|
1 |
touch app/design/frontend/BelVG/Name of the theme you created/Magento_Theme/templates/footer_menu.phtml |
Add to footer_menu.phtml the following code:
|
1 2 3 4 5 6 7 8 9 10 11 12 13 14 15 16 17 18 19 |
<div class="menu"> <div class="menu__column"> <h4><?php echo __('First Tilte')?></h4> <ul> <li><a href="#"><?php echo __('Customer Sevice')?></a></li> <li><a href="#"><?php echo __('Faq')?></a></li> <li><a href="#"><?php echo __('Shipping Information')?></a></li> <li><a href="#"><?php echo __('Site terms & Conditions')?></a></li> </ul> </div> <div class="menu__column"> <h4><?php echo __('Second Tilte')?></h4> <ul> <li><a href="#" title="<?php echo __('About Us')?>"><?php echo __('About Us')?></a></li> <li><a href="#" title="<?php echo __('Privacy Policy')?>"><?php echo __('Privacy Policy')?></a></li> <li><a href="#" id="open-map" title="<?php echo __('Contact Us')?>"><?php echo __('Contact Us')?></a></li> </ul> </div> </div> |
Add to the Contact Us link a map:
|
1 2 3 4 5 6 7 8 9 10 11 12 13 14 15 16 17 18 19 20 21 22 23 24 25 26 |
<script> require( [ 'jquery', 'Magento_Ui/js/modal/modalToggle' ], function( $, modalToggle ) { var options = { title: 'Contact Us', type: 'popup', responsive: true, contentSelector: '#popup-map', toggleEvent: 'click', innerScroll: true, }; return modalToggle(options, '#open-map'); } ); </script> <div id="popup-map"> <iframe src="https://www.google.com/maps/embed?pb=!1m14!1m12!1m3!1d1992.5997417996828!2d27.51397443607992!3d53.90672151661629!2m3!1f0!2f0!3f0!3m2!1i1024!2i768!4f13.1!5e0!3m2!1sru!2sby!4v1553770504758" width="100%" height="450" frameborder="0" style="border:0" allowfullscreen></iframe> </div> |
where:
options — configuration of our popup for the map,
modalToggle(options, ‘#open-map’) — calls our popup,
<iframe> — tag to embed the map.
2. Elaborate your menu by creating:
– folders and files for the styles
|
1 2 |
mkdir -p app/design/frontend/BelVG/Name of the theme you created/Magento_Theme/web/css/source/ touch app/design/frontend/BelVG/Name of the theme you created/Magento_Theme/web/css/source/_extend.less |
– basic style for our menu
|
1 2 3 4 5 6 7 8 9 10 11 12 13 14 15 16 17 18 19 20 21 22 23 24 25 26 27 28 29 30 31 32 33 34 35 36 37 38 39 40 41 42 43 44 45 46 47 48 49 50 51 52 53 54 55 56 57 58 59 60 61 62 63 64 65 66 67 68 69 70 71 72 73 74 75 76 77 78 79 80 81 82 83 84 85 86 87 |
@menu__font-color: #666; @menu__transition: all 0.1s ease-out; & when (@media-common = true) { .footer { &.content { .menu { .lib-vendor-prefix-display(flex); .lib-vendor-prefix-flex-wrap(wrap); box-sizing: border-box; float: left; width: 100%; color: @menu__font-color; padding: 30px; &__column { display: block; width: 100%; } h4 { margin: 0; padding-bottom: 5px; font-size: 22px; font-weight: 300; line-height: 1.2; } ul { margin: 0; padding: 20px 0; } li { font-size: 14px; line-height: 1.5; } a { padding: 3px 0 3px 10px; color: @menu__font-color; .lib-css(transition, @menu__transition); &:hover { padding-left: 20px; color: @color-blue1; text-decoration: none; } } } } } } .media-width(@extremum, @break) when (@extremum = 'min') and (@break = @screen__m) { .footer { &.content { .menu { width: 50%; padding: 0; &__column { display: block; width: 50%; } } } } } .media-width(@extremum, @break) when (@extremum = 'max') and (@break = @screen__m) { .footer { &.content { .menu { ul { &:not(:last-child) { padding-bottom: 30px; } } } } } } |
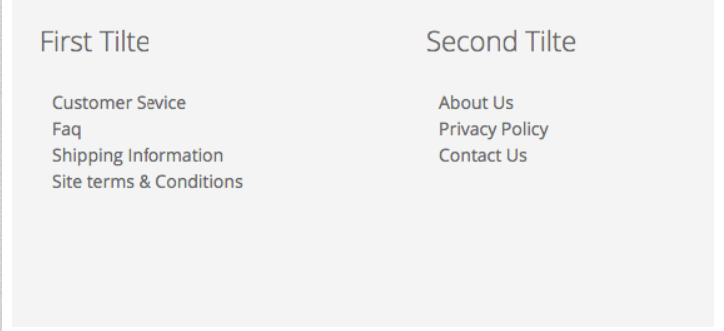
Clear the cache and deploy the static. You will get the following:
|
1 2 |
rm -rf pub/static/* ./var/view_preprocessed/* ./var/page_cache/* ./var/cache/* ./var/generation/* bin/magento setup:static-content:deploy |
Wrapping it up
This is how you edit a footer menu in Magento 2 in three ways. I believe that every store admin will be able to find the most suitable method for them. If you have any questions or comments, please leave them below.





Thanks so much!
I slowly start getting my head around all the possibilities of Magento, but I wish documentation was always written the way you do, showing the different ways of editing / adding elements to the page.
Hi Say,
you can do it via cms block.
Hi,
I am a beginner in Magento. In my application admin needs the possibility to add or remove footer links. So which method is more suitable ?
Thank you.