This is the next part of our PrestaShop 1.7.5 guide, and today we’re going to concentrate on the shopping cart, in particular order statuses and order messages, tax rules and cart lifetime.
Update: we renewed this article on 16.05.2019 and added a more detailed broader overview of taxes in ecommerce and tax management in PrestaShop.
How to Manage Order Statuses
How to Manage Order Messages
How to Add Tax Rules
How to Manage Cart Lifetime
How to Manage Order Statuses in Prestashop 1.7.5
Customers always need to know how is their order doing, which makes order statuses in your online store a very important aspect that needs special care and tending. In PrestaShop 1.7.5 you will find a set of default order statuses, which you can edit, configure and even delete. Yet if you feel the default statuses are enough for you, it’s no problem – you can easily create your own from the admin panel.
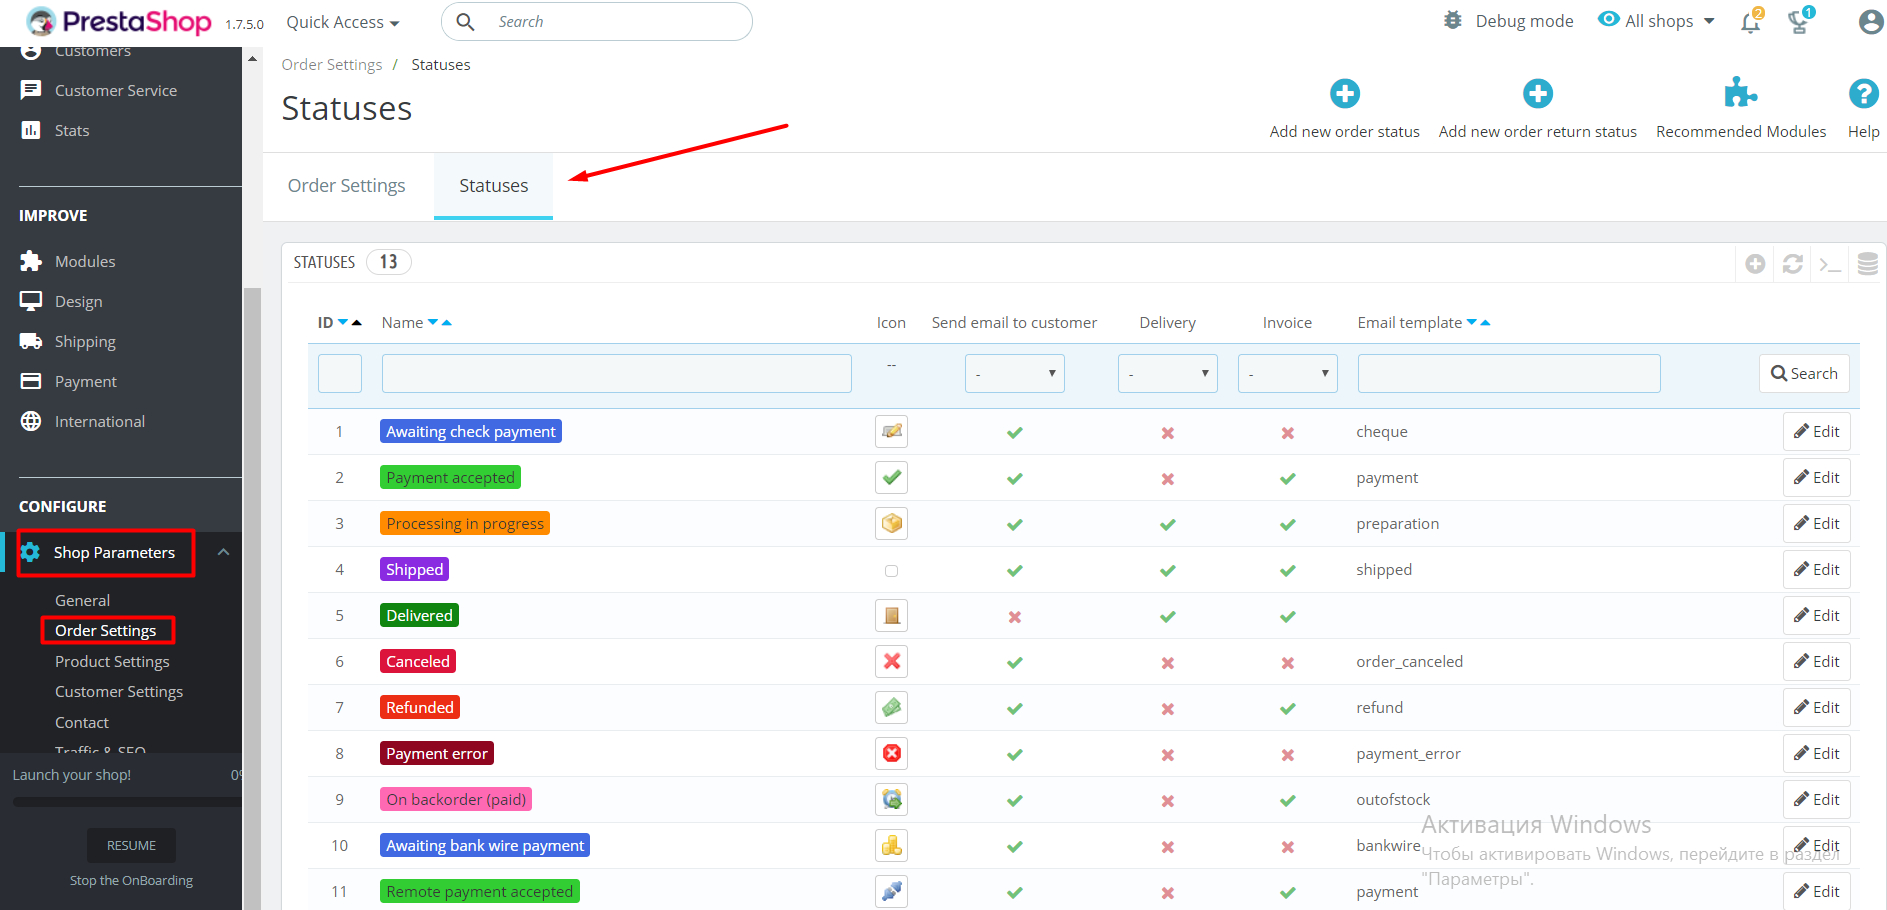
Now, let’s begin working with order statuses by going to the Configure section -> Order Settings -> tab Statuses.
Here you can see the list of the statuses, each highlighted with its own color. Order statuses are separated into two sections – Statuses and Return Statuses. The difference between them is that Return Statuses are used rarely.
Each status has a set of the following features:
- Icon (status image);
- Send an email to the customer (when the order status is changed, the customer is notified via email);
- Delivery and Invoice (allows the customer to download invoice or delivery ticket);
- Email template (the template that was chosen for the current status).
To change the features mentioned above, press Edit.
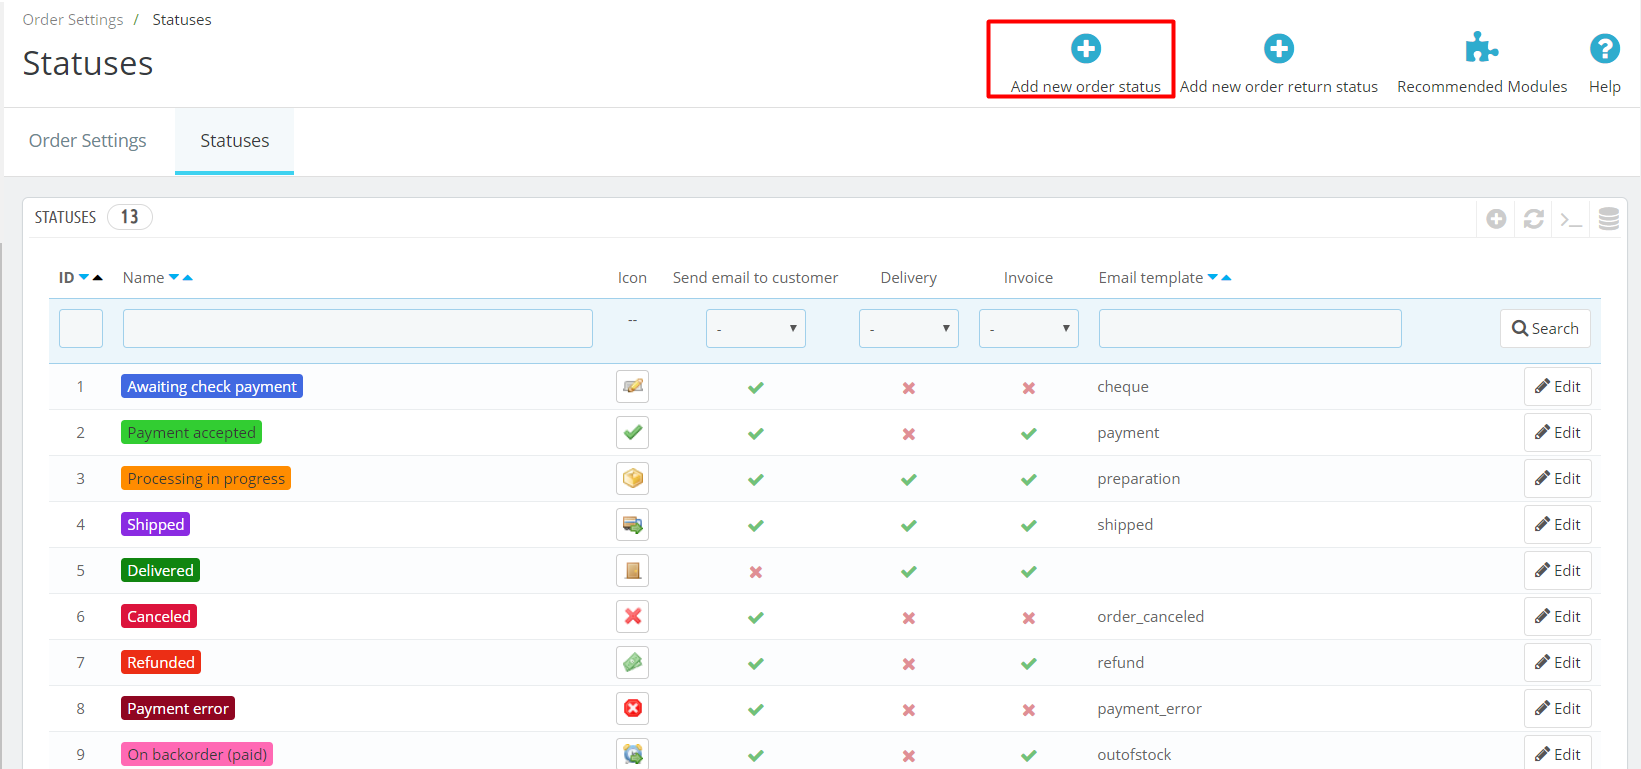
To create a new order status, click Add new order status button.
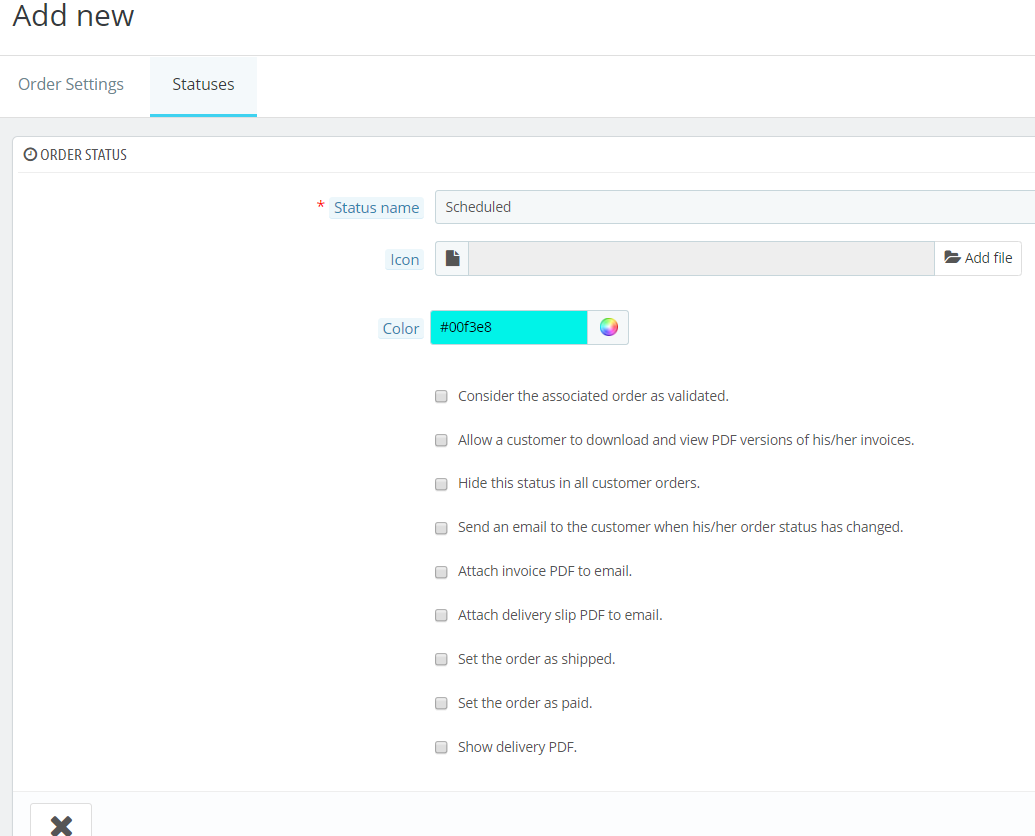
You’ll get to the following page.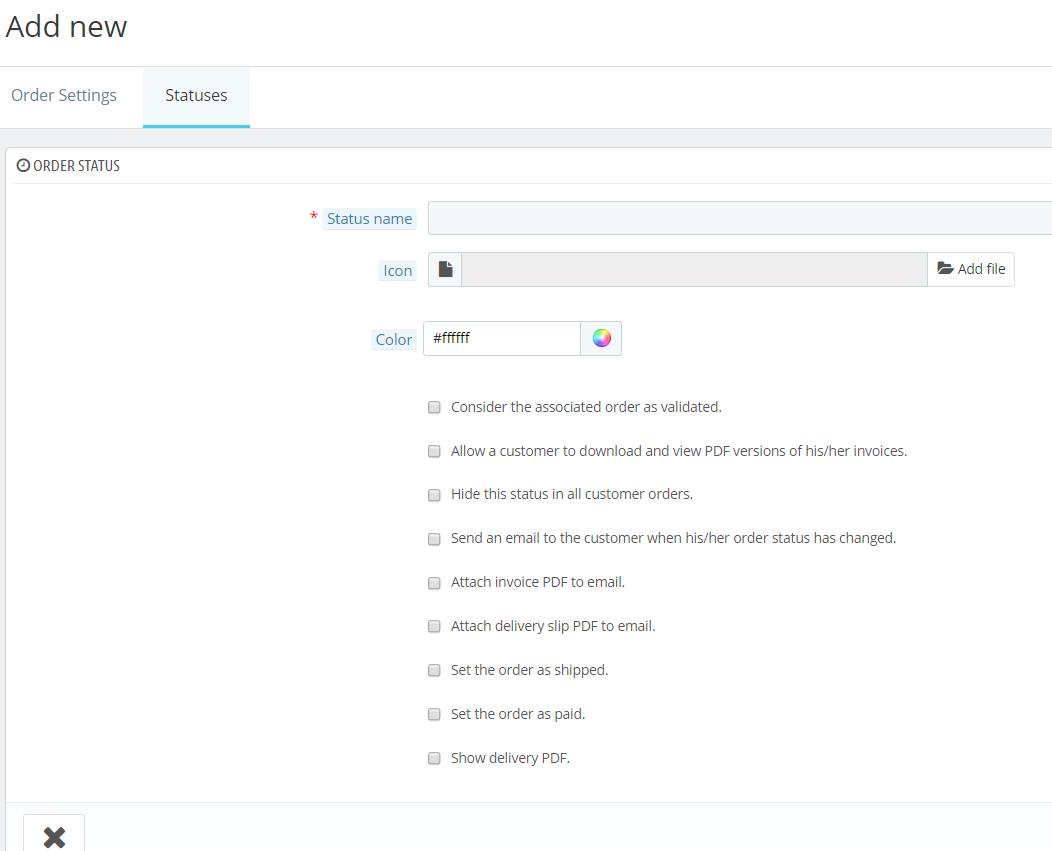
Here you will need to set up the following:
- Status Name – displayed at the frontend and backend,
- Icon – image 16 x 16 pixels,
- Color – color of the status highlight,
- Consider the associated order as validated,
- Allow a customer to download and view PDF versions of his/her invoices,
- Hide this status in all customer orders,
- Send an email to the customer when his/her order status has changed,
- Attach invoice PDF to email,
- Attach delivery slip PDF to email,
- Set the order as shipped,
- Set the order as paid,
- Show delivery PDF.
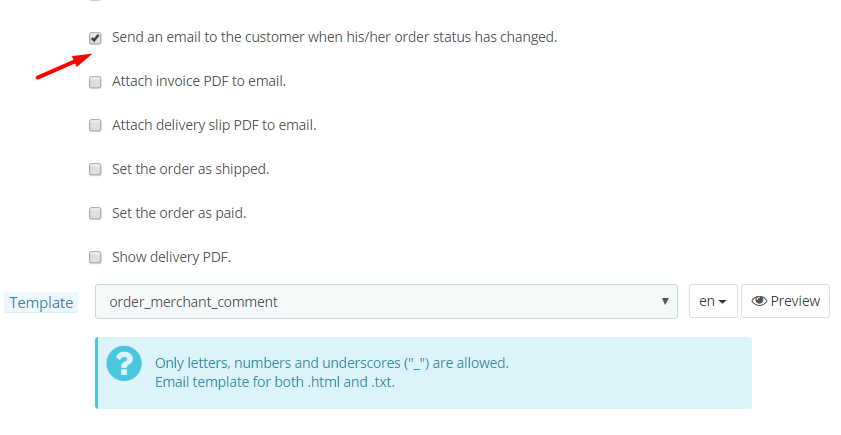
As you enable “Send an email to the customer when his/her order status has changed”, the following template field will appear, allowing you to choose the template from the ones you already have.
We have already described how to create and manage an email template in the previous PrestaShop 1.7.5 article.
As an example, I will create my own order status with the name Scheduled, set up the necessary features and press Save.
As you can see, my new template appeared in the list with the other order statuses.
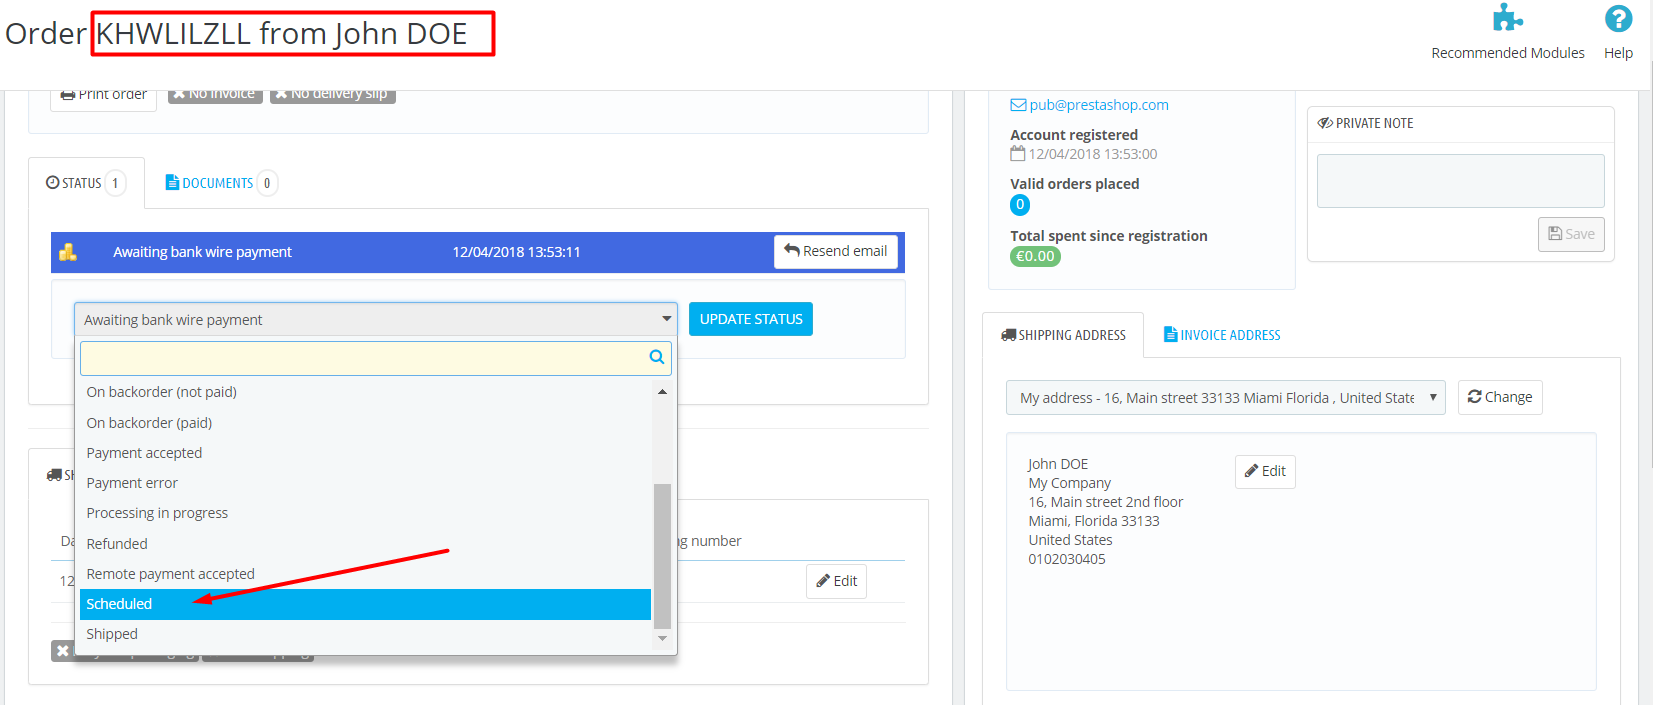
Now you need to apply the status to the order. Go to Sell section and click Orders. Select the particular order you want to modify and click on it.
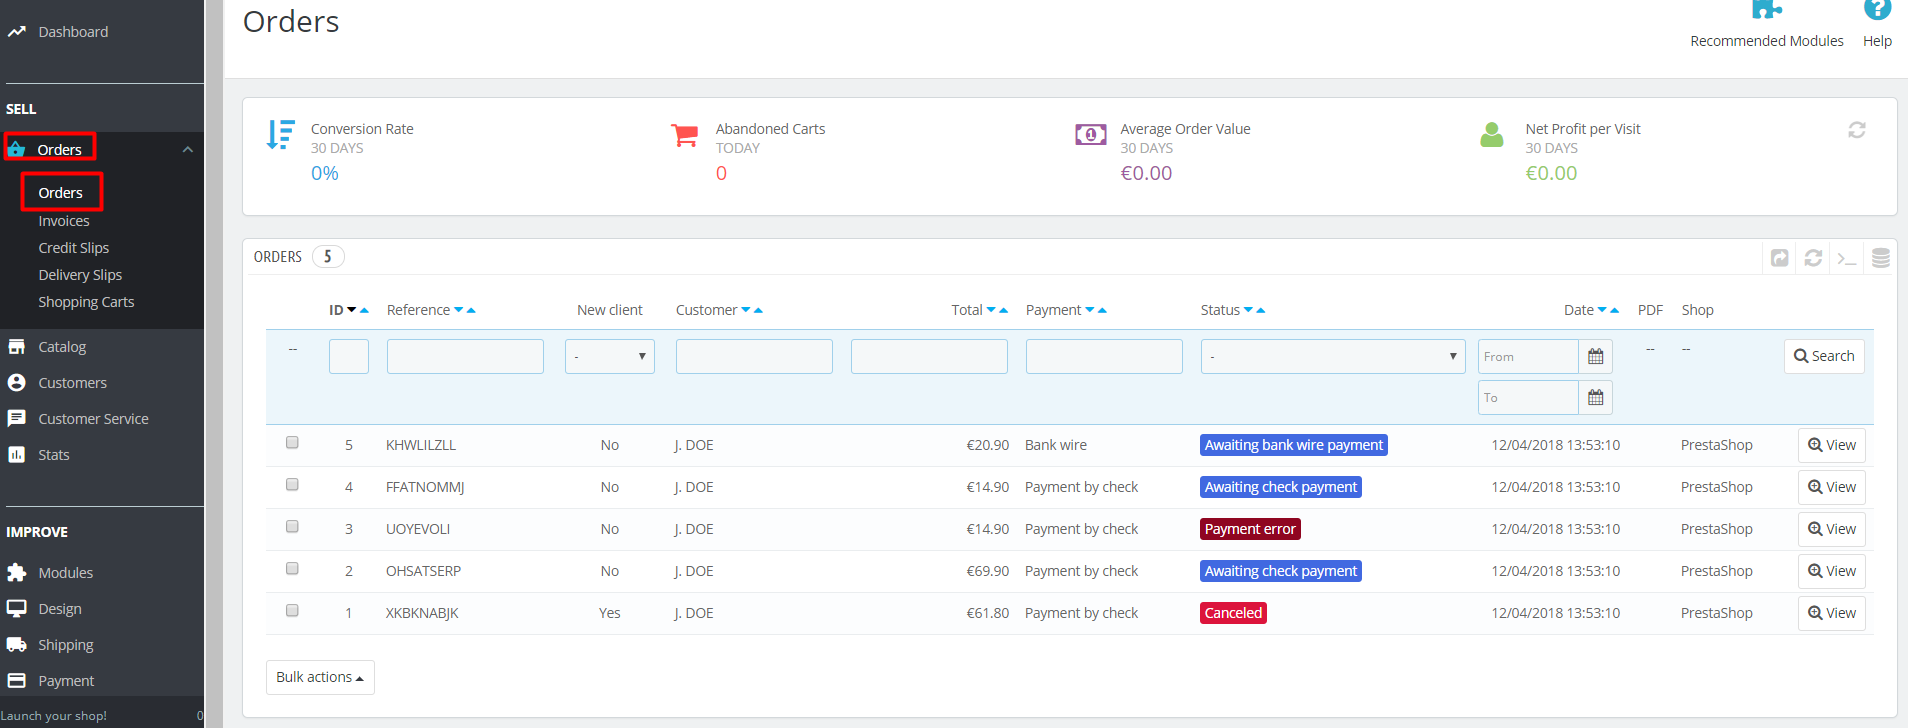
In the dropdown list you will see the list of possible order statuses. Select yours and click Update Status.
How to Manage Order Messages in Prestashop 1.7.5
Communication with clients is the keystone of strong relationship between you and them. Sending information on the progress of the order shows the customer you care for them. Even in case of sudden drawbacks, when there was a failure with delivery or stock, sending a right message may offset the negative feelings. As you can see, order messages are powerful assets which are rather easy to master in PrestaShop 1.7.5.
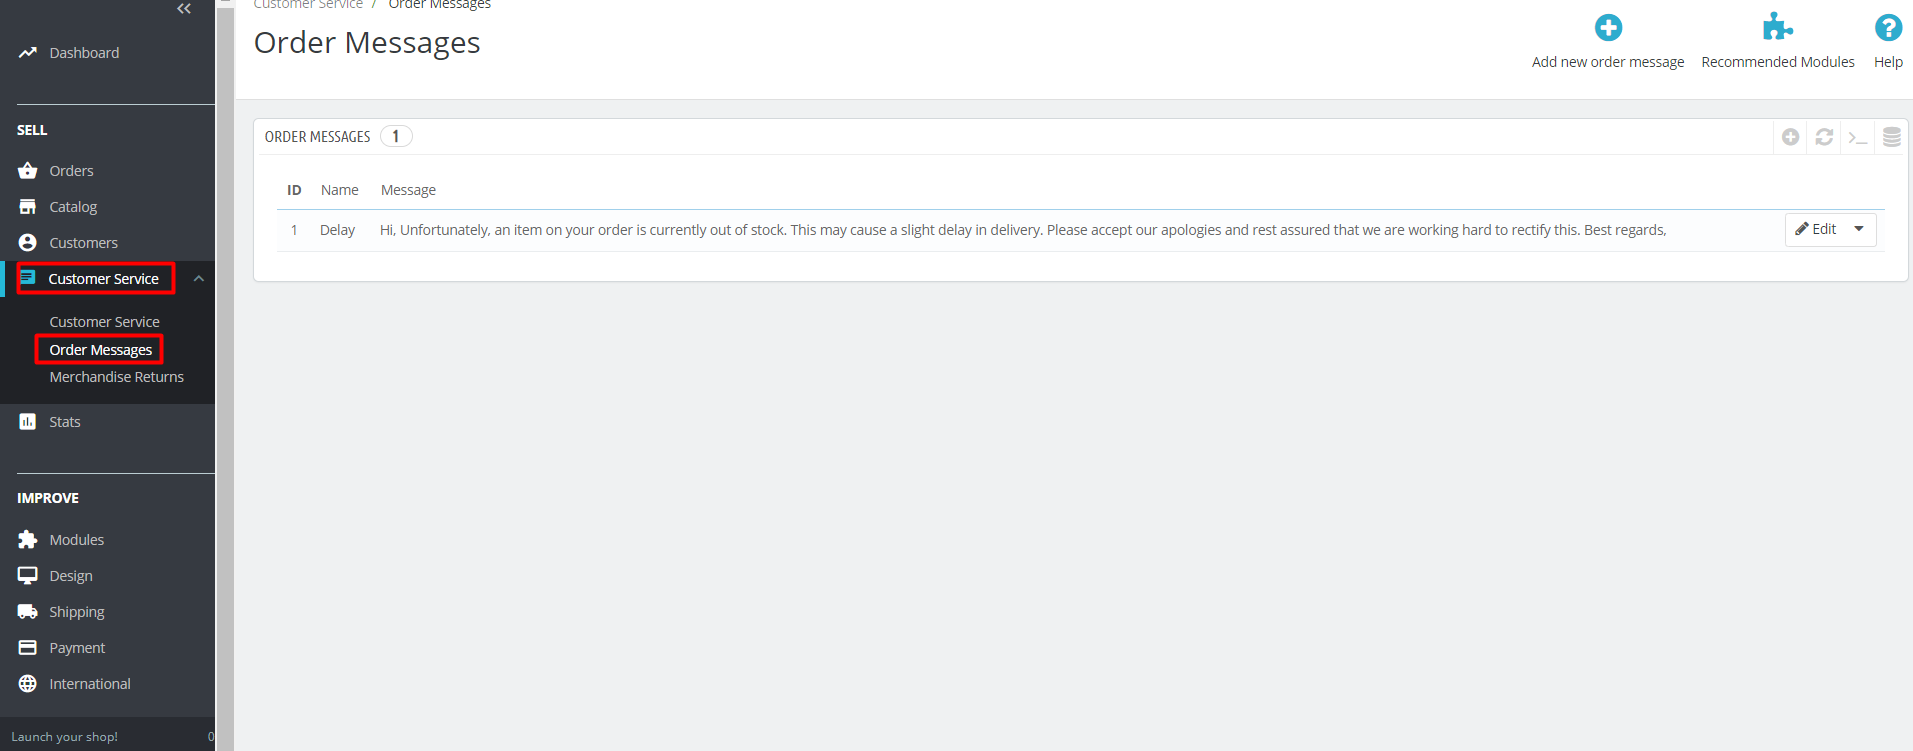
To begin with, go to Customer Service –> Order Messages to create message template.
Click Edit to see the default message or Add new order message to create a new one.
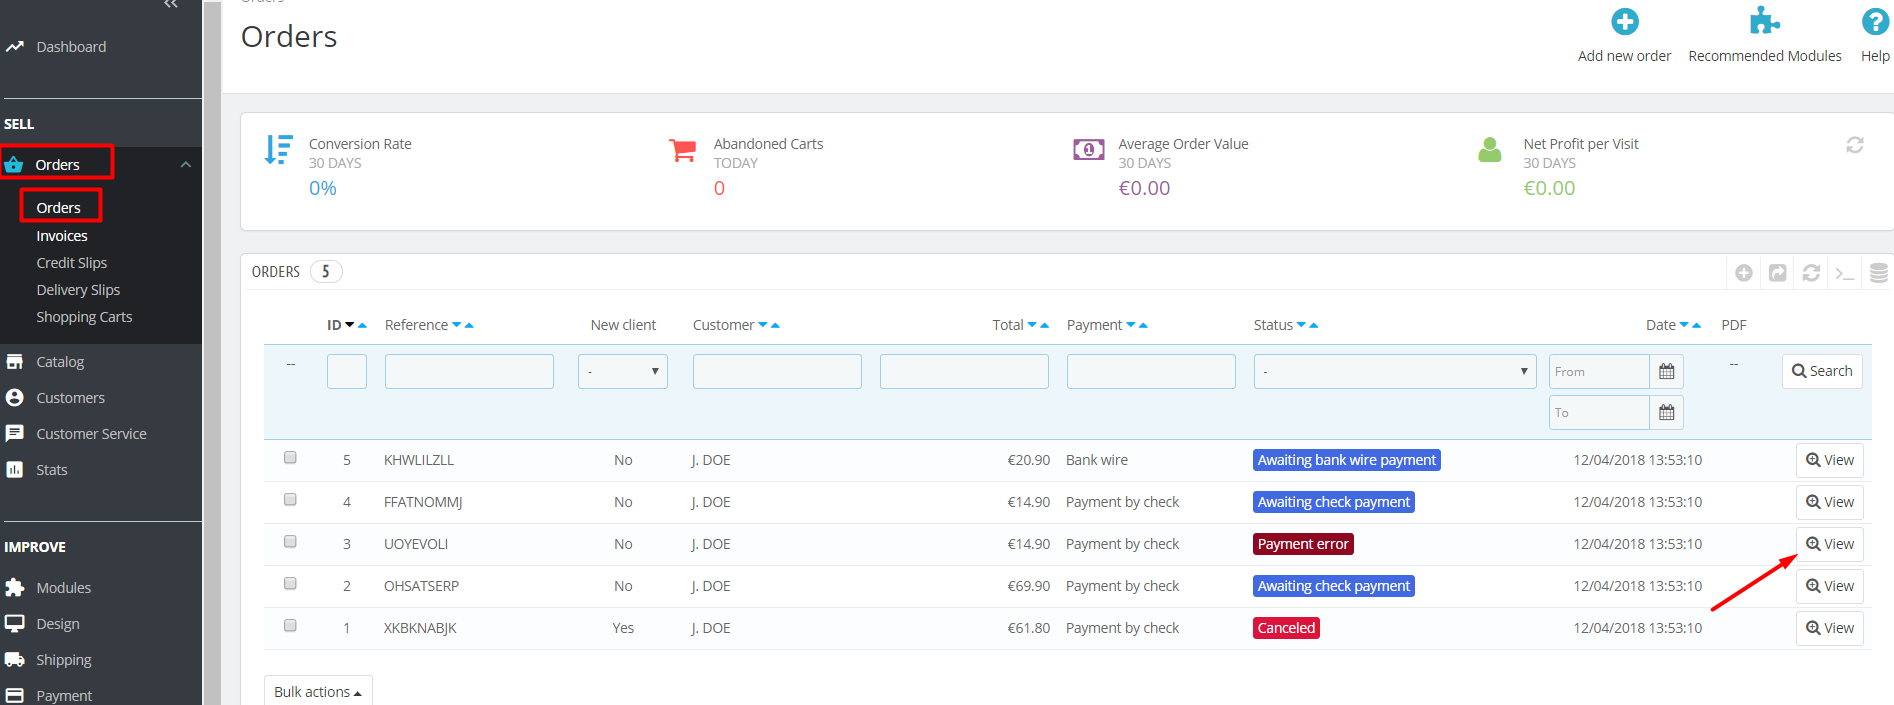
Now go to the Order section and Orders tab; here you will see the list of the currently placed orders. Click View on the one you want to add message to.
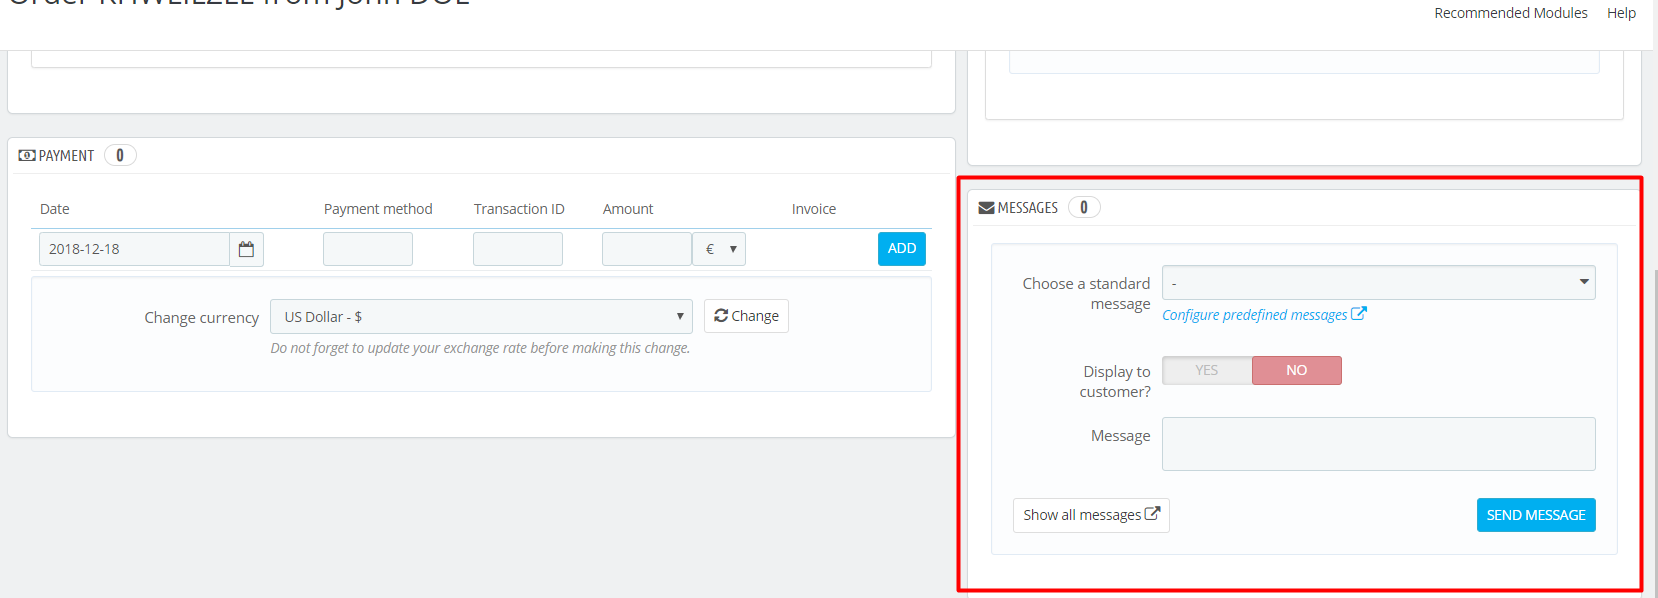
Here you will find the Message block.
You can fill in the following fields:
- Choose a standard message;
- Enable the “Display to customer?” option;
- If needed you can modify the message;
- In case you want to see all the story, click “Show all messages”;
- Send the message.
As you configure this field, click Save, and the customer will get your message at his email.
How to Add Tax Rules in PrestaShop 1.7.5
What is ecommerce tax
In brick-and-mortar retail, taxes are an intrinsic part of the purchase and sale act, and in ecommerce, things are just the same. An ecommerce sales tax is a charge collected from a single act of online sale, either as a fixed sum of money or percentage from the item bought. Ecommerce tax laws secure the compulsory contribution to the state revenue by levying taxes from goods or services trades or other kinds of transactions.
Because they are appointed by government authorities, ecommerce sales tax laws vary from country to country and even region from region. This diversity makes ecommerce sales tax a cause of a headache for those who comply with it and a discouraging factor for new or small businesses. Often, they become discouraged with ecommerce and sales tax complexity and choose not to enter global markets. As a result, an enterprise loses a fair share of potential profit and clientele.
We encourage all the ecommerce owners not to be put off by the complexity of ecommerce tax rates around the world. Instead, take time to work these things out once and for all, and the positive effect on your business will serve a fair reward for your efforts.
Below you will find a brief but substantial account of ecommerce tax legislation in European Union and the USA as well as how to establish your business tax compliance for these regions.
How does ecommerce tax work in the European Union? Step-by-step Instruction
In the EU, to all goods, tangible and intangible, should be applied the Value Added Tax, VAT for short. The rules of the VAT application is more or less uniform throughout the EU, yet the tax percentage is different for each of the 28 countries-members, ranging from 17 to 27 % of the product price.
Value Added Tax sum is directly added to the product price, although some retailers choose to inform customers about its amount before the checkout. A certain part of the levied VAT must be submitted to the authorities, which means that if a business owner did not charge it, they will be obliged to pay the sum from their pocket or face serious legal consequences.
If you are a non-European resident and want to expand your business to the EU, what should you do? Here is a step-by-step guide.
Step #1: register your business in Mini One Stop-Shop (MOSS) of the country you aim to set up your business.
Step #2: get your VAT rate calculated. The main variables here are whether you sell to private individuals or businesses and their location (calculated from the customer’s billing address, bank location or similar).
Step #3: charge your customers with VAT.
Step #4: compose detailed VAT invoices, containing general information about your business, your VAT number and VAT rate.
Step #5: submit the VAT returns quarterly to your local MOSS in the national currency.
Complete the five steps described above and establish a sales tax on ecommerce enterprise you own in any European Union country.
How to handle sales tax with ecommerce in the USA. Step-by-step Guide
In the USA, the ecommerce tax system is more diversified and may seem vague to those who come across it for the first time. The principal notion in USA ecommerce tax rules is “nexus”, which is a sufficient commercial connection to this or that American state. When you have qualified for nexus in a certain state, then you get the right to levy taxes there, and if in another state your enterprise does not, you are not entitled to charge deals there with any ecommerce tax.
Traditionally, nexus is defined as a sufficient physical presence – a rather vague term that can stand for a brick-and-mortar store, headquarters or secondary office of any size, warehouse and even a sales representative. However, recently a number of new definitions were introduced to the states legislature that altered the underlying notion of nexus. At the moment, apart from traditional physical nexus, the following definitions of nexus are enacted in the USA law:
- Affiliate nexus – when you are referred to a certain business or an individual in a certain state and it results in sales.
- Economic nexus – when a business economic activity reaches a certain threshold in a year.
- Click-through nexus – when your enterprise is referred to by a business located in a certain state.
- Web cookies nexus – in certain states, even web-cookies are enough to qualify for nexus.
So, how to file ecommerce business tax for the newly created USA business? Here is what you should do, step-by-step.
Step #1: register in the Department of Revenue for a sales tax permit
Step #2: calculate the tax, consisting, according to the legislature, of the overall state tax and any other charges that might exist.
Step #3: file tax returns.
Complete these three steps and set an ecommerce sales tax for your online store.
Having studied all the details of the modern ecommerce tax legislation, let us proceed to the aspect of tax configuration and management in PrestaShop.
How to add ecommerce tax rules in PrestaShop
When you work for the international market, you need to take into account the taxes that exist in each country one way or another. And instead of entering the tax percentage each time manually, you can easily create tax rules in PrestaShop 1.7.5 which will be automatically applied to this or that country or region.
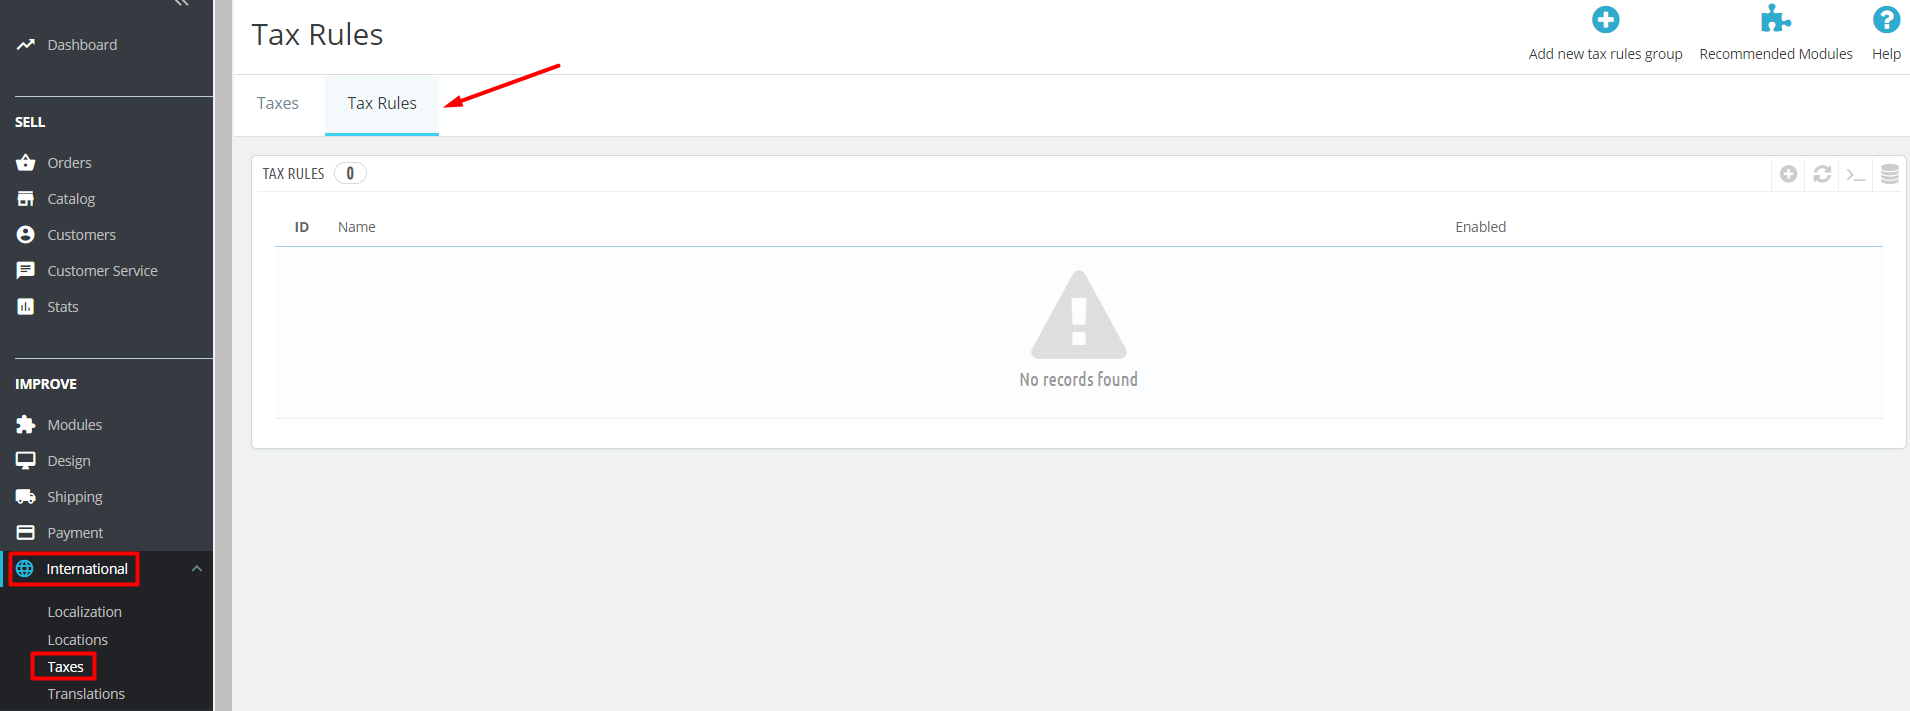
Let’s start. As you logged in to your admin panel, go to International section, click on Taxes -> Tax Rules tab.
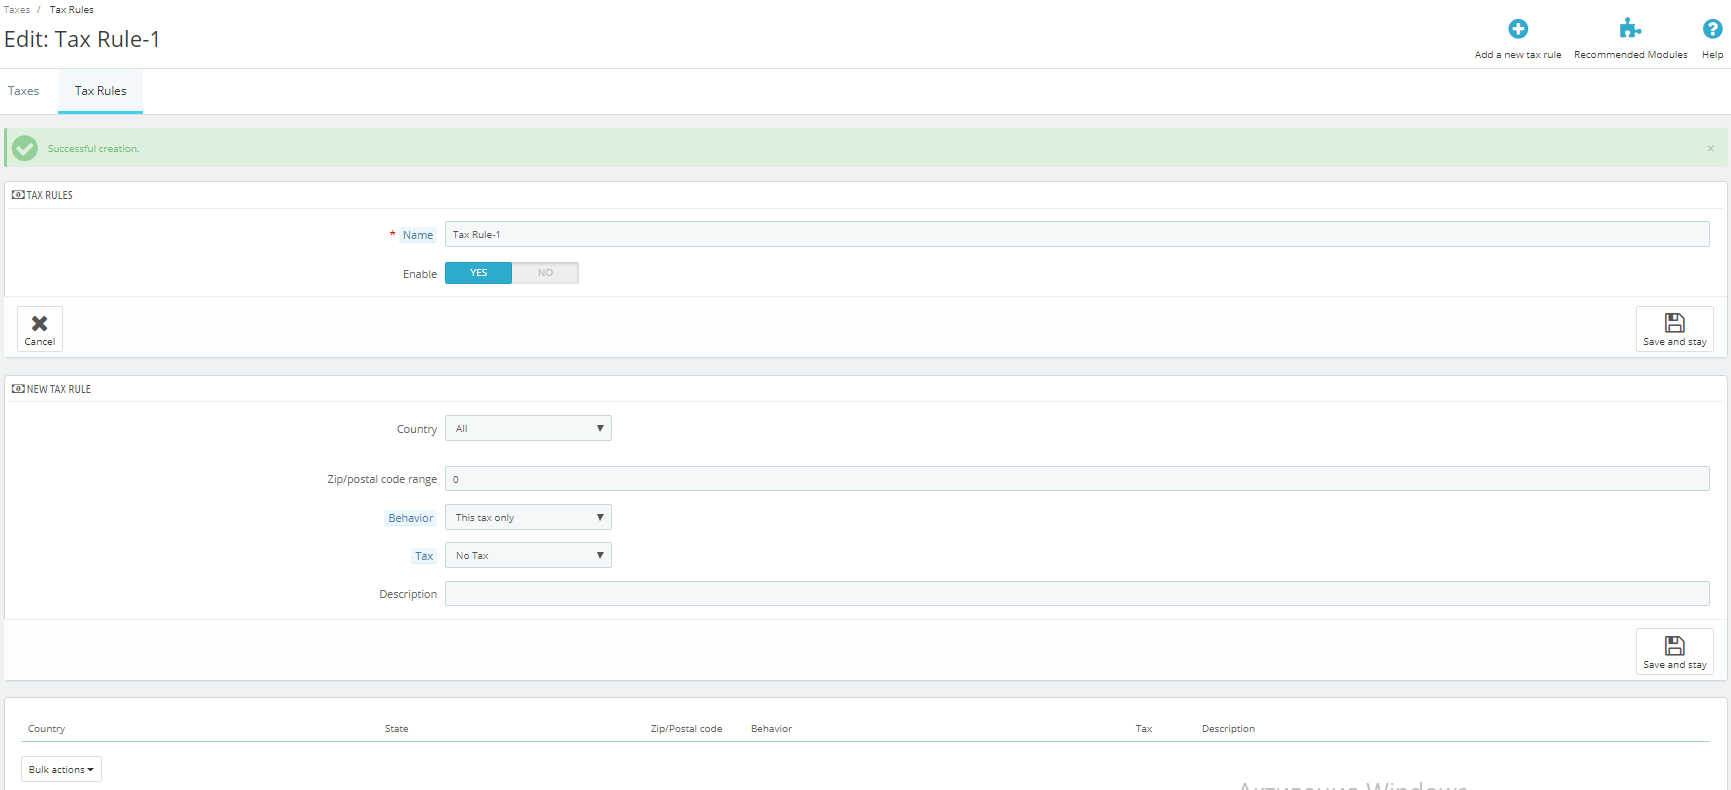
Here you will see the list of all tax rules you have created and used. To create a new one, press the Add new tax rules group. You’ll get to the following form first, where you need to enter its Name and click Enable. Then press Save and stay.
Here you will need to fill in more data on the new tax rule.
- Country to which the rule will apply.
- Zip/postal code range.
- Behavior: This Tax Only / Combine / One After Another.
- Tax, which you need to choose from the drop-down list.
- Additional Description.
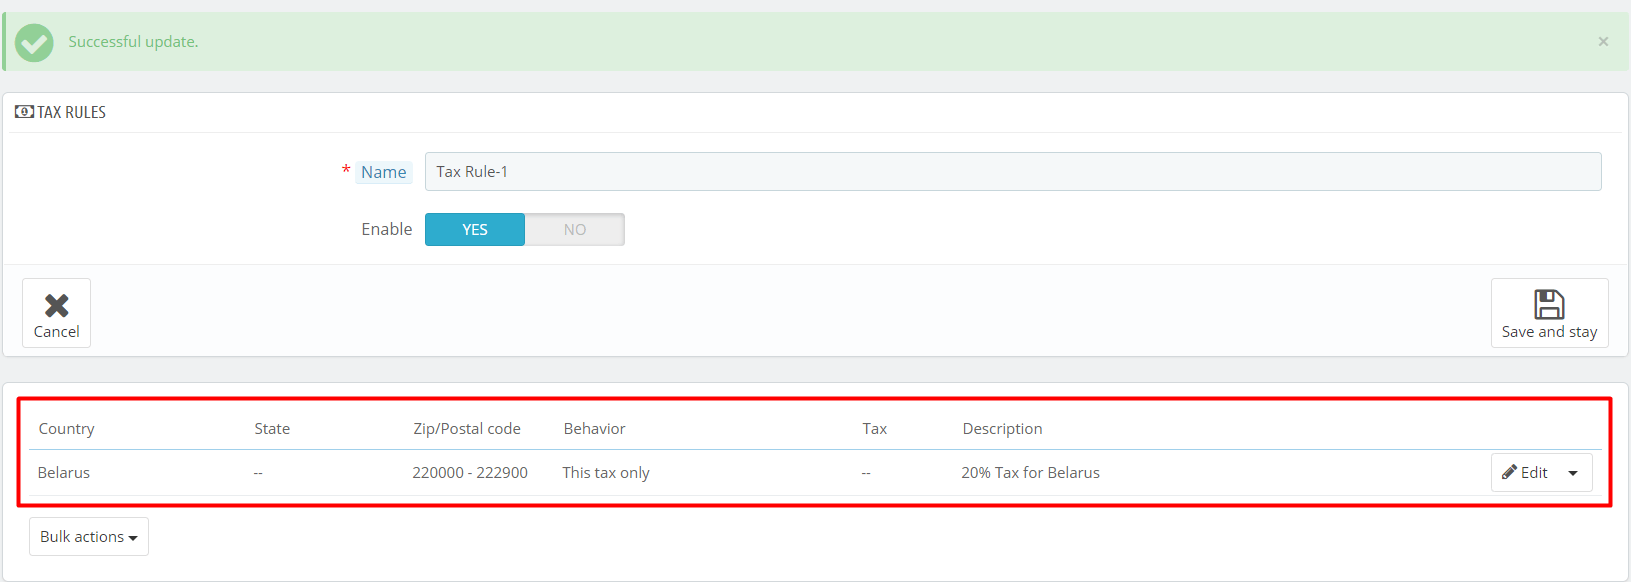
As you entered the information required, press Save and stay. Your new tax rule will appear in the list below.
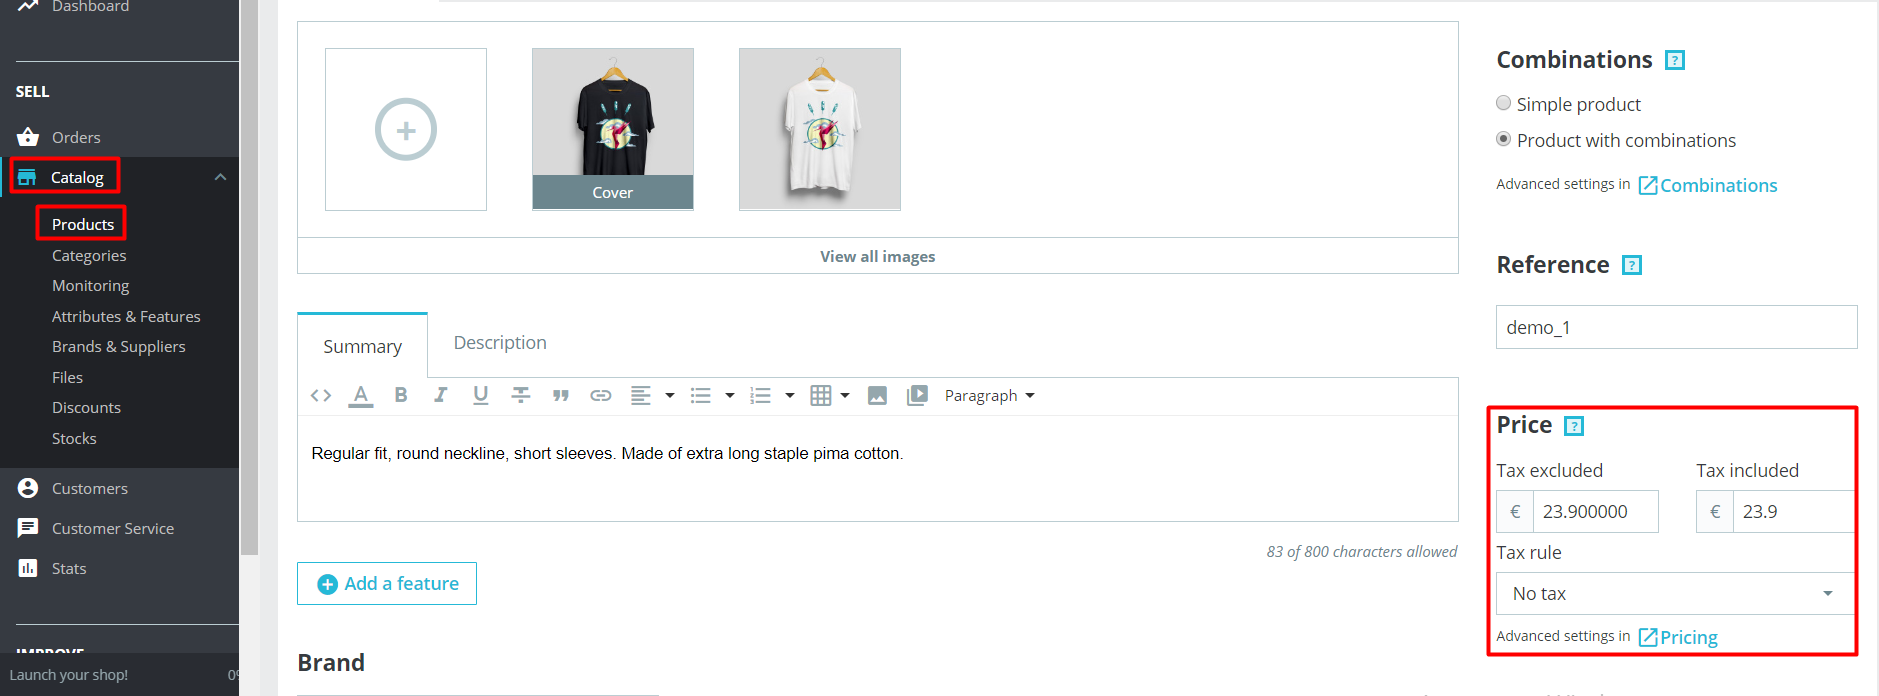
Now you can apply this rule to any product you wish simply by going to the Catalog -> Products, choosing the product and specifying the tax rule in the Price section.
Best PrestaShop order tax module
Apart from utilizing a set of tax management capabilities, as a PrestaShop store owner, you can also employ additional functionalities to your ecommerce system. Official marketplace offers a sufficient amount of PrestaShop tax modules for different purposes and for every pocket. I selected top three of them that are the balanced combination of quality and price.
VAT1 Dual display of prices tax excl. and tax incl. This PrestaShop module will be very useful for retailers who work for the EU markets. VAT1 shows a VAT-free price on product details, categories, on a special block or a featured products block. The extension also allows to alter appearance of the price, in particular, its size, color, display of the label tax and translation.
Compatibility: v1.5.2.0 – v1.7.5.2.
Price: €39.99.
Options, Fees, Taxes and Discounts, Shipping Cost Module. This PrestaShop extension will be a perfect suit for an online store with a diversified market and, therefore, numerous ecommerce tax rates. Options, Fees, Taxes and Discounts, Shipping Cost Module allows to create and configure additional taxes, fees and discounts to the orders.
Compatibility: v1.6.0.4 – v1.7.5.2.
Price: €149.99.
Synthesis accounting with VAT Module. This is a great module for improving your VAT tax management capabilities and analyzing your store activity and performance. Synthesis accounting allows to track your sales and export this data in the Excel table for your future use.
Compatibility: v1.4.6.2 – v1.7.5.2
Price: €39.99.
How to Manage Cart Lifetime in Prestashop 1.7.5
There is one particular situation in online shop-visitor interaction that is particularly sensitive to the merchant. Imagine a customer who visited your store without logging in, added goods to his shopping cart and left. You need to somehow keep what he added in the cart in case he returns and wants to continue the purchase. In PrestaShop 1.7.5 you can manage the lifetime of your cart in a few easy steps.
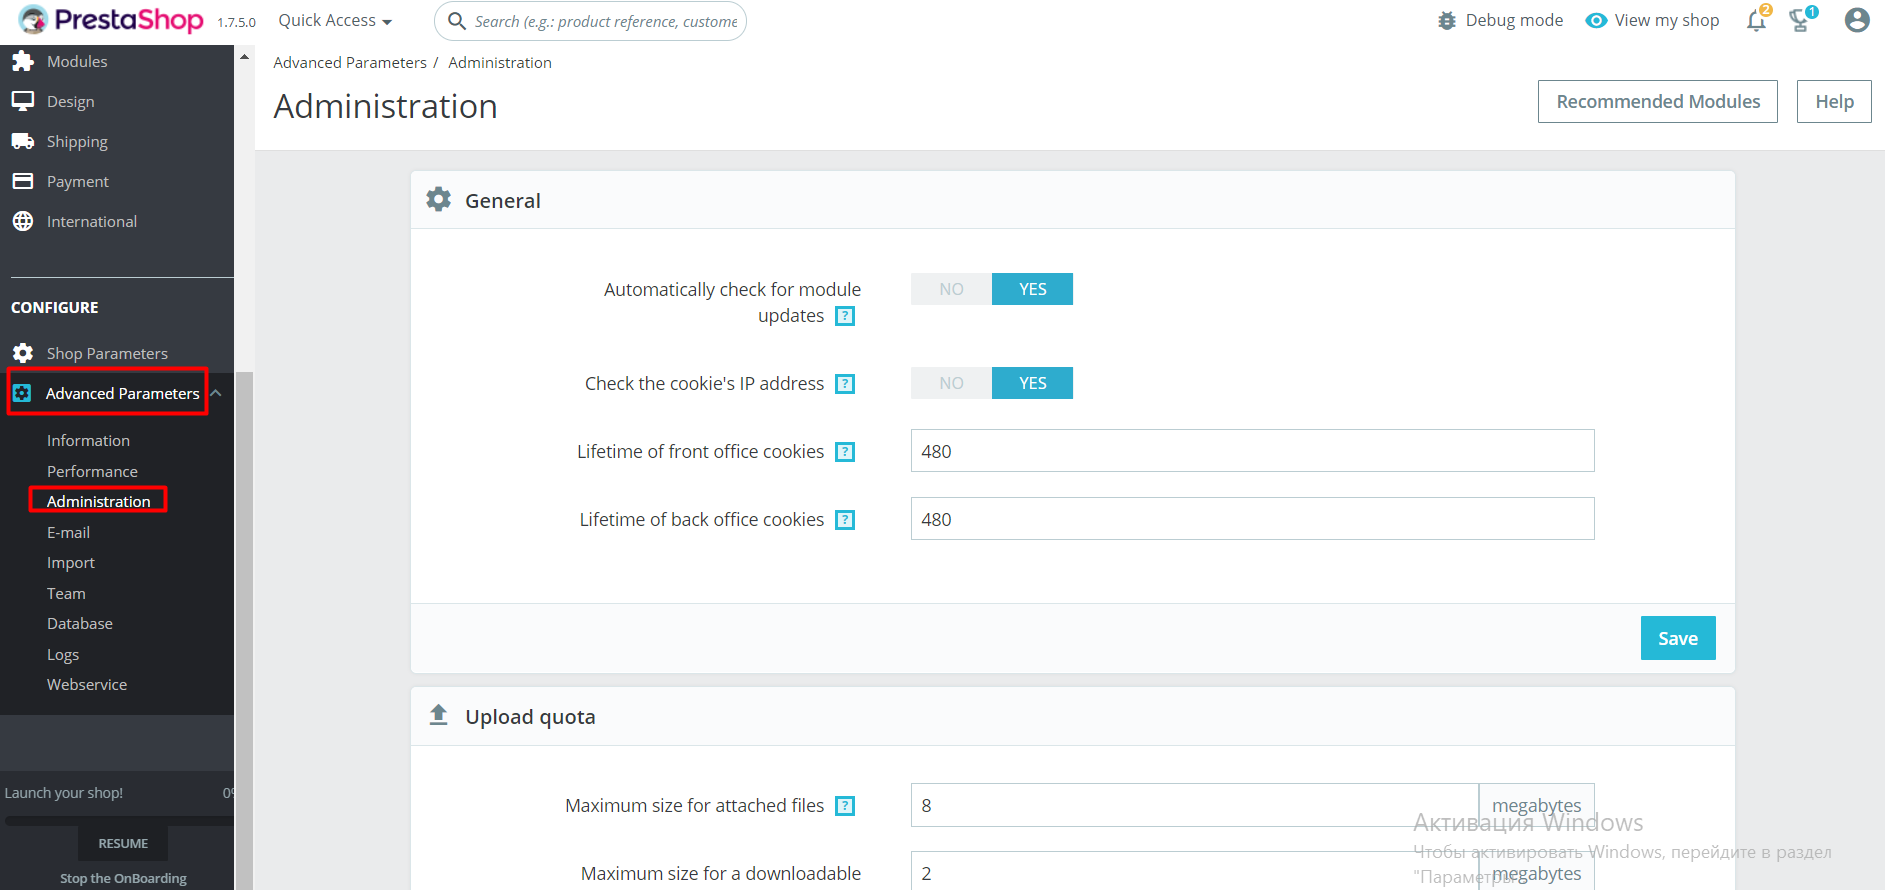
Go to Configure -> Advanced parameters and click on Administration.
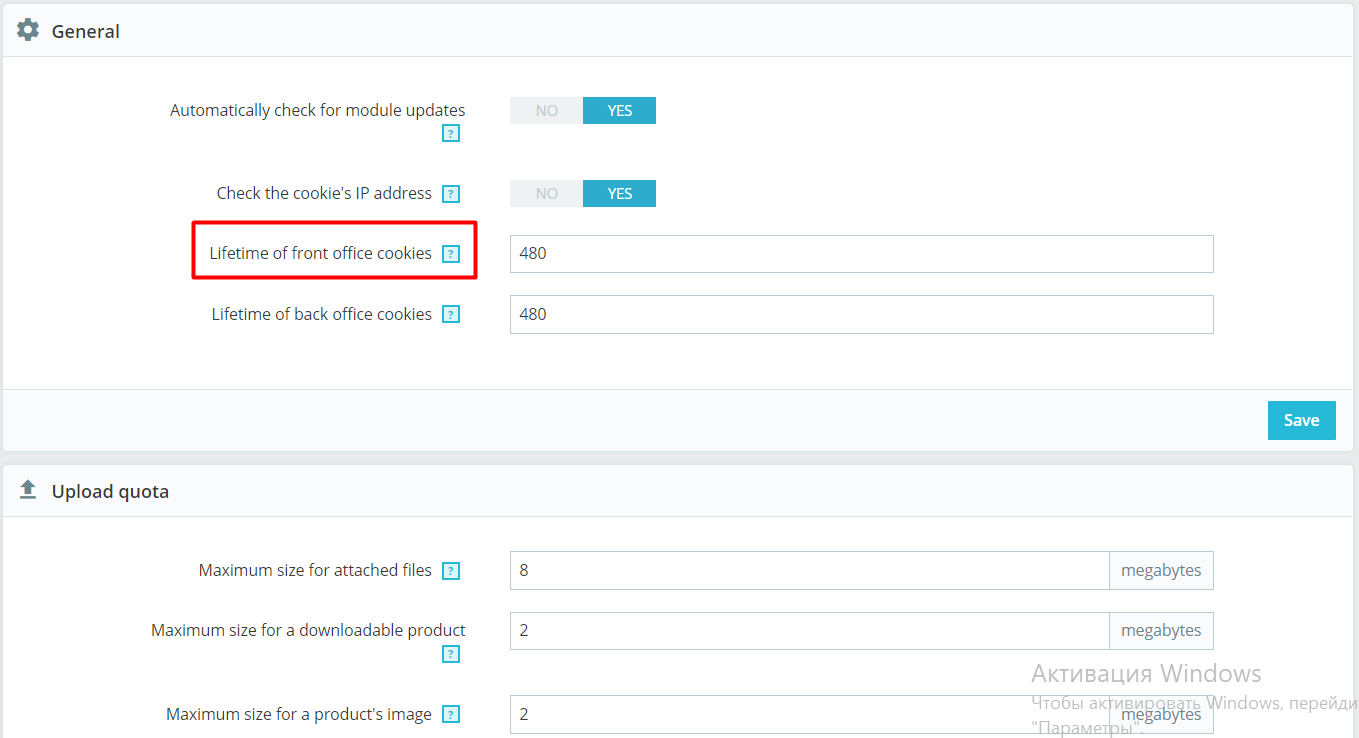
Here you will need the Lifetime of front office cookies field.
Here you need to fill in the number of hours you want the product to be kept in the shopping cart. For example, if you want it to be 20 days, enter 480 hours. Click Save to preserve the changes you’ve made.
This is all – we walked you through four aspects of PrestaShop 1.7.5 cart rules management: order statuses, order messages, tax rules and cart lifetime. If you have questions or comments, you’re welcome to leave them down below.
If you missed the first two parts, go here for Part 1 and here for Part 2.


