
Which structural blocks are available as a part of the content on all pages
First off, it should be mentioned that there are structural blocks and content blocks in Magento. Besides, structural blocks are parent containers towards content blocks (more details you can find in our article Understanding Containers, Blocks, and Actions in Magento 2 Layout Structure).
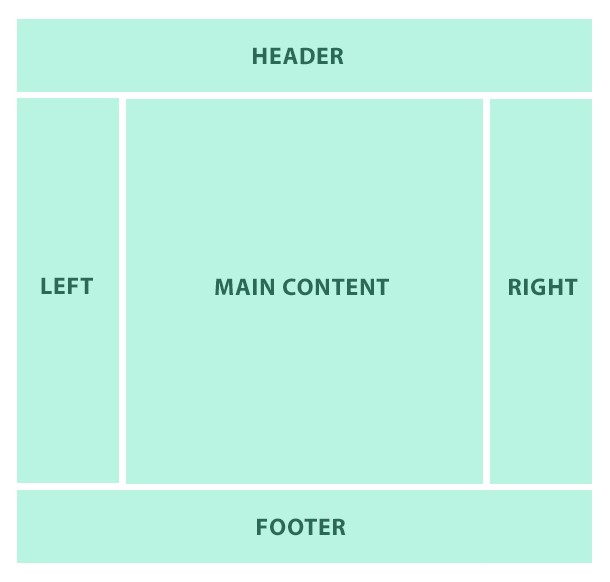
Today we’re going to discuss structural blocks. Both in Magento 1.9 and Magento 2.2 there are 5 main structural blocks:
- Header
- Footer
- Main/Content (Main – в Magento 2.2, Content – в Magento 1.9)
- Left
- Right
3 out of 5 blocks are placed on every page (header, footer, main/content), but “left” and “right” columns are placed if the appropriate template is used (2columns-left, 2columns-right and 3columns). These blocks can be controlled by default in the following system files:
As for Magento 1.9:
/app/design/frontend/our_package/our_theme/layout/page.xml
As for Magento 2.2:
/app/design/frontend/vendor/our_theme/layout/default.xml

Magento Webdesign
Take your online store to the next level with BelVG Magento webdesign
Visit the pageTo which menus can I add custom entries using layout XML in an upgrade‐safe way
Let’s define the case when the changes can be overwritten when Magento is upgraded completely or just some modules. It can happen if we change the files of the Magento core, default theme files or module files. For example, if we change the layout of the directory file in the Magento core folder:
In Magento 1.9:
/app/design/frontend/base/default/layout/catalog.xml
In Magento 2.2:
/app/code/Magento/Catalog/view/frontend/layout/default.xml
It’s not surprising that when Magento is upgraded, the files are overwritten and the changes are lost. Even if you’ve installed your module or your company’s module, you shouldn’t change it directly in the module folder, as when upgrading the module later, all current changes can be lost. On the whole, changing Magento files and its modules directly in the files is not good, so you’re not recommended to do it.
How to change these files? You should know the most important rule that all changes should be in the theme files.
For changing the block structure one can do the following in the theme:
- use the file local.xml
- create extending layout file
- create overriding layout file
You can read more about extending и overriding layout file in the article Override a Layout in Magento 2.
How can I include a custom template in transactional email templates
As for Magento 1.9.
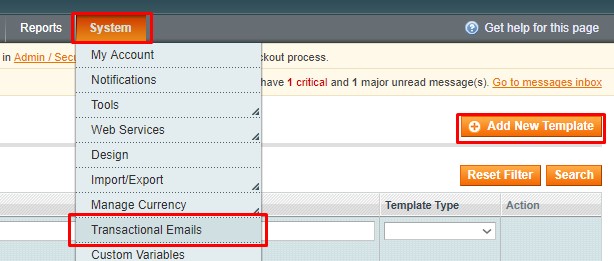
In the admin panel go to “System – Transactional Emails”, click “Add New Template” and we are on the page to create a custom email template.
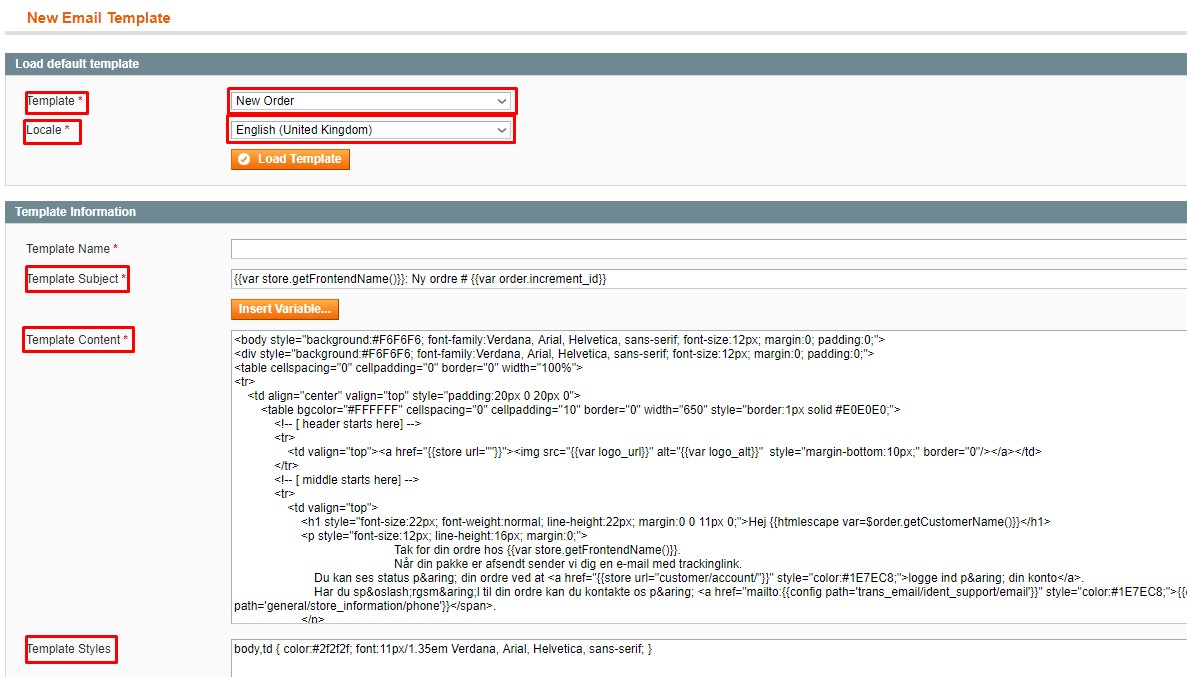
Then we select the template which our custom template is based on. We choose the necessary general template (for example, “New Order”) in the dropdown list of the field “Template”, and template location (for example, “English United Kingdom”) for the field “Locale” and click “Load template”. Then the fields (“Template Subject”, “Template Content” and “Template Styles”) are filled with the general template data. All we need is to fill in the field “Template Name” and get the template changed as it’s necessary by changing the theme and email content. Now we can use the template instead of the general one.
Moreover, email templates can be found in the files on the server at the address:
app/design/frontend/base/default/template/email

Magento 2 Migration
Take your online store to the next level with BelVG Magento 2 Migration
Visit the pageUsing these files, we can copy email content and put it in our template created in the admin panel or copy the file completely to our theme. In this case, the default template is overridden. The file will be placed here:
/app/design/frontend/our_package/our_theme/template/email/
As for Magento 2.2.
In the admin panel go to “Marketing – Email Templates”, click “Add New Template” and create our custom template.
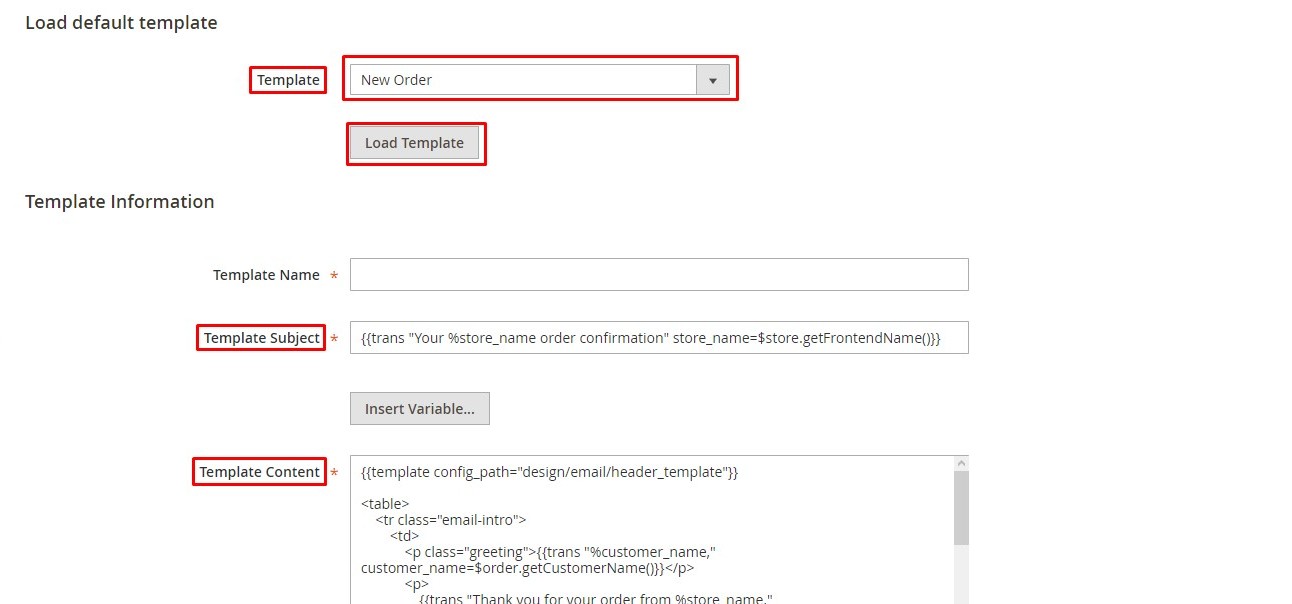
Then we select the template which our custom template is based on. We choose the necessary general template (for example, “New Order”) in the dropdown list of the field “Template” and click “Load Template”. Then the fields (“Template Subject” and “Template Content”) are filled with the general template data. All we need is to fill in the field “Template Name” and get the template changed as it’s necessary by changing the theme and email content. Now we can use the template instead of the general one.
More information about creating and using the custom template you can get here: http://devdocs.magento.com/guides/v2.0/frontend-dev-guide/templates/template-email.html
Also, you can find email template in the files on the server. For example, the email template of a new account will be placed here:
vendor/magento/module-customer/view/frontend/email/account_new.html
Using the file, we can copy email content and put it in our template created in the admin panel or copy the file completely to our theme. In this case, the default template is overridden. The file will be placed here:
/app/design/frontend/our_package/our_theme/Magento_Customer/email/account_new.html
How can I create links to store pages in transactional email templates
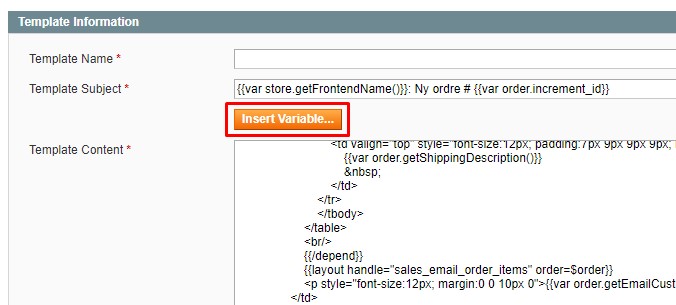
Don’t forget to change email templates only in the custom templates. How to create custom email templates are described above. When editing the custom template, we can use system variables to put changed data, particularly web store links. In Magento 1.9 different variables are used for the links. We can see the list of available variables when clicking “Insert Variable…” on the page of editing the custom email template.
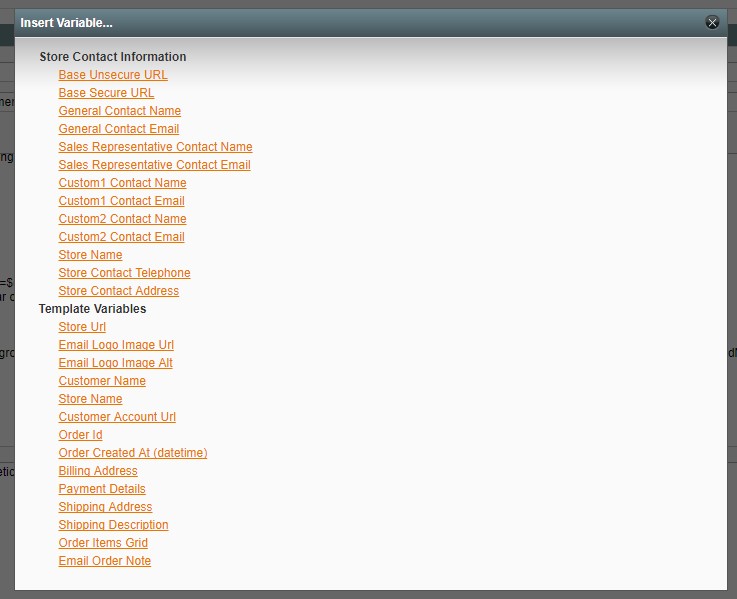
When clicking the button, we see the following window:
Here we choose the necessary variable and click. For example, the variable for web store link is called “Store Url”, so the link will be like this:
|
1 |
<a href="{{store url=""}}"></a> |
And the customer account link will be like this (the variable is called “Customer Account URL”):
|
1 |
<a href="{{store url="customer/account/"}}"></a> |
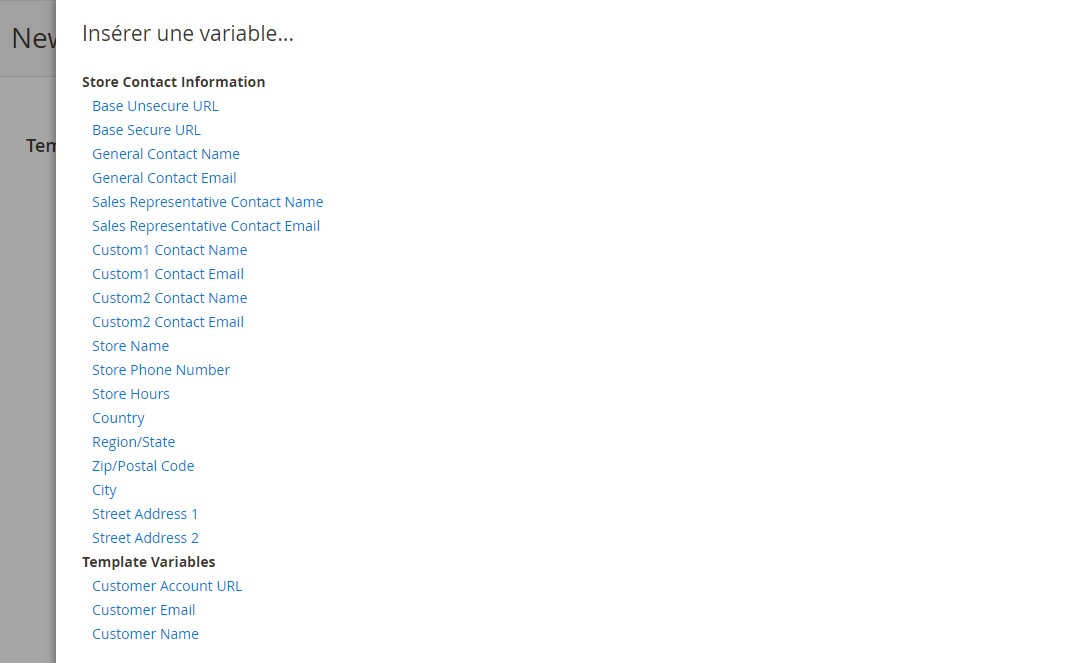
In Magento 2.2 everything is the same as in Magento 1.9. Different variables are used for the links. We can see the list of available variables when clicking “Insert Variable…” on the page of editing the custom email template:
When clicking the button, we see the following window:
Here we choose the necessary variable and click. For example, the variable for customer account link is called “Customer Account URL”, and the link will be like this:
<a href=”{{store url=”}}”></a>
How can I access properties of the template variables (for example the order in the new order email, or the customer in the registration confirmation email)
In order to have access to template variables properties, we can use the PHP method “get” or just get variable property value as an object property. Both in Magento 1.9 and Magento 2.2 it occurs in the following way:
To get the property “Shipping Description” of the variable “order” by using the method “get”, it’s necessary to use the following construction:
<a href=“{{store url=’customer/account/’}}”></a>
Where:
“order” – variable
“getShippingDescription()” – the method to get the ShippingDescription property value.
The property “email” of the variable “customer” can be got without the method “get” by using the construction {{var customer.email}}
Where:
“customer” – variable
“email” – variable property

Magento Custom Development
Take your online store to the next level with BelVG Magento Custom Development
Visit the page





Very nice!
Awesome & real notes you have given..