Sitemaps are structured lists of all URLs on your website with a list of their parameters. The primary function of a sitemap is to make it easier for search engines to understand and index the content of your website. A website sitemap is also a valuable tool if you want to ensure that Googlebot can see all the content that you have on your website. Fortunately, most CMS systems enable the site owners to generate one.
There are up to six different types of sitemaps, but in this article, we will focus on two sitemap formats that are most often used: HTML and XML.
Table of contents:
What is a Sitemap in Magento 2
The Importance of Sitemaps in Magento 2
How to Generate XML and HTML Sitemaps in Magento 2
How to Submit Sitemap to Google

What is a Sitemap in Magento 2
A sitemap represents a navigation aid featuring links to all resources found within a website, offering a comprehensive view of its layout and content.
For Magento 2 websites, XML and HTML sitemaps reign as the most favoured and crucial options. An XML sitemap aids search engines in grasping the site’s organization and enhancing page indexing. Meanwhile, an HTML sitemap is a powerful tool for user navigation, enabling them to navigate the site and locate desired content with utmost efficiency.
What is an HTML Sitemap in Magento 2?
An HTML sitemap is an outline text version of the site navigation on one page. This type of sitemap is essential for any kind of website, whether it is an ecommerce, non-profit, blog, or entertainment website. HTML sitemap makes it easier for some users to navigate through the website since all the resources they might need are quickly accessible. This is why creating and then keeping your sitemap user-friendly is essential. If it’s easy to navigate, quick to load, and cleanly organized, your website’s visitors can use it without any complications if they choose this type of navigation.
According to HTML sitemap Magento 2 best practices, it’s crucial to have an anchor link connected to every page on your website in the sitemap. This not only aids user navigation but also makes your website search engine crawlable. When search engines read the sitemap, they become aware of every page on the site, including any URLs that are not easily discovered through the normal crawling process.
What is an XML Sitemap in Magento 2?
An XML sitemap is a text file that details all URLs on a website. It can include extra data on each Magento 2 sitemap URL, including the information addressing its latest update, its priority level, the average frequency changes that occur, the URL relation to the rest of the site, and whether there are any other versions of the same URL in different languages. According to Google documentation, XML sitemaps are helpful for websites with extensive archives or a large volume of media content. However, even if your webstore does not match these characteristics, it will still primarily benefit from having a sitemap.
The sitemap protocol format contains XML tags and should:
- Begin with <urlset> opening tag and end with </urlset> closing tag.
- Include a <url> entry for URLs as a parent XML tag.
- Specify the namespace (protocol standard) inside the <urlset> tag.
- Include a <loc> child entry for <url> parent tags.
Other tags are optional, and their support may vary from search engine to search engine. So, before including any of those optional tags, consult the documentation for each search engine.
What is the Difference between an HTML and XML Sitemap in Magento 2?
Since the article is dedicated to two sitemaps, it is important to clearly understand their differences. So, this paragraph is dedicated to the HTML sitemap vs. XML sitemap comparison.
HTML and XML sitemaps have different uses and values for search engine optimization. The main difference is that HTML sitemaps are written primarily for users and are needed most to help them gain a comprehensive understanding of a website. In contrast, XML sitemaps are written first for search engines.
HTML sitemap Magento provides a general overview of the website, its pages, and information that could be useful to the user. While it is mostly used by website visitors, it can also assist in search engine ranking.
XML sitemaps are specifically created to aid search engines in understanding a website’s structure. They provide all the necessary information, such as the location of pages and their last update, to facilitate efficient indexing and crawling.
| XML Sitemap Benefits | HTML Sitemap Benefits |
| are written first of all for search engines, and helps to improve SEO practices of a store. | helps users understand the website structure and find the content they are looking for on the website. |
| increases the chance of your website to be crawled and indexed by search engines. | provides a general overview of the website, the pages, and information for users. |
| provides the information about the structure of an online store for search engines to understand the relationship between website pages. | offers the search engine ranking assistance and makes a website fully crawled. |
The Importance of Sitemaps in Magento 2
Creating a Magento 2 sitemap is especially useful for SEO. An XML sitemap is designed for search bots, and an updated XML file can be used to ping search engines, alerting them of changes and updates. An XML document lets search engines know that there is fresh new content. Having a well-built Magento 2 XML sitemap substantially increases your chances of having your web pages crawled and indexed by search engines, mainly if the navigation system of the website does not work properly or the general internal linking strategy doesn’t provide links to all of your pages.
If your website is international or has the same page translated into different languages, the Magento 2 XML sitemap can be used to sort the content for search engines. The sitemap will signal the crawlers that the page has multiple versions, and they will use this information to ensure that users are provided with the correct version of the website based on their language or location.
How to Generate Sitemaps in Magento 2
Now we will figure out how XML Sitemap generation differs from HTML one with the step by step instructions.
How To Generate XML Sitemap In Magento 2
Below you will find step-by-step instructions on how to generate a sitemap in Magento 2 in the back office.
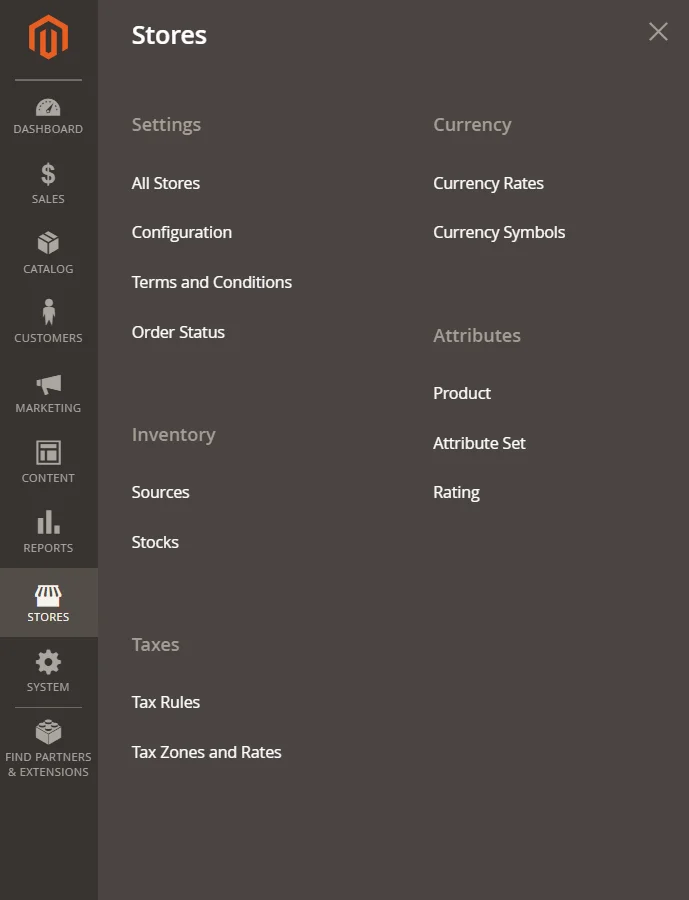
Step #1: navigate to Stores -> Settings -> Configuration.
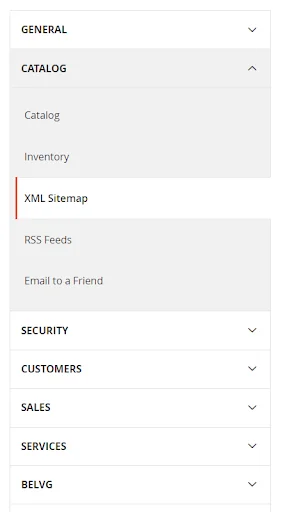
Step #2: in the Catalog tab, select XML Sitemap.
Bear in mind that these settings can be performed for Default configuration, as well as for a website or a store view, depending on the task.
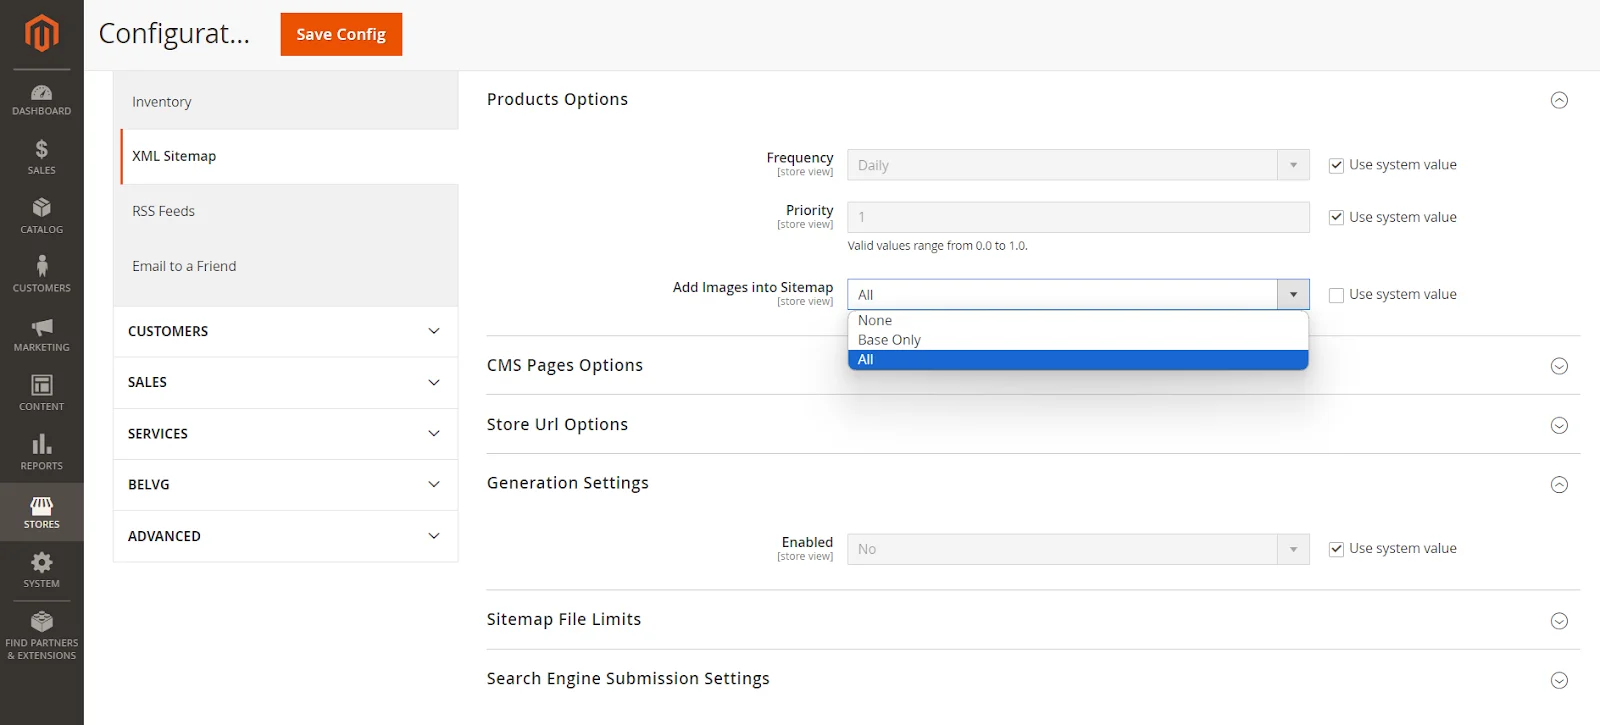
Step #3: configure the update frequency and priority for categories, products and CMS pages in the Categories Options, Products Options, and CMS Pages Options sections.
In most cases, the default values in these sections are preferable, but if you need to introduce some custom changes, here are the fields you must modify.
There are the following values available for Frequency settings:
- Always
- Hourly
- Daily
- Weekly
- Monthly
- Yearly
- Never
The Frequency values are aimed at search engine crawlers and set up how often the crawler can visit the page. It is recommended to set Always for the pages that change each time one visits them. The Never value should be applied to the archived pages; this way, search engine crawlers will see them rarely to keep track of unforeseen changes if any occur. However, the crawlers may ignore the values you set and visit the pages with the “Weekly” value more often than the ones with the “Hourly” value.
The Priority value is set in the range from 0 to 1, where 1 is the highest priority.
With priority setting, you signify which pages are the most important and which are less important. Therefore, setting 1 Priority for all the pages is useless, as all the pages will be equally important. For priority, the default value is 0.5, and this is a recommended value in most cases.
Also, in the Add Images to Sitemap field, set up what images you want to add to the Sitemap: None, Base Only, or All.
When finished, press Save Config.
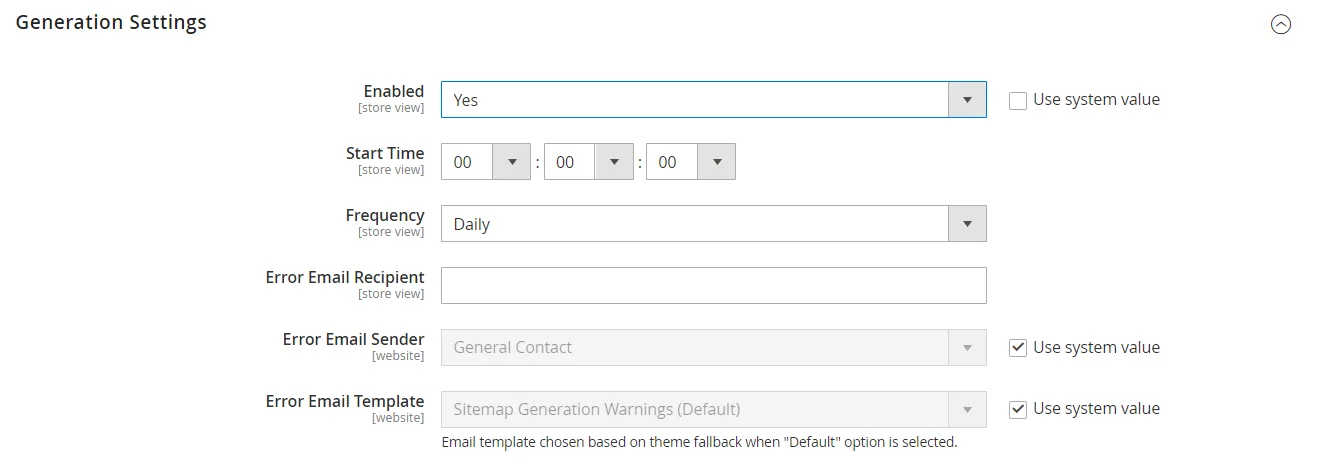
Step #4: set up Magento 2 sitemap generation settings.
Expand the Generation Settings section and configure the following:
- Enabled – enables the sitemap generation, so set it to Yes.
- Start Time – the server time at which sitemap generation will be launched. The best time is at night when the load is minimal,
- Frequency – how often the sitemap will update. The best way is to set the value equal to the frequency of product addition or change at your store.
- Error Email Recipient – the email address to which the messages about errors with sitemap generation will be sent.
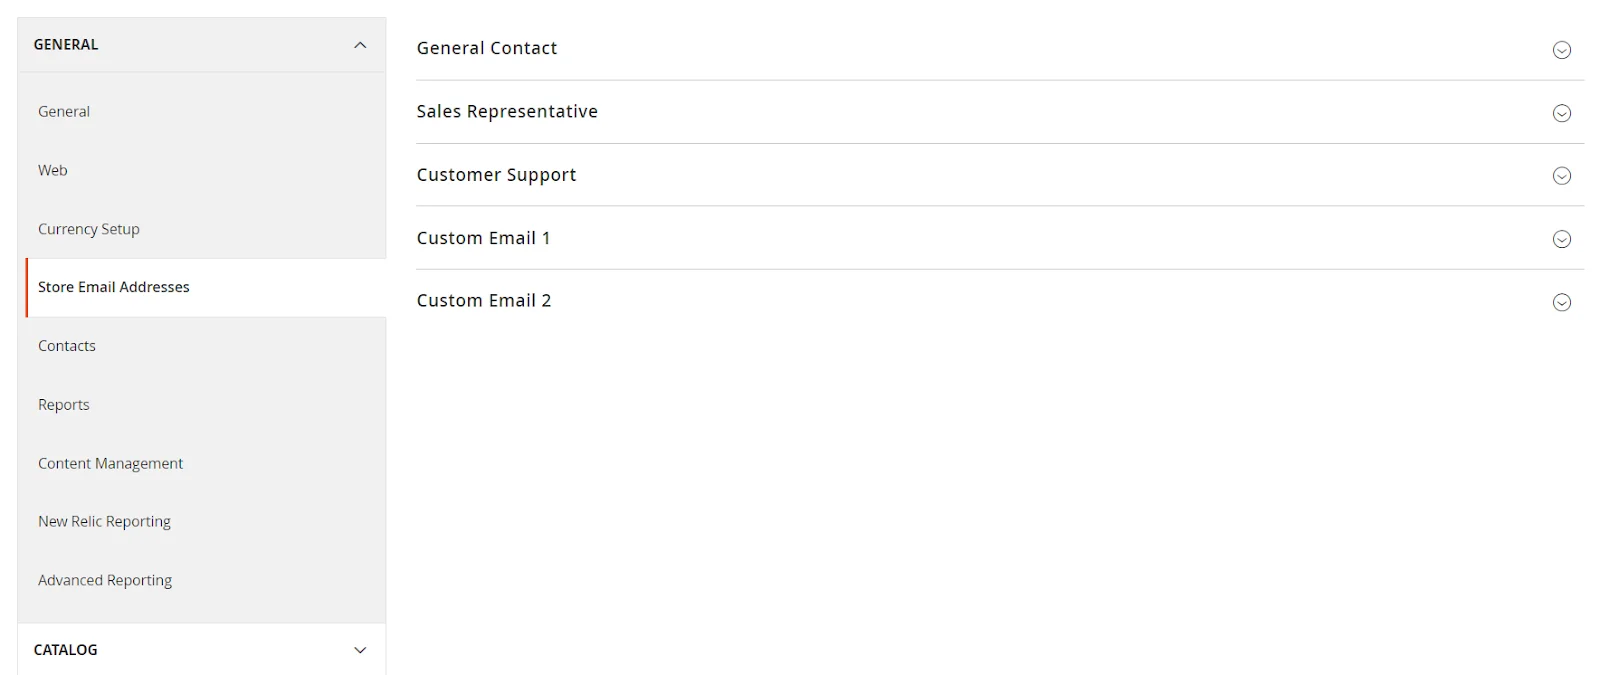
- Error Email Sender — the email address that sends the message about sitemap generation errors. The available options are General Contact, Sales representative, Customer support, and Custom email.
To set the email addresses for these fields, navigate to Stores -> Configuration -> General -> Store Email Addresses.
Magento settings allow defining them for the whole website or a separate store.
Error Email Template – the message template used for sitemap generation notification.
Step #5: define sitemap file limits
Expand the Sitemap File Limits section and fill in the following fields:
- Maximum No of URLs Per File – limit the number of URLs added to the website.
- Maximum File Size – limit the file size.
Step #6: define the rules for adding the sitemap into robots.txt
Expand the Search Engine Submission Settings section and set the Enable Submission field to Yes. This configuration adds the sitemap link into the robots.txt file crawlers use to get the site indexation rules.
Step #7: press Save Config and flush the configuration cache to enable the changes you made.
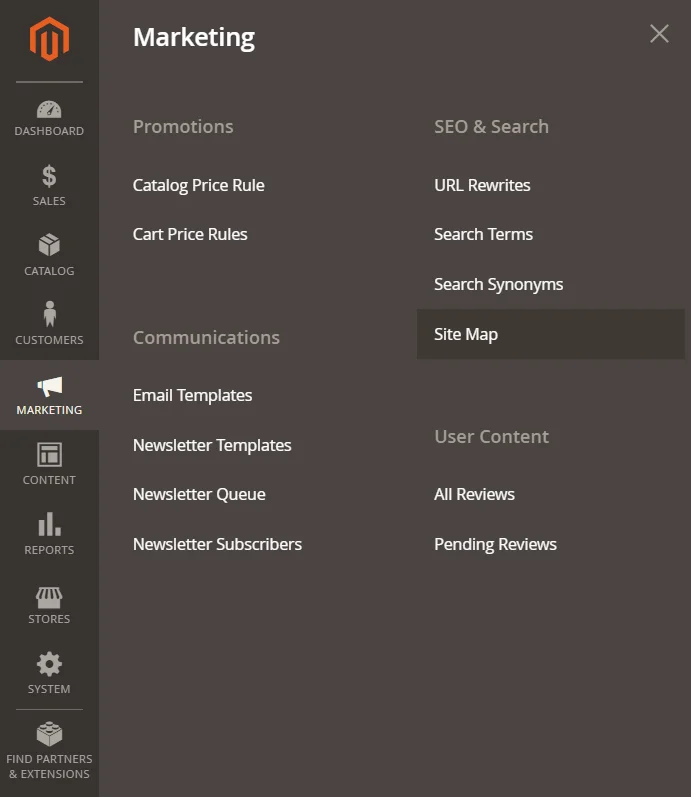
Step #8: to set up the sitemap generation, navigate to Marketing -> SEO & Search -> Sitemap.
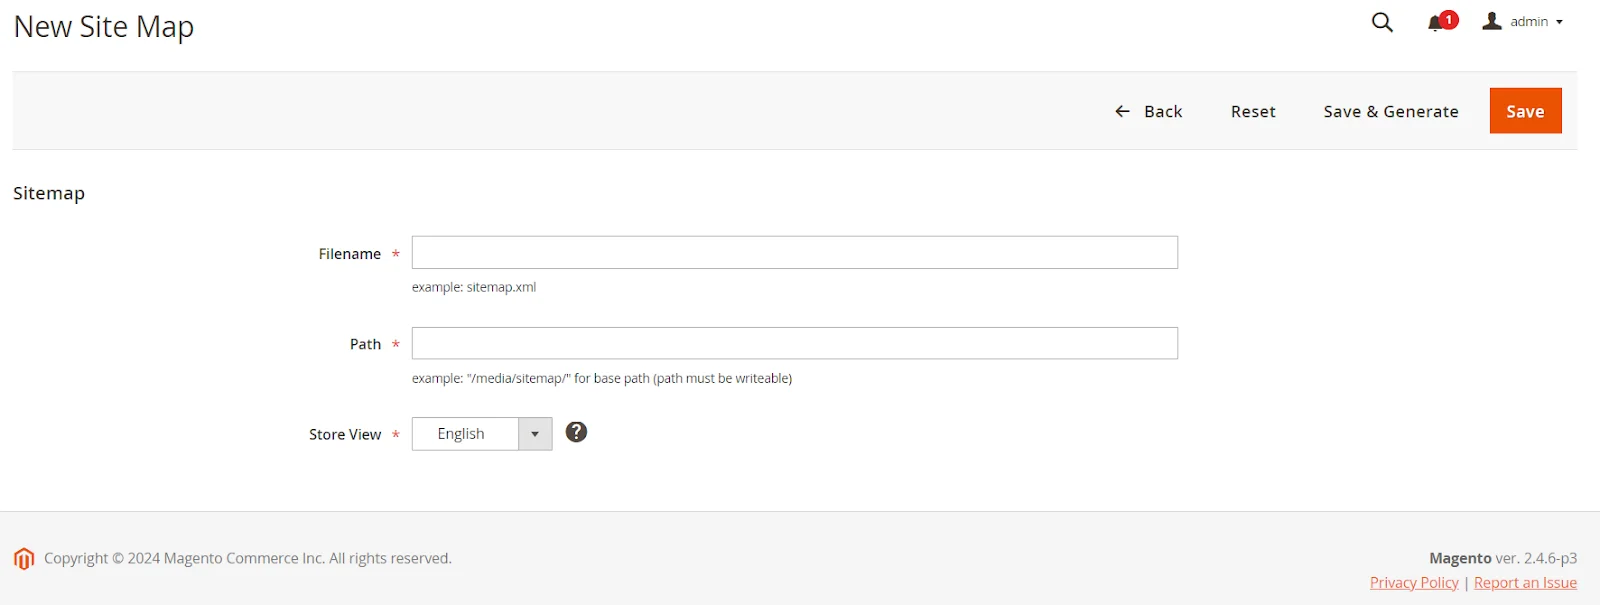
Step #9: press the Add Sitemap button in the upper right corner.
Step #10: enter the Filename and Path values.
Commonly, Magento 2 sitemap.xml is used as a filename, while the path is set with a forward slash. Remember that the directory where the sitemap file will be created must be writable.
Step #11: press the Save or Save & Generate button.
If you press Save, the map will be automatically generated at the date and time you set it up. Otherwise, if you press Save & Generate, the sitemap will be generated immediately.
If your Magento store has many products, the first option is preferable. You can schedule the generation for a time when the load on the shop will be minimal.
How to Generate a Sitemap for a Custom Model?
Adding a URL from the custom model is performed by adding a new ItemProvider into \Magento\Sitemap\Model\ItemProvider\Composite.
Below is the example of adding CMS pages into the sitemap. Although CMS pages are included in the XML sitemap by default, our example demonstrates how to add any other model:
app/code/VendorName/Sitemap/etc/module.xml
app/code/VendorName/Sitemap/etc/di.xml
app/code/VendorName/Sitemap/etc/adminhtml/system.xml
app/code/VendorName/Sitemap/Model/ItemProvider/ExamplePages.php
app/code/VendorName/Sitemap/Model/ItemProvider/ExamplePagesConfigReader.php
Magento Support & Maintenance
Get support and maintenance for your Magento store from the BelVG team
Visit the storeHow To Generate HTML Sitemap In Magento 2
Unlike XML sitemap management, Magento 2 doesn’t support the feature of generating an HTML sitemap. The most effective approach is to use a third-party Magento SEO extension. Setting up sitemap generation using these extensions is straightforward and similar to the process you would follow within Magento 2.
Moreover, these extensions offer additional capabilities beyond Magento 2’s default features, such as including or excluding specific links from the sitemaps.
How to Submit a Sitemap to Google?
Submitting an XML sitemap to Google can be done via Google Search Console and does not require special knowledge. Below is a simple step-by-step guide that will guide you through this process.
NB! Before adding a sitemap to Google, one must confirm their rights to the website in Google Search Console.
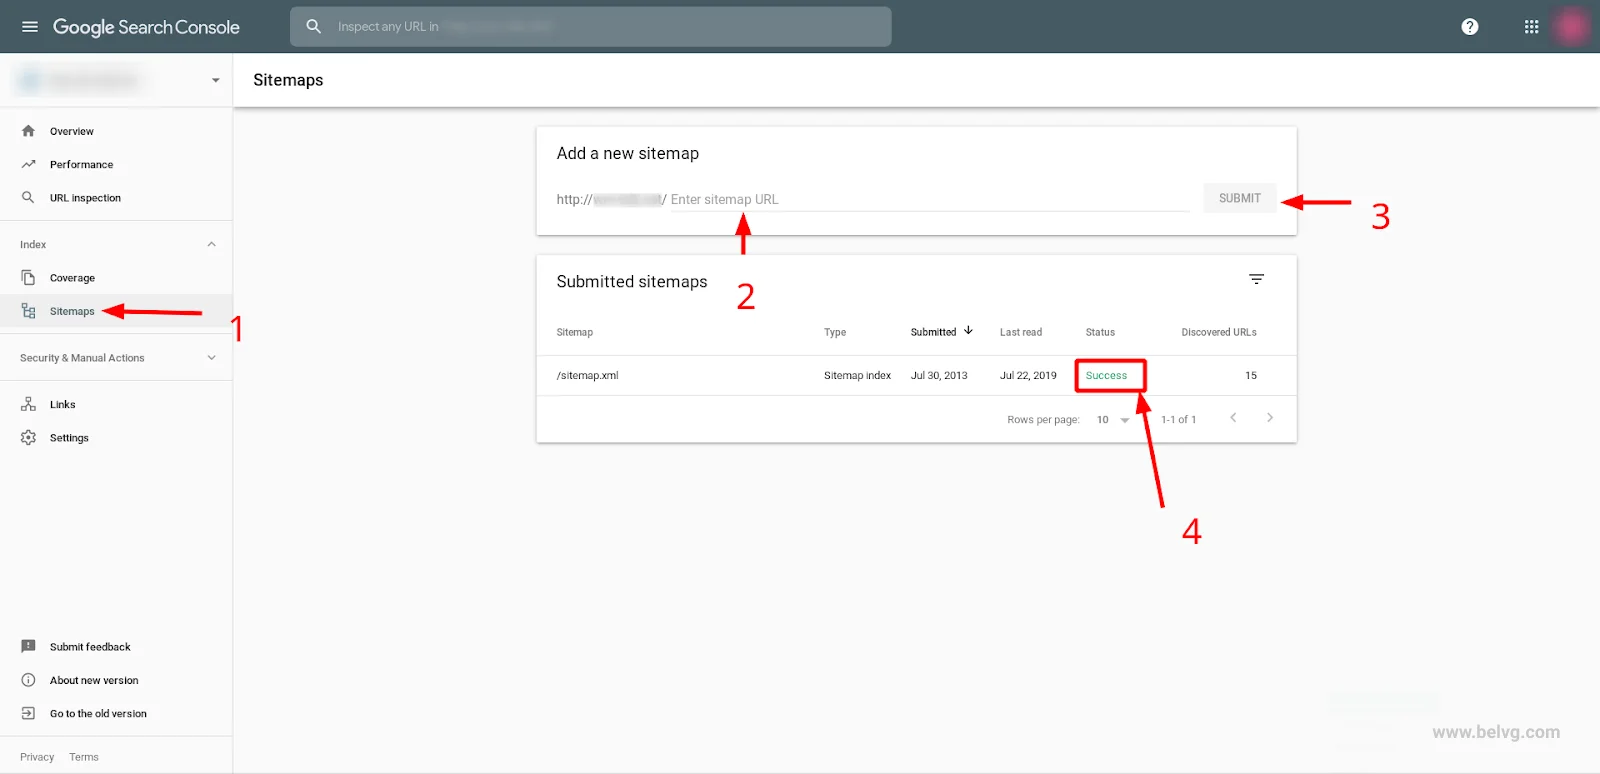
Step #1: go to the Google Search Console tool and enter the website’s address.
Step #2: select Sitemap in the left sidebar.
Step #3: enter the XML sitemap URL without the domain address in the corresponding entry line (marked 2 on the screenshot). Commonly, the address is site URL + sitemap.xml; however, to be specific, you may check in the Magento sitemap generator settings.
Step #4: press the Submit button.
The Sitemap will be added to the web crawler queue. In the Submitted sitemap section below, users can track the progress of their sitemap submission.
In case the following warning – “Your Sitemap appears to be an HTML page. Please use a supported sitemap format instead.” – appears during the Google submission of the sitemap. Then, you must check whether the Magento sitemap URL you submitted in step 3 is correct.
Conclusion
As you can see, there are two main sitemap types — XML and HTML. They serve different functions — one is for search engines, and another is for user experience and search optimization. Following the detailed step-by-step instructions above, you can create the necessary sitemaps on your own, but if you need support, you can always find it here. Turn to the BelVG team, and we will solve any problem and provide quality Magento development solutions.
