
Communication with customers is the key to gaining their loyalty. You have to be patient, positive and responsive. We have already discussed hundreds of ways and places where you can reach out to the customers. But what is the most efficient way for the customers to reach out to you? Discover contact page advantages!
There is a great variety of different tools like chatbots, emails, social networks and others. In this article, we decided to pay attention to contact forms and present a ready-made guide to empower your Magento website. Read the article to find out how to add custom fields to a contact form and get some useful tips for your business.
Table of contents:
What is a Contact Page and Why do You Need It?
Why is Contact Page Important for SEO?
Top Contact Form Tips
Best Contact Us Page Examples
How to Add Custom Fields to Magento Contact Form
There is a great variety of different tools like chatbots, emails, social networks and others. In this article, we decided to pay attention to contact forms and present a ready-made guide to empower your Magento website. Read the article to find out how to add custom fields to a contact form and get some useful tips for your business.
What is a Contact Page and Why do You Need It?
First, you should ask yourself a question – do I even need a contact page? A contact us page contains a form which allows website visitors to contact its owner or a support team depending on whose email it is connected to. The contact form consists of the fields where visitors can enter a name, email to let the support team contact them back and a subject matter with a message.
You may wonder why to create a separate contact page as the users could directly reach out to you using email or phone number mentioned on the website as well. Why do business owners opt for contact pages? Here are several reasons why:
- Contact page protects your website from spam. Imagine that you want to communicate with the audience, so you put an email somewhere on your website. This way spammers get access to your inbox and they are likely to load it with spam emails. If you don’t want to spend hours looking for a relevant message, use the contact form to get in touch with your customers.
- Contact page helps to track website visitors. You just need to set conversion goals to the contact form and track the number of visitors on your contact page. Moreover, you can track from where your visitors enter the contact page and define the most popular way. Using a contact form, you can develop a strategy to convert your visitors into loyal customers.
- Contact page increases conversions. How? If for any reason, your website visitor encounters a problem, a contact page is a feature you need to prevent them from leaving directly. They come across a contact form and start a conversation looking for the solution they need.
- Contact page gives your website a professional look. A website without a contact form will look incomplete or show that you don’t know how to run an online business. Adding it to the website, you will appear more professional to the visitors. Moreover, potential business partners are more likely to contact you via the form rather than an email address.
Why is Contact Page Important for SEO?
Contact pages are needed not only to communicate with customers but they can do more for your website. A contact form is one of the pages on your website that can rank in searches. But the majority of companies do not include keywords on their contact pages losing a SEO opportunity.
However, a contact us page does not have many possible places where you can add keywords. As an alternative, many merchants use additional tags at the HTML of web pages. Regular website users won’t pay attention to these trick but, as you know, search engines have a limited understanding of the page content. Making pages with Microdata, you will help Google and other search engines understand what kind of information is given, where the location is, what the price is and even more. As a result, your contact form ranks higher in searches and drives traffic.

Magento Custom Development
Take your online store to the next level with BelVG Magento Custom Development
Visit the pageTop Contact Form Tips
Before creating a contact form for your website, you need to have a clear vision of it. And here there are also some rules that you need to follow or your visitors won’t click the Submit button. We have plenty of experience in creating contact forms for our customers as well as using them ourselves – so here is a list of working tips for you.
- Simplify as much as possible. Do not use lots or fields, colors and details – anything that can divert or irritate users. They don’t need to feel that the company tries to let people give up and contact it in any case. Making it simple, people will contact you because they want to.
- Use common phrasing. Have you ever seen proper contact forms with huge and over creative phrases? Definitely not. Keep following the idea of simplicity – use classic phrases like Help, Contact Us, Get Support that are easy to understand for everyone.
- Avoid confusing Call to actions and put them in common places. We recommend following strategies of the majority of companies – use footer and header links for the contact page and don’t put it anywhere else on the page. But if it doesn’t fit your design, you can try to find your own way. However, make sure to keep it understandable.
- Make your form mobile friendly. Hardly all your visitors use desktops with the same dimensions. If your contact form is not mobile-friendly, you risk losing a number of customers who can’t contact you from smartphones or tablets. Make your contact form mobile friendly to show customers that you care about their experience.
- Avoid long dropdown menu options. If you decide to use dropdown menus in your contact form, remember that users hate long ones. No one is searching for their date of birth for hours. Users just leave the page tired of the menu – let them enter the information without any difficulties.
- Use only simple captchas. All business owners will agree that captcha is a must to filter spam and avoid email issues. But despite this, captcha has a negative effect on conversions of websites. Trying to protect your website from spammers, don’t use complex captchas with lots of verification stages or you risk losing customers in future.
- Send a personalized message after the form is sent. Many merchants create ready-made message forms to respond to customers. But when people want to communicate with a brand via the contact form, they expect to see a personal interest of a support team. Sending personalized messages, you have more chances to build strong relationships with users.
Best Contact Us Page Examples
A well-designed customer contact form can enhance the customer experience. Every business is different with unique products and services as well as customers and their personal requirements. But all such pages have something in common what you can see on the following contact page examples and include in your online contact form.
Basecamp
Basecamp is a software company based in Chicago. It creates web applications such as Campfire, Backpack and Highrise, open source web app Ruby on Rails as well as Basecamp software package.
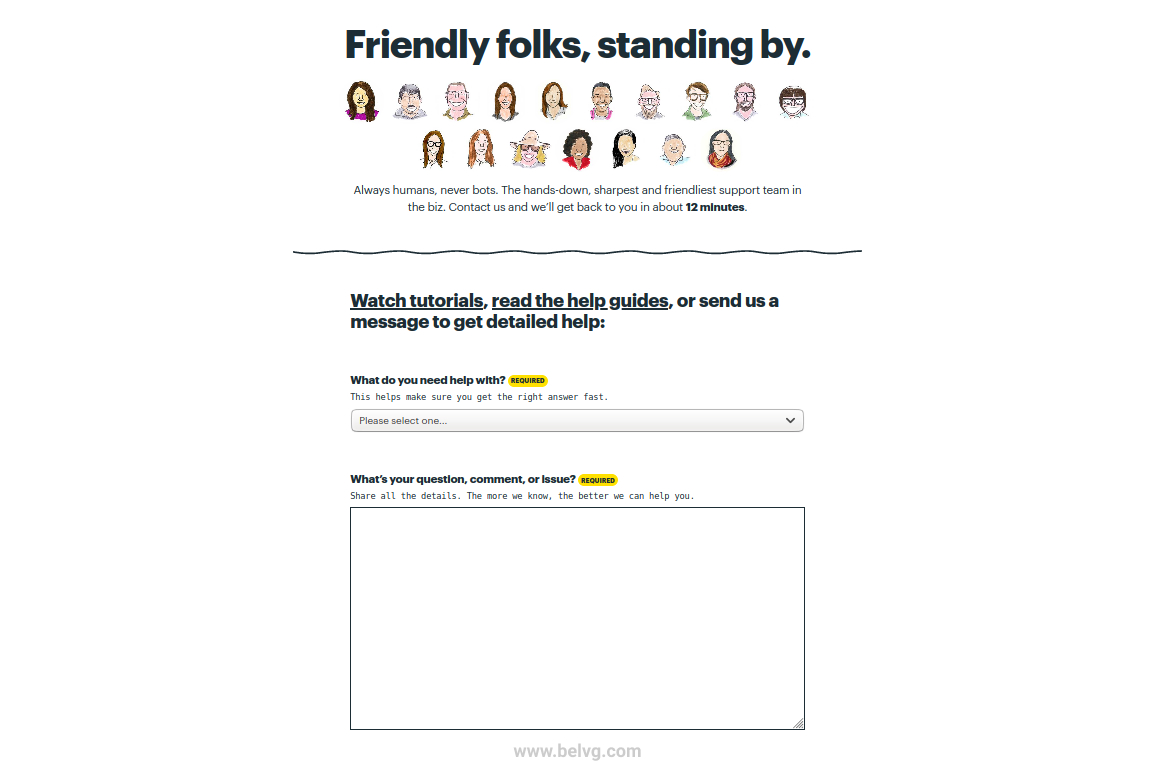
The company’s contact page design is an example of not only fascinating but also functional form. Basecamp wants to create close relationships with customers and prove that they care about them introducing the support team members to users. Their contact page has links to their FAQ page and guides for users. Instead of a bold subject field, Basecamp offers to choose among the most frequent problems. Then you only need to fill out the message, email and URL address fields and add a screenshot or document, if necessary.
Monin
Monin is a producer of syrups, toppings and sauces from France. The company was founded in 1912 and turned into a leading brand of the drinks industry. If you visit different restaurants and clubs, you might have seen Monin drinks among other ingredients at the bar.
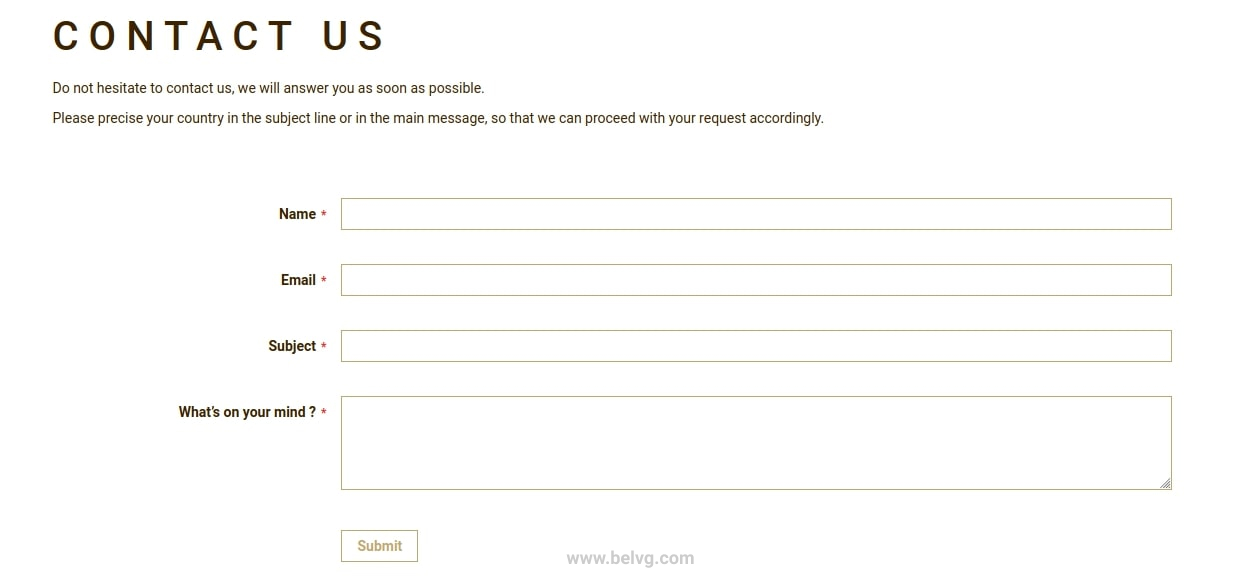
The contact page of the company is an example of a classic form that was made in the same style as the whole website. Monin contact form contains the most common fields where you need to enter your name, email address, subject of your issue and the message.
Yummygum
Yummygum is a design studio from Amsterdam, the Netherlands. They focus on user interfaces as well as web, IOS and native apps icons. The company, unlike the above mentioned, offers a two-step process to contact their support team.
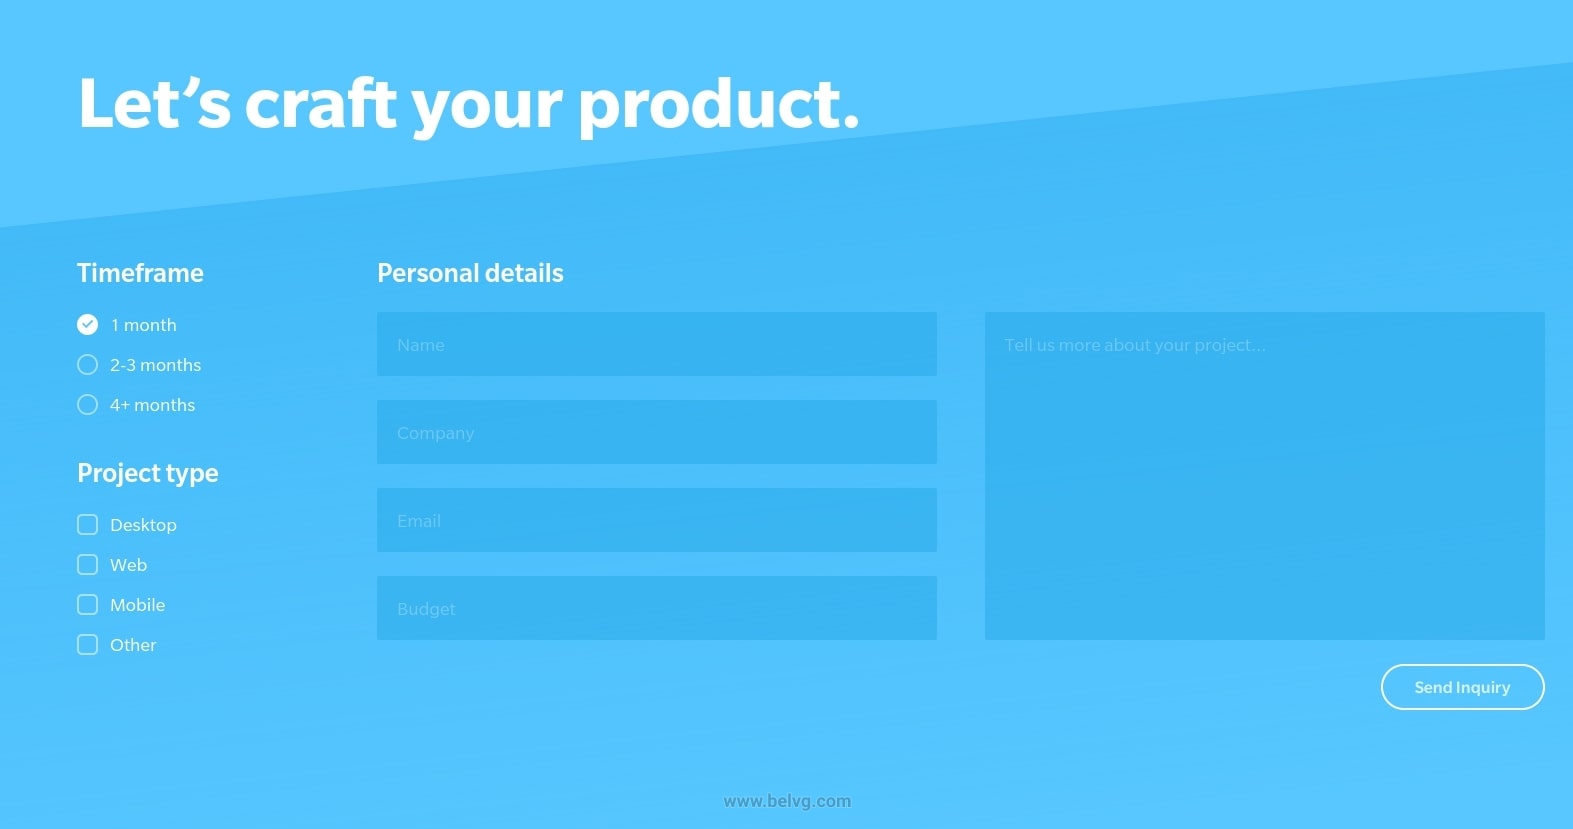
When you click on Contact on Yummygum website, you can pick the style of conversation: formal, meeting for coffee and informal. According to your choice, you will see different contact forms. Choosing Your great project, you need to fill out name, company, email address, budget and explain the idea as well as pick timeframe and project type. Clicking on Meeting for coffee of Birds and bees, you see a simple form with name, email and a message.
Dior
Dior is a French luxury brand founded in 1946. The company designs and retails fashion accessories, leather goods, footwear, clothes, makeup and skincare. The company has over 200 brick and mortar stores worldwide as well as sells goods online on their website.
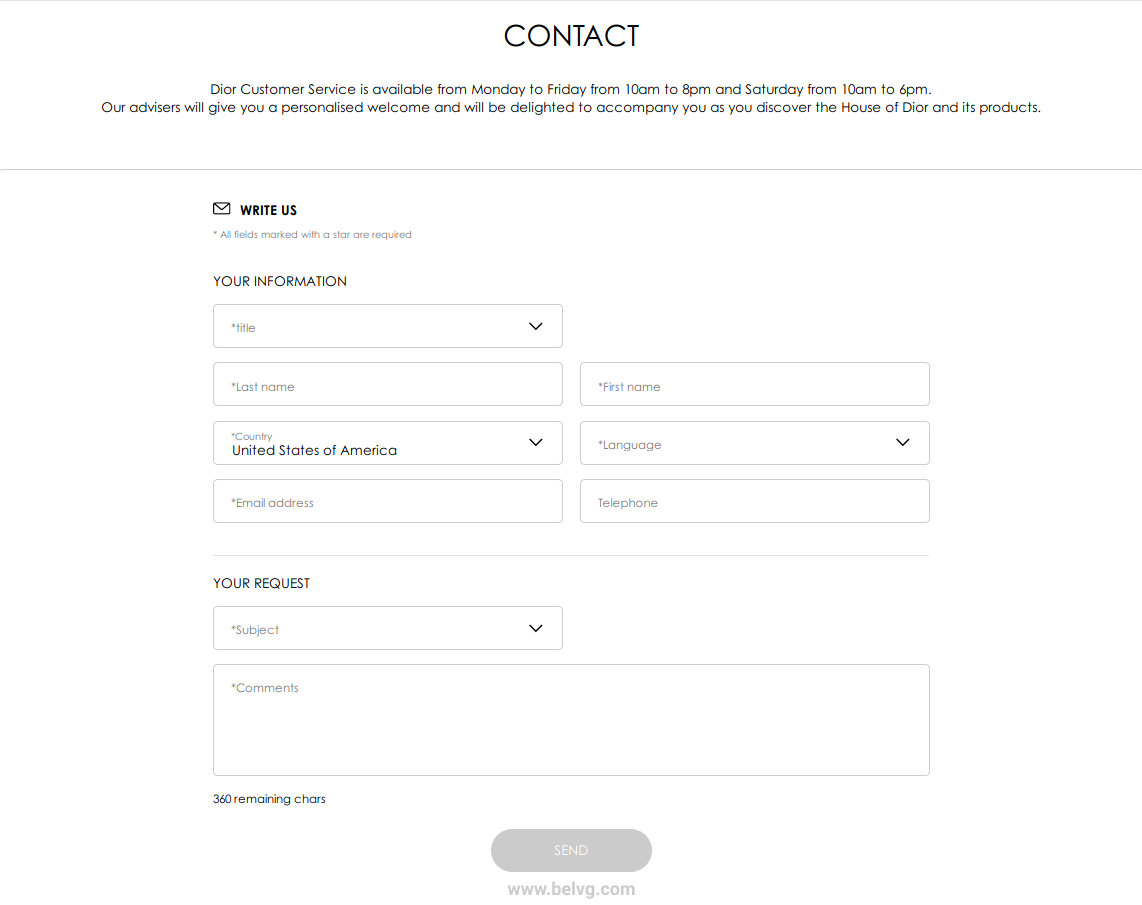
Dior is a brand that doesn’t focus on a specific product. Having a huge number of goods, the company has to divide their contact pages according to it. For example, on their contact page you can pick among Christian Dior Couture and Parfums Christian Dior. Choosing the first one, you appear on a detailed contact page. There you see their working hours and need to fill out your title, name, location, number, email address and only then enter your subject and explain the issue. Below, you can start an online chat, call the support team, make an appointment with an advisor in store and visit their FAQ page.
Are you inspired? As you have seen, a contact page is not a boring list of your phone numbers and addresses. When you want the page to work on your brand, you need to generate creative ideas and make it unique.
How to Add Custom Fields to Magento 2 Contact Form
Want to add a contact form to your Magento store? Instead of using a ready-made one, create custom contact fields for your website. It allows to create different combinations of fields to collect the right set of information about your customers. So, how can you do it?
To create a form according to your needs, default Magento 2 functionality might not be enough. There are several ways to extend its functionality.
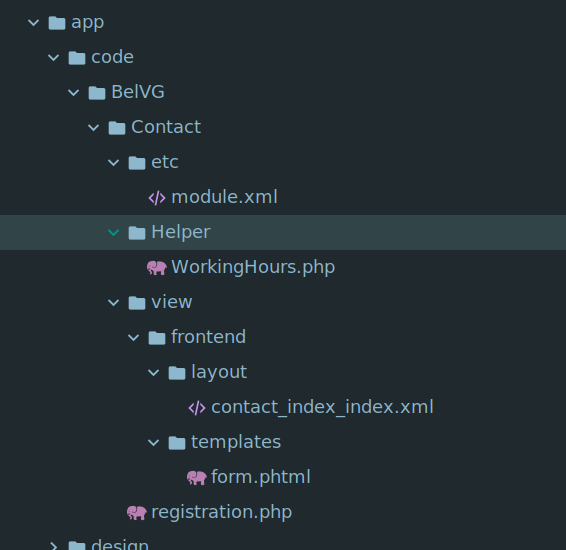
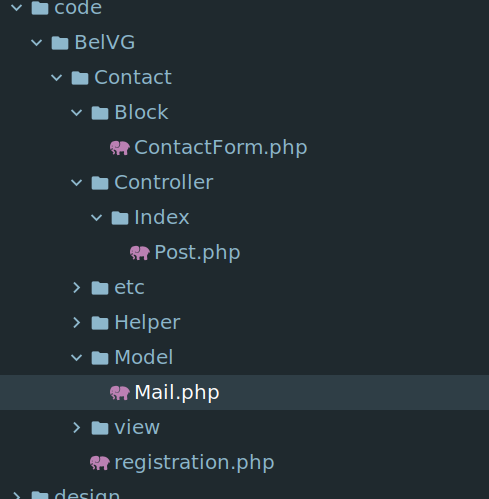
Firstly, you can use modules or create your own. For example, let’s create the BelVG Contact module:
Create form.phtml template and add there an enctype=”multipart/form-data” attribute and new fields for department and file uploading.
……
|
1 2 3 4 5 6 7 8 9 10 11 12 |
<div class="field department required"> <label class="label" for="department"> <span><?=block->escapeHtml(__(Department)) ?></span> </label> <div class="control"> <select name="department" required> <option disabled selected hidden value=""><?= $block->escapeHtml(__('Select a department')) ?></option> <option><?= $block->escapeHtml(__('Tech dept')) ?></option> <option><?= $block->escapeHtml(__('Marketing dept')) ?></option> </select> </div> </div> |
|
1 2 3 4 5 6 7 |
<div class="field file"> <label class="label" for="file"><span><?= $block->escapeHtml(__('Attach a file')) ?></span></label> <div class="control"> <input name="MAX_FILE_SIZE" type="hidden" value="2000000" /> <input type="file" name="file" id="file"> </div> </div> |
Add information to choose the working hours of a store (which are configured in the admin panel).
|
1 |
<div class="field note no-label"><?= $block->escapeHtml(__('Our working hours: '))?></div> |
We also need to enter data on the working hours. Use WorkingHours.php for that.
|
1 2 3 4 5 6 7 8 9 10 11 |
public function getWorkingHours($store = null) { if (!$store) { $store = $this->storeManager->getStore(); } return $this->scopeConfig->getValue( \Magento\Store\Model\Information::XML_PATH_STORE_INFO_HOURS, \Magento\Store\Model\ScopeInterface::SCOPE_STORE, $store ); } |
Enter in the Hours template the following:
$this->helper(BelVG\Contact\Helper\WorkingHours::class)->getWorkingHours()
But this template is not connected instead of a standard one. To do this, add contact_index_index.xml.
|
1 2 3 4 |
<referenceBlock name="contactForm" remove="true"/> <referenceContainer name="content"> <block class="Magento\Contact\Block\ContactForm" name="customContactForm" template="BelVG_Contact::form.phtml"/> </referenceContainer> |
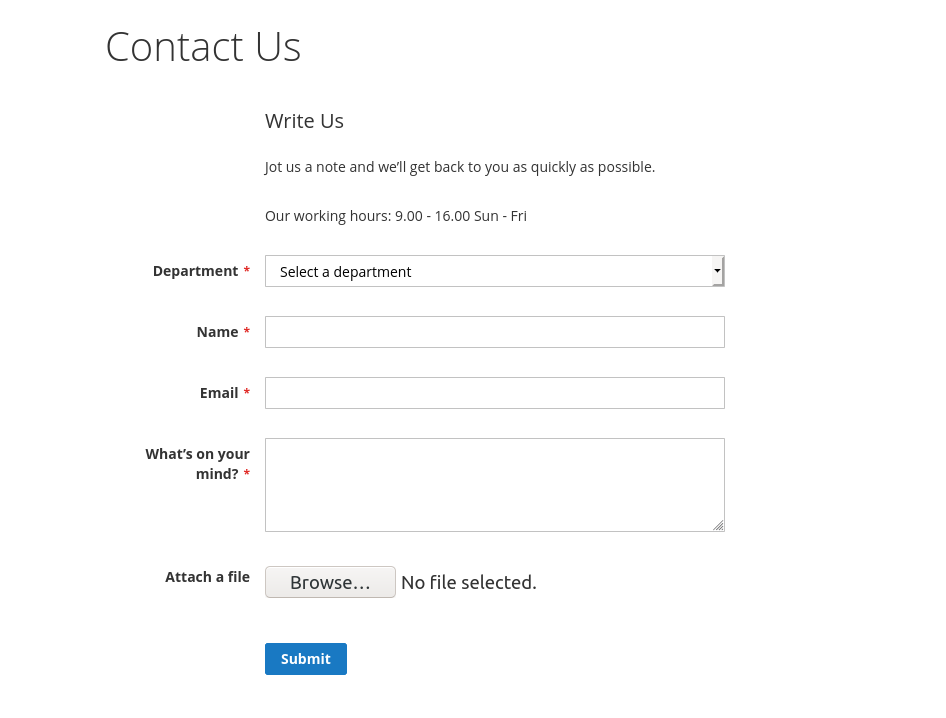
Now on a website, you can see something like this:
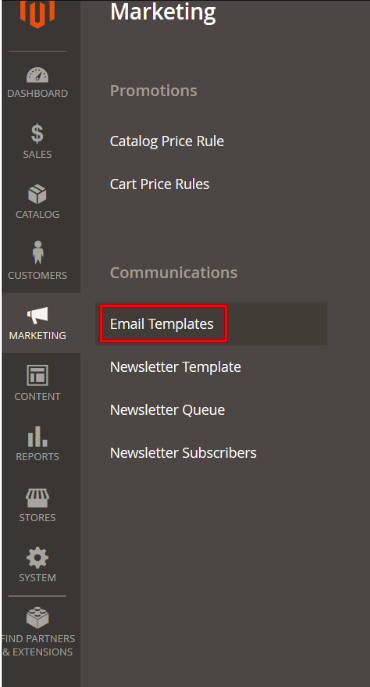
Then, we need to create an email template.
In the template, you should apply the field to the selected department.
|
1 2 3 4 |
<tr> <td><b>{{trans "Department"}}</b></td> <td>{{var data.department}}</td> </tr> |
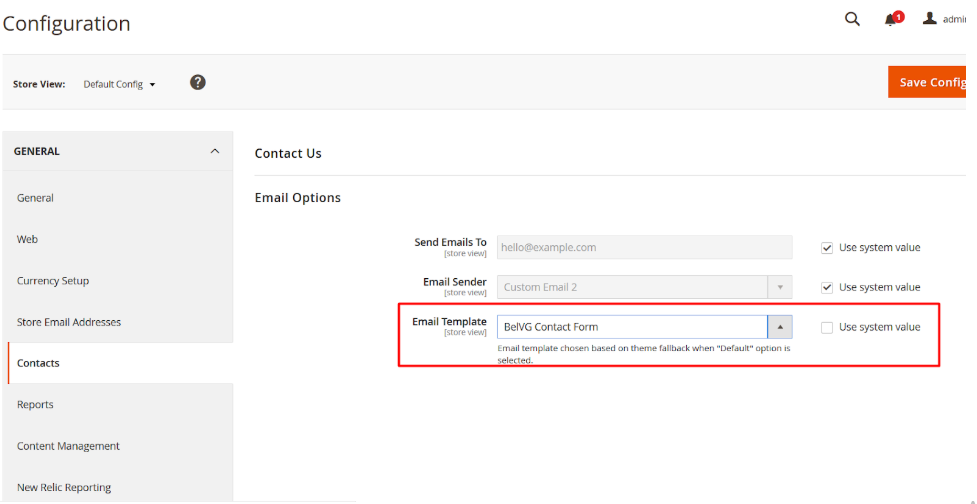
And then you should apply the new field.
To process the file, we need to add Block, Model and Controller:
In the Block we create:
|
1 2 3 4 5 6 7 8 9 10 11 12 13 |
public function getFormAction() { return $this->getUrl('custom_contact/index/post', ['_secure' => true]); } public function getWorkingHours($store = null) { if (!$store) { $store = $this->storeManager->getStore(); } $storeInformation = $this->information->getStoreInformationObject($store); return $storeInformation->getData('hours'); } |
In the Controller:
|
1 2 3 4 5 6 7 8 9 10 11 12 13 14 15 16 17 18 19 20 21 22 23 24 25 26 27 28 29 30 31 32 33 34 35 36 37 38 39 40 41 42 43 44 45 46 47 48 49 50 51 52 53 54 55 56 57 58 59 60 61 62 63 64 65 66 67 68 69 70 71 72 73 74 75 76 77 78 79 80 81 82 |
public function execute() { if (!$this->getRequest()->isPost()) { return $this->resultRedirectFactory->create()->setPath('*/*/'); } try { $this->sendEmail($this->validatedParams()); $this->messageManager->addSuccessMessage( __('Thanks for contacting us with your comments and questions. We\'ll respond to you very soon.') ); $this->dataPersistor->clear('contact_us'); } catch (LocalizedException $e) { $this->messageManager->addErrorMessage($e->getMessage()); $this->dataPersistor->set('contact_us', $this->getRequest()->getParams()); } catch (\Exception $e) { $this->logger->critical($e); $this->messageManager->addErrorMessage( __('An error occurred while processing your form. Please try again later.') ); $this->dataPersistor->set('contact_us', $this->getRequest()->getParams()); } return $this->resultRedirectFactory->create()->setPath('contact/index'); } /** * @param array $post Post data from contact form * @return void */ private function sendEmail($post) { $this->customMail->send( $post['params']['email'], ['data' => new DataObject($post['params']), 'file' => $post['file']] ); } /** * @return array * @throws \Exception */ private function validatedParams() { $request = $this->getRequest(); if (trim($request->getParam('name')) === '') { throw new LocalizedException(__('Enter the Name and try again.')); } if (trim($request->getParam('comment')) === '') { throw new LocalizedException(__('Enter the comment and try again.')); } if (false === \strpos($request->getParam('email'), '@')) { throw new LocalizedException(__('The email address is invalid. Verify the email address and try again.')); } if (trim($request->getParam('hideit')) !== '') { throw new \Exception(); } $result = ['params' => $request->getParams(), 'file' => []]; $filesData = $this->getRequest()->getFiles('file'); if(isset($filesData['name'])) { try { $data = $this->getAttachFileData(); } catch (\Exception $e) { throw new LocalizedException(__('Attached file error.')); } $result['file'] = $data; } return $result; } private function getAttachFileData() { $uploader = $this->fileUploaderFactory->create(['fileId' => 'file']); $uploader->setAllowRenameFiles(true); $uploader->setFilesDispersion(true); $uploader->setAllowCreateFolders(true); $path = $this->fileSystem->getDirectoryRead(DirectoryList::MEDIA)->getAbsolutePath('contact-file'); $result = $uploader->save($path); $filePath = $result['path'].$result['file']; $fileName = $result['name']; return ['path' => $filePath, 'name' => $fileName]; } |
In the Model:
|
1 2 3 4 5 6 7 8 9 10 11 12 13 14 15 16 17 18 19 20 21 22 23 24 25 26 27 28 |
public function send($replyTo, array $variables) { /** @see \Magento\Contact\Controller\Index\Post::validatedParams() */ $replyToName = !empty($variables['data']['name']) ? $variables['data']['name'] : null; $fileData = !empty($variables['file']) ? $variables['file'] : []; $this->inlineTranslation->suspend(); try { $transport = $this->transportBuilder ->setTemplateIdentifier($this->contactsConfig->emailTemplate()) ->setTemplateOptions( [ 'area' => Area::AREA_FRONTEND, 'store' => $this->storeManager->getStore()->getId() ] ) ->setTemplateVars($variables) ->setFrom($this->contactsConfig->emailSender()) ->addTo($this->contactsConfig->emailRecipient()) ->setReplyTo($replyTo, $replyToName); if(!empty($fileData)) { $transport->addAttachment($fileData['path'], $fileData['name']); } $transport->getTransport()->sendMessage(); } finally { $this->inlineTranslation->resume(); } } |
Now you receive a file as an attachment in the message.
Wrapping it up
If you consider upgrading your Magento contact form or still don’t have it at all, keep our tips and guides in mind. Follow our detailed instruction to add custom fields in your Magento online store and get ideas from the best examples of contact us forms that we have listed above. If you look for more information on how to empower your website, check our blog.
Like the article? Share your thoughts in the comments below and check out our contact page.
The following people contributed to the article: Aleksander Kutseika, Diana Zevan.






Hi, the file cannot be committed directly. You need to add a link to the file.
Hi, thanks for the comment. Here is your answer:
Change
$path = $this->fileSystem->getDirectoryRead(DirectoryList::MEDIA)->getAbsolutePath(‘contact-file’);
on
$path = $this->fileSystem->getDirectoryRead($this->directoryList::MEDIA)->getAbsolutePath(‘contact-file/’);
Did you make a folder in media/contact-files to save the uploaded file in getAttachedFileData function?
private function getAttachFileData()
{
$uploader = $this->fileUploaderFactory->create([‘fileId’ => ‘file’]);
$uploader->setAllowRenameFiles(true);
$uploader->setFilesDispersion(true);
$uploader->setAllowCreateFolders(true);
$path = $this->fileSystem->getDirectoryRead(DirectoryList::MEDIA)->getAbsolutePath(‘contact-file’);
$result = $uploader->save($path);
$filePath = $result[‘path’].$result[‘file’];
$fileName = $result[‘name’];
return [‘path’ => $filePath, ‘name’ => $fileName];
}
Can you share the link of the blog you mentioned for this issue?
It works but how the about the image? I add
{{trans “Image”}}
{{var data.file}}
It didnt work at all. thanks
Hello, Cen! Unfortunately, we cannot help you based on this comment, we would need more details. Feel free to contact our support team and we will figure out how we can help you
It works but how the about the image? I add
{{trans “Image”}}
{{var data.file}}
It didnt work at all. thanks
Hi, Syed! Thanks for your comment!
Yes, I agree with you, overriding a theme is a basic step in this case, which I obviously completed. However, since there already have been articles on our blog dedicated to this aspect, I felt it was unnecessary to mention it in the article.
Thank you for sharing this tutorial.
As editing a core file is not the right approach, so it’s better to override the core files.
So, it would be better if you can also show the basic step of overriding theme i,e theme declaration, and registration before editing the form.phtml file.