First off, it’s necessary to define the function of every attribute.
“name” is a block identifier in XML layout with the help of which a block can be applied. The attribute “name” should be unique within the page. It’s worth comparing the attribute with “id” for HTML tags. If we don’t assign the attribute, it is assigned automatically by the system in the ANONYMOUS_n format (where “n” is an order number with unspecified “id” attribute).
“as” assigns an alias under which this block is identified within its parent. The attribute should be unique within the parent block. As a rule, “as” is shorter than “name” that is convenient when calling a block in the template files. If we do not assign the attribute “as”, it is automatically equal to the attribute “name”.
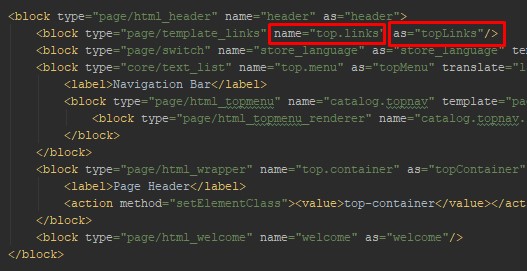
Let’s learn the example of using the attribute “as” when calling a block in the template. In picture 1 there is a block which outputs a link at the top of the site. It contains the following attributes name=”top.links” and as=”topLinks”
In order to output the block in the header of the template, we apply the block call construction. We should apply the attribute “as” as an identifier.
In the example “name” and “as” have the same length and probably you can’t understand the reason to use “as”, but when the attribute “name” gets longer, it becomes clear the necessity of “as” usage.
All in all, the attribute “name” is a unique block identifier (as a rule, it’s long and exhaustive), but the attribute “as” is an alias (it is short as a rule), which is used when calling a block in the template files. The key function of the attribute “as” is simplifying blocks.
Magento 2 Development
Take your online store to the next level with BelVG Magento 2 Development
Visit the pageWhat is the processing order of layout XML instructions?
In Magento there is the following processing order of layout XML instructions (from highest priority to lowest):
- User XML layout in the admin panel;
- Custom theme layout (current theme);
- Default theme layout (parent theme);
- Base theme layout (basic theme).
It should be mentioned that within layout files user handles will have a higher priority than default handles. In other words, XML layout is processed in the same order as fallback stages starting from current theme and finishing with basic one (you can find additional info in the article “How many fallback steps are there in Magento 1 and 2?”). You should comprehend that layouts of a higher priority not always should override layouts of a lower priority. As a rule, it is enough when they’re extended (you can find additional info in the article
“Override a layout in Magento 2”. Since Magento forms the ultimate XML layout by using all layout files according to the priorities described above.
How to include a custom CSS file on a product detail page for a specific product?
There are two ways to include a custom file (let’s call it “custom_example.css”) for a specific product. But before applying it, it’s necessary to put the file into the folder containing the CSS files of your custom theme, i. e. “/skin/frontend/our_package/our_theme/css”.
Way 1
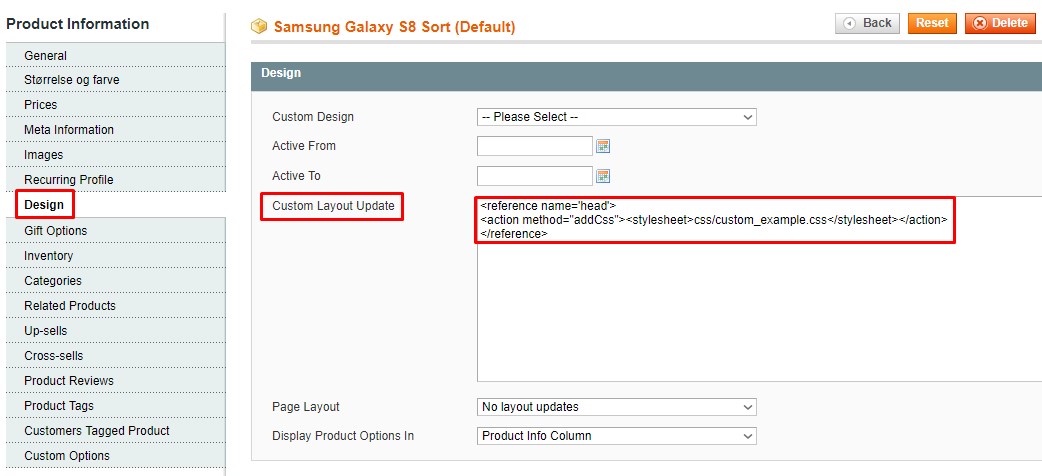
Go to the admin panel of the website and open the product for which a custom CSS file should be applied. On the tab “Design” in the field “Custom Layout Update” we need to add the connection code of the custom CSS file:
|
1 2 3 |
<reference name='head'> <action method="addCss"><stylesheet>css/custom_example.css</stylesheet></action> </reference> |
Where “css/custom_example.css” is the file path of the custom theme.
Way 2
Open catalog layout file in your theme:
“/app/design/frontend/our_package/our_theme/layout/catalog.xml“
Besides, we can use the file local.xml:
“/app/design/frontend/our_package/our_theme/layout/local.xml“
Generally, we should add the code in any of these files:
|
1 2 3 4 5 |
<catalog_product_view product="219"> <reference name="head"> <action method="addCss"><stylesheet>css/custom_example.css</stylesheet></action> </reference> </catalog_product_view> |
In this case, the meaning of the attribute “product” is the id of the product for which the custom file should be applied. “css/custom_example.css” is the file path of the custom theme.
Do not forget to clear cache after changes are made. I would add for myself, the second way is not appropriate enough, as it makes the layout file worse, so you need to check if there’s the unused code left when the product is removed.

Magento Custom Development
Take your online store to the next level with BelVG Magento Custom Development
Visit the page


