This article is intended to provide Magento developers with some new tips on Magento 1.9 configuration. We split the article into two parts: the 1st one will tell you about Product detail pages configuration, in the other part you are going to learn how to configure Category pages. Without further ado, let us get things under the way.
Product detail pages (including Simple, Configurable, Bundle, Grouped, Virtual, Downloadable, Gift Card products):
- Configure design changes (page layout);
- Use custom layout updates (XML);
- Use container blocks provided by native Magento to display additional information on category pages.
Configure design changes (page layout)
Open the desired product in the admin panel. After that go to Design tab, find Page Layout and choose the necessary layout. You can choose from various options:
- 1 column;
- 2 columns with left bar;
- 2 columns with right bar;
- 3 columns.
You can add your own layout (click on the image to open it in full size):

Magento Custom Development
Take your online store to the next level with BelVG Magento Custom Development
Visit the pageYou can also configure layout product page by adding the following construction into local.xml:
|
1 2 3 4 5 6 7 8 |
<handle> <label>Catalog Product View (Any)</label> <!-- Mage_Catalog --> <reference name="root"> <action method="setTemplate"><template>page/2columns-left.phtml</template> </action> </reference> </handle> |
When speaking generally about products, instead of layout name you can insert the following:
|
1 2 3 4 5 6 7 8 |
<catalog_product_view> <PRODUCT_TYPE_simple> <PRODUCT_TYPE_configurable> <PRODUCT_TYPE_grouped> <PRODUCT_TYPE_bundle> <PRODUCT_TYPE_virtual> <PRODUCT_TYPE_downloadable> |
Regarding a particular product, the layout name will be:
|
1 |
<PRODUCT_ID> |
Use custom layout updates (XML)
We add custom layout configurations into local.xml (/app/design/frontend/our_package/our_theme/layout/local.xml) or into catalog.xml using the handles I mentioned above:
|
1 2 3 4 5 6 7 8 |
<catalog_product_view> <PRODUCT_TYPE_simple> <PRODUCT_TYPE_configurable> <PRODUCT_TYPE_grouped> <PRODUCT_TYPE_bundle> <PRODUCT_TYPE_virtual> <PRODUCT_TYPE_downloadable> |
Regarding a particular product, the layout name will be:
|
1 |
<PRODUCT_ID> |
Use container blocks provided by native Magento to display additional information on category pages
To add blocks to additional information tab, use the following construction, where we display our block in phtml template: $this->getChildHtml(‘my_child_alias’)
After that in file local.xml or catalog.xml we write our template into the following construction:
|
1 2 3 |
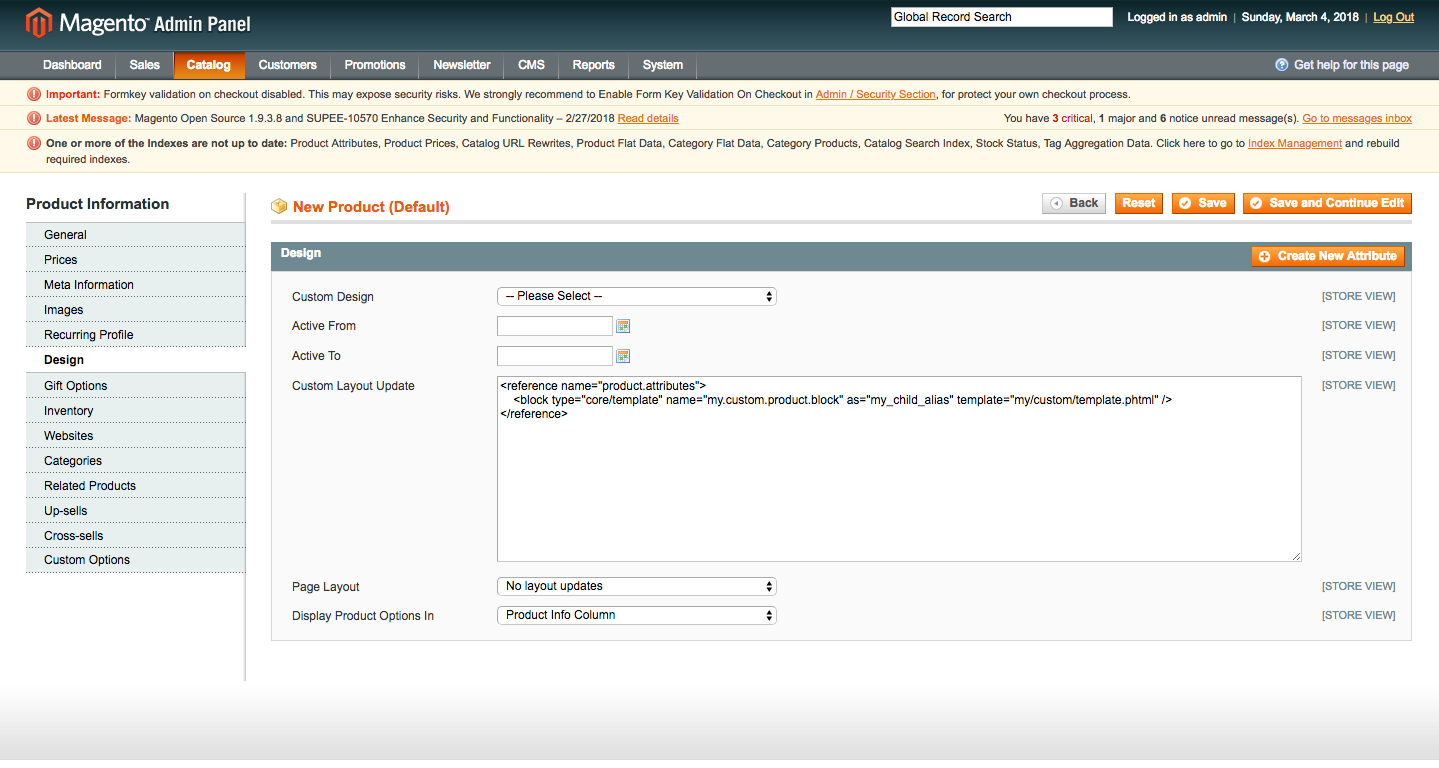
<reference name="product.attributes"> <block type="core/template" name="my.custom.product.block" as="my_child_alias" template="my/custom/template.phtml" /> </reference> |
We can also set our override in the admin panel on the Design tab of the corresponding product (click on the image to open it in full size):
Category Pages:
- Configure design changes (page layout);
- Use custom layout updates (XML);
- Configure the layered navigation;
- Configure design inheritance;
- Configure a CMS block as a category landing page.
Configure design changes (page layout)
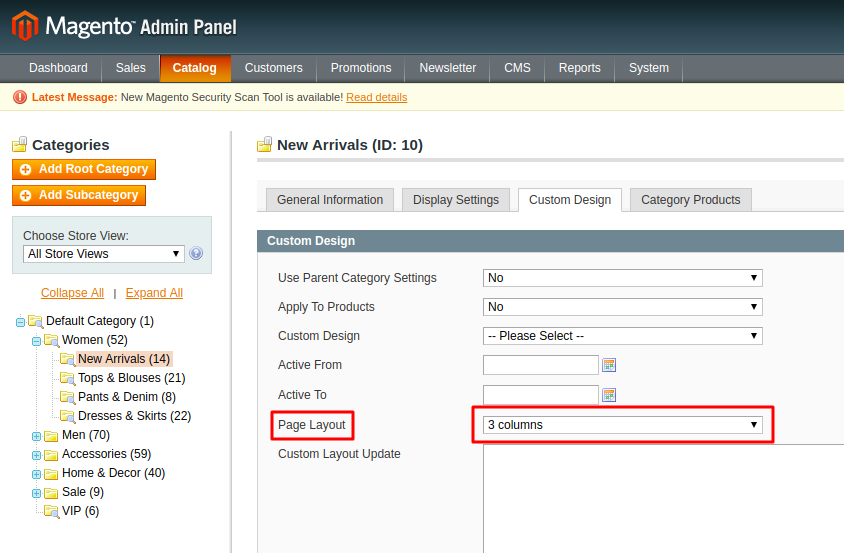
Also, it is possible to configure design changes via admin panel. You can choose one of the standard layouts (1 column, 2 columns with left bar, 2 columns with right bar, 3 columns), or create your own:
Another option is to set page layout in file.xml of your theme, or in catalog.xml (/app/design/frontend/our_package/our_theme/layout/catalog.xml), or in local.xml (/app/design/frontend/our_package/our_theme/layout/local.xml) using “setTemplate“. It looks as follows:
|
1 2 3 4 5 6 7 |
<required-handle> <reference name="root"> <action method="setTemplate"><template>page/2columns-right.phtml</template></action> </reference> </required-handle> |
where required-handle — is the necessary handle of the category (for example, “catalog_category_default”), for which we configure the layout.
Magento 2 Development
Take your online store to the next level with BelVG Magento 2 Development
Visit the pageUse custom layout updates (XML)
Custom layout changes for the category should be added in our theme in file catalog.xml (/app/design/frontend/our_package/our_theme/layout/catalog.xml) or in file local.xml (/app/design/frontend/our_package/our_theme/layout/local.xml).
Configure the layered navigation
Layered navigation consists of product features (price, size, color, material, etc.). It is displayed as a filter on the site (by default in left sidebar). We set product filters in the admin panel in product properties. Layout design for layered navigation can be configured in our themes in folder “/app/design/frontend/base/default/template/catalog/layer”. Category filter can be configured in folder “/app/design/frontend/base/default/template/catalog/navigation”
Configure design inheritance
We have a separate article devoted to inheritance in our blog.
In short and regarding the issue, the design changes from our theme are initially applied. For example, the category templates will be used from the current theme (/app/design/frontend/our_package/our_theme/templates/catalog/category). If the system does not find the templates in that folder, it will search for them among the templates of the theme, from which our theme was inherited (from the theme “default/blank”, for example) and so on. The final step is theme “base/default”.
Configure a CMS block as a category landing page
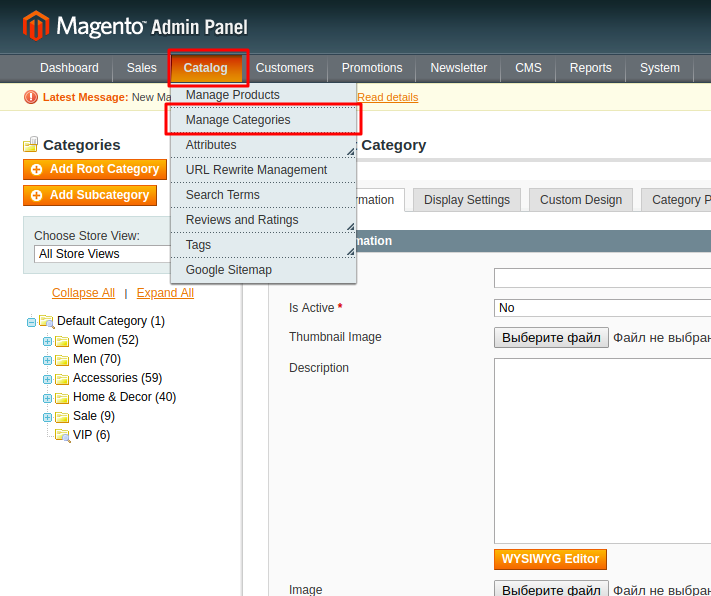
For that purpose click “Catalog -> Manage Categories” in the admin panel,
choose the necessary category and go to “Display Settings”.
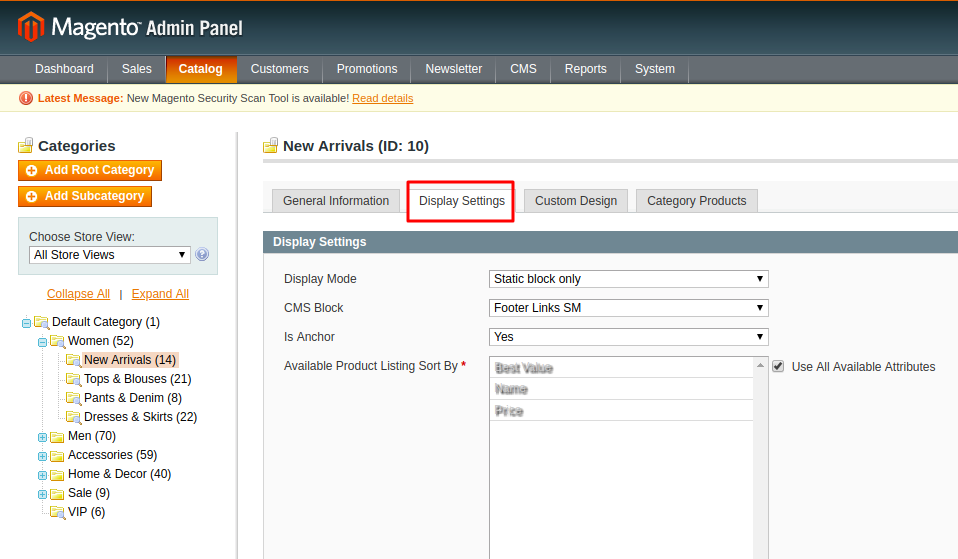
Change Display Mode property to “Static Blocks Only” and choose statistic block “CMS Block”, which you would like to be featured on the page.
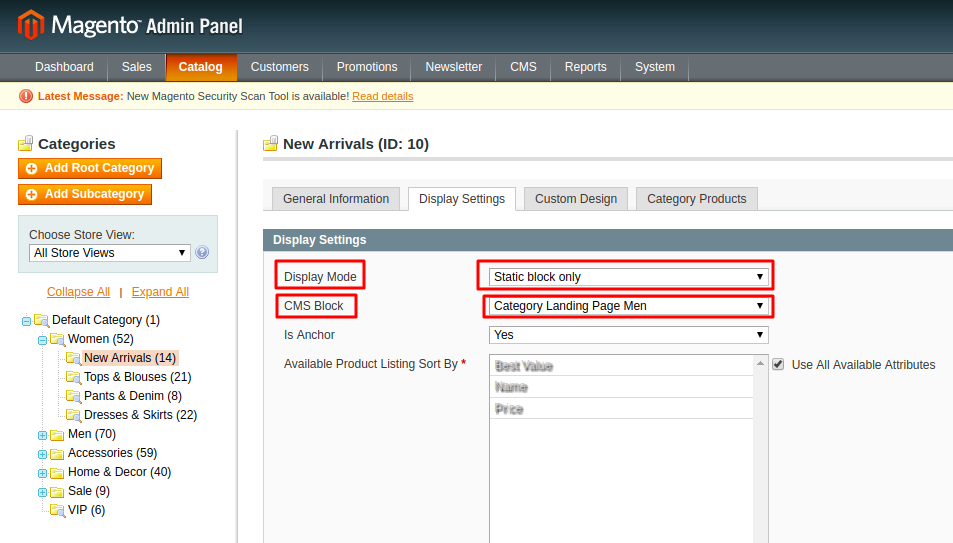
We set the contents and visual appearance of the category page in the chosen CMS Block.
Another option is to use a WordPress integration extension. Fishpig has one available for Magento.
That is all we had to share with you concerning Product detail and Category pages configuration. We have another article about Widgets configuration to be published soon, so don’t miss out!
You are free to leave your questions in the comment section below if something is still unclear to you. Click here for more of Magento configuration tips and technics.

Magento Webdesign
Take your online store to the next level with BelVG Magento Webdesign
Visit the page


