One of the most common tasks during a site development is changing the appearance and the structure of the pages. In Magento 2, layout XML files are used to describe the structure of the pages. Developers most commonly have to solve two basic types of tasks: modification of the existing layout files and the creation of their own. Let’s take a closer look at these types of tasks.
Creating your own layout files
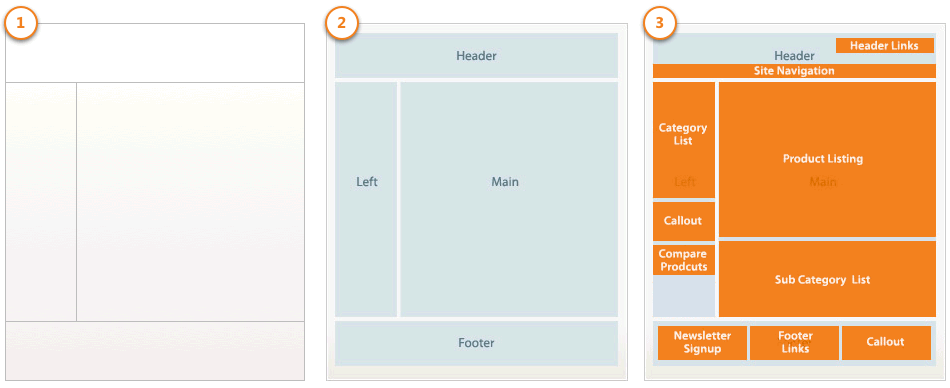
In Magento 2 layouts (1) are used to describe the basic structure of a web page. Containers (2) are used to create a page layout. The contents of a container can be blocks and other containers. Blocks (3) are intended for outputting the html content of a page, which is contained in their template files.
1 – layout; 2 – containers; 3 – blocks
To create your own layout we need to complete the following 2 steps. The first one, is creating a layouts.xml file along the following path: <Your_module>/view/<area>/, with the following content:
|
1 2 3 4 5 6 |
<?xml version="1.0" encoding="UTF-8"?> <page_layouts xmlns:xsi="http://www.w3.org/2001/XMLSchema-instance" xsi:noNamespaceSchemaLocation="urn:magento:framework:View/PageLayout/etc/layouts.xsd"> <layout id="my-layout"> <label translate="true">My layout</label> </layout> </page_layouts> |
The next step is to add a my-layout.xml file along the following way: <Your_module>/view/<area>/page_layout/ and fill it with the necessary content:
|
1 2 3 4 5 6 7 8 9 |
<?xml version="1.0"?> <layout xmlns:xsi="http://www.w3.org/2001/XMLSchema-instance" xsi:noNamespaceSchemaLocation="urn:magento:framework:View/Layout/etc/page_layout.xsd"> <update handle="empty"/> <referenceContainer name="page.wrapper"> <container name="header.container" as="header_container" label="Page Header Container" htmlTag="header" htmlClass="page-header" before="main.content"/> <container name="page.top" as="page_top" label="After Page Header" after="header.container"/> <container name="footer-container" as="footer" before="before.body.end" label="Page Footer Container" htmlTag="footer" htmlClass="page-footer"/> </referenceContainer> </layout> |
After that our new template will be available on the administrative panel and we can use it on our website:
Modification of the existing layout fies
Magento 2 provides a number of instructions that allow you to change the layout file in almost any way. But first you need to learn how to specify layout for a particular page. You can do this in the configuration xml file of the page using the layout attribute of the root node of the page. For example, to change the default layout for the Advanced Search page from 1-column to 2-column with left bar, we need to create a file along the following way:
app/design/frontend/<You_vendor_name>/<You_theme>/Magento_CatalogSearch/layout/catalogsearch_advanced_index.xml.
The file should contain the following:
|
1 2 3 |
<page layout="2columns-left" xmlns:xsi="http://www.w3.org/2001/XMLSchema-instance" xsi:noNamespaceSchemaLocation="urn:magento:framework:View/Layout/etc/page_configuration.xsd"> ... </page> |
However, more often we don’t have to completely change the layout of the page, but to add or remove something in the existing one. For these purposes, there is a number of tools in Magento 2 that allow us to:
- add and remove static resources (JavaScript, CSS, fonts) in the head section of the page;
- create and change containers;
- create and change blocks;
- set templates for blocks;
- pass arguments to blocks;
- move items (blocks and containers);
- change the order of the elements (blocks and containers);
- delete elements (blocks and containers).
Let’s take a look at some examples of using these instructions.
Adding and deleting static resources
To add static resources to the page you should create the default_head_blocks.xml file along the following path:
You_theme/Magento_Theme/layout/default_head_blocks.xml.
You can add a css file using the following instruction:
|
1 |
<css src="css/my-styles.css"/> |
To add a locally hosted JavaScript file, you can use one of the following instructions:
|
1 2 |
<script src="Magento_Catalog::js/sample1.js"/> <link src="js/sample.js"/> |
To connect an external resource, you need to add the src_type attribute with the url value. For example:
|
1 2 |
<css src="https://maxcdn.bootstrapcdn.com/bootstrap/3.3.4/css/bootstrap-theme.min.css" src_type="url" /> <script src="https://maxcdn.bootstrapcdn.com/bootstrap/3.3.4/js/bootstrap.min.js" src_type="url" /> |
You can add a font using the link tag with the mandatory addition of the rel=”stylesheet” and type=”text/css”:
|
1 |
<link rel="stylesheet" type="text/css" src="http://fonts.googleapis.com/css?family=Montserrat" src_type="url" /> |
Adding and changing containers
To add a new container, you can use the following instruction:
|
1 |
<container name="you.container" as="youContainer" label="My Container" htmlTag="div" htmlClass="my-container" /> |
Name is the only mandatory attribute.
To change a container, (to add a block, for example) there is a referenceContainer instruction:
|
1 2 3 |
<referenceContainer name="header.panel"> <block class="YouVendor\YouModule\Block\YouBlock" name="new.block" /> </referenceContainer> |
Adding and changing blocks. Changing the block template. Changing Block Parameters
The block is created using the block instruction with the required argument name. For example:
|
1 |
<block class="Magento\Catalog\Block\Product\View\Description" name="product.info.sku" template="product/view/attribute.phtml" after="product.info.type" /> |
You can change the block using the referenceBlock instruction. Let’s take the following block as an example:
|
1 2 3 4 5 |
<block class="Namespace_Module_Block_Type" name="block.example"> <arguments> <argument name="label" xsi:type="string">Block Label</argument> </arguments> </block> |
To change its argument and add a new one, we need to use the following instruction:
|
1 2 3 4 5 6 7 8 |
<referenceBlock name="block.example"> <arguments> <!-- The argument you want to change --> <argument name="label" xsi:type="string">New Block Label</argument> <!-- New argument --> <argument name="custom_label" xsi:type="string">Custom Block Label</argument> </arguments> </referenceBlock> |
If we need to assign a template to the block, there are 2 methods to do it.
Method 1: using the template attribute:
|
1 |
<referenceBlock name="new.template" template="Your_Module::new_template.phtml"/> |
Method 2: using an argument with the template name:
|
1 2 3 4 5 |
<referenceBlock name="new.template"> <arguments> <argument name="template" xsi:type="string">Your_Module::new_template.phtml</argument> </arguments> </referenceBlock> |
The new_template.phtml in the demonstrated examples is a path to the template file relative to the template folder (<your_module>/view/<area>/templates or <your_theme>/<Your_Module>/templates).
It should be noted that templates specified in the first way have a higher priority. This means that the value specified in the template attribute will overwrite the one specified with the argument.
Changing order, moving and deleting blocks and containers
You can change the order of the element within the parent using the before and after attributes. For attribute values, you must specify the name of the element, before or after which we want to place the element we need.
With the help of the move instruction, we can not only change the order of the element, but also change its parent. For example, the following instruction will move the block named product.info.review to a container named product.info.main and place it before the container named product.info.price:
|
1 |
<move element="product.info.review" destination="product.info.main" before="product.info.price"/> |
You can delete a block or a container using the remove attribute of the referenceBlock or referenceContainer instructions respectively. For example, you can delete the catalog.compare.sidebar block using the following instruction:
|
1 |
<referenceBlock name="catalog.compare.sidebar" remove="true" /> |
Thank you for reading, hope everything was clear. Please leave your comments and questions in the comment section below and I will get in touch as soon as possible.
Check out BelVG’s quality Magento extensions at our official store.


This complex concept in magento2 is so simply explained by you. Thank you so much.
This helped me alot. Thank you!