Understanding the page structure of the site is fundamental knowledge, without which it would be impossible to understand the principles of any CMS. As we know, every html page that a user sees on the site consists of markup tags. In Magento, however, pages initially consist of structural components (blocks and containers) which, after applying certain methods and actions, are generated into a usual html page. That is what you will learn about in this article.
The purpose of containers
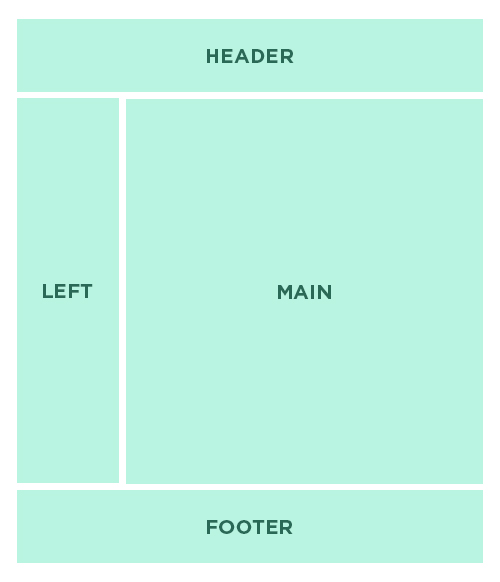
Containers are what page framework is built from. They are the basic elements of Magento page structure. Header, footer, left sidebar, main column are the main containers of a Magento webpage.
The purpose of blocks
Blocks along with containers are basic components of the Magento page structure. Сontent is added to containers by means of blocks — they are some files with templates, on which html code is generated. You can think of them as furniture that fills up a room (containers). Site navigation, product list, category list, footer links are some of the most frequently used page blocks.
How containers can be used in creating themes
Let’s take a closer look at containers. As we mentioned before, containers make up the framework of a page. They can contain child elements, such as blocks and other containers, but can stay empty as well. Here you can see an example of a container and block applied in layout:
|
1 2 3 4 5 |
<container name="category.view.container" htmlTag="div" htmlClass="category-view" after="-"> <block class="Magento\Catalog\Block\Category\View" name="category.image" template="Magento_Catalog::category/image.phtml"/> <block class="Magento\Catalog\Block\Category\View" name="category.description" template="Magento_Catalog::category/description.phtml"/> <block class="Magento\Catalog\Block\Category\View" name="category.cms" template="Magento_Catalog::category/cms.phtml"/> </container> |
Every container has its own attributes, that let you manage it. Let’s consider briefly each of them.
- Name. This attribute is obligatory. This is an identifier which can be used to address a certain container. Name attribute should be unique within the page. This attribute could be compared with id for html tags.
- Label. This is a signature that will be displayed in the browser.
- Before/after. These attributes allow placing the current container before or after an element, which name is specified in this attribute. If the attribute has “-” value, then the container is placed accordingly first or last on its level of nesting.
- As. Assigns with an alias, on which the current container is identified in the range of its parent.
- Output. Defines whether to output the root element.
- Html Tag. Specifies what tag to use to wrap a container.
- HtmlId. Specifies id attribute value for a tag that wraps a container.
- HtmlClass. Specifies class attribute value for a tag that wraps a container.
How blocks can be used in creating themes
And now let’s get a closer look at the other basic elements of layout files — blocks. The following element is made to output a content according to a template. You can see on the code we placed before, how do the blocks look like in the layout file. Each block, as well as a container, has its own attributes, that allows to manage it. Let’s consider these attributes.
- Class. Specifies a class on which rendering of this block is implemented.
- Name. This attribute is obligatory. This is an identifier which can be used to address to the certain block. Name attribute should be unique within the page. This attribute could be compared with id for html tags.
- Before/after. These attributes allow placing the current block before or after an element, which name is specified in this attribute. If the attribute has “-” value, then the block is placed accordingly first or last on its level of nesting.
- Template. Specifies a path to a template of the current block.
- As. Assigns with an alias, on which the current block is identified in the range of its parent.
- Cacheable. Defines whether to cache the current block or not.
What is the default block type
The block type is determined by the “class” attribute.
For example, for the following block:
|
1 |
<block class="Magento\Framework\View\Element\Template" name="store_account" template="Magento_Theme::html/account.phtml"/> |
it will be class=”Magento\Framework\View\Element\Template”.
This attribute specifies the class name that implements the rendering of this block. The object of this class is responsible for the actual visualization of the block output.
The default block class in Magento 2 is: Magento/Framework/View/Element/Template.
In Magento, you can find other classes, and also you can create your own class. The main thing to remember is that all custom classes must extend from the default class.
You can view the contents of the file for this class in the installed Magento along the following path: /Vendor/magento/framework/View/Element/Template.php
How the order of rendered child blocks can be influenced both in containers and in blocks
There is a Before/after attribute both for container and blocks. This attribute sets the order in which blocks and containers are displayed on a page.
Need a quality Magento extension? Visit our store and find a suitable Magento module.


Hi, Noel!
Thank you for your useful addition. You are right, running
cache:clean layoutwould be indeed better.Just thought I would add that you can run
cache:clean layoutin the console after making changes to page structure layout.