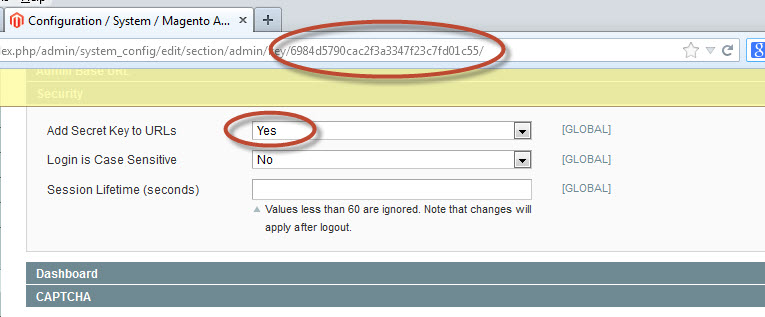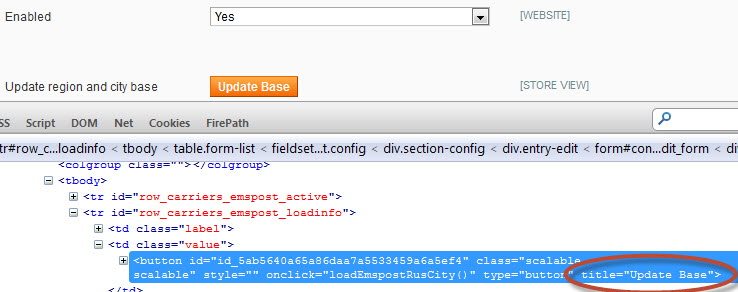
When automating tests for Magento you may encounter certain difficulties with using Secret Key in URL and with MD5 code in the IDs of most buttons.


Using Secret Key in URL will not allow you to refer to the necessary address directly, instead you will be able to find it only by clicking through the relevant elements one by one. This can considerably complicate the whole test writing process and significantly reduce test performance. Much easier would be to disable using Secret Key in URL right after you install or clone Magento, than trying to find other ways to address this problem.
Unfortunately, it is not that simple with automatically generated IDs of the buttons. This feature cannot be disabled, moreover, it is almost impossible to predict which ID a button will have after the next page reload because ID is encoded with the MD5 algorithm based on the result of the function time() of the page update.
This causes some difficulties in using the most widespread search method which allows finding page elements by their Id. This will not allow using the default search either, i.e. , when the locator type is not specified explicitly. Due to this, you will need to use a more cumbersome and slow type of locator – to search using XPath.
Xpath – a language that is used to find elements in XML documents and which offers great capabilities for testing, such as, for instance, finding the third checkbox on a page, etc.
Below there are some simple examples:
//Button[ @title= ‘Update base’] – searches for the first button with the required title on the page

xpath= /html/body/form[ 1] – the absolute path to the first form on the page
xpath=html/body/div[ 3] /div/table/tbоdy/tr/td[ 2] /button – the absolute path to the button on the page
The easiest way to determine the XPath to an element is to check it directly in firePath which is a FireBug plugin.
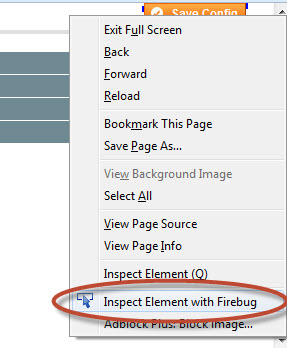
To determine the XPath just click the element and choose Inspect Element with Firebug.

Then right-click the HTML element and choose Inspect in FirePаth Panel.

Now we have the Xpath of the element // * [ @id= ‘id_4f959FDF96841161c4CE7b91946d058b’].

But such locator is not suitable for us because it contains Id. Therefore, we need the absolute XPath. In order to make FirePаth always provide the absolute XPath to an element tick the Generate Absolute XPath box in the settings.

In this case we will always get the absolute path.

The second method to create an XPath locator is to write it yourself. This can be done using Name, Type, Title and other element’s attributes. In this case it is not necessary to get tied to the location of the element on the page. But remember that if you do not specify where to search, for example, for the button with the required title, the locator will find the first one if there are several buttons with the same title. The same is with all other non-unique element’s attributes.
One of the problems with using XPath locators is that tests can significantly lose their flexibility. In most cases your tests will be tied to the location of an element on the page. So in case the location changes your tests will lose their functionality as well. And, as a consequence, this will require additional time to modify and tune your tests.
Therefore it is preferable to consider this point at the design stage, in order to minimize time losses during the follow-up support for your test kits. The most simple and obvious solution is to make all paths to the used test elements as a separate class, and transfer the corresponding variable of that class to all methods, which are using locators:
|
1 2 3 4 5 6 7 8 9 10 11 12 13 14 15 |
public class MyConfig { //back-end public String button_save = "xpath=html/body/div[3]/div/table/tbody/tr/td[2]/button"; public String text_save_config = "The configuration has been saved."; //expected text after sucessfull submit public String site_url = "magento/test/index.php/admin/system_config/"; } public class MyTest { public void runTest(){ selenium.open(MyConfig.site_url); selenium.waitForPageToLoad("30000"); selenium.click(MyConfig.button_save); selenium.isTextPresent(MyConfig.text_save_config); } } |
Thus, if for any reason the name or location of an element changes, you will have to make the relevant adjustments only in the class MyCоnfig. This piece of code illustrates the use of locators as a separate class. But it will not work in the way it is presented here.


