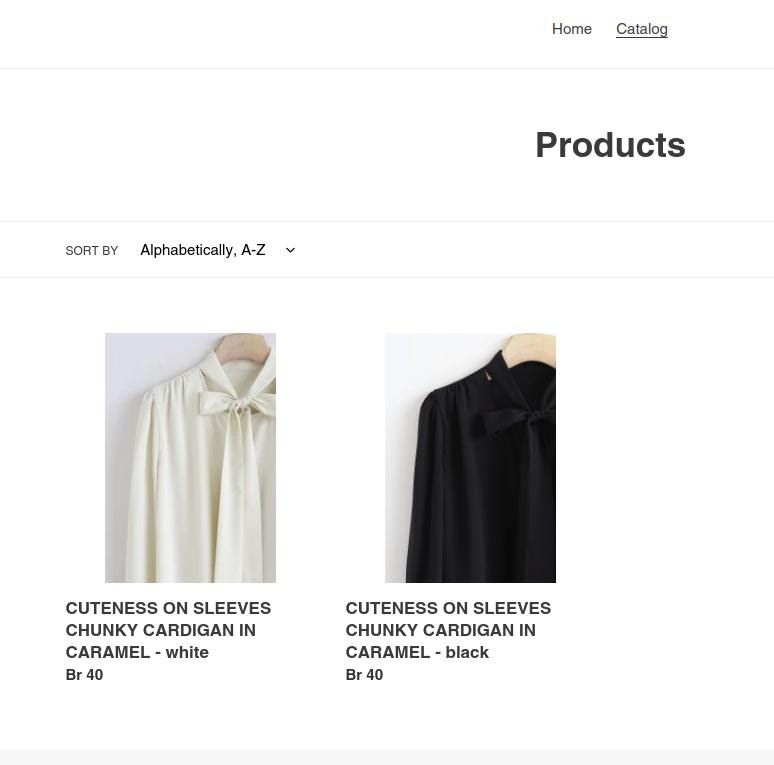
In your Shopify store, you can add, display and edit different product variants. This article will provide you with all the information you need to configure custom variants, exceed default capabilities to add more variants and options, hide them if necessary and show variants as separate products. Improve your store with the proven-to-work tips from the BelVG developers!
Shopify custom variants
How to add variants on Shopify
How to add more Shopify variants and options than the default ones
How to add one Shopify variant or in bulk & add option to existing variant
How to hide Shopify variants
How to show variants as separate products
Shopify custom variants
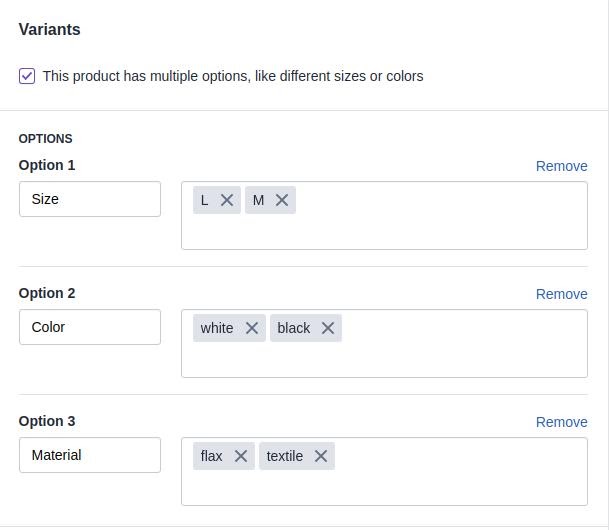
By default, on Shopify one product can be presented in three different options. You can select them from the presets offered in the Shopify admin (like size, color, etc.) or set the custom options that you need. The product options, in their turn, can be split into option values: small, medium or large sizes, different colors or material types, and so on. Besides that, you can add text, image and other options to a product using Shopify apps only. And one specific combination of different option values makes up one product variant.
How to add variants on Shopify
On Shopify, you can add only 100 variants and not more than 3 options to one product. No matter what Plan you use, it is a default setting for all stores on this platform.
When creating a product, you can also create product variants:
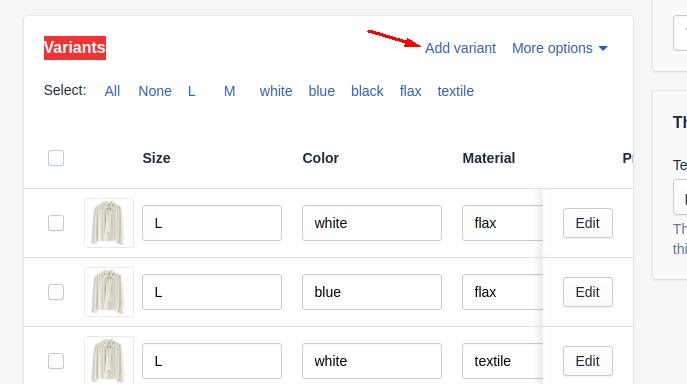
- In the variants section, click Add variant.
- Enter a name for the option.
- In the parameter values field, enter the parameter value followed by a comma, for example: S, M, L
How to add more Shopify variants and options than the default ones
The limit of variants and options can be increased only by using an app from the Shopify App Store.
You can configure your theme code to extract line properties to get custom requirements from your customers if you need to sell a product that has more than 100 variants or 3 options.
Important! Don’t forget to save all your files after you change them.
Let’s see how you can create a new product page template:
- From your Shopify admin, go to Online Store > Themes.
- Find the theme you want to edit, and then click Actions > Edit code.
- In the Templates directory, click Add a new template.
- Choose product from the drop-down menu, and give your template a name “custom“.
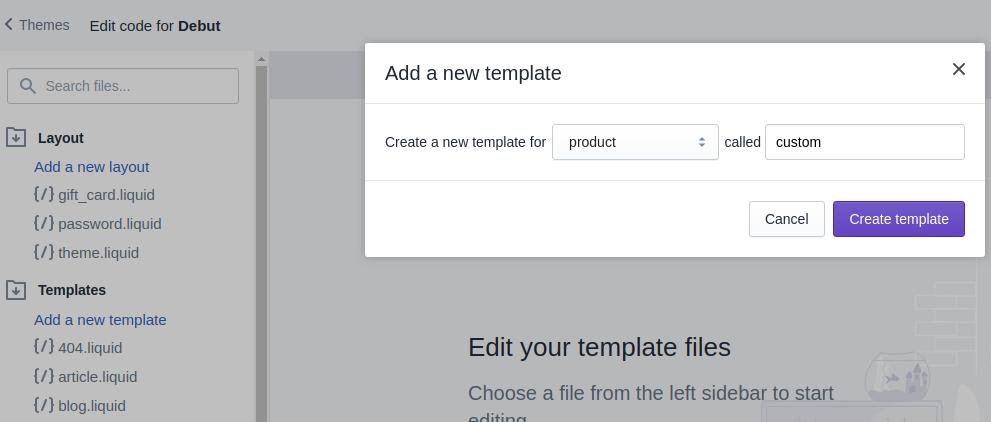
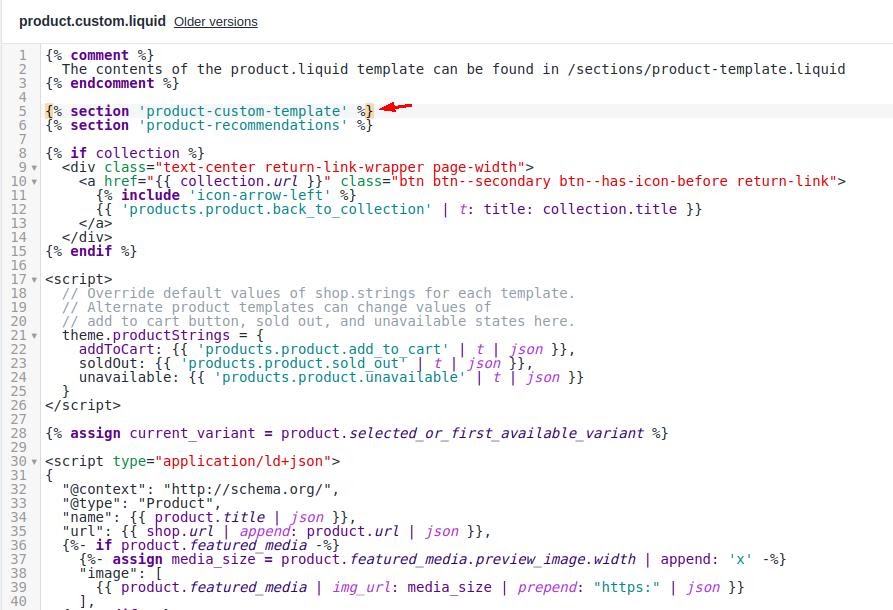
5. Click Create template. It creates a copy of your product.liquid template with the name product.custom.liquid.
6. Find the following line of code: {% section 'product-template' %} and replace it with: {% section 'product-custom-template' %}
7. In the Sections directory, click Add a new section.
8. Give your new section file a name “product-custom-template”. Click Create section.
9. Delete all of the default code so that the file is empty. Copy all of the content from your product-template.liquid file and paste it into your new product-custom-template file.
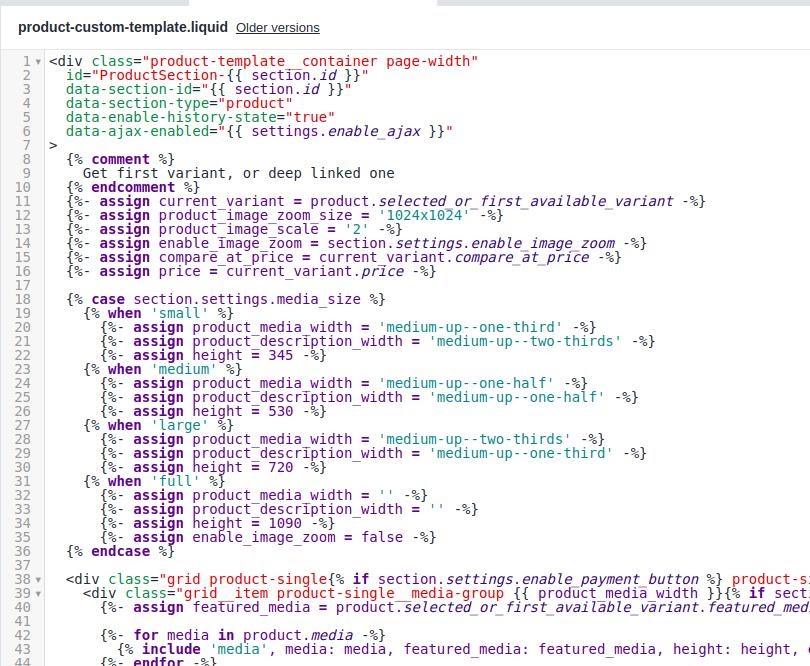
10. You can add as many custom form fields to your product page as you need. You can use the Shopify UI Elements Generator tool to easily generate the HTML and Liquid code for each form field that you want to add to your cart page.
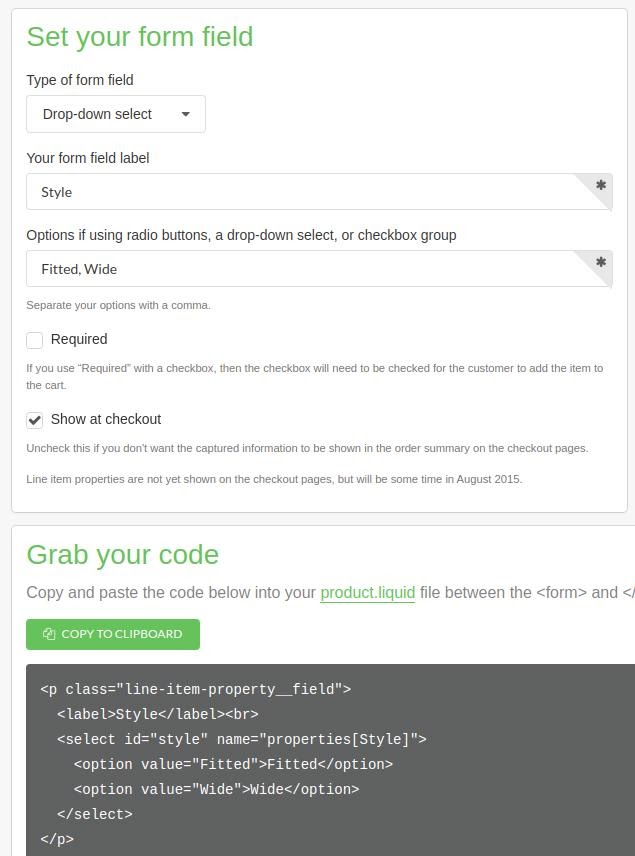
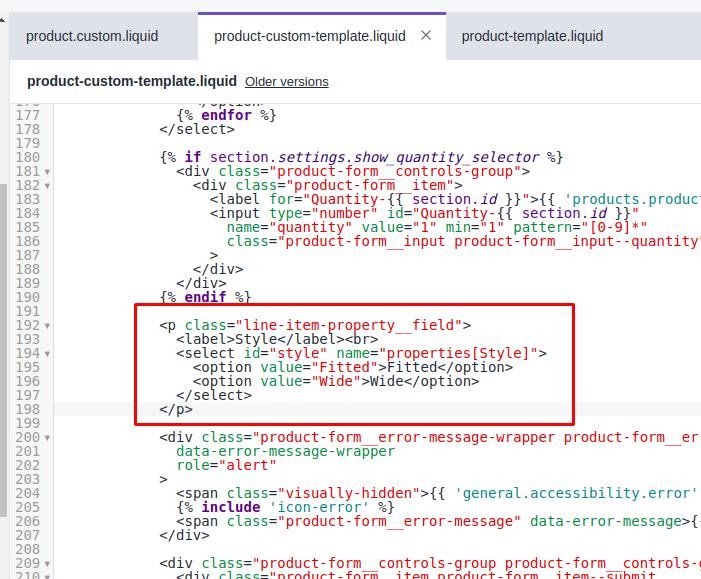
11. The result code from the generator is inserted into a new product-custom-template template in a desired place.
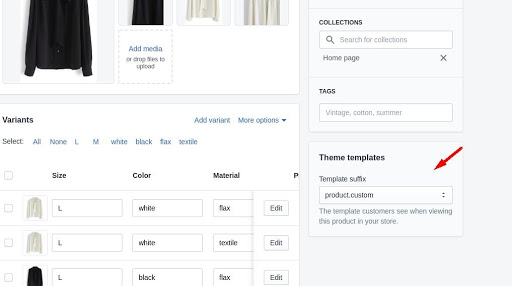
12. To display this template, you need to change it for the product.
How to add one Shopify variant or in bulk & add option to existing variant
To add one variant, you have to click in the Variants section Add variant.
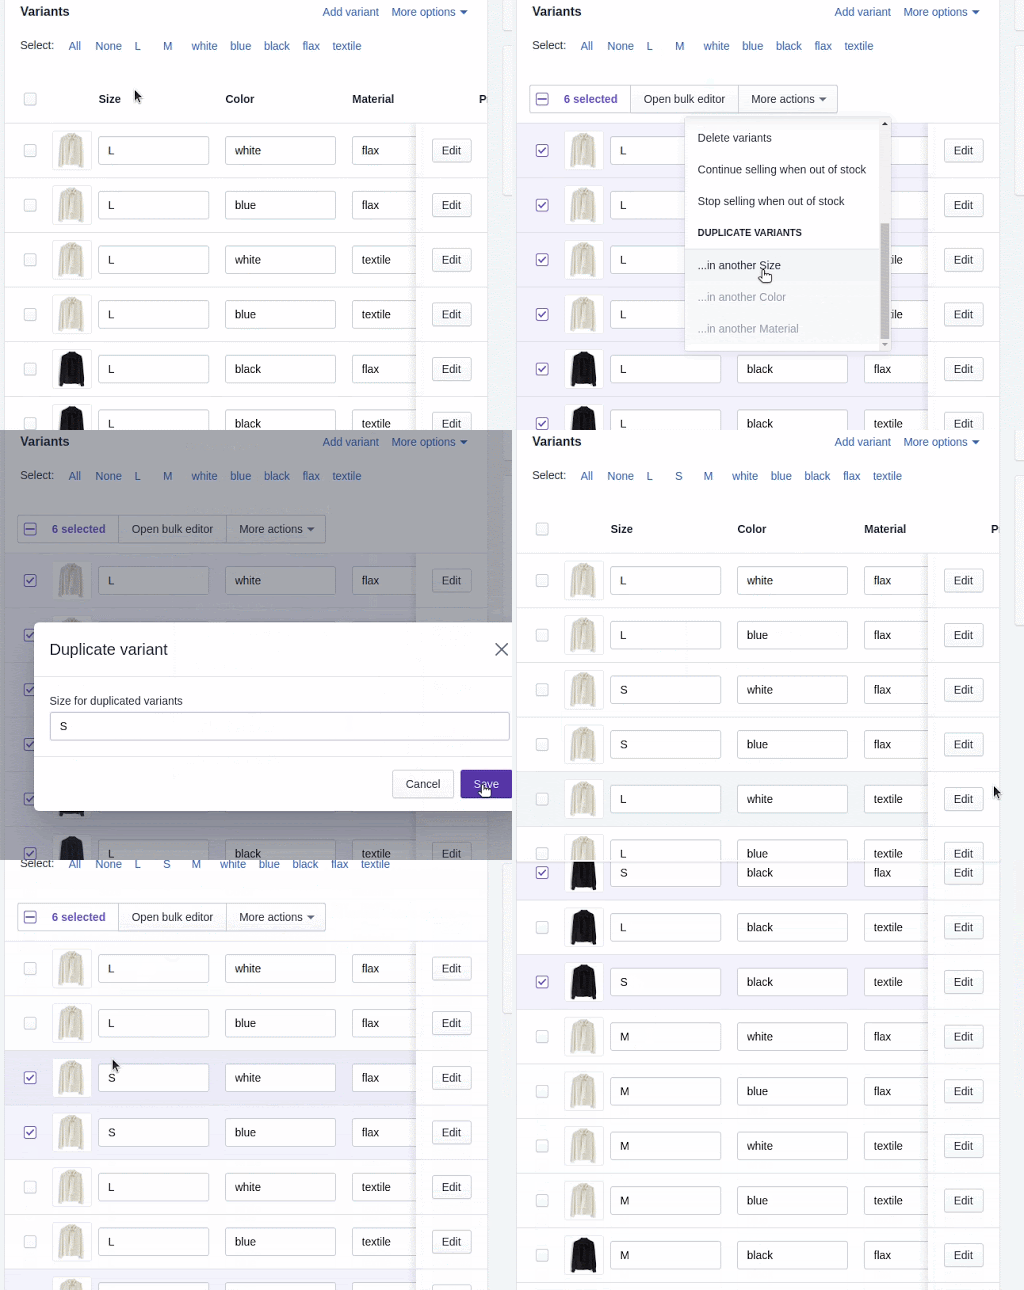
To add variants in bulk, you need to duplicate the variant where you want to add a new option. For example, you need to create product variants with a new size S. To do this, you need to select the Size L > More action > Duplicate variants (..in another size) > Write a new size > Save.
How to hide Shopify variants
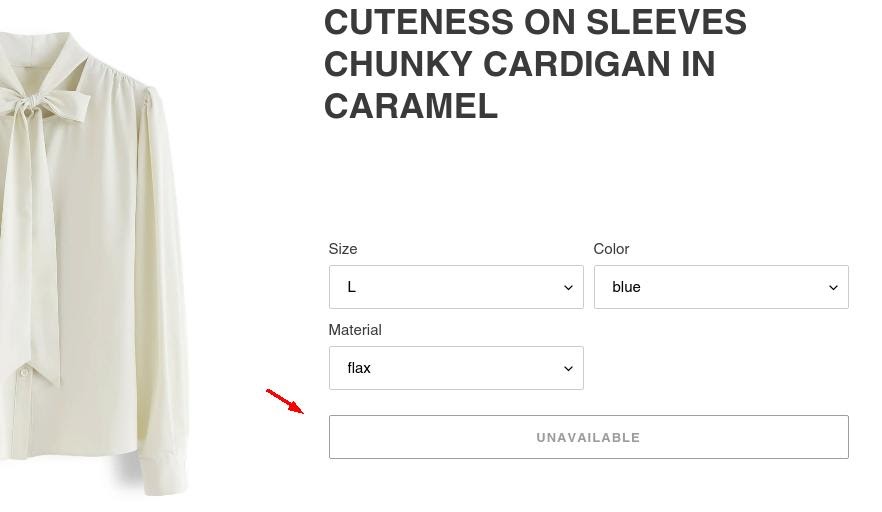
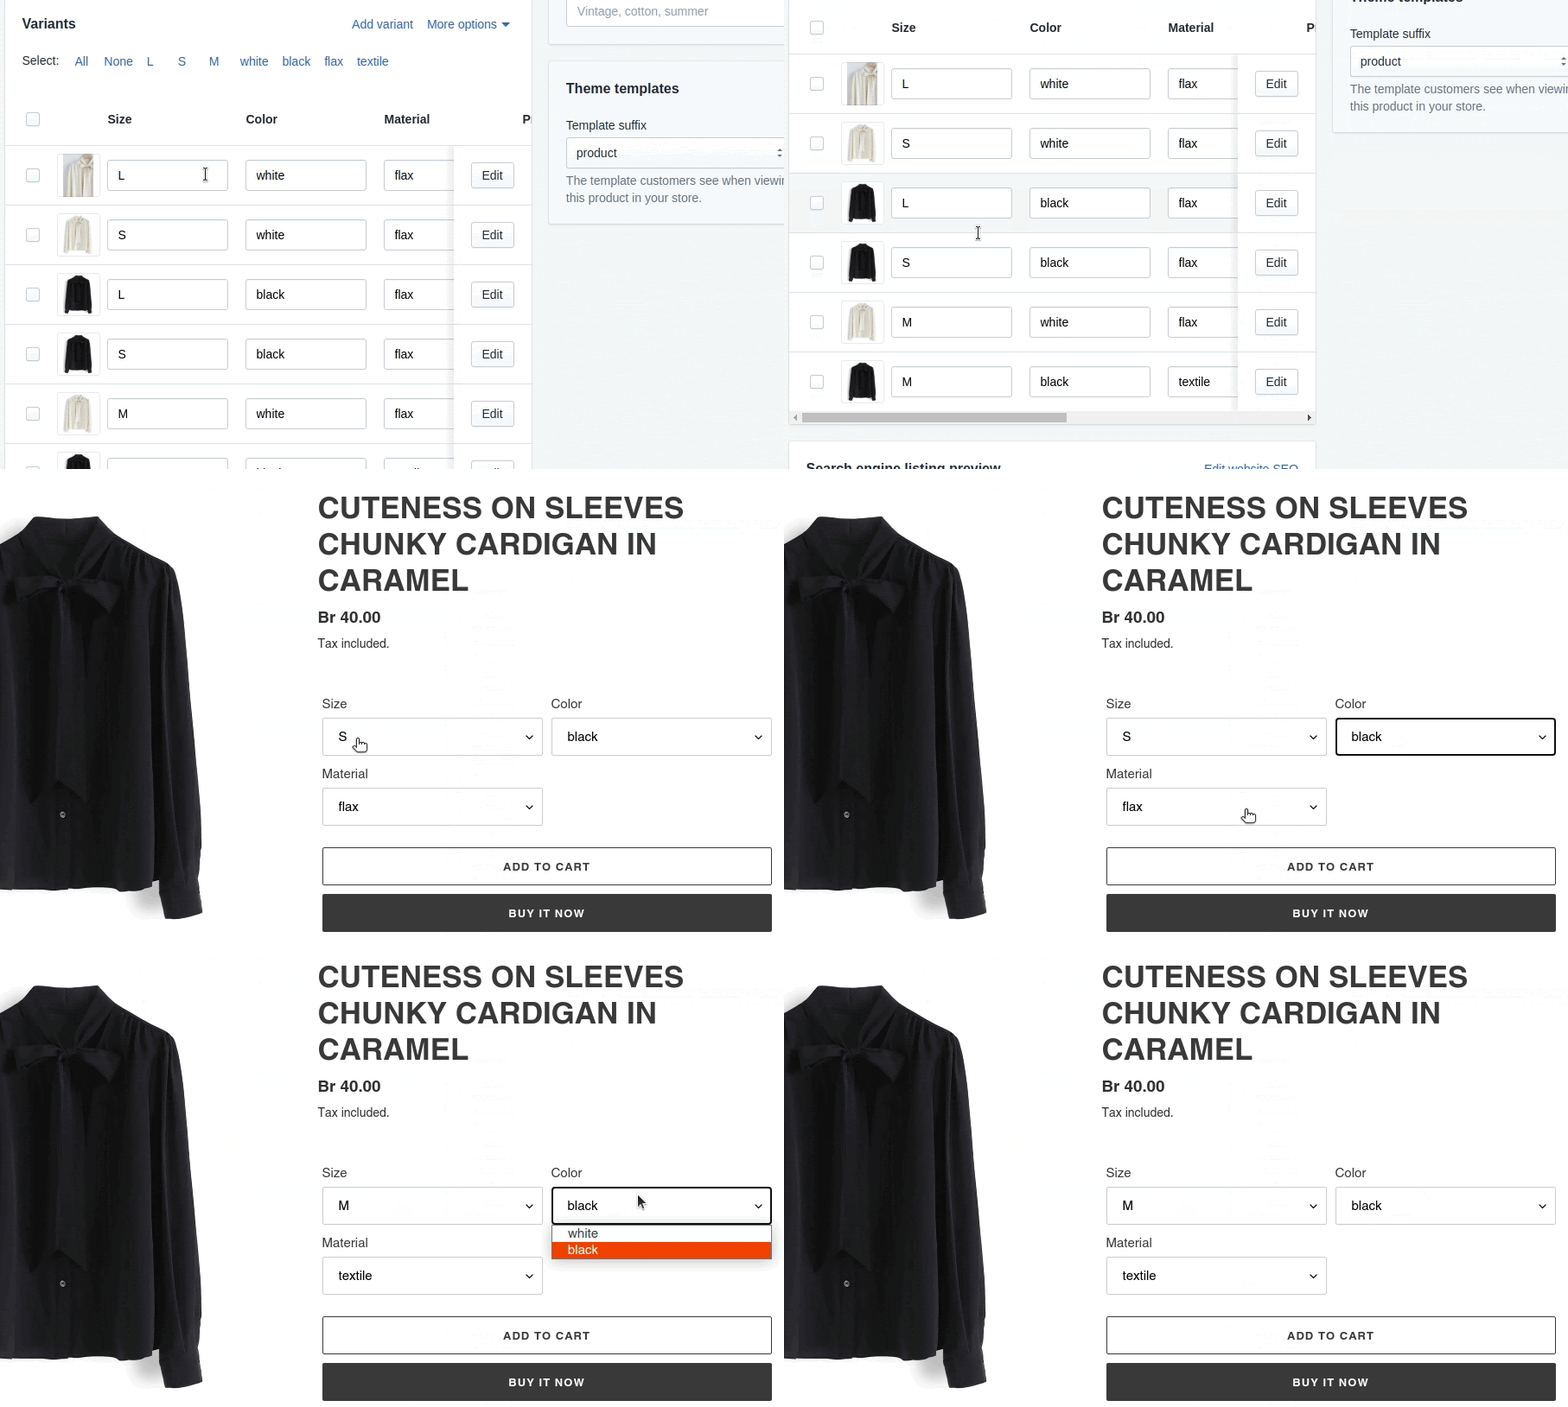
To avoid displaying unavailable combinations of options when a client selects one of the options, you should link these options.
Follow these steps to link options:
- Go to Online Store > Themes.
- Click Actions > Edit code.
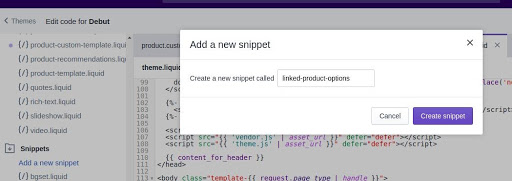
- Under Snippets, click the link Add a new snippet.
- Give your new snippet a name “linked-product-options“.
5. In your new snippet file, paste the following code:
|
1 2 3 4 5 6 7 8 9 10 11 12 13 14 15 16 17 18 19 20 21 22 23 24 25 26 27 28 29 30 31 32 33 34 35 36 37 38 39 40 41 42 43 44 45 46 47 48 49 50 51 52 53 54 55 56 57 58 59 60 61 62 63 64 65 66 67 68 69 70 71 72 73 74 75 76 77 78 79 80 81 82 83 84 85 86 87 88 89 90 91 92 93 94 95 96 97 98 99 100 101 102 103 104 105 106 107 108 109 110 111 112 113 114 115 116 117 118 119 120 121 122 123 124 125 126 |
<script> window.addEventListener('DOMContentLoaded', function() { var Shopify = Shopify || {}; // Required functionality from depricated options_selection.js Shopify.arrayIncludes = function(e, t) { for (var n = 0; n < e.length; n++) if (e[n] == t) return !0; return !1 }, Shopify.uniq = function(e) { for (var t = [], n = 0; n < e.length; n++) Shopify.arrayIncludes(t, e[n]) || t.push(e[n]); return t } Shopify.optionsMap = {}; Shopify.updateOptionsInSelector = function(selectorIndex) { switch (selectorIndex) { case 0: var key = 'root'; var selector = jQuery('.single-option-selector:eq(0)'); break; case 1: var key = jQuery('.single-option-selector:eq(0)').val(); var selector = jQuery('.single-option-selector:eq(1)'); break; case 2: var key = jQuery('.single-option-selector:eq(0)').val(); key += ' / ' + jQuery('.single-option-selector:eq(1)').val(); var selector = jQuery('.single-option-selector:eq(2)'); } var initialValue = selector.val(); selector.empty(); var availableOptions = Shopify.optionsMap[key]; for (var i=0; i<availableOptions.length; i++) { var option = availableOptions[i]; var newOption = jQuery('<option></option>').val(option).html(option); selector.append(newOption); } jQuery('.swatch[data-option-index="' + selectorIndex + '"] .swatch-element').each(function() { if (jQuery.inArray($(this).attr('data-value'), availableOptions) !== -1) { $(this).removeClass('soldout').show().find(':radio').removeAttr('disabled','disabled').removeAttr('checked'); } else { $(this).addClass('soldout').hide().find(':radio').removeAttr('checked').attr('disabled','disabled'); } }); if (jQuery.inArray(initialValue, availableOptions) !== -1) { selector.val(initialValue); } selector.trigger('change'); }; Shopify.linkOptionSelectors = function(product) { // Building our mapping object. for (var i=0; i<product.variants.length; i++) { var variant = product.variants[i]; if (variant.available) { // Gathering values for the 1st drop-down. Shopify.optionsMap['root'] = Shopify.optionsMap['root'] || []; Shopify.optionsMap['root'].push(variant.option1); Shopify.optionsMap['root'] = Shopify.uniq(Shopify.optionsMap['root']); // Gathering values for the 2nd drop-down. if (product.options.length > 1) { var key = variant.option1; Shopify.optionsMap[key] = Shopify.optionsMap[key] || []; Shopify.optionsMap[key].push(variant.option2); Shopify.optionsMap[key] = Shopify.uniq(Shopify.optionsMap[key]); } // Gathering values for the 3rd drop-down. if (product.options.length === 3) { var key = variant.option1 + ' / ' + variant.option2; Shopify.optionsMap[key] = Shopify.optionsMap[key] || []; Shopify.optionsMap[key].push(variant.option3); Shopify.optionsMap[key] = Shopify.uniq(Shopify.optionsMap[key]); } } } // Update options right away. Shopify.updateOptionsInSelector(0); if (product.options.length > 1) Shopify.updateOptionsInSelector(1); if (product.options.length === 3) Shopify.updateOptionsInSelector(2); // When there is an update in the first dropdown. jQuery(".single-option-selector:eq(0)").change(function() { Shopify.updateOptionsInSelector(1); if (product.options.length === 3) Shopify.updateOptionsInSelector(2); return true; }); // When there is an update in the second dropdown. jQuery(".single-option-selector:eq(1)").change(function() { if (product.options.length === 3) Shopify.updateOptionsInSelector(2); return true; }); }; {% if product.available and product.options.size > 1 %} var $addToCartForm = $('form[action="/cart/add"]'); if (window.MutationObserver && $addToCartForm.length) { if (typeof observer === 'object' && typeof observer.disconnect === 'function') { observer.disconnect(); } var config = { childList: true, subtree: true }; var observer = new MutationObserver(function() { Shopify.linkOptionSelectors({{ product | json }}); observer.disconnect(); }); observer.observe($addToCartForm[0], config); } {% endif %} var selector = jQuery('.single-option-selector:eq(0)'); selector.trigger('change'); {% if product.options.size == 1 %} {% for variant in product.variants %} {% unless variant.available %} jQuery('.single-option-selector option').filter(function() { return jQuery(this).text().trim() === {{ variant.title | json }}; }).remove(); {% endunless %} {% endfor %} jQuery('.single-option-selector').trigger('change'); {% endif %} }); </script> |
6. Go to the theme.liquid file.
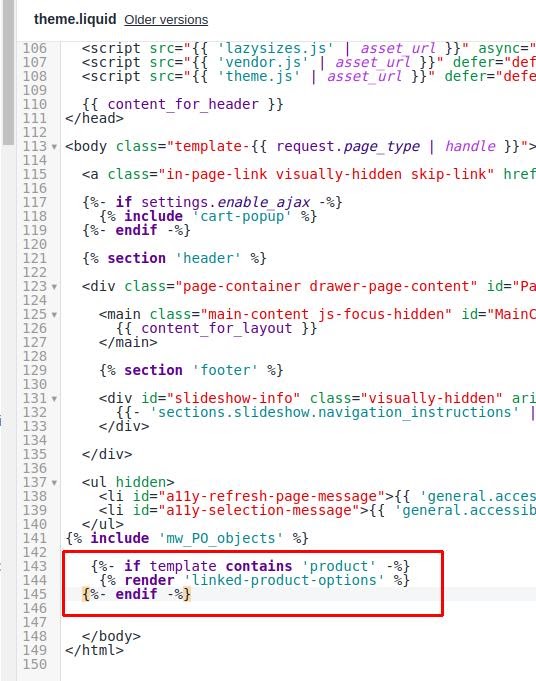
7. Before the closing </body> tag, you need to paste the following code:
|
1 2 3 |
{%- if template contains 'product' -%} {% render 'linked-product-options' %} {%- endif -%} |
Here we go! Now only related options are displayed:
How to show variants as separate products
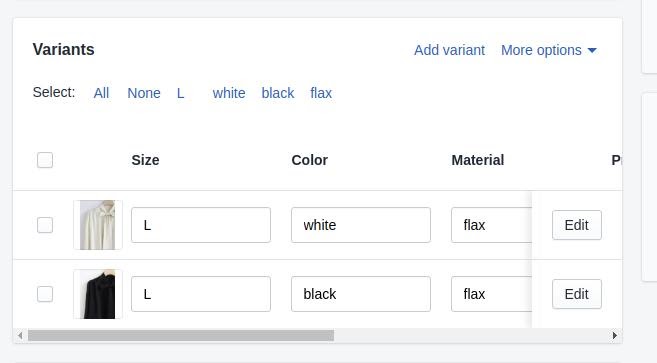
Now let’s separate products according to color variants on the category page:
- Open the collection-template.liquid file in the Section folder.
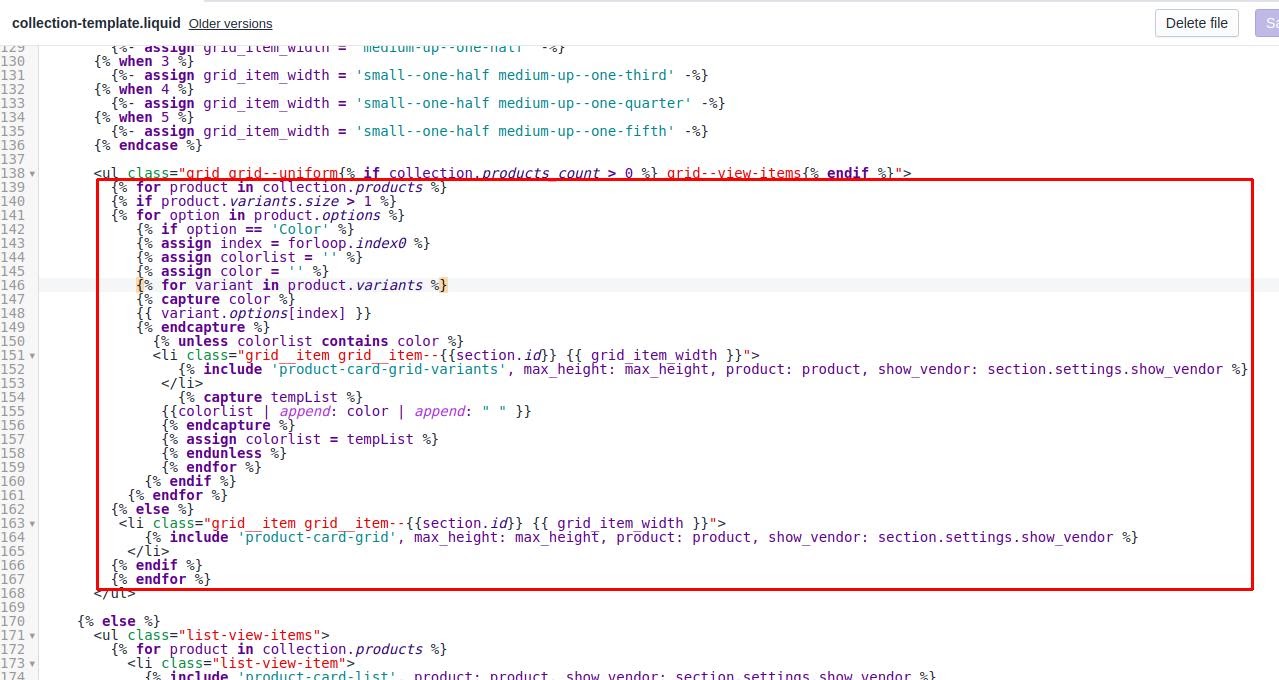
- Find the following line of code: <ul class=”grid grid–uniform{% if collection.products_count > 0 %} grid–view-items{% endif %}”>
- And inside the ul tag delete the whole code and paste this one:
|
1 2 3 4 5 6 7 8 9 10 11 12 13 14 15 16 17 18 19 20 21 22 23 24 25 26 27 28 29 |
{% for product in collection.products %} {% if product.variants.size > 1 %} {% for option in product.options %} {% if option == 'Color' %} {% assign index = forloop.index0 %} {% assign colorlist = '' %} {% assign color = '' %} {% for variant in product.variants %} {% capture color %} {{ variant.options[index] }} {% endcapture %} {% unless colorlist contains color %} <li class="grid__item grid__item--{{section.id}} {{ grid_item_width }}"> {% include 'product-card-grid-variants', max_height: max_height, product: product, show_vendor: section.settings.show_vendor %} </li> {% capture tempList %} {{colorlist | append: color | append: " " }} {% endcapture %} {% assign colorlist = tempList %} {% endunless %} {% endfor %} {% endif %} {% endfor %} {% else %} <li class="grid__item grid__item--{{section.id}} {{ grid_item_width }}"> {% include 'product-card-grid', max_height: max_height, product: product, show_vendor: section.settings.show_vendor %} </li> {% endif %} {% endfor %} |
4. Create a new product-card-grid-variants.liquid snippet in the Snippet folder.
5. Insert the following code there:
|
1 2 3 4 5 6 7 8 9 10 11 12 13 14 15 16 17 18 19 20 21 22 23 24 25 26 27 28 29 30 31 32 33 34 35 36 37 38 39 40 41 42 43 44 45 46 47 48 49 50 |
{% comment %} Renders a product card using "Grid" style Accepts: - max_height: {Number} Maximum height of the product's image (required) - product: {Object} Product Liquid object (required) - show_vendor: {Boolean} Show the product's vendor depending on the section setting (optional) Usage: {% include 'product-card-grid', max_height: max_height, product: product, show_vendor: section.settings.show_vendor %} {% endcomment %} <div class="grid-view-item{% unless product.available %} grid-view-item--sold-out{% endunless %} product-card"> <a class="grid-view-item__link grid-view-item__image-container full-width-link" href="{{ product.url | within: collection }}"> <span class="visually-hidden">{{ product.title }}</span> </a> {% capture img_id %}ProductCardImage-{{ section.id }}-{{ product.id }}{% endcapture %} {% capture wrapper_id %}ProductCardImageWrapper-{{ section.id }}-{{ product.id }}{% endcapture %} {%- assign preview_image = variant.image -%} {%- assign img_url = preview_image | img_url: '1x1' | replace: '_1x1.', '_{width}x.' -%} {% unless preview_image == blank %} {% include 'image-style', image: preview_image, height: max_height, wrapper_id: wrapper_id, img_id: img_id %} {% endunless %} <div class="product-card__image-with-placeholder-wrapper" data-image-with-placeholder-wrapper> <div id="{{ wrapper_id }}" class="grid-view-item__image-wrapper product-card__image-wrapper js"> <div style="padding-top:{% unless preview_image == blank %}{{ 1 | divided_by: preview_image.aspect_ratio | times: 100 }}%{% else %}100%{% endunless %};"> <img id="{{ img_id }}" class="grid-view-item__image lazyload" alt="{{ preview_image.alt }}" data-src="{{ img_url }}" data-widths="[180, 360, 540, 720, 900, 1080, 1296, 1512, 1728, 2048]" data-aspectratio="{{ preview_image.aspect_ratio }}" data-sizes="auto" data-image> </div> </div> <div class="placeholder-background placeholder-background--animation" data-image-placeholder></div> </div> <noscript> {% capture image_size %}{{ max_height }}x{{ max_height }}{% endcapture %} <img class="grid-view-item__image" src="{{ preview_image | img_url: image_size, scale: 2 }}" alt="{{ preview_image.alt }}" style="max-width: {{ max_height | times: preview_image.aspect_ratio }}px;"> </noscript> <div class="h4 grid-view-item__title product-card__title" aria-hidden="true">{{ product.title }} - {{ variant.option2 }}</div> {% include 'product-price-listing', product: variant, show_vendor: show_vendor %} </div> |
Well done! The category page now has its products separated by color.
