In this article, we will consider the ways to enhance your product with the help of new Magento 2 modules (extensions), specifically, by adding the files to the directory via FTP or with the help of the configuration setting for Composer, as well as their custom structure, admin part, and debugging process.
How to install modules in Magento 2
Dependency injection
Custom structure
The admin part
Debugging process
Magento 2 extensions are used for customization and extending existing Magento functionality or adding new features.
There is a good article in Adobe devdocs with detailed information on the topic.
How to install modules in Magento 2
There are two options how you can do it since the release of the 2.4.0 version:
- The first one is to add the Magento 2 extension files to app/code/<Vendor>/<Module> directory.
- The second one is to install it via composer.
There was a third one that was deprecated in Magento 2.3.6 and removed in Magento 2.4.0. It was a Setup Wizard feature.
To begin the extension development in Magento 2, use Modules Manager. You can find more detailed information here.
You can find information on main composer’s commands, and composer config file.
Option #1 How to install modules in Magento 2
- Copy module’s files to app/code/<Vendor>/<Module> directory via FTP.
Option#2 How to install modules in Magento 2
- There is a configuration setting for Composer which indicates the location of the extension’s files. They can be located remotely or locally.
To add the configuration for composer, the following command is used:
composer config repositories.<module_name> path /path/to/magento/module (there could be any path on your server which is convenient for you)
If a repository is located remotely the command could be:
composer config repositories.<module_name> git https://remote-repository-url.com
- To run composer <vendor>/<name>:<version> is required
If you do it for the first time Magento will ask you to enter Access Keys. You could get them in your account on https://magento.com/.
You can find an instruction on how to do it here.
After you have placed the required extension files in Magento via Option 1 or Option 2, run the following commands to finish the installation:
If the extension is being installed on the site in a production mode:
|
1 2 3 4 5 6 7 8 9 10 11 |
bin/magento maintenance:enable php bin/magento module:enable <Vendor>_<Module> php bin/magento setup:upgrade bin/magento setup:di:compile bin/magento setup:static-content:deploy bin/magento maintenance:disable |
If the extension is being installed on a site in developer mode:
|
1 2 3 |
php bin/magento module:enable <Vendor>_<Module> php bin/magento setup:upgrade |
Below you will find several articles with detailed information about the commands used for installing extensions and the description of different options that could be selected for more specific purposes.
You can find the instruction on how to enable or disable the maintenance mode here.
In this article, you can read more about code compilation.
The topic of static files deployment is described here.
You can study how to enable or disable modules in more detail here.
More information about production/developer/default Magento modes is provided here.
Dependency Injection
Dependency Injection is an important concept of declaring dependencies of classes. You will find information on DI Concept here, in this article and about DI configuration in Magento 2 here.
Example:
Path is vendor/magento/module-store/etc/di.xml
|
1 2 3 4 |
<config xmlns:xsi="http://www.w3.org/2001/XMLSchema-instance" xsi:noNamespaceSchemaLocation="urn:magento:framework:ObjectManager/etc/config.xsd"> <preference for="Magento\Store\Api\StoreRepositoryInterface" type="Magento\Store\Model\StoreRepository"/> ... </config> |
Path is vendor/magento/module-store/Model/ScopeTreeProvider.php
|
1 2 3 4 5 6 7 8 9 10 11 12 13 14 15 16 17 18 19 20 21 22 23 24 25 26 27 28 29 30 31 32 33 |
<?php ... namespace Magento\Store\Model; ... use Magento\Store\Api\StoreRepositoryInterface; ... /** * Class for building a scopes tree. */ class ScopeTreeProvider implements ScopeTreeProviderInterface { ... /** * @var StoreRepositoryInterface */ private $storeRepository; /** * @param WebsiteRepositoryInterface $websiteRepository * @param GroupRepositoryInterface $groupRepository * @param StoreRepositoryInterface $storeRepository */ public function __construct( ... StoreRepositoryInterface $storeRepository ) { ... $this->storeRepository = $storeRepository; } |
Class Magento\Store\Model\StoreRepository is a realization of Magento\Store\Api\StoreRepositoryInterface declared in di.xml
So you could include an interface in your class and use the desired realization of it.
Сustom structure
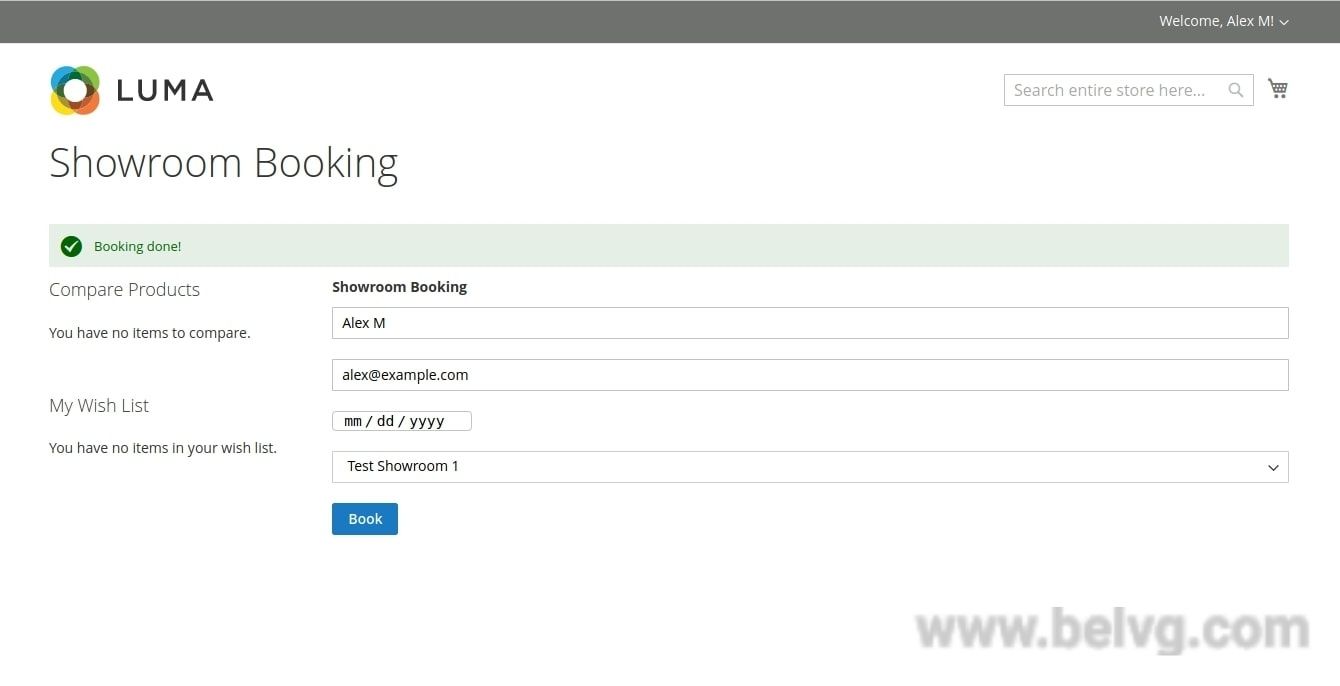
There is an example of a custom structure. The extension implements an ability to set up a date of visiting the showroom. The customer should enter a name, an email, desired date and showroom from a list.

To create the form the next structure is required (front end part):
- Declare a module
app/code/BelVG/Showroom/composer.json
|
1 2 3 4 5 6 7 8 9 10 11 12 13 14 15 16 17 18 19 20 21 22 |
{ "name": "belvg/showroom", "version": "1.0.0", "require": { "../../../../vendor/magento/framework": ">=100.0.0", "php": "~5.5.0|~5.6.0|>=7.0.0" }, "type": "magento2-module", "extra": [], "autoload": { "files": [ "registration.php" ], "psr-4": { "BelVG\\Showroom\\": "" } }, "license": [ "" ], "description": "" } |
app/code/BelVG/Showroom/registration.php
|
1 2 3 4 5 6 7 |
<?php \Magento\Framework\Component\ComponentRegistrar::register( \Magento\Framework\Component\ComponentRegistrar::MODULE, 'BelVG_Showroom', __DIR__ ); |
app/code/BelVG/Showroom/etc/module.xml
|
1 2 3 4 |
<?xml version="1.0" ?> <config xmlns:xsi="http://www.w3.org/2001/XMLSchema-instance" xsi:noNamespaceSchemaLocation="urn:magento:framework:Module/etc/module.xsd"> <module name="BelVG_Showroom" setup_version="1.0.0"/> </config> |
- Create controllers
Here is a controller for displaying a form on the site. It should be extended from Magento\Framework\App\Action\Action class.
app/code/BelVG/Showroom/Controller/Booking/Index.php
|
1 2 3 4 5 6 7 8 9 10 11 12 13 14 15 16 17 18 19 20 21 22 23 24 25 26 27 28 29 30 31 32 33 34 35 36 37 38 39 40 41 42 43 44 45 |
<?php namespace BelVG\Showroom\Controller\Booking; use BelVG\Showroom\Helper\Data; use Magento\Framework\App\Action\Context; use Magento\Framework\Controller\ResultFactory; use Magento\Framework\App\Action\Action; use Magento\Framework\View\Result\PageFactory; class Index extends Action { /** * @var Data */ protected $helperData; /** * @var PageFactory */ protected $pageFactory; public function __construct( Context $context, Data $helperData, PageFactory $pageFactory ) { parent::__construct($context); $this->helperData = $helperData; $this->pageFactory = $pageFactory; } /** * @return \Magento\Framework\App\ResponseInterface|\Magento\Framework\Controller\ResultInterface|\Magento\Framework\View\Result\Layout|\Magento\Framework\View\Result\Page */ public function execute() { if (!$this->helperData->isModuleOutputEnabled()) { $resultRedirect = $this->resultFactory->create(ResultFactory::TYPE_REDIRECT); $resultRedirect->setPath('/'); return $resultRedirect; } return $this->pageFactory->create(); } } |
Here is a controller for saving information from postData and notifying an administrator about booking:
app/code/BelVG/Showroom/Controller/Booking/Save.php
|
1 2 3 4 5 6 7 8 9 10 11 12 13 14 15 16 17 18 19 20 21 22 23 24 25 26 27 28 29 30 31 32 33 34 35 36 37 38 39 40 41 42 43 44 45 46 47 48 49 50 51 52 53 54 55 56 57 58 59 60 61 62 63 64 65 66 67 68 69 70 71 72 73 74 75 76 77 78 79 80 81 82 83 84 85 86 87 88 89 90 91 92 93 94 95 96 97 98 99 100 101 102 103 104 105 106 107 108 109 110 |
<?php namespace BelVG\Showroom\Controller\Booking; use BelVG\Showroom\Model\BookingFactory; use Magento\Framework\App\Action\Action; use Magento\Framework\App\Action\Context; use Magento\Framework\Controller\ResultFactory; use Magento\Framework\Exception\LocalizedException; use Magento\Framework\DataObject; use Magento\Framework\Mail\Template\TransportBuilder; use Magento\Framework\Escaper; use BelVG\Showroom\Helper\Data; class Save extends Action { /** * @var BookingFactory */ protected $bookingFactory; /** * @var TransportBuilder */ protected $transportBuilder; /** * @var Escaper */ protected $escaper; /** * @var Data */ protected $helperData; /** * Save constructor. * @param Data $helperData * @param BookingFactory $bookingFactory * @param TransportBuilder $transportBuilder * @param Escaper $escaper * @param Context $context */ public function __construct( Data $helperData, BookingFactory $bookingFactory, TransportBuilder $transportBuilder, Escaper $escaper, Context $context ) { parent::__construct($context); $this->bookingFactory = $bookingFactory; $this->transportBuilder = $transportBuilder; $this->escaper = $escaper; $this->helperData = $helperData; } /** * @return \Magento\Framework\App\ResponseInterface|\Magento\Framework\Controller\ResultInterface|\Magento\Framework\View\Result\Layout * @throws \Exception */ public function execute() { $data = (array) $this->getRequest()->getPost(); if (!empty($data)) { try { $booking = $this->bookingFactory->create()->setData($data); $booking->save(); $this->sendEmailToAdmin($data); $this->messageManager->addSuccessMessage('Booking done!'); } catch (LocalizedException $e) { $this->logger->error($e->getMessage()); $this->messageManager->addErrorMessage('Something went wrong during booking.'); } } $resultRedirect = $this->resultFactory->create(ResultFactory::TYPE_REDIRECT); $resultRedirect->setPath('showroom/booking'); return $resultRedirect; } /** * @param $data */ private function sendEmailToAdmin($data) { $sender = [ 'name' => $this->escaper->escapeHtml($data['customer_name']), 'email' => $this->escaper->escapeHtml($data['customer_email']), ]; $postObject = new DataObject(); $postObject->setData($data); try { $transport = $this->transportBuilder ->setTemplateIdentifier('showroom_booking_email_template') ->setTemplateOptions( ['area' => \Magento\Framework\App\Area::AREA_FRONTEND, 'store' => \Magento\Store\Model\Store::DEFAULT_STORE_ID,] ) ->setTemplateVars(['data' => $postObject]) ->setFrom($sender) ->addTo($this->helperData->getRecipient()) ->getTransport(); $transport->sendMessage(); } catch (LocalizedException $e) { $this->logger->error($e->getMessage()); } } } |
Configuration for controllers is placed in app/code/BelVG/Showroom/etc/frontend/routes.xml
The form will be accessed on the page http://<domain>/showroom/booking/
|
1 2 3 4 5 6 7 8 |
<?xml version="1.0" encoding="UTF-8"?> <config xmlns:xsi="http://www.w3.org/2001/XMLSchema-instance" xsi:noNamespaceSchemaLocation="urn:magento:framework:App/etc/routes.xsd"> <router id="standard"> <route id="showroom" frontName="showroom"> <module name="BelVG_Showroom"/> </route> </router> </config> |
- Create the form displaying on the site
app/code/BelVG/Showroom/Block/Booking.php
|
1 2 3 4 5 6 7 8 9 10 11 12 13 14 15 16 17 18 19 20 21 22 23 24 25 26 27 28 29 30 31 32 33 34 35 36 37 38 39 40 41 42 43 44 45 46 47 48 49 50 51 52 53 54 55 56 57 58 59 60 61 62 63 64 65 66 67 68 69 70 71 |
<?php namespace BelVG\Showroom\Block; use Magento\Framework\View\Element\Template; use Magento\Framework\View\Element\Template\Context; use BelVG\Showroom\Model\ResourceModel\Showroom\Collection; use BelVG\Showroom\Helper\Data; class Booking extends Template { /** * @var Data */ protected $helperData; /** * @var Collection */ protected $collection; /** * Construct * * @param Data $helperData * @param Collection $collection * @param Context $context * @param array $data */ public function __construct( Data $helperData, Collection $collection, Context $context, array $data = [] ) { $this->collection = $collection; $this->helperData = $helperData; parent::__construct($context, $data); } /** * @return string */ public function getFormActionUrl() { return $this->getUrl('showroom/booking/save', ['_secure' => false]); } /** * @return Collection|null */ public function getShowrooms() { $showrooms = $this->collection->getItems(); if (!empty($showrooms)) { return $showrooms; } return null; } /** * @return \Magento\Customer\Model\Customer|null */ public function getCustomer() { if ($customer = $this->helperData->getCustomer()) { return $customer; } return null; } } |
The name of the layout file is <route_name>_<controller_path>
app/code/BelVG/Showroom/view/frontend/layout/showroom_booking_index.xml
|
1 2 3 4 5 6 7 8 9 10 11 12 |
<?xml version="1.0"?> <page layout="2columns-left" xmlns:xsi="http://www.w3.org/2001/XMLSchema-instance" xsi:noNamespaceSchemaLocation="urn:magento:framework:View/Layout/etc/page_configuration.xsd"> <head> <title>Showroom Booking</title> </head> <body> <referenceBlock name="navigation.sections" remove="true" /> <referenceContainer name="content"> <block class="BelVG\Showroom\Block\Booking" name="showroom_booking" template="BelVG_Showroom::showroom/booking/form.phtml"/> </referenceContainer> </body> </page> |
app/code/BelVG/Showroom/view/frontend/templates/showroom/booking/form.phtml
|
1 2 3 4 5 6 7 8 9 10 11 12 13 14 15 16 17 18 19 20 21 22 23 24 25 26 27 28 29 30 31 32 33 34 35 36 37 38 39 40 41 42 43 44 45 46 47 48 49 50 51 52 53 54 55 56 57 58 59 |
app/code/BelVG/Showroom/Helper/Data.php <?php namespace BelVG\Showroom\Helper; use Magento\Framework\App\Helper\AbstractHelper; use Magento\Framework\App\Helper\Context; use Magento\Store\Model\ScopeInterface; use Magento\Customer\Model\Session; class Data extends AbstractHelper { const IS_ENABLED_PATH = 'showroom/general/enable'; /** * @var Session */ protected $customerSession; public function __construct( Context $context, Session $customerSession ) { parent::__construct($context); $this->customerSession = $customerSession; } /** * @param null $storeId * @return bool|mixed */ public function isModuleOutputEnabled($storeId = null) { return $this->scopeConfig->getValue( self::IS_ENABLED_PATH, ScopeInterface::SCOPE_STORE, $storeId ); } /** * @return \Magento\Customer\Model\Customer|null */ public function getCustomer() { if ($this->customerSession->isLoggedIn()) { return $this->customerSession->getCustomer(); } return null; } /** * @return mixed */ public function getRecipient() { return $this->scopeConfig->getValue('trans_email/ident_support/email',ScopeInterface::SCOPE_STORE); } } |
- Create database data and models
To create access to the database, data Models and Collection are used. Here is a base set of Models which are used for manipulating data.
app/code/BelVG/Showroom/Model/Showroom.php
|
1 2 3 4 5 6 7 8 9 10 11 12 13 14 15 16 17 18 19 20 21 22 23 24 25 26 27 28 29 30 31 32 33 34 35 36 37 38 39 40 41 42 43 44 |
<?php namespace BelVG\Showroom\Model; use Magento\Framework\Model\AbstractModel; use Magento\Framework\DataObject\IdentityInterface; class Showroom extends AbstractModel implements IdentityInterface { const CACHE_TAG = 'belvg_showroom'; /** * @var string */ protected $_cacheTag = 'belvg_showroom'; /** * @var string */ protected $_eventPrefix = 'belvg_showroom'; protected function _construct() { $this->_init('BelVG\Showroom\Model\ResourceModel\Showroom'); } /** * @return string[] */ public function getIdentities() { return [self::CACHE_TAG . '_' . $this->getId()]; } /** * @return array */ public function getDefaultValues() { $values = []; return $values; } } |
app/code/BelVG/Showroom/Model/ResourceModel/Showroom.php
|
1 2 3 4 5 6 7 8 9 10 11 12 13 14 15 16 17 18 19 20 21 22 |
namespace BelVG\Showroom\Model\ResourceModel; use Magento\Framework\Model\ResourceModel\Db\AbstractDb; use Magento\Framework\Model\ResourceModel\Db\Context; class Showroom extends AbstractDb { /** * Showroom constructor. * @param Context $context */ public function __construct( Context $context ) { parent::__construct($context); } protected function _construct() { $this->_init('belvg_showroom', 'showroom_id'); } } |
app/code/BelVG/Showroom/Model/ResourceModel/Showroom/Collection.php
<?php namespace BelVG\Showroom\Model\ResourceModel\Showroom; use Magento\Framework\Model\ResourceModel\Db\Collection\AbstractCollection; class Collection extends AbstractCollection
|
1 2 3 4 5 6 7 8 9 10 11 12 13 14 15 16 17 18 19 20 21 22 23 24 25 26 |
{ /** * @var string */ protected $_idFieldName = 'showroom_id'; /** * @var string */ protected $_eventPrefix = 'belvg_showroom_collection'; /** * @var string */ protected $_eventObject = 'showroom_collection'; /** * Define resource model * * @return void */ protected function _construct() { $this->_init('BelVG\Showroom\Model\Showroom', 'BelVG\Showroom\Model\ResourceModel\Showroom'); } } |
To add database data, InstallSchema and InstallData scripts are implemented.
InstallSchema is used for adding tables, fields, etc.
InstallData is used to add necessary content for the extension.
I used InstallData to add a list of showrooms.
app/code/BelVG/Showroom/Setup/InstallData.php
|
1 2 3 4 5 6 7 8 9 10 11 12 13 14 15 16 17 18 19 20 21 22 23 24 25 26 27 28 29 30 31 32 33 34 35 36 37 38 39 40 41 42 43 44 45 46 |
<?php namespace BelVG\Showroom\Setup; use BelVG\Showroom\Model\ShowroomFactory; use Magento\Framework\Setup\InstallDataInterface; use Magento\Framework\Setup\ModuleContextInterface; use Magento\Framework\Setup\ModuleDataSetupInterface; class InstallData implements InstallDataInterface { /** * @var ShowroomFactory */ protected $showroomFactory; /** * InstallData constructor. * @param ShowroomFactory $showroomFactory */ public function __construct( ShowroomFactory $showroomFactory ) { $this->showroomFactory = $showroomFactory; } /** * @param ModuleDataSetupInterface $setup * @param ModuleContextInterface $context * @throws \Exception */ public function install(ModuleDataSetupInterface $setup, ModuleContextInterface $context) { $showrooms = [ ['showroom_name' => "Test Showroom 1"], ['showroom_name' => "Test Showroom 2"], ['showroom_name' => "Test Showroom 3"], ['showroom_name' => "Test Showroom 4"], ['showroom_name' => "Test Showroom 5"] ]; foreach ($showrooms as $data) { $showroom = $this->showroomFactory->create(); $showroom->addData($data)->save(); } } } |
app/code/BelVG/Showroom/Setup/InstallSchema.php
|
1 2 3 4 5 6 7 8 9 10 11 12 13 14 15 16 17 18 19 20 21 22 23 24 25 26 27 28 29 30 31 32 33 34 35 36 37 38 39 40 41 42 43 44 45 46 47 48 49 50 51 52 53 54 55 56 57 58 59 60 61 62 63 64 65 66 67 68 69 70 71 72 73 74 75 76 77 78 79 80 81 82 83 84 85 86 87 88 89 90 91 92 93 94 95 96 97 98 99 100 101 102 103 104 105 106 107 108 109 110 111 112 113 114 115 116 117 118 119 120 121 122 123 124 125 126 127 128 129 130 131 132 133 134 135 136 137 138 139 140 141 142 143 144 |
<?php namespace BelVG\Showroom\Setup; use Magento\Framework\DB\Adapter\AdapterInterface; use Magento\Framework\DB\Ddl\Table; use Magento\Framework\Setup\InstallSchemaInterface; use Magento\Framework\Setup\ModuleContextInterface; use Magento\Framework\Setup\SchemaSetupInterface; use Psr\Log\LoggerInterface; class InstallSchema implements InstallSchemaInterface { /** * @var LoggerInterface */ protected $logger; /** * InstallSchema constructor. * @param LoggerInterface $logger */ public function __construct( LoggerInterface $logger ) { $this->logger = $logger; } /** * @param SchemaSetupInterface $setup * @param ModuleContextInterface $context */ public function install( SchemaSetupInterface $setup, ModuleContextInterface $context ) { $installer = $setup; $installer->startSetup(); if (!$installer->tableExists('belvg_booking_showroom')) { try { $tableBookingShowroom = $installer->getConnection()->newTable( $installer->getTable('belvg_booking_showroom') ) ->addColumn( 'booking_id', Table::TYPE_INTEGER, null, [ 'identity' => true, 'nullable' => false, 'primary' => true, 'unsigned' => true, ], 'Booking ID' ) ->addColumn( 'customer_name', Table::TYPE_TEXT, 255, ['nullable => false'], 'Customer Name' ) ->addColumn( 'customer_email', Table::TYPE_TEXT, 255, ['nullable => false'], 'Customer Email' ) ->addColumn( 'booking_date', Table::TYPE_TIMESTAMP, null, ['nullable' => false, 'default' => Table::TIMESTAMP_INIT_UPDATE], 'Booking Date' ) ->addColumn( 'showroom_name', Table::TYPE_TEXT, 255, ['nullable => false'], 'Showroom Name' ) ->setComment('Booking Showroom Table'); $installer->getConnection()->createTable($tableBookingShowroom); } catch (\Zend_Db_Exception $e) { $this->logger->error($e->getMessage()); } $installer->getConnection()->addIndex( $installer->getTable('belvg_booking_showroom'), $setup->getIdxName( $installer->getTable('belvg_booking_showroom'), ['customer_name', 'showroom_name', 'customer_email'], AdapterInterface::INDEX_TYPE_FULLTEXT ), ['customer_name', 'showroom_name', 'customer_email'], AdapterInterface::INDEX_TYPE_FULLTEXT ); } if (!$installer->tableExists('belvg_showroom')) { try { $tableShowroom = $installer->getConnection()->newTable( $installer->getTable('belvg_showroom') ) ->addColumn( 'showroom_id', Table::TYPE_INTEGER, null, [ 'identity' => true, 'nullable' => false, 'primary' => true, 'unsigned' => true, ], 'Showroom ID' ) ->addColumn( 'showroom_name', Table::TYPE_TEXT, 255, ['nullable => false'], 'Showroom Name' ) ->setComment('Showroom Table'); $installer->getConnection()->createTable($tableShowroom); } catch (\Zend_Db_Exception $e) { $this->logger->error($e->getMessage()); } $installer->getConnection()->addIndex( $installer->getTable('belvg_showroom'), $setup->getIdxName( $installer->getTable('belvg_showroom'), ['showroom_name'], AdapterInterface::INDEX_TYPE_FULLTEXT ), ['showroom_name'], AdapterInterface::INDEX_TYPE_FULLTEXT ); } $installer->endSetup(); } } |
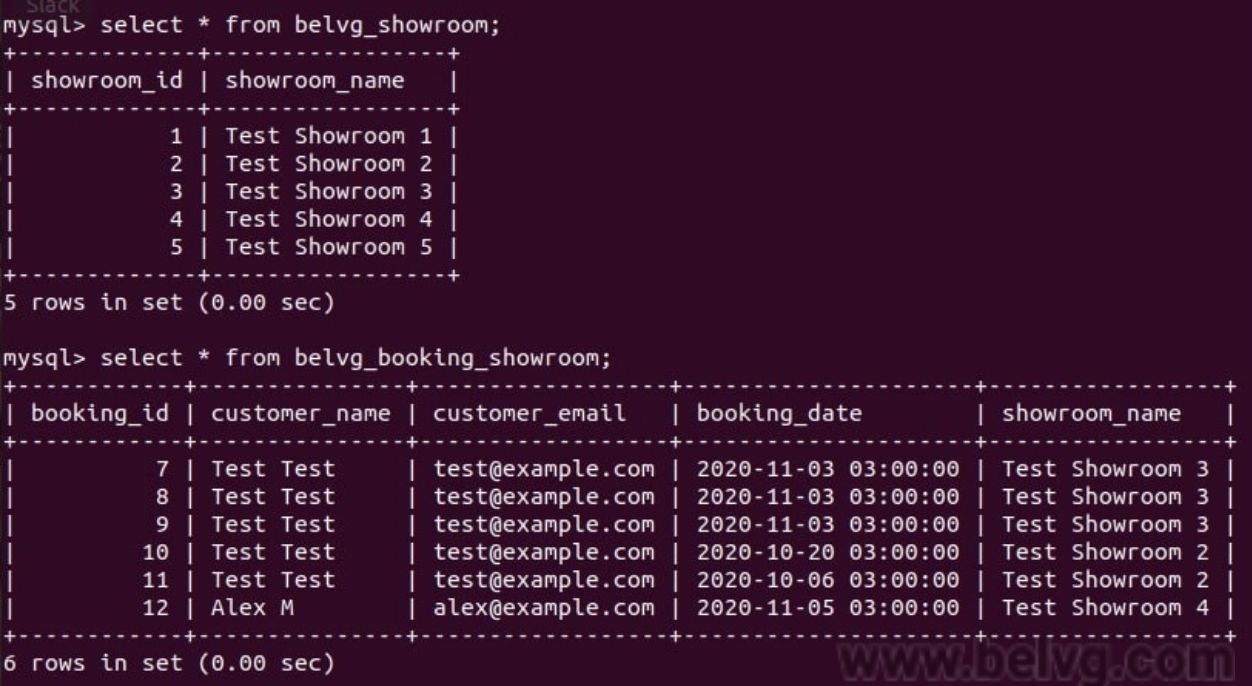
Here is an example of Database tables:

The admin part
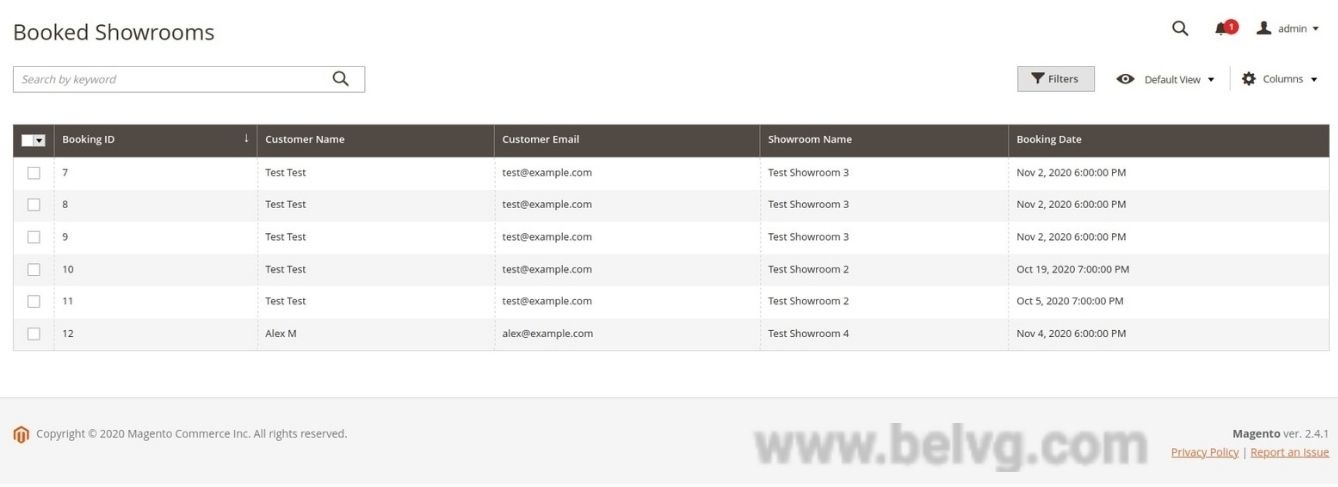
The form will be accessed on the page http://<domain>/<backend_url>/showroom/booking/index
Here is an example of Grid:

Here is an example of the Module’s configuration:

There are two more ways that are often used to extend the existing methods in Magento 2 concepts: plugins and observers.
You can find more detailed information about plugins here. They could be used for every public method allowing you to add the code before or after the method or override the whole method.
Observers allow you to put the code inside the method using special events. You could use an already existing event or create your own one to extend your own methods when needed.
You can find more detailed information about observers here.
Debugging process
Magento should be turned to developer mode for the debugging process.
To configure Xdebug in PhpStorm use the guide.
To enable errors displaying two strings should be uncommented in app/bootstrap.php
|
1 2 |
error_reporting(E_ALL); ini_set('display_errors', 1); |
To download the full version of the extension to see the implementation of the admin part
I hope that this article was helpful to you. Please feel free to share your opinion in the comments below!


