When writing modules, there might be a need to make edits to some pages. This can be adding, modifying or editing any elements on the page. Changes are made in Layout handles xml files.
The name of the layout
Layout customization tasks
Where layout handles are stored
Extend & override layouts
Extend module layout
Override module layout
Override theme layout
View the result of an xml layout on a page
The name of the layout xml file
The Xml file has a name based on the routing. For example, product URL look like this: /catalog/product/view/… Thus, the layout of the handle for this page will be catalog_product_view.xml. If the changes should be made on all pages, the file will be named default.xml.
Layout customization tasks
Let’s take a quick look at how you can customize layouts.
Set the page layout
Page layout is specified in the root <page> node.
Default theme has the following page layouts:
- 1column
- 2columns-left
- 2columns-right
- 3columns
which are located at: /vendor/magento/module-theme/view/frontend/page_layout.
Let’s take a look at the example of assigning the 1column layout for a product page:
module-catalog/view/frontend/layout/catalog_product_view.xml
|
1 2 3 4 |
<?xml version="1.0"?> <page layout="1column" xmlns:xsi="http://www.w3.org/2001/XMLSchema-instance" xsi:noNamespaceSchemaLocation="urn:magento:framework:View/Layout/etc/page_configuration.xsd"> … </page> |
Include or remove static resources (JavaScript, CSS, fonts) in <head>
JavaScript, CSS and other static assets are added in the <head> node. Let’s look at the example of using it in the layout:
module-theme/view/frontend/layout/default_head_blocks.xml
|
1 2 3 4 5 6 7 8 9 |
<?xml version="1.0"?> <page xmlns:xsi="http://www.w3.org/2001/XMLSchema-instance" xsi:noNamespaceSchemaLocation="urn:magento:framework:View/Layout/etc/page_configuration.xsd"> <head> <meta name="viewport" content="width=device-width, initial-scale=1"/> <css src="mage/calendar.css"/> <script src="requirejs/require.js"/> </head> ... </page> |
When adding external resources, you must specify an attribute src_type=”url“.
To add Google fonts, you need to add the attributes rel=“stylesheet“ and type=“text/css“.
To add JavaScript, you can use <link src=”js/sample.js”/> or <script src=”js/sample.js”/> instructions.
The example of using the external resource:
|
1 2 3 4 5 6 7 8 |
<page xmlns:xsi="http://www.w3.org/2001/XMLSchema-instance" xsi:noNamespaceSchemaLocation="urn:magento:framework:View/Layout/etc/page_configuration.xsd"> <head> … <css src="https://maxcdn.bootstrapcdn.com/bootstrap/3.3.4/css/bootstrap-theme.min.css" src_type="url" /> <script src="https://maxcdn.bootstrapcdn.com/bootstrap/3.3.4/js/bootstrap.min.js" src_type="url" /> <link rel="stylesheet" type="text/css" src="http://fonts.googleapis.com/css?family=Montserrat" src_type="url" /> </head> </page> |
Adding conditional comments
Conditional comments are meant for special instructions for Internet Explorer.
In layout files they are used in the following way:
|
1 2 3 |
<head> <css src="css/ie-9.css" ie_condition="IE 9" /> </head |
You can take a look at its usage in *.phtml file at: magento2-base/setup/view/layout/layout.phtml
|
1 2 3 4 5 6 7 8 |
<?php ... <!--[if IE 9]> <html class="ie9" lang="en" ng-app="magentoSetup"><![endif]--> <!--[if !IE]><!--> <html lang="en" ng-app="magentoSetup"> <!--<![endif]--> ... |
Create a container or block
A typical block has a class and a phtml file containing html and data from the methods of the class. Container does not have classes and phtml. Container is similar to the html markup to which you can attach the blocks with the “as” attribute. Also, the container has htmlTag and htmlClass attributes.
Let’s look at the example of creating a container and a block in the layout:
module-theme/view/frontend/layout/default.xml
|
1 2 |
<block name="require.js" class="Magento\Framework\View\Element\Template" template="Magento_Theme::page/js/require_js.phtml" /> <container name="page.bottom" label="Before Page Footer" htmlTag="div" htmlClass="content"/> |
Reference a container or a block
To update a block or container, referenceBlock and referenceContainer instructions are used.
Let’s look at the reference container and the block in the layout:
module-theme/view/frontend/layout/default.xml
|
1 2 3 4 5 6 7 8 9 10 11 12 13 14 |
<referenceBlock name="top.links"> <block class="Magento\Theme\Block\Html\Header" name="header" as="header" before="-"> <arguments> <argument name="show_part" xsi:type="string">welcome</argument> </arguments> </block> </referenceBlock> <referenceContainer name="main.content"> <block class="Magento\Framework\View\Element\Template" name="skip_to_content.target" before="-" template="Magento_Theme::html/skiptarget.phtml"> <arguments> <argument name="target_id" xsi:type="string">contentarea</argument> </arguments> </block> </referenceContainer> |
Set the template used by a block
There are 2 ways to assign a block to a template:
- Using template attribute
<referenceBlock name=”customer_form_register” template=”Magento_Checkout::cart/item/configure/updatecart.phtml”/>
- Using <argument> instruction
|
1 2 3 4 5 |
<referenceBlock name="product.info.addtocart"> <action method="setTemplate"> <argument name="template" xsi:type="string">Magento_Checkout::cart/item/configure/updatecart.phtml</argument> </action> </referenceBlock> |
The templates specified as an attribute have a higher priority than the templates specified as an argument.
Modify block arguments
To modify block arguments, use the <referenceBlock> instruction.
Let’s look at the layout:
module-wishlist/view/frontend/layout/customer_account.xml
It has a block:
|
1 2 3 4 5 6 |
<block class="Magento\Framework\View\Element\Html\Link\Current" ifconfig="wishlist/general/active" name="customer-account-navigation-wish-list-link"> <arguments> <argument name="path" xsi:type="string">wishlist</argument> <argument name="label" xsi:type="string">My Wish List</argument> </arguments> </block> |
Extending layout will be:
|
1 2 3 4 5 6 7 8 |
<referenceBlock name="customer-account-navigation-wish-list-link"> <arguments> <!-- Modified block argument --> <argument name="label" xsi:type="string">Wish List</argument> <!-- Newly added block argument --> <argument name="custom_label" xsi:type="string">Custom Block Label</argument> </arguments> </referenceBlock> |
Use block object methods to set block properties
There are 2 ways to do this:
- using the <argument> instruction for <block> or <referenceBlock>.
Let’s look at the example of using it in the layout:
module-catalog/view/frontend/layout/catalog_product_view.xml
|
1 2 3 4 5 6 |
<referenceBlock name="page.main.title"> <arguments> <argument name="css_class" xsi:type="string">product</argument> <argument name="add_base_attribute" xsi:type="string">itemprop="name"</argument> </arguments> </referenceBlock> |
CSS class is set and an attribute is added for the product page.
using the <action> instruction. Use this method only when you can not use the previous one.
Let’s look at an example of using it in the layout:
module-customer/view/frontend/layout/customer_account_index.xml
|
1 2 3 4 5 |
<referenceBlock name="page.main.title"> <action method="setPageTitle"> <argument translate="true" name="title" xsi:type="string">My Dashboard</argument> </action> </referenceBlock> |
Rearrange elements
There are 2 ways to change the order of elements on a page:
- Using the <move> construction;
- Specifying before and after attributes.
Let’s take a look at using the <move> instruction in the layout:
module-theme/view/frontend/layout/print.xml
|
1 2 3 4 5 6 7 8 9 |
<?xml version="1.0"?> <page layout="1column" xmlns:xsi="http://www.w3.org/2001/XMLSchema-instance" xsi:noNamespaceSchemaLocation="urn:magento:framework:View/Layout/etc/page_configuration.xsd"> <body> ... <move element="logo" destination="main.content" before="-" /> <move element="copyright" destination="main.content" after="-" /> ... </body> </page> |
In the value of the before / after attribute, we can specify the name of the element, before or after which we need to insert a block. If the block should be the first or the last, as in the example, the value “-” is used.
Let’s take a look at using before and after attributes:
module-sales/view/frontend/layout/sales_order_view.xml
|
1 2 3 4 5 6 7 8 9 10 |
<page xmlns:xsi="http://www.w3.org/2001/XMLSchema-instance" xsi:noNamespaceSchemaLocation="urn:magento:framework:View/Layout/etc/page_configuration.xsd"> .... <referenceContainer name="content"> <block class="Magento\Sales\Block\Order\View" name="order.comments" template="order/order_comments.phtml" before="sales.order.info.links"/> <block class="Magento\Sales\Block\Order\View" name="sales.order.view" cacheable="false" after="sales.order.info.links"> ... </referenceContainer> ... </body> </page> |
Remove elements
The remove attribute is used for removing elements in <referenceBlock> and <referenceContainer>.
Let’s look at the example in the layout:
module-theme/view/frontend/layout/print.xml
|
1 2 3 4 5 6 7 8 9 |
<?xml version="1.0"?> <page layout="1column" xmlns:xsi="http://www.w3.org/2001/XMLSchema-instance" xsi:noNamespaceSchemaLocation="urn:magento:framework:View/Layout/etc/page_configuration.xsd"> <body> <referenceContainer name="header.container" remove="true"/> <referenceBlock name="catalog.topnav" remove="true"/> <referenceContainer name="footer-container" remove="true"/> ... </body> </page> |
Replace elements
There is no mechanism to replace an element, but you can delete it and add a new one.
Where layout handles are stored
app/code/<Vendor>/<Module>/view/frontend/layout/ – front end;
app/code/<Vendor>/<Module>/view/adminhtml/layout/ – back end.
Extend & override layouts
To change layouts, you can use extend & override.
Extend means that you do not need to copy the entire file, but only specify changes from the parent layout. Using override, you can copy the layout and work with it, in this case the data from the parent layout will not be taken into account. It is worth noting that layout override is not recommended.
Extend module layout
The path to the files:
app/design/[StoreSide]/[Vendor]/[theme]/[Vendor_Module]/layout/
For example, if you need module’s extend layout:
app/code/Belvg/Example/view/frontend/layout/layout.xml
The path to it will be:
app/design/frontend/Vendor/theme/Belvg_Example/layout/layout.xml

Layered Navigation
Take your online store to the new level together with BelVG's extensions
Download hereOverride module layout
The path to the files:
app/design/[StoreSide]/[Vendor]/[theme]/[Vendor_Module]/layout/override/base/
For example, if you need to override module’s layout:
app/code/Belvg/Example/view/frontend/layout/layout.xml
The path to it will be:
app/design/frontend/Vendor/theme/Belvg_Example/layout/override/base/layout.xml
Note: The base folder is intended for overriding module layouts. If we wanted to overload the theme layout, the folder would be called theme and the path to it would be:
app/design/[StoreSide]/[Vendor]/[theme]/[Vendor_Module]/layout/override/theme/[Vendor2]/[theme2]/
Override theme layout
For example, if you need to override theme layout:
app/design/frontend/Magento/Luma/Magento_Theme/layout/default.xml
The path to it will be:
app/design/frontend/[Vendor]/[theme]/Magento_Theme/layout/override/theme/Magento/blank/default.xml
View the result of an xml layout on a page
When we visit a page, the xml layout is built for it. Let’s look at the result using the Observer.
1. Create module.xml:
app/code/Belvg/LayoutLogger/etc/module.xml
|
1 2 3 4 |
<?xml version="1.0" ?> <config xmlns:xsi="http://www.w3.org/2001/XMLSchema-instance" xsi:noNamespaceSchemaLocation="urn:magento:framework:Module/etc/module.xsd"> <module name="Belvg_LayoutLogger" setup_version="1.0.0"/> </config> |
2. Create registeration.php:
app/code/Belvg/LayoutLogger/registration.php
|
1 2 3 4 5 6 |
<?php \Magento\Framework\Component\ComponentRegistrar::register( \Magento\Framework\Component\ComponentRegistrar::MODULE, 'Belvg_LayoutLogger', DIR ); |
3. Create events.xml and declare the observer:
app/code/Belvg/LayoutLogger/etc/frontend/events.xml
|
1 2 3 4 5 6 |
<?xml version="1.0" encoding="UTF-8"?> <config xmlns:xsi="http://www.w3.org/2001/XMLSchema-instance" xsi:noNamespaceSchemaLocation="urn:magento:framework:Event/etc/events.xsd"> <event name="layout_generate_blocks_after"> <observer name="belvg_layout_logger_layout_generate_blocks_after" instance="Belvg\LayoutLogger\Model\Layout" /> </event> </config> |
4. Create an observer that will write all layout pages into a separate xml file:
app/code/Belvg/LayoutLogger/Module/Layout.php
|
1 2 3 4 5 6 7 8 9 10 11 12 13 14 15 16 17 18 19 20 21 22 23 24 25 26 27 28 29 30 31 32 33 |
<?php namespace Belvg\LayoutLogger\Model; use Magento\Framework\App\RequestInterface; use Magento\Framework\Event\Observer; use Magento\Framework\Event\ObserverInterface; class Layout implements ObserverInterface { protected $request; public function __construct( RequestInterface $request ) { $this->request = $request; } public function execute(Observer $observer) { $layoutsDir = BP . '/var/log/layouts/'; if (!mkdir($layoutsDir, 0777, true) && !is_dir($layoutsDir)) { throw new \RuntimeException(sprintf('Directory "%s" was not created', $layoutsDir)); } $moduleName = $this->request->getModuleName(); $controller = $this->request->getControllerName(); $action = $this->request->getActionName(); $time = date('Y-m-d H:i:s'); $xml = $observer->getEvent()->getLayout()->getXmlString(); $fileName = $moduleName . '_' . $controller . '_' . $action . ' ' . $time . '.xml'; $fopen = fopen($layoutsDir . $fileName, 'ab+'); fwrite($fopen, $xml . PHP_EOL); fclose($fopen); return $this; } } |
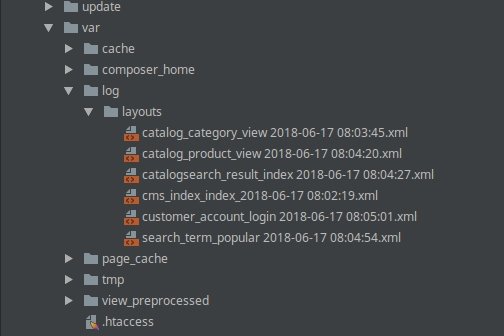
As a result, we will get the xml layout files of the visited pages:
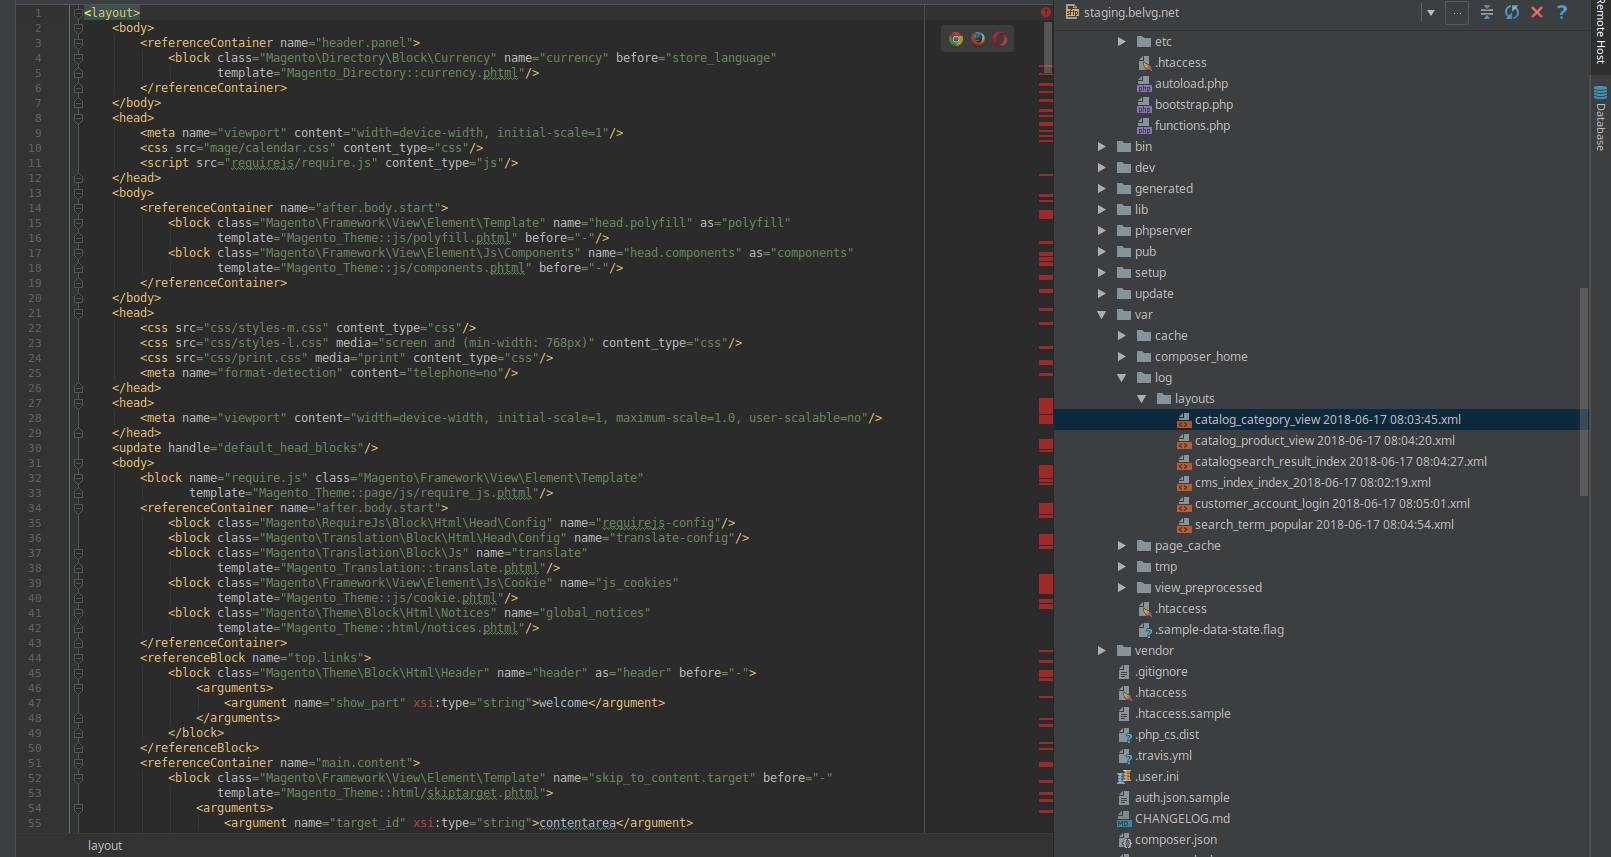
This is how you can look at the layout xml of the page we are interested in and see all the instructions contained.
catalog_category_view for 2.2.3 sd:
Hope this information was clear and useful to you. Please leave your questions in the comment section below and I will get in touch with you as soon as possible.


Hi, Mudasser! Thanks for your comment!
There was a mistake in the code, but now we fixed it. We are grateful that you noticed it and informed us.
After following the given steps to perform i found this exception.
“Warning: fopen(/var/www/html/Magento-CE-2.3.2/var/log/layouts/cms_index_index 2019-07-12 03:19:54.xml): failed to open stream: No such file or directory”.
Can you please guide me to ix this exception.
Thanks in advance sir.