
This article is dedicated to a rather important Magento 2 Certification aspect – online shop page layouts and how they are inherited. In particular, we will answer the following questions:
What is the purpose of page layouts?
How can the page layout be specified?
Where are the existing page layouts used?
How can a custom page layout be created?
How can the root page layout be specified for all pages and for specific pages?
What is the purpose of page layouts in Magento 2?
According to canons of modularity that the Magento 2 developers try to follow, each component of the solution should have a common logic or a rule to which they correspond. In case of Magento, it is page layouts and configurations that control connections between modules. This is a regular xml document that includes many useful instructions and functions, which we discussed in detail in the previous article. These functions help you manage the design of the entire store and each page individually. What is more, functions allow you to connect any module to target page, component or cms block and move them in a template according to the customer’s wishes. This way you put minimum effort in such configuration and don’t have to worry about the connections loss or conflicts between components.
Almost all third-party or standard modules that in any way affect the graphical user interface must contain a layout file in their structure that is responsible for its display configuration. As a rule, they are located in the module directory, in the layout folder, and have a fairly standard structure for the layout file:
|
1 2 3 4 5 6 |
<?xml version="1.0"?> <page xmlns:xsi="http://www.w3.org/2001/XMLSchema-instance" layout="1column" xsi:noNamespaceSchemaLocation="urn:magento:framework:View/Layout/etc/page_configuration.xsd"> <body> // Page layout handles // </body> </page> |
How can the page layout be specified in Magento 2?
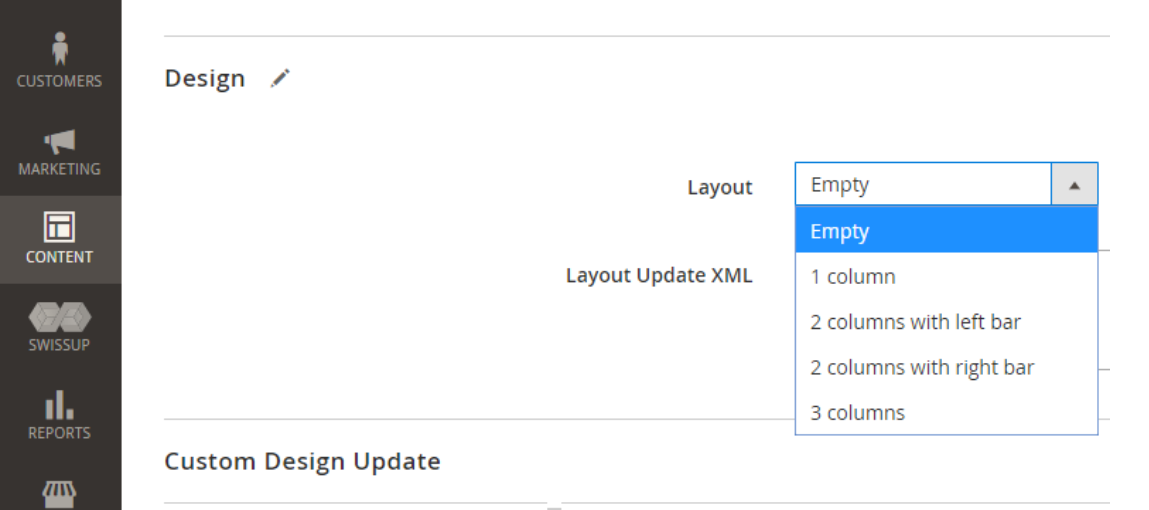
The example above showed the standard <page> tag with the layout directive, which indicates the structure (type) of the page layout from which the new page layout is inherited. It means that our module page with this layout file will have a one-column grid, the same that is used by the standard Magento 2 “Luma” theme on the main page. I would like to remind that you can also use the admin panel to select the required template. The corresponding menu item can be found in the following way:
Content ⇒ Pages ⇒ Target_Page_Edit ⇒ Design ⇒ Layout
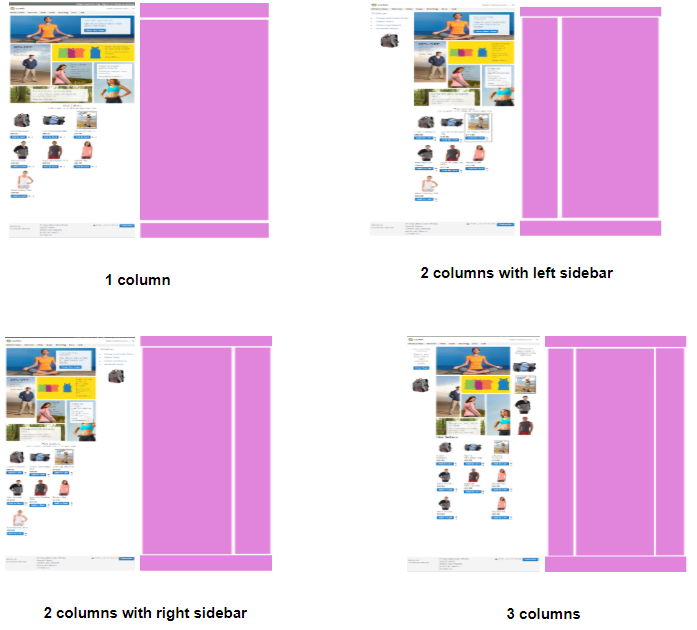
If you apply a standard grid to the “Luma” theme main page, the results you’ll get may surprise you:
Where are the existing page layouts used in Magento 2?
Earlier we found out that there are 5 types of default page layouts in Magento 2. Let’s take the “Luma” theme as an example and see which main pages they are applied at:
- empty (page without containers) – checkout pages (update from empty),
- 1 column (one container for all the content) – home page, product-view, all-cms-pages, cart, login-page, success page,
- 2 column with left bar (container for content and left sidebar) – what-is-new, category-view, subcategory-view, account-pages,
- 2 column with right bar (container for content and right sidebar) – no-route-page (404),
- 3 column (3 optional containers).
You might have noticed that module-checkout uses standard, a little bit changed the empty layout in its pages structure. Its markup looks like this:
|
1 2 3 4 5 6 7 8 9 10 |
<?xml version="1.0"?> <layout xmlns:xsi="http://www.w3.org/2001/XMLSchema-instance" xsi:noNamespaceSchemaLocation="urn:magento:framework:View/Layout/etc/page_layout.xsd"> <update handle="empty"/> <referenceContainer name="page.wrapper"> <container name="checkout.header.container" as="checkout_header_container" label="Checkout Page Header Container" htmlTag="header" htmlClass="page-header" before="main.content"> <container name="checkout.header.wrapper" label="Checkout Page Header" as="checkout_header_wrapper" htmlTag="div" htmlClass="header content"/> </container> </referenceContainer> <move element="logo" destination="checkout.header.wrapper"/> </layout> |
Therefore it’s clear that Magento does not limit developers in their creative work and allows them to add custom solutions to the layout. We’ll discuss how to do this in the next paragraph.
How can a custom page layout be created in Magento 2?
By default, the standard layout files are situated at:
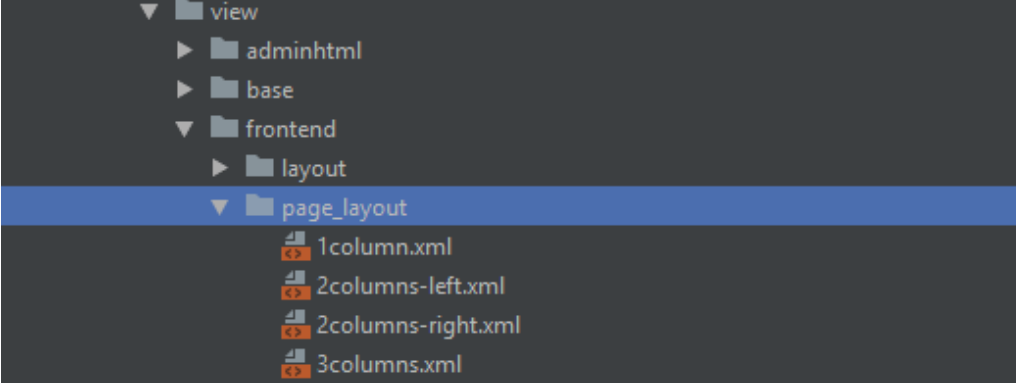
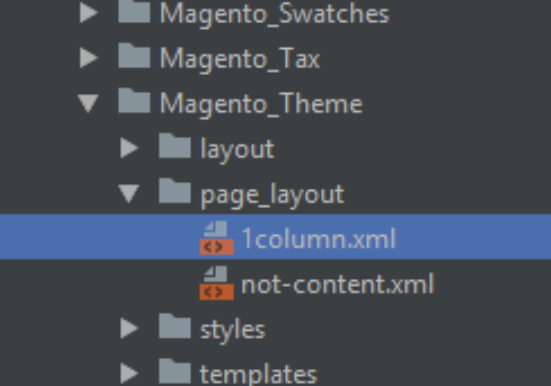
vendor ⇒ magento ⇒ module-theme ⇒ view ⇒ frontend ⇒ page_layout
All layout discussed files are stored here:
How can the root page layout be specified for all pages and for specific pages in Magento 2?
And that is how they look in the admin panel:
But in order to apply a custom template file to the created theme, the layout files must be placed at:
app ⇒ design ⇒ [vendor_name] ⇒ [module_theme] ⇒ Magento_Theme ⇒ page_layout
For example, many store pages will have a two-column structure without a side menu and breadcrumbs. Therefore, it will be logical to create a custom layout with the following markup in it:
|
1 2 3 4 5 6 7 8 9 10 |
<?xml version="1.0"?> <layout xmlns:xsi="http://www.w3.org/2001/XMLSchema-instance" xsi:noNamespaceSchemaLocation="urn:magento:framework:View/Layout/etc/page_layout.xsd"> <update handle="2columns-left"/> <referenceContainer name="page.wrapper"> <referenceBlock name="breadcrumbs" remove="true"/> </referenceContainer> <referenceContainer name="columns"> <referenceContainer name="div.sidebar.main" remove="true"/> </referenceContainer> </layout> |
You can further apply it to all the pages you want.
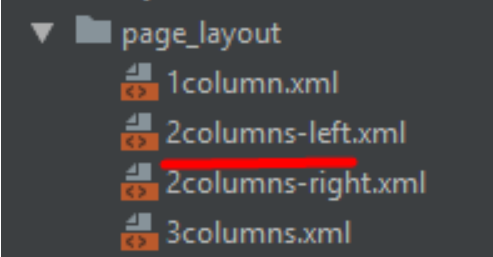
In the markup above, we used the previously described method of inheritance from the parent layout. With the help of the update directive the handle attribute is passed with the value of the template name. It is exactly the same as in the vendor folder of the standard theme, but without the .xml extension:
The newly created layout file recursively incorporates the parent’s markup in the process of inheritance, replacing at the same time all the predefined markup blocks with those specified in the child file.
FYI: All layout files are subject to the same inheritance principles as each of them individually. Here’s how the Magento engine collects all the configuration files before giving it to the client:
- Collecting layout files from all active modules in the order defined in the module list configuration file (app ⇒ etc ⇒ config.php).
- Determining the sequence of the inherited themes.
- Setting the file priority, depending on their nesting order.
- Next, depending on the developer’s actions, the redefined files are replaced and/or the existing ones are extended.
- All layout files are merged into a single one.
This order of actions before content rendering demonstrates how Magento optimizes its resources and increases development speed. The inheritance principle is widely used in object-oriented programming languages to save computer resources and significantly speed up program interfaces development, which is very descriptive in our case, since we did not have to describe the two-column layout of the whole page, but only the part we needed. The fact that the inheritance process eliminates the repetition of the code lines in the final layout and its continuous rewriting with new recurring commands allows to save the machine resources.
In order to finish custom page layout creation, you need to declare it in the layout configuration file. In the standard Magento module, it is located at the following address:
vendor ⇒ magento ⇒ module-theme ⇒ view ⇒ frontend ⇒ layouts.xml
But in order for it to be saved during the work with the composer, it is necessary to place it in the theme file:
app ⇒ design ⇒ [vendor_name] ⇒ [module_theme] ⇒ Magento_Theme ⇒ layouts.xml
Next, using the <layout> tag in the markup, you need to transfer the display name of the layout by wrapping it in the <label> tag, and specify the value that will be used for the client by using the id attribute:
|
1 2 3 4 5 6 |
<?xml version="1.0" encoding="UTF-8"?> <page_layouts xmlns:xsi="http://www.w3.org/2001/XMLSchema-instance" xsi:noNamespaceSchemaLocation="urn:magento:framework:View/PageLayout/etc/layouts.xsd"> <layout id="2columns-not-breadcrumbs"> <label translate="true">2 columns without breadcrumbs</label> </layout> </page_layouts> |
In the end, we will see the result we aimed for at the admin panel:
The value of the new layout will be the id attribute passed for the <layout> tag.
This is not the only way to override or overwrite the layout file. In the example above i demonstrated the creation of a custom layout file for all pages. In the same way you can overwrite the existing standard layout file by applying the necessary changes to it. For example, you can make a one-column layout, but without breadcrumbs.
|
1 2 3 4 5 6 7 8 9 10 |
<?xml version="1.0"?> <layout xmlns:xsi="http://www.w3.org/2001/XMLSchema-instance" xsi:noNamespaceSchemaLocation="urn:magento:framework:View/Layout/etc/page_layout.xsd"> <update handle="empty"/> <referenceContainer name="page.wrapper"> <container name="header.container" as="header_container" label="Page Header Container" htmlTag="header" htmlClass="page-header" before="main.content"/> <container name="page.top" as="page_top" label="After Page Header" after="header.container"/> <container name="footer-container" as="footer" before="before.body.end" label="Page Footer Container" htmlTag="footer" htmlClass="page-footer"/> </referenceContainer> <referenceContainer name="breadcrumbs" remove="true" /> </layout> |
By placing the file in the theme folder with the name of the target layout and the current markup, you apply it to all the store pages which use this type of grid. In this case, all pages that used the one-column layout file will use the new rewritten instance as their template. What is remarkable, according to the rules of inheritance described above and the priority principles, all layout files located in the current theme and inherited from the one-column layout will already have our rewritten file as its parent.
As described above, each module that in any way interacts with the client interface has a layout file in its structure that is responsible for the content rendering configuration. Since it is known that the store itself consists of a set of modules interacting with each other, we can assume that the creation of a layout configuration file is possible not only for all pages together, but also for each one individually. Therefore, each page can be configured and look whatever you want it to.
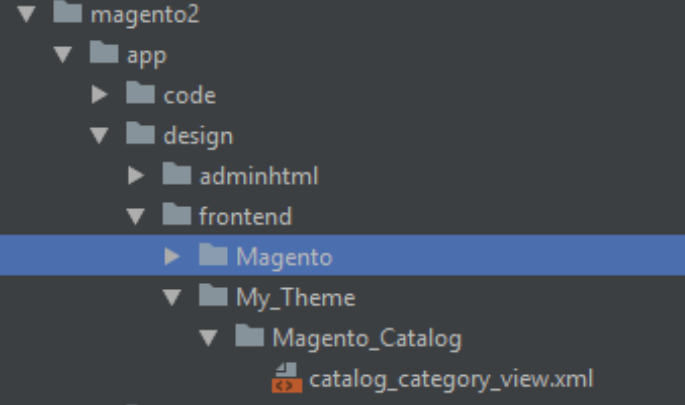
For example, if you need to rewrite the standard layout file, responsible for rendering the categories page, then you need to copy the “module-catalog” folder from the target module and put it in the theme folder, replacing the catalog name with “Magento_Catalog” by default. Next, following the module structure in the vendor folder, add the target layout file, “catalog_category_view.xml” in our case. The result will look something like this:
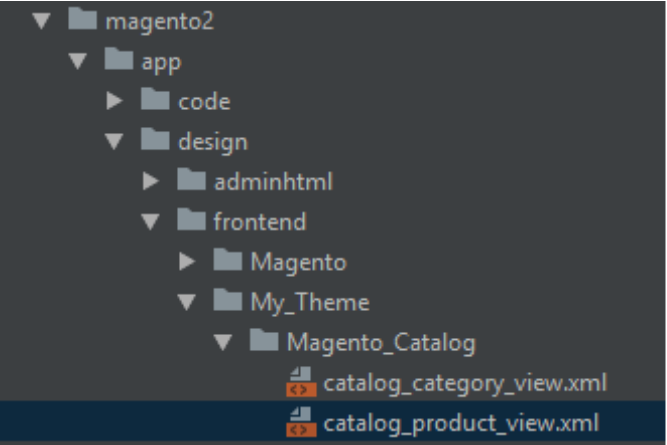
And to customize, for example, the product viewing page, we place a file called “catalog_product_view.xml” in the same directory, according to the method discussed above.
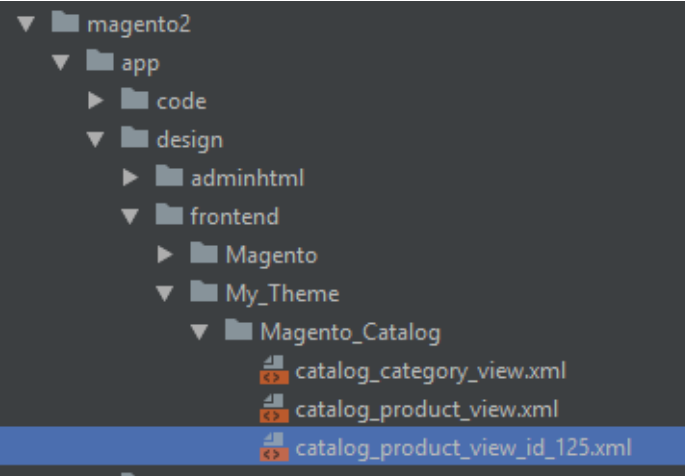
Magento platform is known for its flexibility and is not limited to customizing all the product pages or categories with a single template. You can create pages with the individual design for each product separately, meaning that each product can be placed on its own page, designed to increase the efficiency and volume of sales. To do this, you need to place the template file with the product ID in the same directory:
“catalog_product_view_id_***.xml”
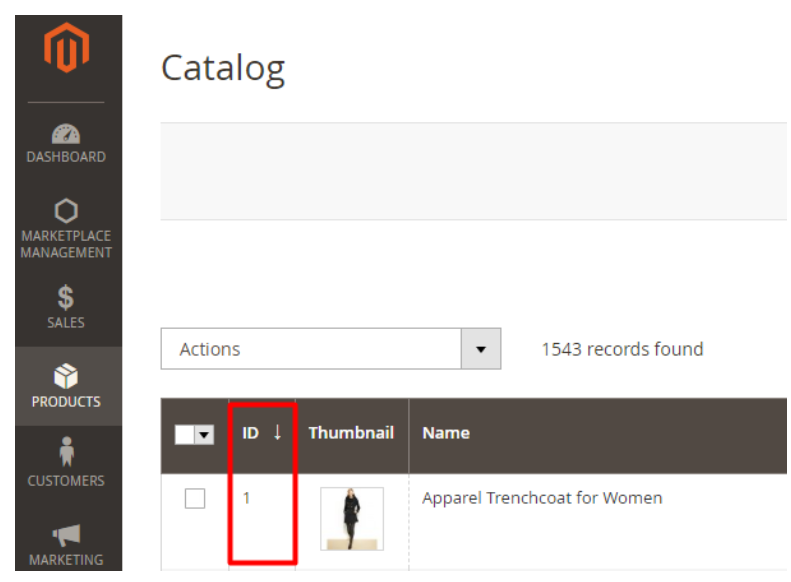
Product ID can be easily found in the admin panel at:
products ⇒ catalog⇒ target_product ⇒ column_name (ID)
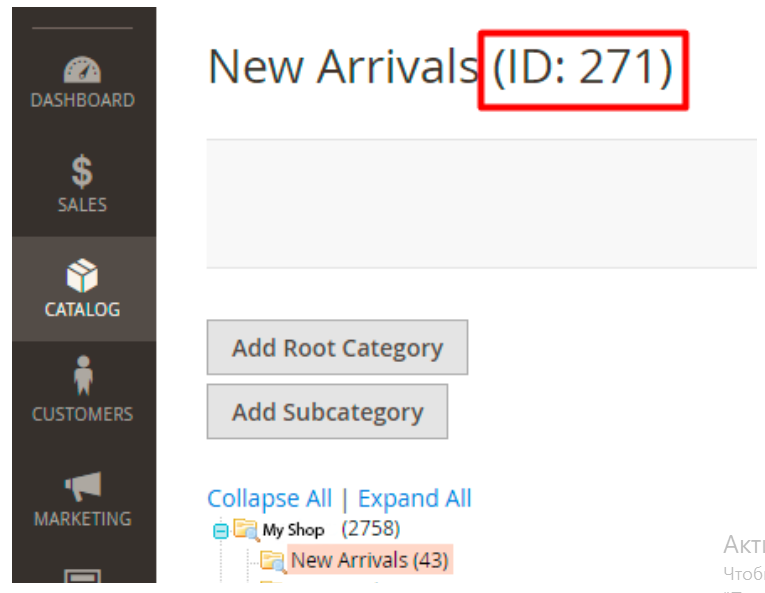
The same is true for the layout of the target categories; you just need to replace the word “product” in the title with “category” and insert the ID of the target category:
“catalog_product_category_id_***.xml”
You can find category ID in the admin panel menu:
In this article, we have considered the ways of expanding and changing page configurations by rewriting the standard layout files or creating new ones. If you use xml directives and how to transfer attributes to them which were described in detail in the previous article, you will be able to change any preinstalled theme as you wish. Last but not least: if you turn off the cache during development, it will significantly speed up the process.
This is all to this topic! I hope you found my article useful and insightful. If you have any questions or remarks left, please leave them in the comments down below.







Hi, Peter! Thanks for your question.
Unfortunately, it’s not possible to do it using filename like cms_page_view_layout_2columns-left.xml. Merged cms_page_view.xml have specific page layout (e.g. 2columns-left). So, you can add layout instructions directly to the file cms_page_view.xml.
That’s a great source of info, thanks Igor.
Is there a way to target cms pages that have the 2 column left layout only? ie creating a file such as cms_page_view_layout_2columns-left.xml?
Or you would need to create a new layout handle/file etc as you described?