Effective PrestaShop 1.7. management is a concern of many online merchants. In this article, we are going to discuss images generation options, how you can manage PrestaShop image settings and particularly, configure sizes and add new types. Read on to improve your developer skills.
First of all, you should know that all the images that you upload on Prestashop get automatically resized depending on the function they perform. It includes smaller size images for catalog, preview, thumbnails, etc. So, it should be enough to upload just one image of good quality to make sure it will look good on different website pages.
The first step when you want to configure PrestaShop image settings is to log into Admin Panel, find Design section and select Image Settings in the drop down menu.
Here you will find a list of image types that you have on your site. These types depend on the theme that you have installed.
In case you want to add a new image type, you simply need to click Add new image type button. Then, you should specify its name, width and height parameters and then choose the type of content that the images of this type will contain.
There is just one moment you need to be aware of. If you want to avoid blank spaces around images, you need to upload all of your images with the same ratio. It does not matter if it is 1:1, 4:3 or 16:9. If the images of the same type have different ratio, the system will automatically add white borders, so you need to crop them before uploading. In case your images are 500px:500px or 800px:800px, there is no need to crop them at all, because they have the same ratio 1:1 and they will be added with the same size. You should pay attention to it when uploading images.
_2x image types are necessary for retina feature to make images look good on mobile devices. For example, the dimension of a thumbnail is 140*210, then thumbnail_2x would be 280*420. To enable this feature, you just need to turn it on are you can see on the next screenshot (Generate high resolution images). It will generate a copy of every image you with a double size. Don’t forget to click on Save button to apply changes.
Another important thing is the smallest dimension of images that you want to upload. You should create image style sizes based on this factor. If the size of your smallest image is 560×820, you need to reduce the size of all images, which are larger than 560×820. In another case, blank spaces will be added automatically to apply the same size on all the images.
That’s it! And finally, don’t forget to click on Save button.
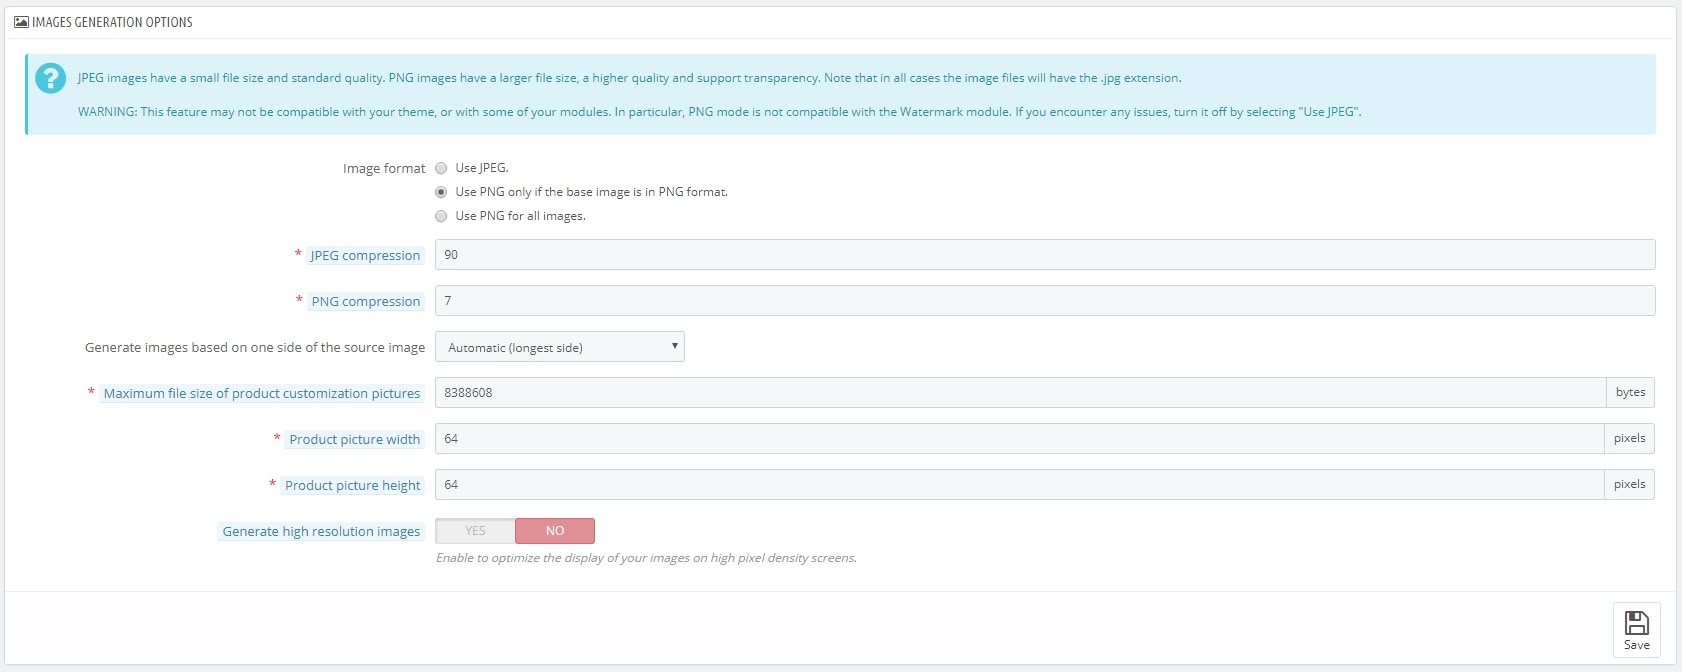
Now, we will go to the next setting – Images Generation Options.
Image format. JPEG format is recommended due to its higher compression ratio. In case you want to minimize image quality loss due to the format change, you’d better opt for the option number 2. You should use PNG only if the base image is in the PNG format.
JPEG compression. It’s highly recommended to set this value not lower than 80.
PNG compression. It’s highly recommended to set this value not higher than 6.
You should generate images based on one side of the source image. Here, you can set the position of an image in the frame.
- Choose “Height” in order to fill the frame height.
- Choose “Width” so that the image fills the width of the frame.
- Choose “Automatic” so that the width and height are calculated to maximize the space it can occupy in the frame.
Maximum file size of product customization pictures. By default, this value is 8 Mb. It is also a limit for pictures that can be uploaded by your customers. You can expand this value if necessary, but make sure that your PHP installation is able to process the file of this size. We would not recommend you to clutter up your server with giant size images.
Product picture width. Set up the maximum width of the image that customers can upload.
Product picture height. Set up the maximum height of the image that customers can upload.
You need to generate high-resolution images. It is needed to make sure the images will display correctly on screens with high pixel density. It will create new files with a resolution twice higher.
The last setting we want to discuss is Thumbnail regeneration. This is useful when you want to regenerate your thumbnails simultaneously and for some specific type of content.
First, you should change image size settings in the table that you see above and then select the content type where images should be regenerated. Final step is to decide whether you want to erase previous images and click the Regenerate thumbnails button.
Now, you can definitely handle PrestaShop image settings as an online shop administrator. Feel free to ask any questions you have in the comments below.

PrestaShop Development
Take your online store to the next level with BelVG PrestaShop Development
Visit the page


Hi Andrey,
it is really very strange.
Please, share all the details with our support department at [email protected], as we may need more details to help you.
Hi! I’ve installed prestashop 1.7.6.1. My web server config is nginx + php-fpm + apache.
I have an issue: all my product images has strange source like “192-home_default/hammer-drill-and-impact-driver-combo-kit-.jpg” and all returns 404. Path part 192-hone_default looks very strange. Do you have any ideas about this trouble?
Hi,
log into Admin Panel, then find Design section and click Image Setting under it. All uploaded images should meet the requirements of the website.
Hi Vlad,
I’m here to ask you about the image that i upload to my prestashop web that i develope. Why all the images are pixelated and gets blury when i uploaded into my website. How can i fix this?
Hi, Victor, thanks for your question.
You can drop us an email at [email protected]. My colleagues from the support department will be happy to help you.
Best wishes.
Hi Vlad,
Thanks for your articles regarding setting up PRESTASHOP 1.7. I found the resolution of thumbnail is always very low and therefore lowering the attraction to customers. Here below is the link is my store: Marvle3D.co.nz. Would you like to have a look please? Thanks heaps.
Best Regards
Victor
Hi, Causam! Thanks for your question.
Actually, the article was on image settings only, that’s why there is no information about how to enable or use image.
But we will take into account your question and will answer it in the articles on new PrestaShop version – 1.7.5.
Ok, so you have created a new image type. Great. Wonderful. Faaaaantastic. How do you actually ENABLE or USE the new image type in say for instance, your Product page?