How can I include a custom CSS file on a product detail page for a specific product type (e.g. grouped, downloadable, configurable, etc.)?
For adding the custom CSS file (for example, “custom_example.css”) for various product types, it’s necessary to open the layout of directory file in your theme:
“/app/design/frontend/our_package/our_theme/layout/catalog.xml”
Additionally, we can use the file local.xml:
“/app/design/frontend/our_package/our_theme/layout/local.xml”
And then depending on product type you should add the necessary code:
For Simple Product Type:
|
1 2 3 4 5 |
<PRODUCT_TYPE_simple translate="label" module="catalog"> <reference name="head"> <action method="addCss"><stylesheet>css/custom_example.css</stylesheet></action> </reference> </PRODUCT_TYPE_simple> |
For Grouped Product Type:
|
1 2 3 4 5 |
<PRODUCT_TYPE_grouped translate="label" module="catalog"> <reference name="head"> <action method="addCss"><stylesheet>css/custom_example.css</stylesheet></action> </reference> </PRODUCT_TYPE_grouped> |
For Configurable Product Type:
|
1 2 3 4 5 |
<PRODUCT_TYPE_configurable translate="label" module="catalog"> <reference name="head"> <action method="addCss"><stylesheet>css/custom_example.css</stylesheet></action> </reference> </PRODUCT_TYPE_configurable> |
For Virtual Product Type:
|
1 2 3 4 5 |
<PRODUCT_TYPE_virtual translate="label" module="catalog"> <reference name="head"> <action method="addCss"><stylesheet>css/custom_example.css</stylesheet></action> </reference> </PRODUCT_TYPE_virtual> |
For Bundle Product Type:
|
1 2 3 4 5 |
<PRODUCT_TYPE_bundle translate="label" module="catalog"> <reference name='head'> <action method="addCss"><stylesheet>css/custom_example.css</stylesheet></action> </reference> </PRODUCT_TYPE_bundle> |
For Downloadable Product Type:
|
1 2 3 4 5 6 7 |
<PRODUCT_TYPE_downloadable translate="label" module="catalog"> <reference name="head"> <action method="addCss"><stylesheet>css/custom_example.css</stylesheet></action> </reference> </PRODUCT_TYPE_downloadable> |
Where “css/custom_example.css” is the file path in our custom theme. Of course, make sure you have put the custom file on the specified path. In this case, it means the folder with css files of our custom theme: “/skin/frontend/our_package/our_theme/css”. Don’t forget to clear cache after making changes.
How can I include a custom CSS file on a CMS page?
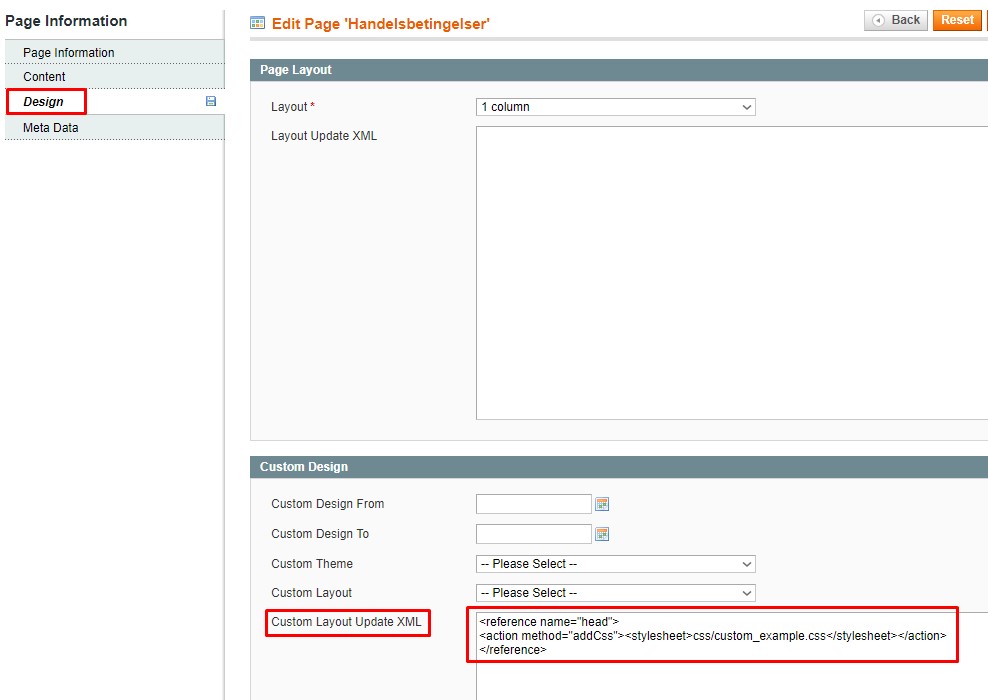
In order to include the custom file (for example, “custom_example.css”) for CMS Page, there’re two possible ways. But before applying, it’s necessary to put the custom file in the folder with CSS files of our custom theme: “/skin/frontend/our_package/our_theme/css”.
The first way:
Get in the admin panel and open CMS Page which the custom css file is applied for. On the tab “Design” in the field “Custom Layout Update XML” add the connection code of custom css file:
|
1 2 3 |
<reference name="head"> <action method="addCss"><stylesheet>css/custom_example.css</stylesheet></action> </reference> |
Where “css/custom_example.css” is the file path in our custom theme.
The second way:
Open layout file local.xml in your theme:
“/app/design/frontend/our_package/our_theme/layout/local.xml”
In this file we should add the following code:
|
1 2 3 4 5 |
<cms_page page_id="8"> <reference name="head"> <action method="addCss"><stylesheet>css/custom_example.css</stylesheet></action> </reference> </cms_page> |
Where the meaning of the attribute “page_id” is the id of the CMS Page which the custom styles file is going to be applied for; “css/custom_example.css” is the file path in our custom theme. Don’t forget to clear cache after making changes.
I would add for myself, it’s not useful to practice the second way, as it “litters” the layout file and, as a result, you have to monitor when deleting CMS Page, there’s no unused connection code of custom files left.

Magento 2 Migration
Take your online store to the next level with BelVG Magento 2 Migration
Visit the pageHow can you avoid copying core layout XML files into a custom theme by using the local.xml layout file?
We can avoid copying core layout XML files into a custom theme by using different handles, directives, and methods in the layout file local.xml. Let’s analyze details!
The general algorithm of working with layout file is following:
- Specify the necessary handle (for example, <default> or <page_empty>, so it depends on the pages it will be applied for).
- Define the necessary directive (for example, <reference name=”root”> in order to refer to the highest block of the structure).
- Practise necessary methods (for example, the method “remove” should be used for removing the block from the current position).
If you need to learn more information related to directives, handles, and methods, read the article.
It was the general algorithm, but let’s consider some real examples of standard tasks, which we can cope with in the file local.xml.
Example 1:
Let’s add styles file (for example, “custom_styles.css”) and scripts file (for example, “custom_scripts.js”) on the home page. So you need to use the following code in the file local.xml
|
1 2 3 4 5 6 |
<cms_index_index> <reference name="head"> <action method="addCss"><stylesheet>css/custom_styles.css</stylesheet></action> <action method="addJs"><script>js/custom_scripts.js</script></action> </reference> </cms_index_index> |
Where:
<cms_index_index> – handle, which shows that changes contained will refer to the home page only.
<reference name=”head”> – directive, which points out that changes will concern the block “head” on the page.
<action method=”addCss”> – method of adding styles files (“css/custom_styles.css” – styles file path).
<action method=”addJs”> – method of adding scripts files (“js/custom_scripts.js” – scripts file path).
Example 2:
Let’s apply the page template with 2 columns – content and right sidebar (2columns-right.phtml) for the default category page). So you need to use the following code in the file local.xml
|
1 2 3 4 5 |
<catalog_category_default> <reference name="root"> <action method="setTemplate"><template>page/2columns-right.phtml</template></action> </reference> </catalog_category_default> |
Where:
<catalog_category_default> – handle, which shows that changes contained will refer to the category page only.
<reference name=”root”> – directive, which points out that changes will concern the highest block.
<action method=”setTemplate”> – method of using the necessary template.
“page/2columns-right.phtml” – path to the template used.

Magento Custom Development
Take your online store to the next level with BelVG Magento Custom Development
Visit the page


