
What are Magento customer groups and what value do they hold for a store admin? How to manage customer groups from admin panel and what changes can be made programmatically? Read on to find out.
No matter how large or small your online store is, you will have a certain number of customers that can not be unmanaged – unless you want the chaos to rule your ecommerce. What is more, it is important to create on-site marketing and promotional and involve customers into them. Yet, the larger your online shop becomes, the less convenient it is to manage your clients manually. But Magento ecommerce platform offers a wonderful way out – customer groups.
Explore our article and learn what are Magento customer groups and how to manage them. Also, discover the extension we created to introduce an individual customer group feature. And finally, find out top 3 Magento customer groups extensions worth implementing into your ecommerce.
Table of contents:
What are customer groups in Magento?
How to create customer groups in Magento?
How to set customer group pricing in Magento?
Top 3 Magento customer group extensions
How to create customer groups programmatically in Magento 2
How to assign a customer to a group programmatically
How to delete the customer group programmatically
How to set Group Price programmatically
What are customer groups in Magento?
Being an advanced ecommerce solution, Magento comes with a set of comprehensive back office configurations that provides for the majority needs of businesses of all scales. The functionality that we will explore in this article and that is a wonderfully useful addition to the basic ecommerce customer management features are customer groups.
Magento back office allows to divide online store customers into more specific categories, called Magento customer groups. Magento 2 customer group behavior can be managed and controlled by the store admin, which allows, with application of specific extensions or custom development, to create a differentiated shopping experience for each client. Magento customer groups can be set up and modified in the store back office, but this means you get access to the default functionality only. Also, you can install a customer group extension or create a module of your own to implement the more advanced customer groups functionality.
For instance, it is possible to divide customers into groups and assign different product prices for each, creating a multi-tiered pricing policy. This was only one example of how customer groups can upgrade your customer management, but you do not have to stick to this one and be creative in your application of Magento 2 customer groups.
Here are some ideas on how to use customer groups in Magento:
- Devise a multi-stage promotion program and assign distinct promotion percentages or various perks like shipping and “buy X, get Y for free” to different customer groups
- Show different tax rates for customer groups at your Magento storefront, with lower rates – for the registered users or ones who are on the loyalty program, and higher rates – for the unregistered and first-time customers. This will be a great encouragement for those who do not have an account at your store, to start one.
- Offer different shipping provisions to different customer groups in Magento as a method of additional promotion (bear in mind this is not an in-built functionality).
All in all, it is obvious Magento customer groups functionality have a wide potential, and how you will realize it depends solely on your needs and imagination.
Now, after we have explored what are customer groups in Magento, it is high time we considered ways and means of working with them – both in online store back office and programmatically.
Magento Development
Take your online store to the next level with BelVG Magento development
Visit the pageHow to create customer groups in Magento?
Now let us explore how and where to set customer groups in Magento. The customer group configuration in admin panel is rather simple and can be performed in several easy steps.
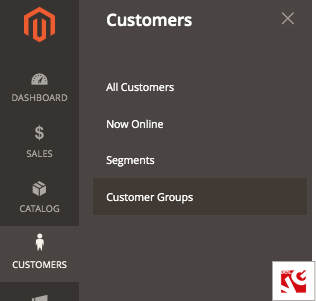
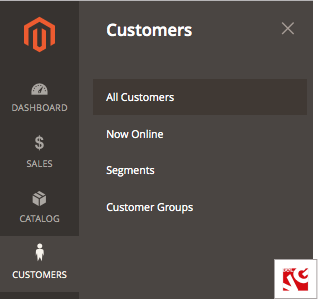
Step #1: log in to your Magento back office and navigate to Customers -> Customer Groups.
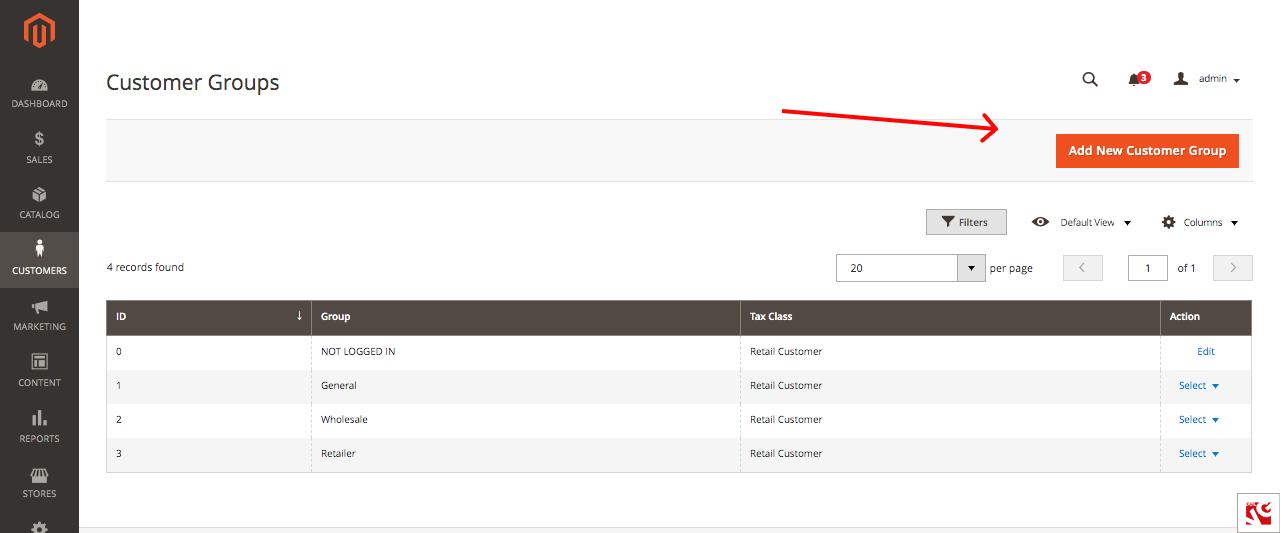
Step #2: press Add New Customer Group button in the upper right corner.
Step #3: enter the new customer group name and assign it a tax class, then press Save Customer Group button.
Now let us move to other configurations and explore where to set customer groups in Magento.
Step #4: navigate to Customers -> All customers.
Step #5: select the customer profiles you want to assign groups to.
Step #6: expand the Action drop down on the left and select Assign a customer group.
Step #7: choose the customer group you wish to assign and press OK at the popup screen.
The selected customer will be assigned to the group you chose.
Now it is time we demonstrated how to apply Magento customer groups on practice. The most common way to put customer groups into practice is to set customer group pricing.
How to set customer group pricing in Magento?
Magento offers two similar functionalities that allow to set differentiated prices – catalog rules and group pricings, and with both you can achieve similar results. So, how to choose which you should apply in this or that situation? It is wiser to implement catalog rules to the whole categories of products or the entire store, while group price is more useful when applied per product basis and for a certain group of customers.
Below is a step-by-step instructions on how to set up customer group pricing in Magento back office.
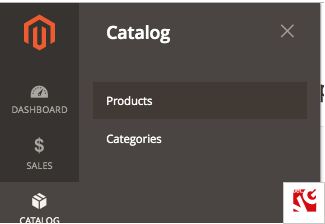
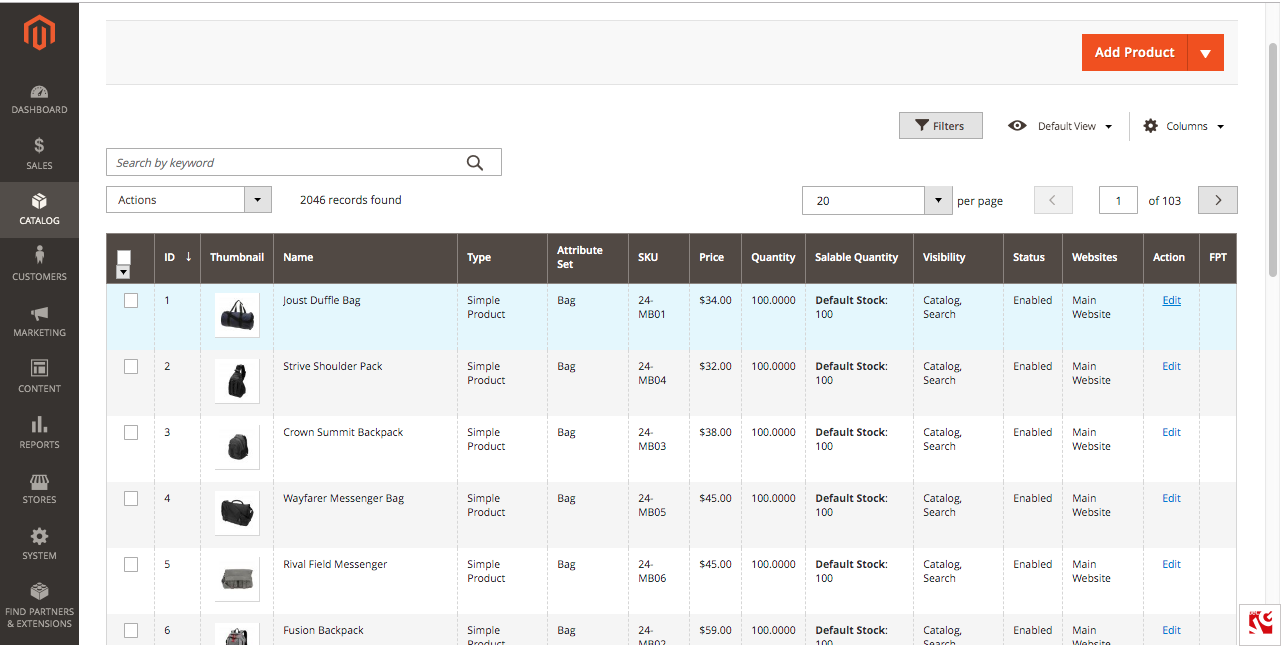
Step #1: navigate to Catalog -> Products
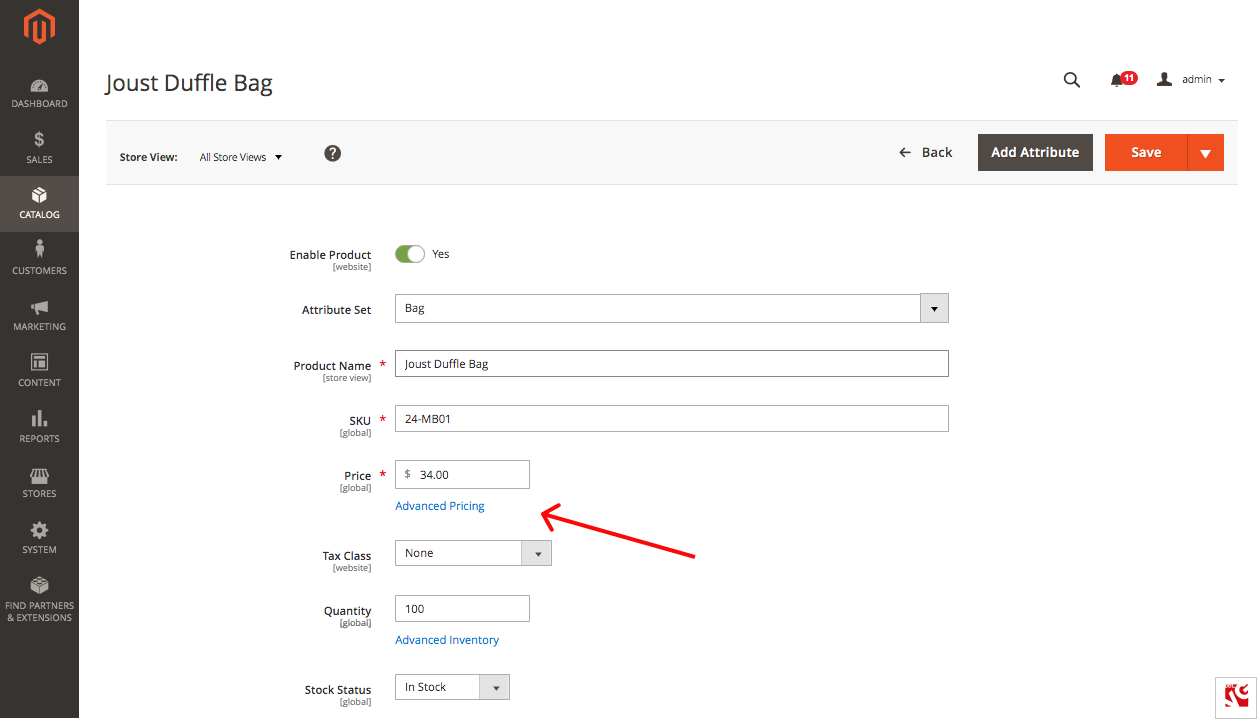
Step #2: select the product you want to set a tiered price for and open it in the Edit mode.
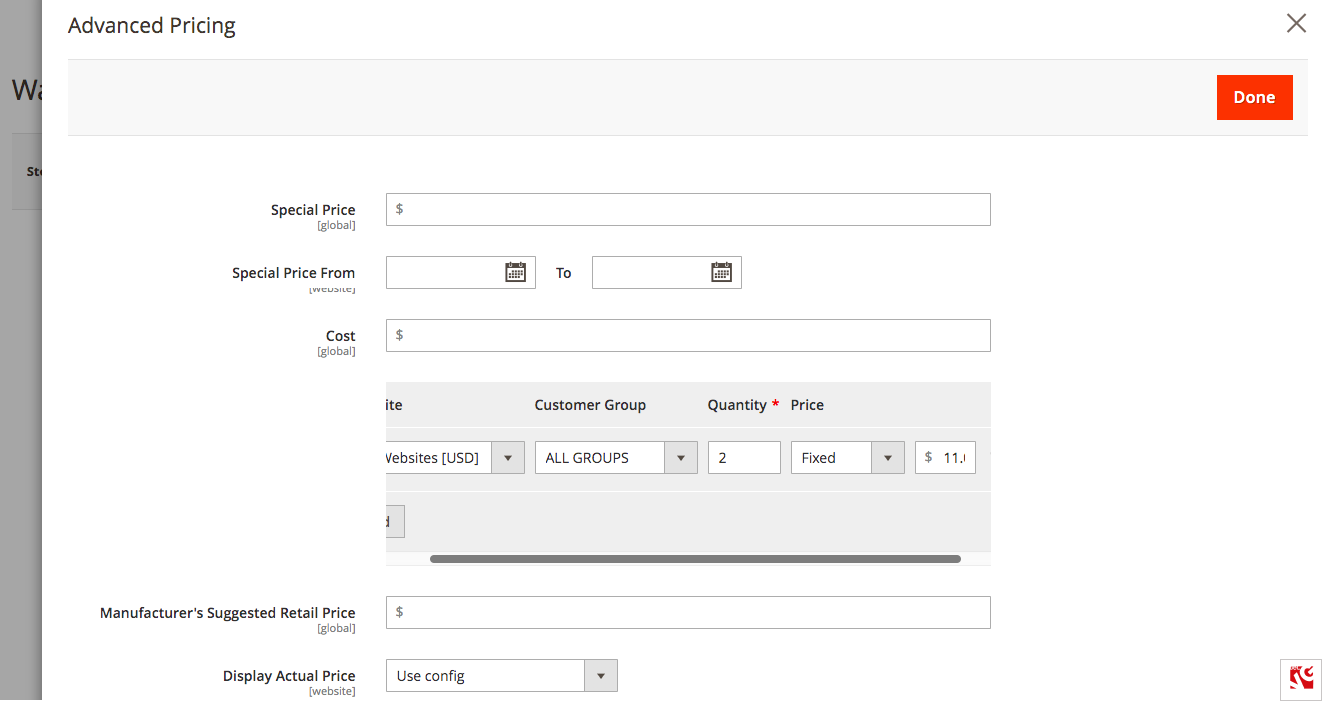
Step #3: press Advanced Pricing caption below the Price field.
Step #4: fill in the following fields:
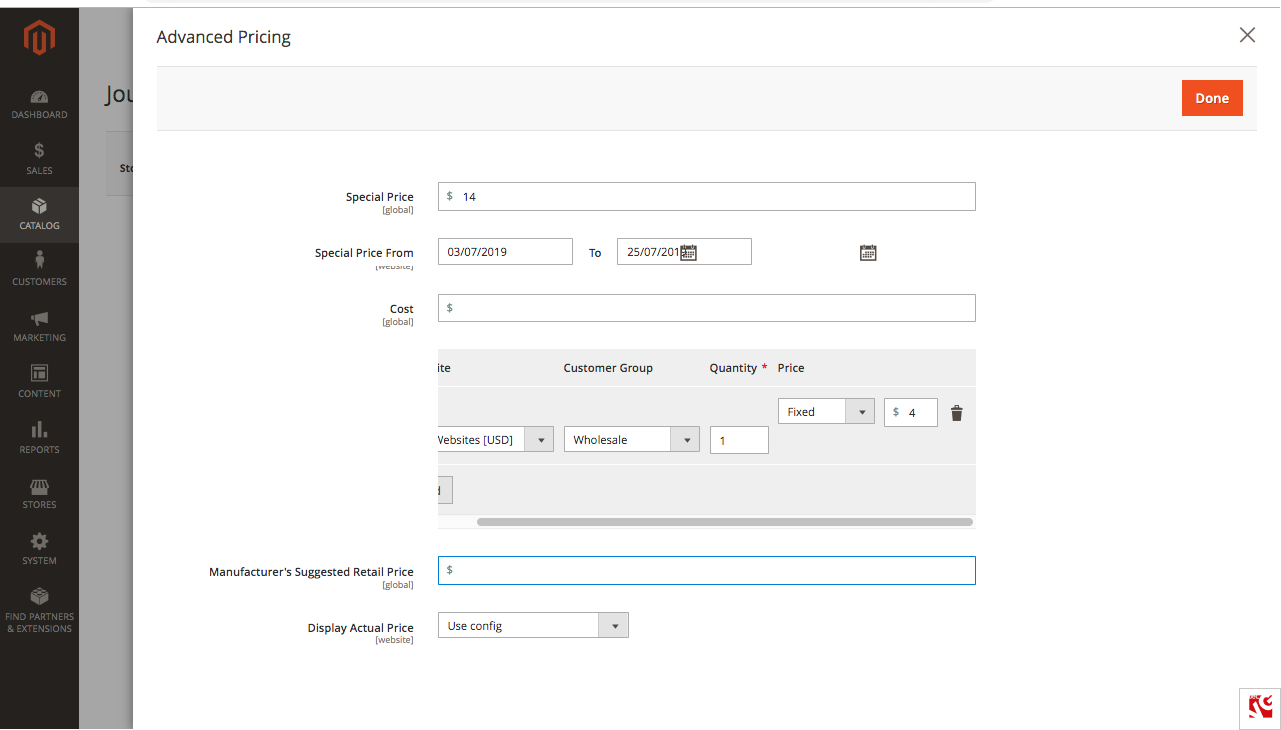
- Special Price
- Special Price From – the date range special price is valid
- Cost
- Website and Customer Group the special price will apply to
- Manufacturer’s Suggested Retail Price
- Display Actual Price
When finished, press Done in the upper right corner.
This is basically it for Magento 2 customer groups configuration capabilities in the back office. Want to extend them and wield more advanced features, but do not have Magento developer’s experience? You can either install a customer groups extension or turn to the BelVG team for Magento custom development services.
Top 3 Magento customer group extensions
Do not have enough time on your hands or Magento experience to introduce the much-needed features into your customer management toolkit? We selected the top 3 Magento customer groups extensions for you to introduce the needed changes quickly and without effort.
 Shipping & Payment By Customer Groups. This Magento 2 extension allows to restrict payment and shipping methods to a certain customer group in your online store. With Shipping & Payment By Customer Groups extension, you will be able to align shipping and payment with your promotion and marketing strategies as well as ecommerce business needs. Even the unregistered customers will not be left unattended – this extension covers for them as well.
Compatibility: Community 2.1, 2.2, Enterprise 2.1, 2.2
Price: $139.00
 Customer Groups Advanced Management. This extension allows the store admin to create and configure various types of customer groups with parent and child accounts. It also allows enables you to add unique registration blocks to new customer groups and link customer groups with each other. All in all, Customer Groups Advanced Management creates a welcoming environment for basic and advanced customer groups configurations.
Compatibility: Community 2.2, 2.3, Enterprise 2.2, 2.3
Price: $199.00
 Customer Groups Shipping & Payment Restrictions. This Magento customer groups extension is similar to the one we explored first, but the key difference is that this one is compatible with solely Magento Community and, consequently, costs twice as little. This extension allows to introduce shipping and payment restrictions for various customer groups from the Magento back office and hide the restricted methods from the storefront.
Compatibility: Community 2.2, 2.3
Price: $69.00
Did not find the Magento extension that suits your needs? Visit our Magento store and explore our outstanding Magento addons!

Magento Extensions
Take your online store to the next level with BelVG Magento extensions
Visit the storeHow to create customer groups programmatically in Magento 2
In order to create a Magento customer group programmatically, we developed an extension from scratch – BelVG_CustomerGroupCLI. In this paragraph, we will not describe the whole process, so if you are new to Magento development, we strongly advise you to first explore Magento 2 Module Structure article to get a grasp of all the base module files.
The adding of a new customer group is implemented in the execute() method, located at the path_to_the_root_magento/vendor/magento/module-customer/Controller/Adminhtml/Group/Save.php in Magento_Customer module.
In our custom Magento module, new customer group installation will be carried out via CLI commands (to learn more about CLI commands, follow the link to the article Magento 2 console commands).
Before we create a new customer group, first we need to specify a tax class for it (to learn how to add a new tax class via admin panel, visit https://belvg.com/blog/how-to-set-up-taxes-in-magento-2-a-complete-step-by-step-instruction.html#step_5 ). For this, we create two CLI commands, the first to view the existing tax classes, the second – to create new tax classes.
Then we add the classes that realize our commands into BelVG/CustomerGroupCLI/etc/di.xml
|
1 2 3 4 5 6 7 8 9 10 11 12 13 14 15 16 |
<?xml version="1.0"?> <config xmlns:xsi="http://www.w3.org/2001/XMLSchema-instance" xsi:noNamespaceSchemaLocation="urn:magento:framework:ObjectManager/etc/config.xsd"> <type name="Magento\Framework\Console\CommandList"> <arguments> <argument name="commands" xsi:type="array"> <item name="tax_class_show" xsi:type="object"> BelVG\CustomerGroupCLI\Console\Command\TaxClassShowCommand </item> <item name="tax_class_create" xsi:type="object"> BelVG\CustomerGroupCLI\Console\Command\TaxClassCreateCommand </item> </argument> </arguments> </type> </config> |
Implementation of the BelVG\CustomerGroupCLI\Console\Command\TaxClassShowCommand class.
We are going to save the existing tax classes, and in order to save them for later, we can apply \Magento\Tax\Model\TaxClass\Source\Customer. We should use getAllOptions() method to pass and extract the existing tax classes for processing.
|
1 2 3 4 5 6 7 8 9 10 11 12 13 14 15 16 17 18 19 20 21 22 23 24 25 |
protected function execute(InputInterface $input, OutputInterface $output) { try { $taxClasses = $this->taxClass->getAllOptions(); $tableRows = []; foreach ($taxClasses as $taxClass) { $tableRows[] = [$taxClass['value'], $taxClass['label']]; } $table = new Table($output); $table ->setHeaders(['Id', 'Name']) ->setRows($tableRows); $table->render(); return \Magento\Framework\Console\Cli::RETURN_SUCCESS; } catch (\Exception $e) { $output->writeln('<error>' . $e->getMessage() . '</error>'); if ($output->getVerbosity() >= OutputInterface::VERBOSITY_VERBOSE) { $output->writeln($e->getTraceAsString()); } return \Magento\Framework\Console\Cli::RETURN_FAILURE; } } |
Implementation of the execute method of BelVG\CustomerGroupCLI\Console\Command\TaxClassCreateCommand class that creates the new tax class.
|
1 2 3 4 5 6 7 8 9 10 11 12 13 14 15 16 17 18 19 20 21 22 23 24 25 |
protected function execute(InputInterface $input, OutputInterface $output) { try { $taxClassName = $input->getOption(self::NAME); $taxClassModel = $this->taxClassModelFactory->create(); $newTaxClassId = $taxClassModel ->setClassName($taxClassName) ->setClassType(\Magento\Tax\Model\ClassModel::TAX_CLASS_TYPE_CUSTOMER) ->save() ->getId(); $message = '<info>New tax customer class '. $taxClassName . ' has been created with ID = ' . $newTaxClassId . '</info>'; $output->writeln($message); return \Magento\Framework\Console\Cli::RETURN_SUCCESS; } catch (\Exception $e) { $output->writeln('<error>' . $e->getMessage() . '</error>'); if ($output->getVerbosity() >= OutputInterface::VERBOSITY_VERBOSE) { $output->writeln($e->getTraceAsString()); } return \Magento\Framework\Console\Cli::RETURN_FAILURE; } } |
Install our module and execute the bin/magento setup:upgrade command.
To see the parameters needed for command execution, use the bin/magento tax:class:create –help command.
Add new tax class bin/magento tax:class:create –tax_class_name=”BelVG Tax Name”.
See the existing tax classes with the bin/magento tax:class:show command.
Now lets define new item for creating Customer Group itself. This update is done in the di.xml as well:
|
1 2 3 |
<item name="customer_group_create" xsi:type="object"> BelVG\CustomerGroupCLI\Console\Command\CustomerGroupCreateCommand </item> |
Create the class that implements interaction with CLI user BelVG\CustomerGroupCLI\Console\Command\CustomerGroupCreateCommand.
|
1 2 3 4 5 6 7 8 9 10 11 12 13 14 15 16 17 18 19 20 21 22 23 24 25 26 27 28 29 30 31 32 33 34 35 36 37 38 39 40 |
protected function configure() { $this ->setName('customer:group:create') ->setDescription('Create new customer group') ->setDefinition($this->getOptionsList()); } protected function execute(InputInterface $input, OutputInterface $output) { try { $output->writeln('<info>Creating new Customer group...</info>'); $this->customerGroupHelper->setData($input); $customerGroupId = $this->customerGroupHelper->execute(); $output->writeln(''); $output->writeln('<info>Customer Group has been created</info>'); $output->writeln('<comment>Customer Group Code: ' . $input->getOption(\BelVG\CustomerGroupCLI\Helper\CustomerGroup::KEY_CODE)); $output->writeln('<comment>Customer Group tax class Id: ' . $input->getOption(\BelVG\CustomerGroupCLI\Helper\CustomerGroup::KEY_TAX_CLASS_ID)); $output->writeln('<comment>Customer Group Id: ' . $customerGroupId); } catch (\Exception $e) { $output->writeln(''); $output->writeln('<error>' . $e->getMessage() . '</error>'); } } /** * @return array */ protected function getOptionsList() { return [ new InputOption(\BelVG\CustomerGroupCLI\Helper\CustomerGroup::KEY_CODE, null, InputOption::VALUE_REQUIRED, '(Required) Code for new customer group. '), new InputOption(\BelVG\CustomerGroupCLI\Helper\CustomerGroup::KEY_TAX_CLASS_ID, null, InputOption::VALUE_REQUIRED, '(Required) Tax customer class ID. Use commands tax:class:show and tax:class:create'), ]; } |
To create a new Customer Group, first, create the BelVG/CustomerGroupCLI/Helper/CustomerGroup.php class. Then, in the newly created class, we perform the data installation for the new customer group and create the group itself.
|
1 2 3 4 5 6 7 8 9 10 11 12 13 14 15 16 17 18 19 20 21 22 23 24 25 26 27 28 29 30 31 32 33 34 35 36 37 38 39 40 41 42 43 |
class CustomerGroup extends \Magento\Framework\App\Helper\AbstractHelper { /** */ const KEY_CODE = 'code'; /** */ const KEY_TAX_CLASS_ID = 'tax-class-id'; /** @var \Symfony\Component\Console\Input\InputInterface */ protected $data; /** @var \Magento\Customer\Model\GroupFactory */ protected $groupFactory; public function __construct( \Magento\Customer\Model\GroupFactory $groupFactory, Context $context ) { $this->groupFactory = $groupFactory; parent::__construct($context); } public function setData(\Symfony\Component\Console\Input\InputInterface $input) { $this->data = $input; return $this; } /** * @throws \Exception */ public function execute() { $customerGroup = $this->groupFactory->create(); $customerGroupId = $customerGroup ->setCode($this->data->getOption(self::KEY_CODE)) ->setTaxClassId($this->data->getOption(self::KEY_TAX_CLASS_ID)) ->save() ->getId(); return $customerGroupId; } } |
Select the suitable tax class id and execute the bin/magento customer:group:create command.
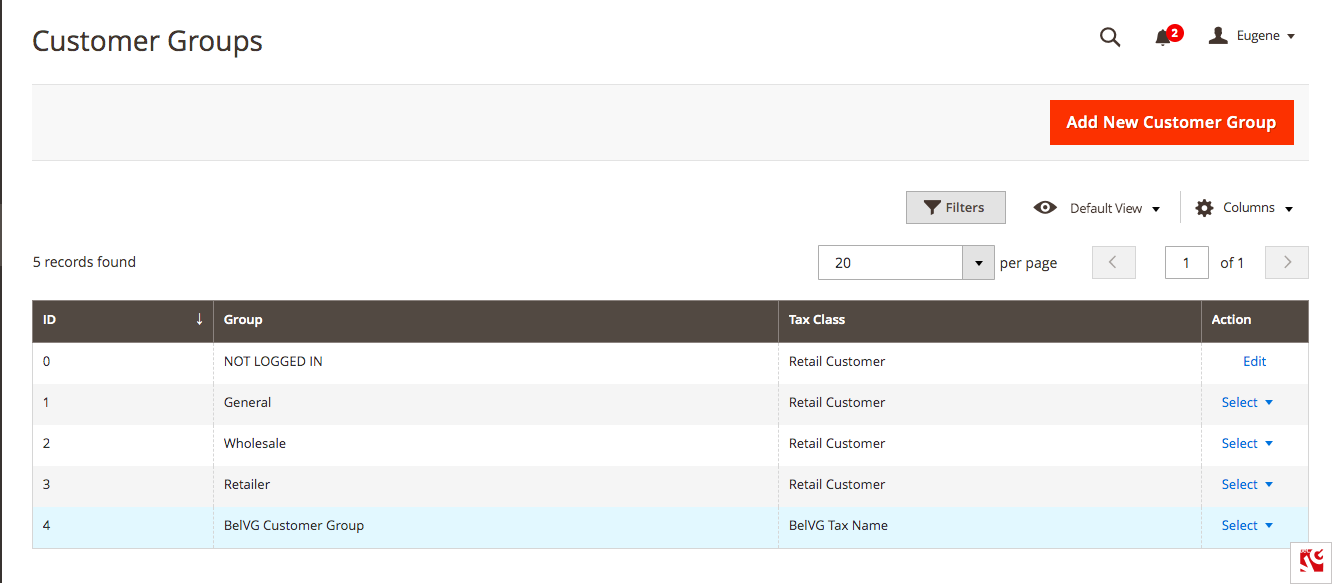
Now we can see the newly created group in admin panel by navigating to CUSTOMERS->Customer Groups.
How to assign a customer to a group programmatically
Add a new command to di.xml.
|
1 2 3 |
<item name="customer_assign_group" xsi:type="object"> BelVG\CustomerGroupCLI\Console\Command\CustomerAssignGroupCommand </item> |
Create the class that implements the command BelVG/CustomerGroupCLI/Console/Command/CustomerAssignGroupCommand.php. To assign a customer to the group we have to set the user Id and the group Id.
|
1 2 |
const USER_ID = 'user-id'; const GROUP_ID = 'group-id'; |
In the execute method that implements assigning customer to the group, we refer $customerId and install a new $customerGroupId customer group for it.
|
1 2 3 4 5 6 7 8 9 10 11 12 13 14 15 16 17 18 19 20 21 22 23 24 25 |
protected function execute(InputInterface $input, OutputInterface $output) { try { $customerId = $input->getOption(self::USER_ID); $customerGroupId = $input->getOption(self::GROUP_ID); $customerGroup = $this->groupRepository->getById($customerGroupId); $customer = $this->customerRepository->getById($customerId); $customer->setGroupId($customerGroupId); $this->customerRepository->save($customer); $message = '<info>Customer Group for customer ' . $customer->getFirstname() . ' ' . $customer->getLastname() . ' has been changed to ' . $customerGroup->getCode() . '</info>'; $output->writeln($message); return \Magento\Framework\Console\Cli::RETURN_SUCCESS; } catch (\Exception $e) { $output->writeln('<error>' . $e->getMessage() . '</error>'); if ($output->getVerbosity() >= OutputInterface::VERBOSITY_VERBOSE) { $output->writeln($e->getTraceAsString()); } return \Magento\Framework\Console\Cli::RETURN_FAILURE; } } |
Execute the command.
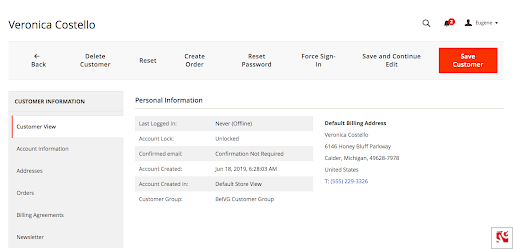
Check the result.
How to delete the customer group programmatically
Add a new command into di.xml
|
1 2 3 |
<item name="customer_group_delete" xsi:type="object"> BelVG\CustomerGroupCLI\Console\Command\CustomerGroupDeleteCommand </item> |
Create the class that executes the command BelVG/CustomerGroupCLI/Console/Command/CustomerGroupDeleteCommand.php.
We have to set group id for deleting.
|
1 |
const GROUP_ID = 'group-id'; |
For deleting a group we will be using customer group repository class (Magento\Customer\Api\CustomerRepositoryInterface).
|
1 2 3 4 5 6 7 8 9 10 11 12 13 14 15 16 17 18 19 20 |
protected function execute(InputInterface $input, OutputInterface $output) { try { $customerGroupId = $input->getOption(self::GROUP_ID); $customerGroup = $this->groupRepository->getById($customerGroupId); $this->groupRepository->delete($customerGroup); $message = '<info>Customer group ' . $customerGroup->getCode() . ' has been deleted</info>'; $output->writeln($message); return \Magento\Framework\Console\Cli::RETURN_SUCCESS; } catch (\Exception $e) { $output->writeln('<error>' . $e->getMessage() . '</error>'); if ($output->getVerbosity() >= OutputInterface::VERBOSITY_VERBOSE) { $output->writeln($e->getTraceAsString()); } return \Magento\Framework\Console\Cli::RETURN_FAILURE; } } |
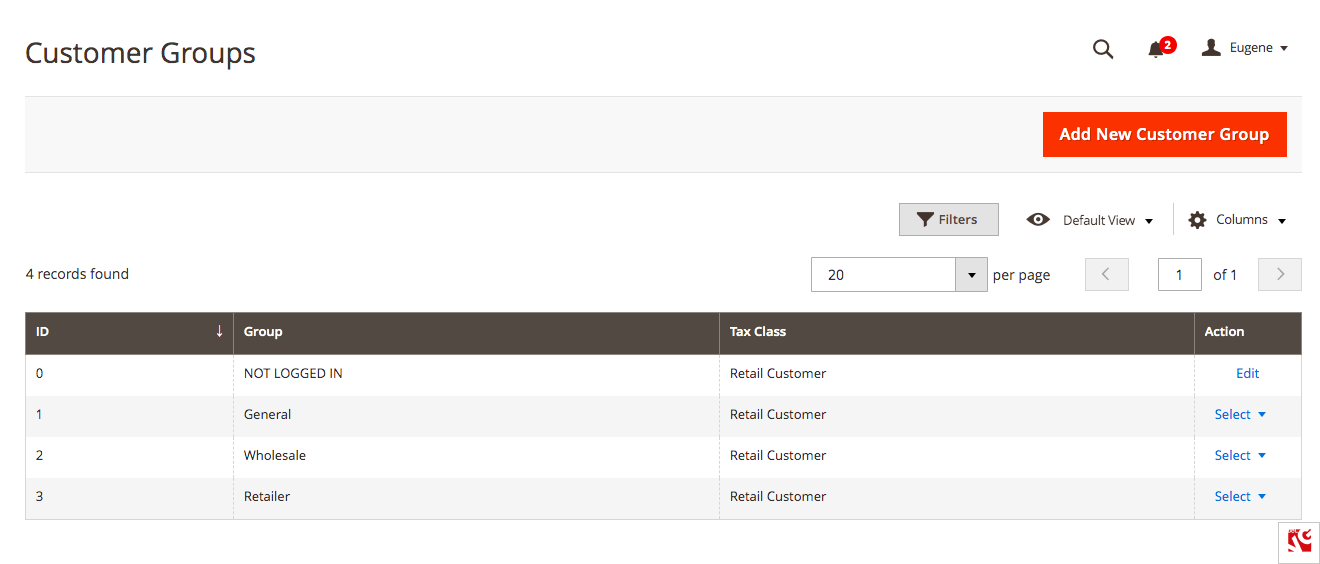
Check the result.
How to set Group Price programmatically
For setting the Customer Group price from class that implements the CLI command we have to emulate area code. Use for it
\Magento\Framework\App\State method emulateAreaCode.
Add new command to the di.xml
|
1 2 3 |
<item name="product_set_tier_price" xsi:type="object"> BelVG\CustomerGroupCLI\Console\Command\ProductSetTierPriceCommand </item> |
Create the class BelVG\CustomerGroupCLI\Console\Command\ProductSetTierPriceCommand that implements this command. For setting product tier price, we can reuse add() method from
\Magento\Catalog\Api\ScopedProductTierPriceManagementInterface. We have to pass product
SKU and \Magento\Catalog\Api\Data\ProductTierPriceInterface.
|
1 2 3 4 5 6 7 8 9 10 11 12 13 14 15 16 17 18 19 20 21 22 23 24 25 26 27 28 29 30 31 32 |
protected function execute(InputInterface $input, OutputInterface $output) { try { $this->state->emulateAreaCode('adminhtml', function () use ($input, $output){ $productSku = (string)$input->getOption(self::PRODUCT_SKU); $priceValue = (float)$input->getOption(self::PRICE_VALUE); $productQty = (float)$input->getOption(self::PRODUCT_QTY); $customerGroupId = (int)$input->getOption(self::CUSTOMER_GROUP_ID); /** @var \Magento\Catalog\Api\Data\ProductTierPriceInterface $productTierPrice */ $productTierPrice = $this->productTierPriceFactory->create(); $productTierPrice->setCustomerGroupId($customerGroupId); $productTierPrice->setValue($priceValue); $productTierPrice->setQty($productQty); $this->productTierPriceManagement->add($productSku, $productTierPrice); $message = '<info>Tier price '. number_format($priceValue, 2) .' for product with SKU = ' . $productSku . ' has been added.</info>'; $output->writeln($message); return \Magento\Framework\Console\Cli::RETURN_SUCCESS; }); } catch (\Exception $e) { $output->writeln('<error>' . $e->getMessage() . '</error>'); $output->write($e->getTraceAsString()); if ($output->getVerbosity() >= OutputInterface::VERBOSITY_VERBOSE) { $output->writeln($e->getTraceAsString()); } return \Magento\Framework\Console\Cli::RETURN_FAILURE; } } |
Execute the command.
Check the result.
You can download the module that implements all these commands from https://github.com/belvg-public/magento2-customer-group-sample. Feel free to fork and improve it.
Wrapping it up
We hope that this article was useful for both store admins and developers who were looking for answers or advice on Magento customer groups. In this article, we explored in detail what Magento 2 customer groups are and how useful they are to build successful ecommerce. We also explored the ways to configure them from Magento back office and shared our custom module for customer groups. We believe that our insights on how we created a Magento customer groups module will serve as an inspiration for you. Finally, we covered top 3 Magento customer groups extensions, with which you can introduce additional features to your customer management techniques.
If you have any questions or comments, feel free to leave them down below.
Magento 2 Integration
Take your online store to the next level with BelVG Magento integration
Visit the page










Great Post! Thanks for sharing valuable information.
Great post, you have discussed each method very well.
Thanks for sharing this great post.