Taxes are the challenge that no merchant can avoid. Taxes are never fun, and calculating, collecting and paying them requires a great deal of attention, accuracy and knowledge of legislation, and the more countries around the world you work with, the more tangled the matters become.
But does it mean that you should give up your intention to enter international markets? Absolutely not. Read further and learn everything you need to know about the ecommerce taxes.
Table of contents:
What are taxes in ecommerce?
Ecommerce tax in the USA
Ecommerce tax in the European Union
Magento 2: Working with taxes
What are tax classes is Magento
What are fixed product taxes in Magento
How to set up VAT in Magento 2
What are taxes in ecommerce?
Ecommerce tax is a tax associated with an online act of purchase. It is usually a certain percentage of sum, charged on the product directly or after the item is added to the shopping cart.
In respect of international online retail, the versatility of tax legislation in the countries around the world poses the major challenge for ecommerce owner. Retailers, especially the small-business ones, are more often than not discouraged by the complexity of tax rules and are unwilling to trade with counties that are not governed by a similar law as they do. As a result, businesses lose profits and the opportunity to enter new markets and grow.
We do not state that international taxes are a simple matter; it is indeed intricate, but not impossible to comprehend. Below you will find a clear, concise and comprehensive guide on how to comply with tax legislation of the US and European countries.
Ecommerce tax in the USA
The cornerstone of the USA tax legislation for ecommerce is a “nexus”. In official terms, nexus is sufficient commercial connection to a certain American state. If your business has nexus in, say, Texas, you are obliged to collect taxes on your sales in Texas; at the same time, you may not have nexus in Massachusetts, meaning that you are not required to levy taxes from the deals there.
Traditionally, nexus denoted only “sufficient physical presence”, which can be widely interpreted, so that a headquarters, an office of any size, a warehouse or brick-and-mortar store, and even a sales representative can be enough to qualify for a nexus. However, recently new definitions of nexus were introduced and gained legal power in certain states, allowing businesses to increase the number of businesses nexus. At the moment, apart from a traditional physically-defined, there are the following types of nexus in the USA:
- Economic nexus – once the business economic activity in a certain state reaches the approved threshold (traditionally this is $100.000 sales amount in a year, or 200 individual transactions), a business qualifies for a nexus there.
- Affiliate nexus – if you are referred to by a certain business or individual and this connection generates sales, this is sufficient for a nexus in the state of the affiliate source location.
- Click-through nexus – when you are referred to by another business located in your state, or have your ads or links placed on their website, this qualifies for a click-through nexus.
- Web cookies nexus – in the following states – Massachusetts, Connecticut, Rhode Island, and Ohio – software or cookies installed on in-state devices are considered enough for a nexus.
So, let us imagine you qualify for a nexus in a state – what’s next?
Step #1: register for a sales tax permit in that state Department of Revenue. Bear in mind that each state has an individual nexus scheme, and each you can also find at the website of the Department of Revenue.
Step #2: charge the customer from this state a tax, that will consist of the overall state tax and any other state or district taxes that may exist.
Example of sales tax calculation for Plano, Texas:
Texas sales tax rate – 6.25%
Collin county sales tax rate – 0%
Plano tax rate – 8.25%
Total sales tax rate – 14.50%
Step #3: file tax returns in this state; to do this correctly, you need to visit the state’s official website for particular guidelines.
Complete these three steps and have your nexus established; afterward, you can run your business in the USA, unconcerned with whether you abifr the USA tax legislation.
Ecommerce tax in the European Union
In the European Union, the tax system differs a lot from the USA. There, all products, both physical and digital, should be charged with a Value Added Tax, or VAT for short. VAT is directly added to the price of the product and should be submitted, all or a certain amount, to the government by the retailer who sells them. Therefore, if a business owner does not charge and gather VAT, they will have to pay this money from their pocket or will have a case filed against them for tax evasion.
European Union consists of 28 independent country-members, and even though they all are under single tax legislation, the VAT rates are specific for each country, usually consisting from 17 to 27 % of the product price. To learn about EU tax rates in greater detail, find at the official resources the up-to-date digital tax rates.
You are a non-EU enterprise aiming to work with European countries – how can you handle VAT?
Step #1: choose the country to base your tax operations and register your business for VAT Mini One Stop-Shop (MOSS) with the local authorities. Receive your VAT number.
Step #2: determine who your customers are (private individuals or businesses) and where they are (based on the customer’s billing address, bank location or other indicators).
Step #3: charge the EU VAT.
Step #4: create detailed VAT invoices. These documents should contain, among the general info about your business, your VAT number and VAT rate your charge. The invoices must be kept for 5 years.
Step #5: submit your VAT returns each quarter to the local MOSS; the sum should be converted into a single currency of your MOSS.
After completing these steps, you have an established mechanism of working with EU taxes and can run your business in good conscience.
Magento 2: Working with taxes
With Magento ecommerce platform, you need no additional tax and finances management tool. Magento has a great number of basic and advanced tax management functionalities and features that will assist the store admin in his ecommerce journey and make the complicated tax management more orderly and clear for him. Moreover, the platform provides for the creation of versatile tax rules and conditions, allowing to set up diverse and varied taxes for different customers, products or countries.
This is the Magento tax guide, and from it you will learn the basics of Magento tax management – what are tax rules, tax classes, fixed product taxes and VAT, and how to set them up for your online store.
Magento tax rules
Tax rules are generated based on product class of a purchased item, customer class of the person making a purchase and tax rates. Magento analyzes all these three indexes as well as the location of a customer, according to their shipping or billing address, and calculates the final tax rate.
How to create a tax rule in Magento
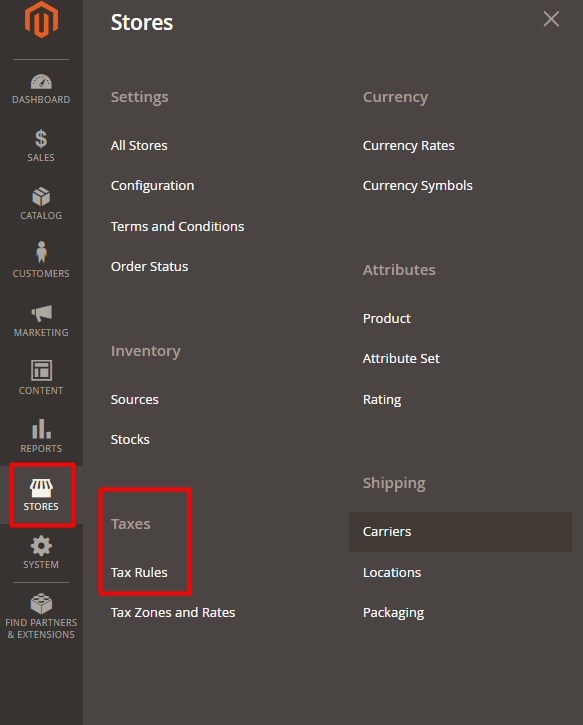
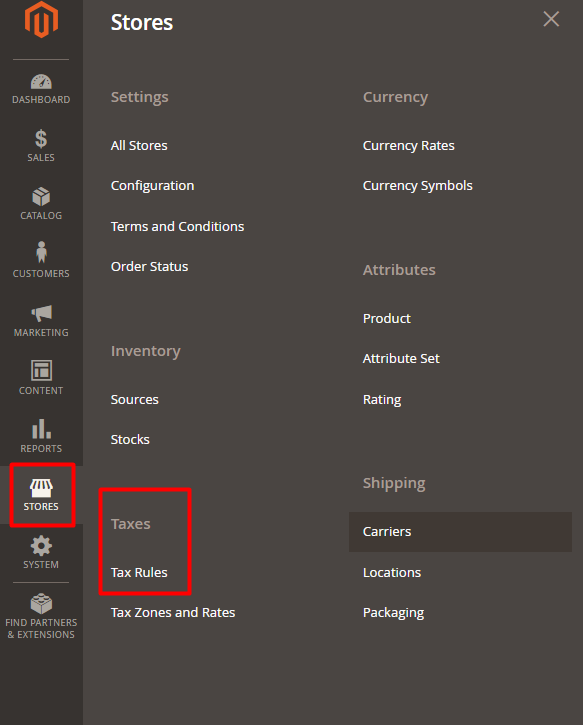
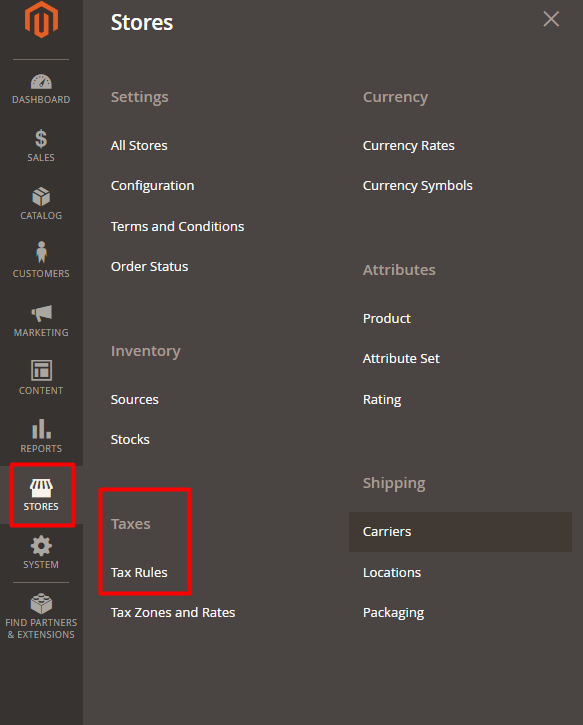
Step #1: log into the admin panel and navigate to Stores -> Taxes -> Tax Rules.
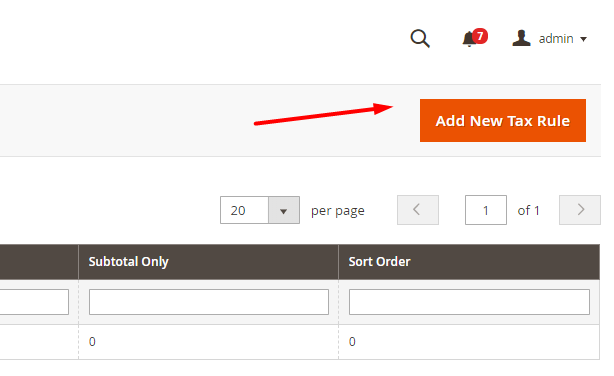
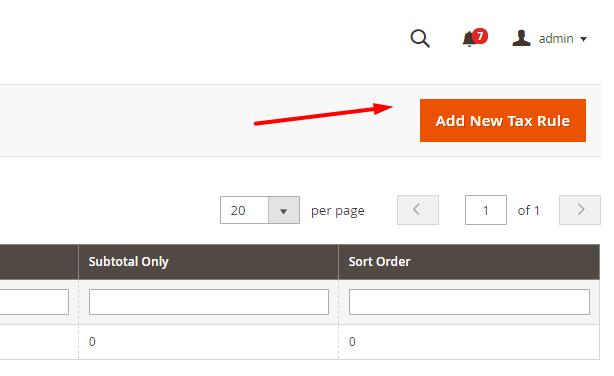
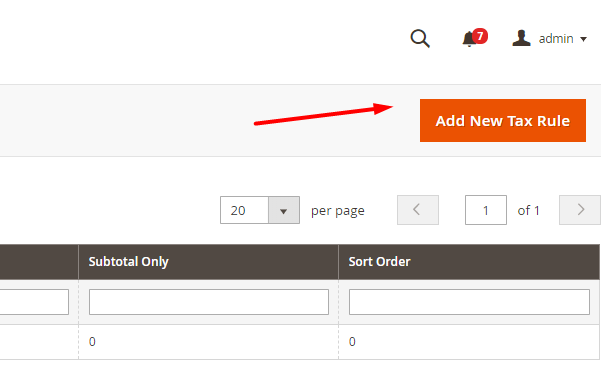
Step #2: press the Add new tax rule button in the upper right corner of the page.
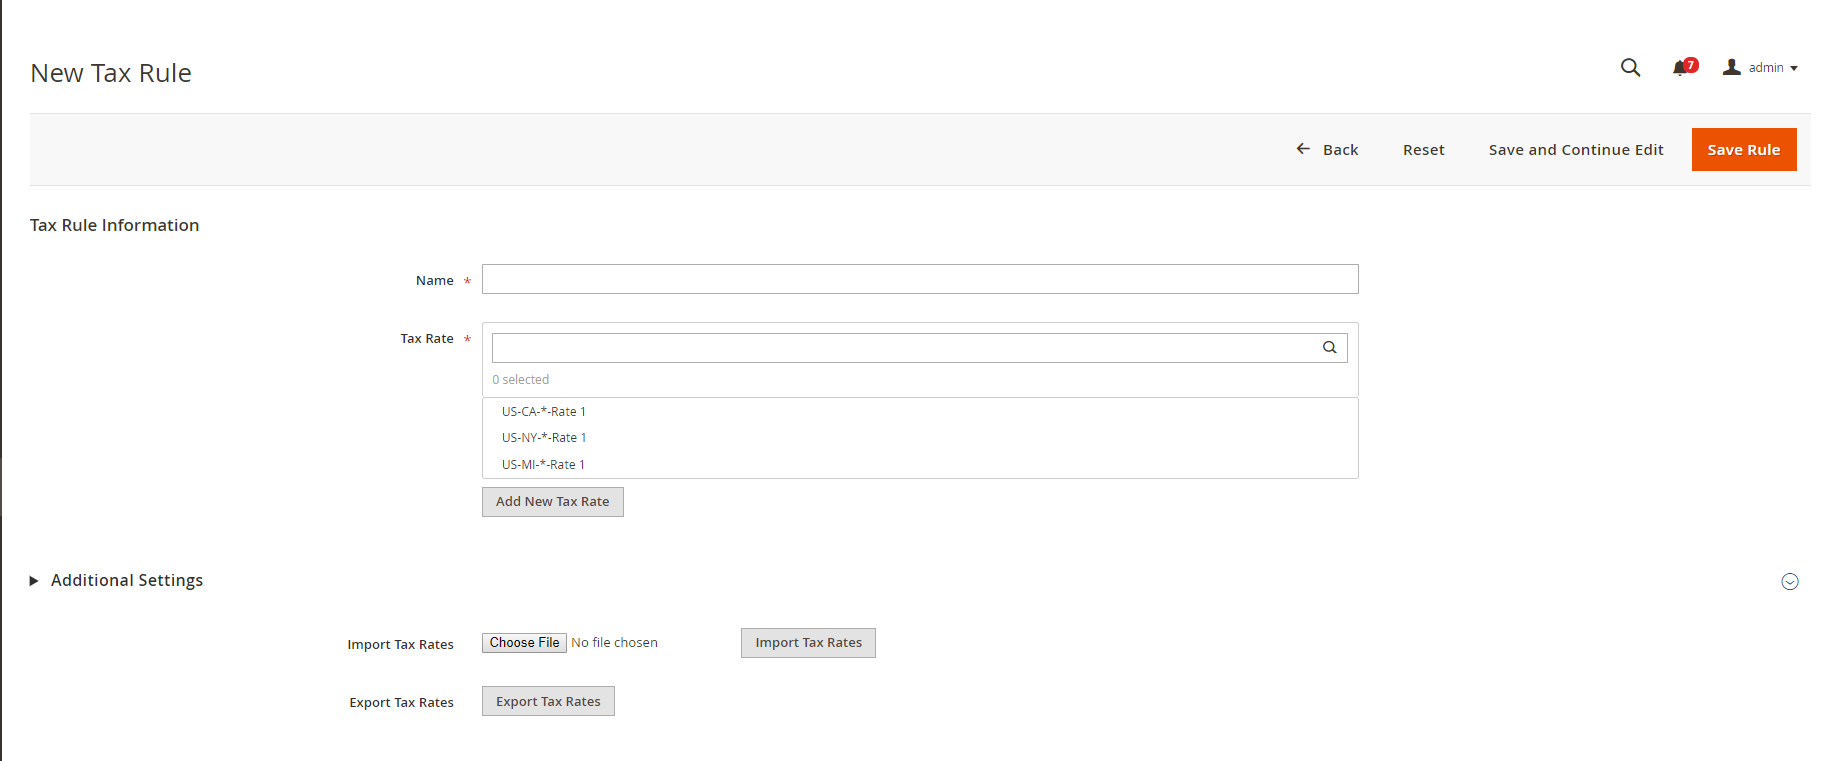
Step #3: complete the Tax Rule Information.
You need to fill in the following required fields:
- Name of the tax rule,
- Tax Rate that will apply to the rule. You can select from a drop down list of existing tax rates, configure them by hovering your mouse over a certain rule and clicking the edit sign or click Add New Tax Rate button below the field.
As you press Edit at a tax rule, you get to the configuration menu with the following fields:
- Tax Identifier – the tax rule name traditionally containing, for convenience’s sake, the name of the county or region it is applied to.
- Zip/Post is Range – by enabling this field, you can set up the application of the Tax Rule zip or post-code-wise in the Range From – Range To fields.
- Zip/Post Code – appears when the previous field is disabled. Here, you fill a particular Zip Code you rule will apply to.

- State – relevant only if you set up the USA as a country.
- Country – select the country the rule applies.
- Rate Percent – the percentage of the tax imposed on the purchase.
Press Save in the upper right corner to keep the changes.
If you decide to create a brand-new rule, you will get the following configuration menu that you need to fill in anew. Having filled in all the required fields, press Save.
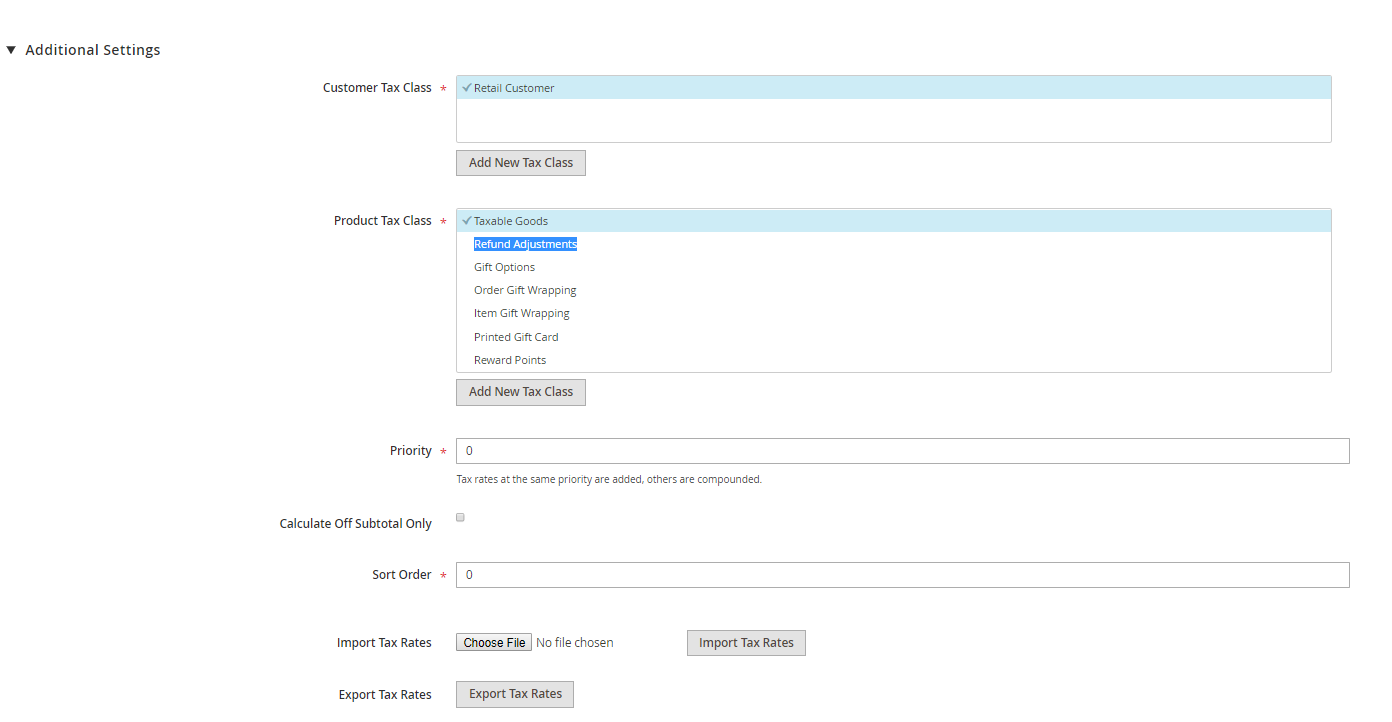
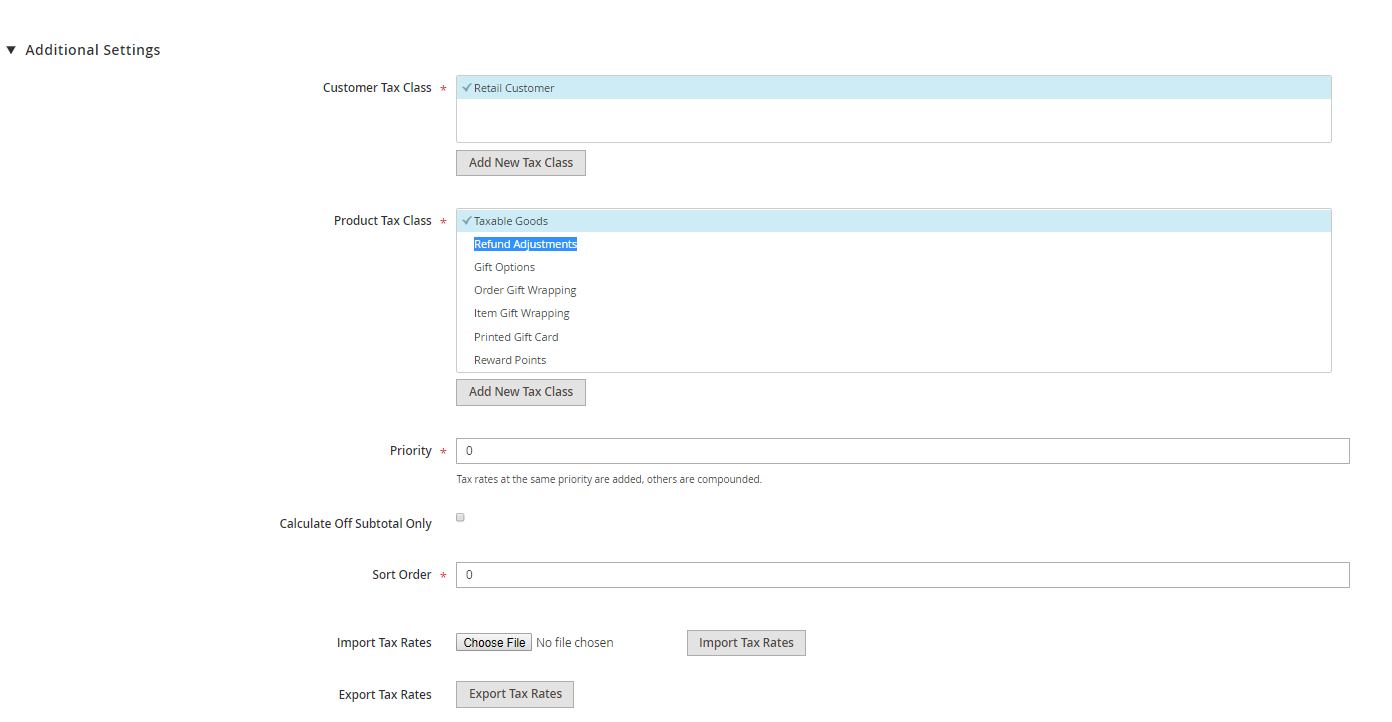
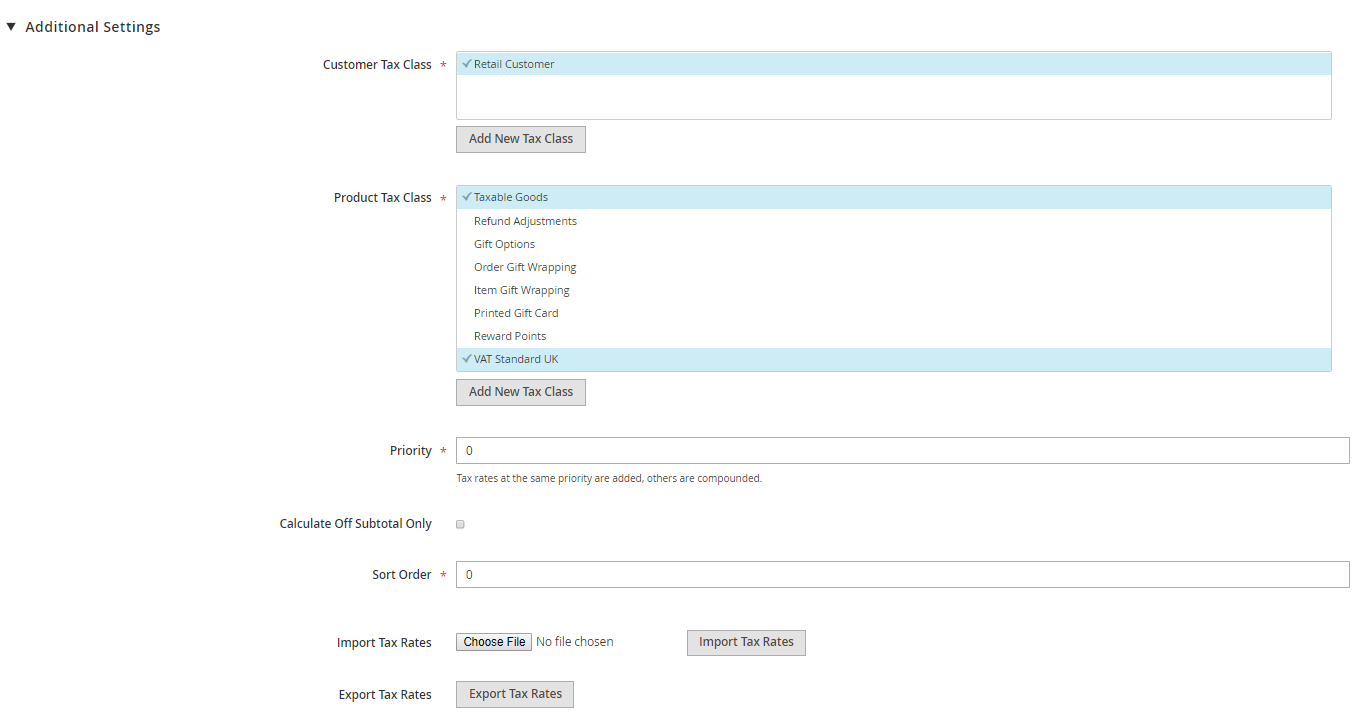
Below you will find Additional Settings menu, containing the following fields:
- Customer Tax Class – you can select from the existing ones, edit them or press Add New Class Tax to create a new customer tax class.
- Product Tax Class – select from the list of the existing ones, edit them or create a brand new product tax class by pressing the button below.
- Priority – indicate the rule priority in case more than one tax will apply. Taxes with the same priority will add up together, the taxes with different priorities will be compounded.
- Calculate Off Subtotal Only – mark the checkbox to base taxes on the order subtotal.
- Sort Order – the order of the tax rule in the list among the other.
You can Import Tax Rates in the CSV table format, as well as Export Tax Rates, also in the CSV format.
What are tax classes is Magento
Above was mentioned such a category as tax classes, and if you have little experience with Magento tax configurations, this aspect might be a bit confusing. So, here is an explanation.
To assign a tax, Magento system needs to analyze a certain data about the order, in particular customer info, what product is being ordered and where and how it needs to be delivered. To simplify this process and make it more uniform and to correctly follow a range of tax legislative rules (for instance, in one country clothes are not taxed, but food is, or, in another country, wholesale retail is subject to special tax cuts), you can assign certain tax classes to customers, products, and shipping, dividing such vast information into clear categories, or classes.
How to configure tax classes in Magento
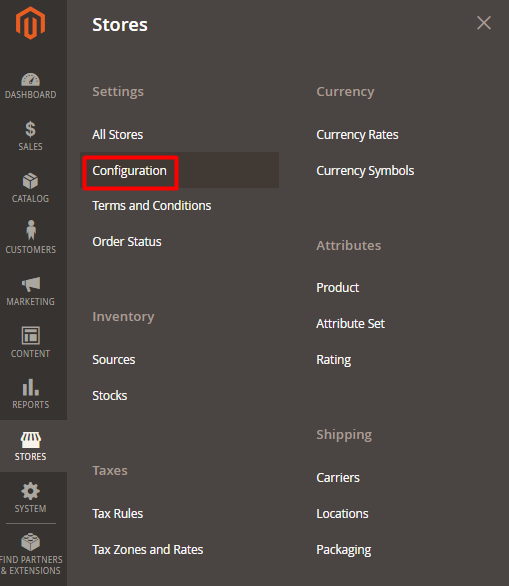
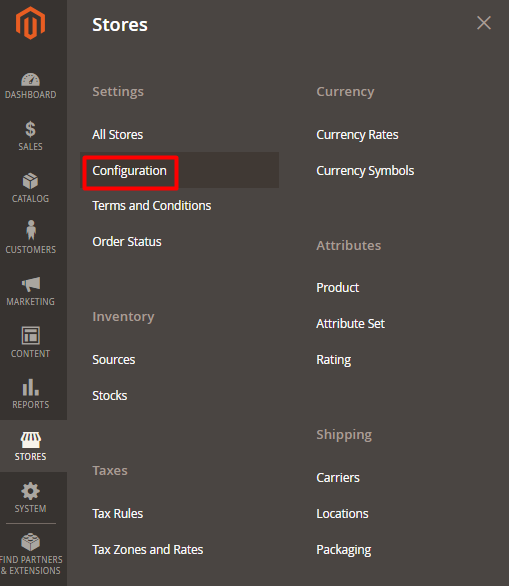
Step #1: navigate to Stores -> Settings -> Configuration.
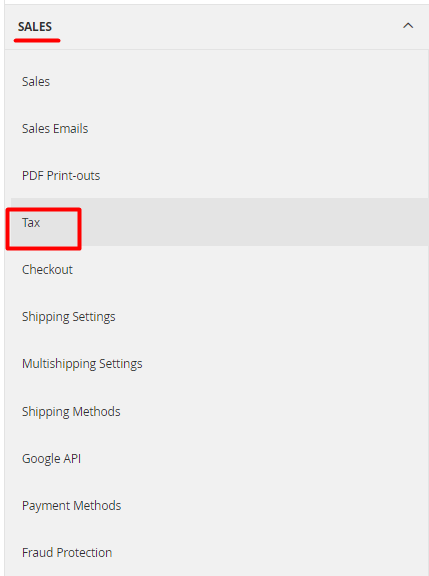
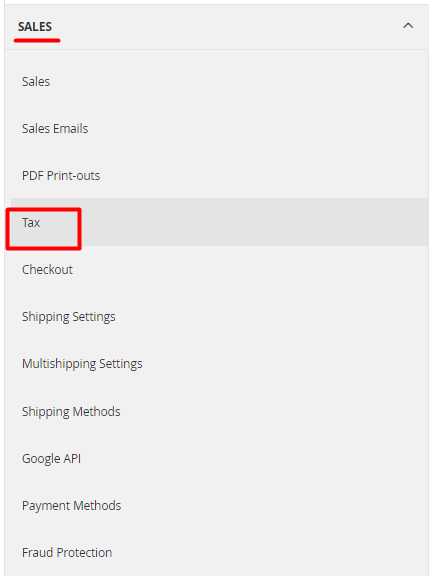
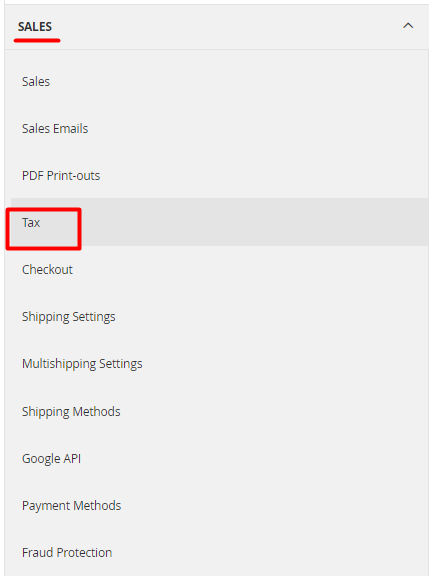
Step #2: expand the Sales section and select Tax.
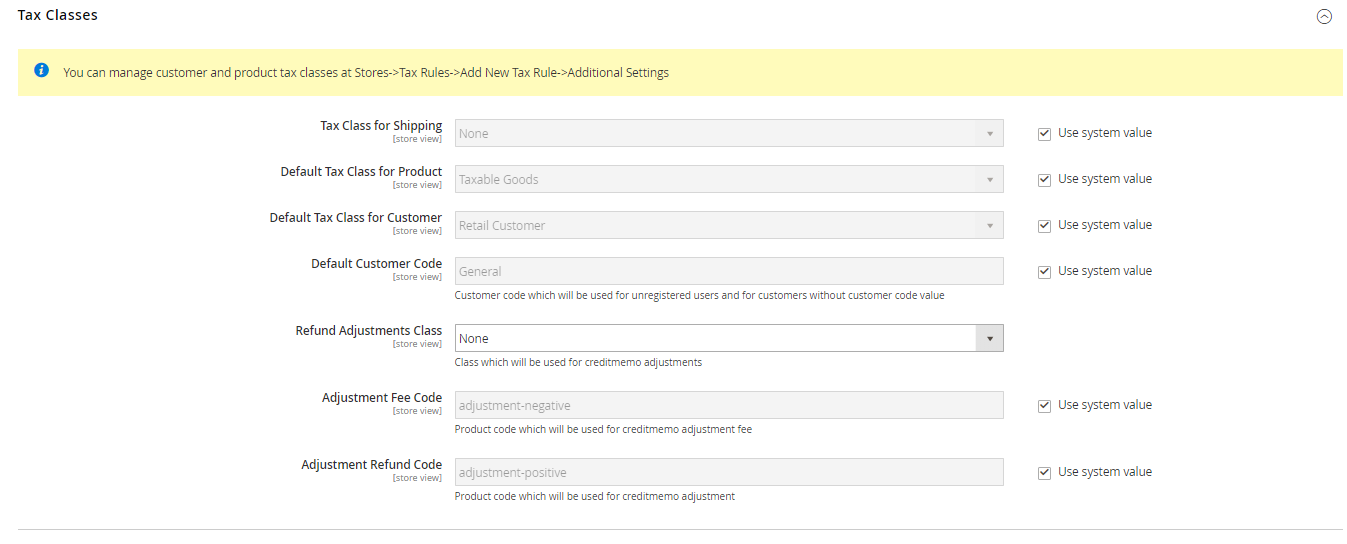
Step #3: expand the Tax Classes section.
Step #4: set up the following fields:
- Tax Class for Shipping
- Default Tax Class for Product
- Default Tax Class for Customer
Step #5: press Save Config when done to keep changes.
How to add new tax classes in Magento 2
Step #1: navigate to Stores -> Taxes -> Tax Rules.
Step #2: press Add New Tax Rule.
Step #3: expand the Additional Settings and press Add New Tax Class below the Customer Tax Class field.
Step #4: enter the new class name in the field that appeared.
Step #5: press Add New Tax Class below the Product Tax Class.

Step #6: enter the new class name in the field that appeared.
How to add default tax destination in Magento 2
Default tax destinations include the information on the country, state, and ZIP or postal code, used to calculate taxes.
Step #1: navigate to Stores -> Settings -> Configuration.
Step #2: expand the Sales section and press Tax.
Step #3: expand the Default Tax Destination Calculation and set up the following parameters:
- Default Country – the country tax calculations are based upon,
- Default State – the province, state or any other administrative division tax calculations are based upon,
- Default Post Code – zip or postal code used for tax calculations.
Step #4: when finished configuration, press Save Config.
Fixed Product Tax in Magento 2
Some countries’ jurisdictions require that a fixed tax would be imposed on certain products. Calculation methods for such taxes vary: some are fixed on an item level, while some are a certain percent of the product value. Different countries’ legislation also rules whether or not the fixed product tax be added to the product cost directly or revealed when customers proceed to the checkout. Therefore, as a merchant, you must carefully study these rules and diligently follow them. In European countries, such taxes are set up by Waste Electrical and Electronic Equipment Directive (WEEE) tax and mostly associated with ecologically harmful items.
All in all, we recommend to reflect the fixed product tax directly at the product page, or at least to notify the customers about it, if you are unwilling to provide the tax number at the product page. In case a customer is caught off guard with an additional cost he is obliged to pay, this will naturally result in a high percentage of cart abandonment, which is, obviously, an unfavorable outcome.
How to enable fixed product tax in Magento 2
To enable fixed product tax, follow these steps.
Step #1: navigate to Stores -> Settings -> Configurations.
Step #2: expand the Sales tab and press Tax.
Step #3: scroll down to Fixed Product Taxes and expand it.
Step #4: set Enable FPT at Yes.
Step #5: optionally, you can enable Display of FPT on Product View Page, In Sales Modules and In Emails to increase the visibility of the tax. You can allow to Apply Tax to FPT and Include FPT In Subtotal at your choice.
Step #6: press Save Config to keep changes.

How to create an FTP attribute
Now, you need to create an FTP attribute. Complete the following steps:
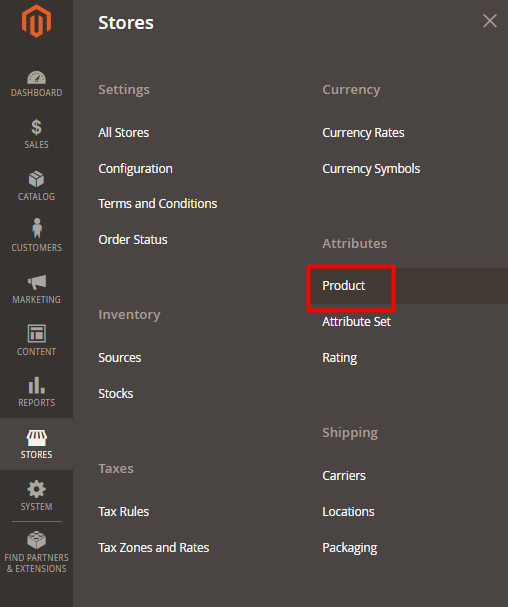
Step #1: go to Stores -> Attributes -> Product.
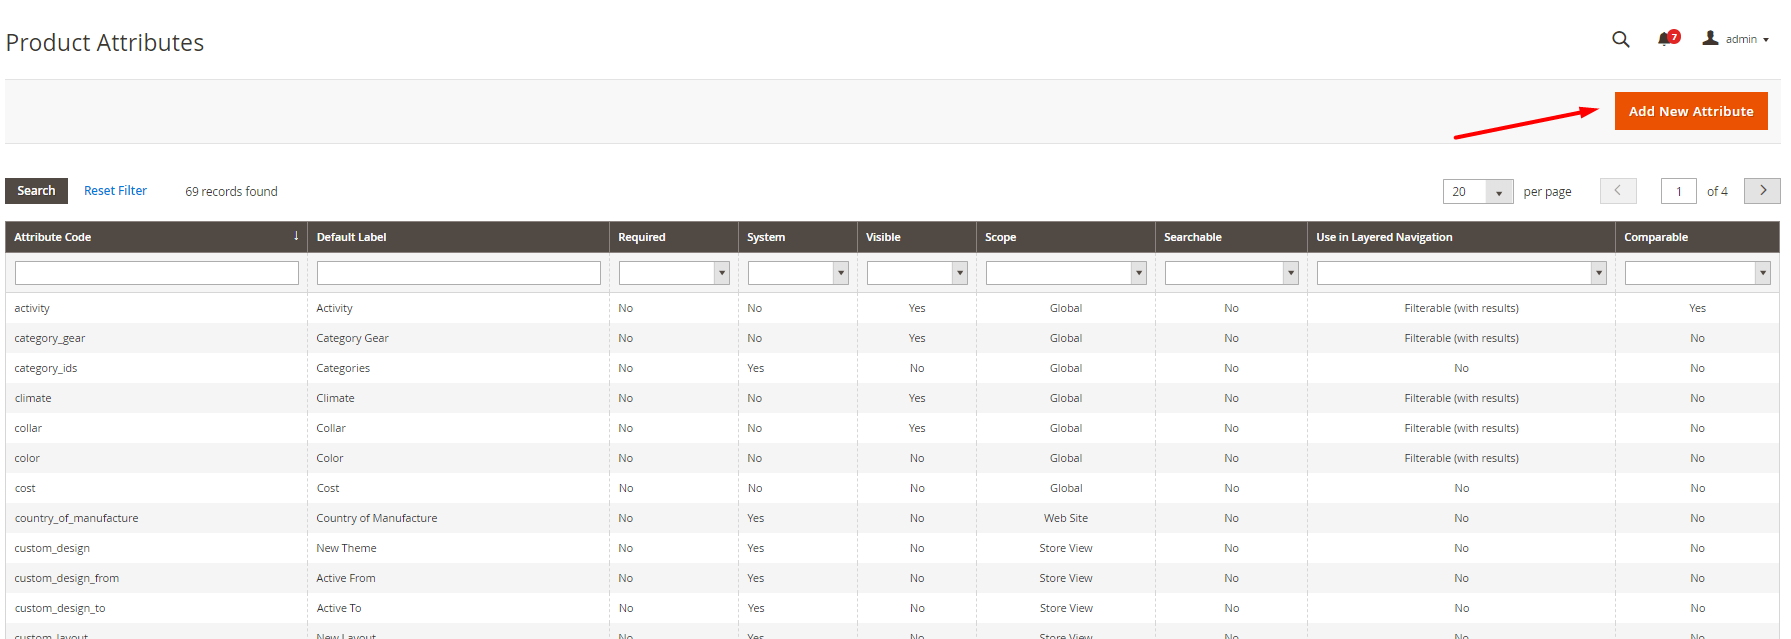
Step #2: press Add New Attribute button in the upper right corner.
Step #3: fill in the Attribute Properties:
- Default Label – the name of the attribute,
- Catalog Input Type for Store Owner – select Fixed Product Tax.
Step #4: expand the Advanced Attribute Properties and fill in the following fields:
- Attribute Code – enter a unique identification number of your attribute; it should consist of no special characters or spaces.
- Add to Column Options – set at “Yes” if you want FPT to appear in the Inventory Grid.
- Use in Filter Options – enable if you want this attribute to appear among the filter options.
Step #4: Press Save Attribute.
How to add the FPT attribute to an attribute set
Next, complete these set of actions to add the fixed product tax attribute to an attribute set.
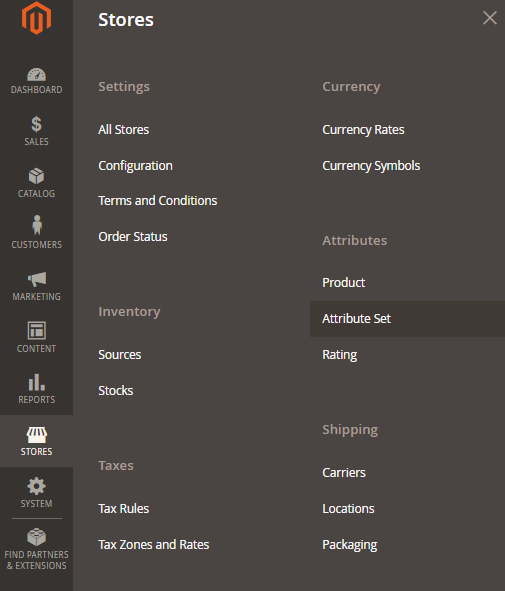
Step #1: navigate to Stores -> Attributes -> Attribute set.
Step #2: click any product’s attribute set to open it in the edit mode.
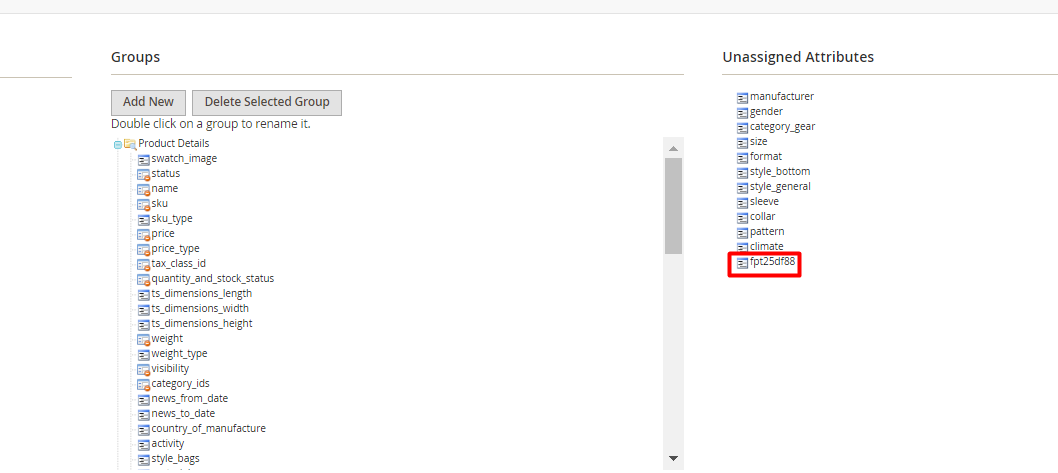
Step #3: drag the FPT attribute from the Unassigned Attributes column to Groups. Place it wherever you want it to appear in the edit mode.
Step #4: press Save in the upper right corner.
Repeat this course of actions for each attribute set you want to add the FPT attribute to.
How to apply FPT to specific products
The final step is adding FPT to specific products.
Step #1: navigate to Products -> Inventory -> Catalog.
Step #2: open the product of your choice in the edit mode.
Step #3: scroll to the FPT section and press Add Tax button.
Step #4: perform the following configurations:
- Website – select the store this tax will apply to,
- Country/State – set up the region the tax will apply to,
- Tax – enter the fixed product tax percentage as a decimal number.
Step #5: press Save when the configuration is completed.
How to set up VAT in Magento 2
In Magento admin panel, you can set up for a value-added tax to be automatically charged, yet only if the customer and the webstore are located in the same country.
Step #1: validate your VAT number.
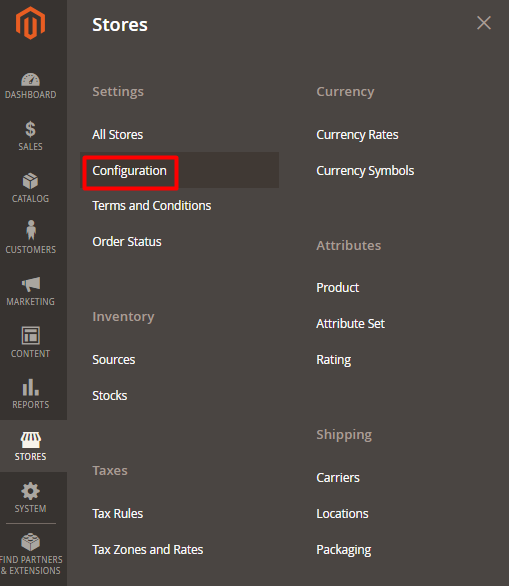
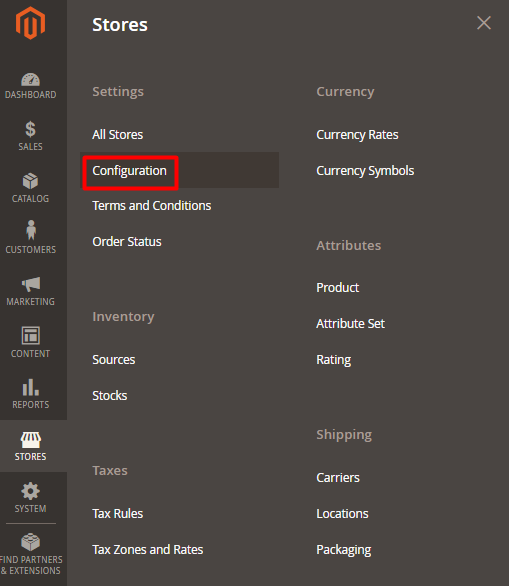
Log into the admin panel and navigate to Stores -> Settings -> Configuration.
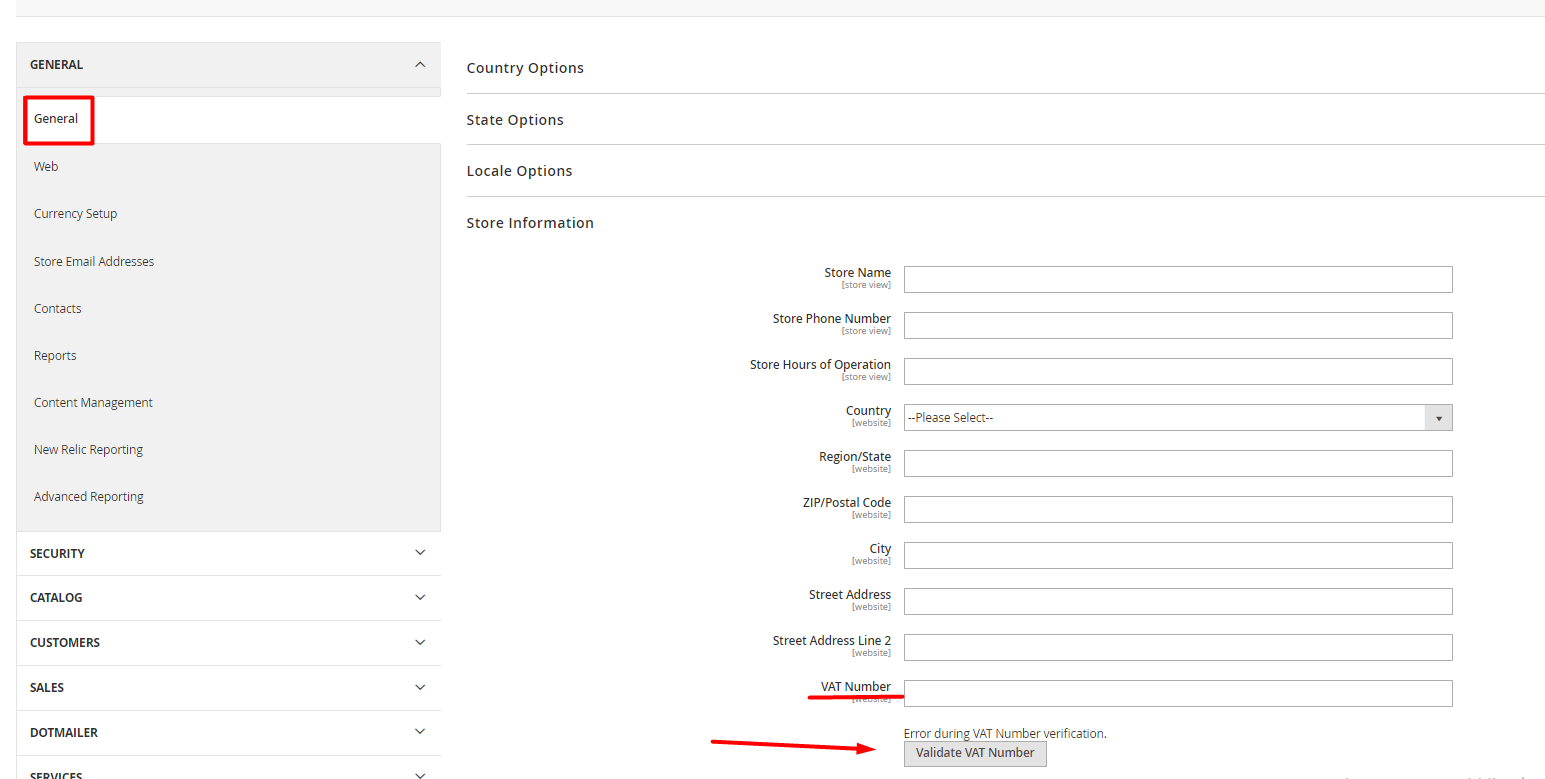
In the General tab, select General and expand Store Information.
Enter your VAT Number in the corresponding field and press Validate VAT number button below.
Step #2: validate customer information.
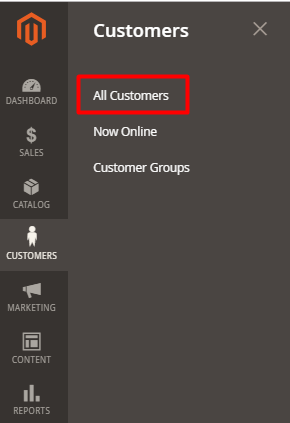
Navigate to Customers -> All customers.
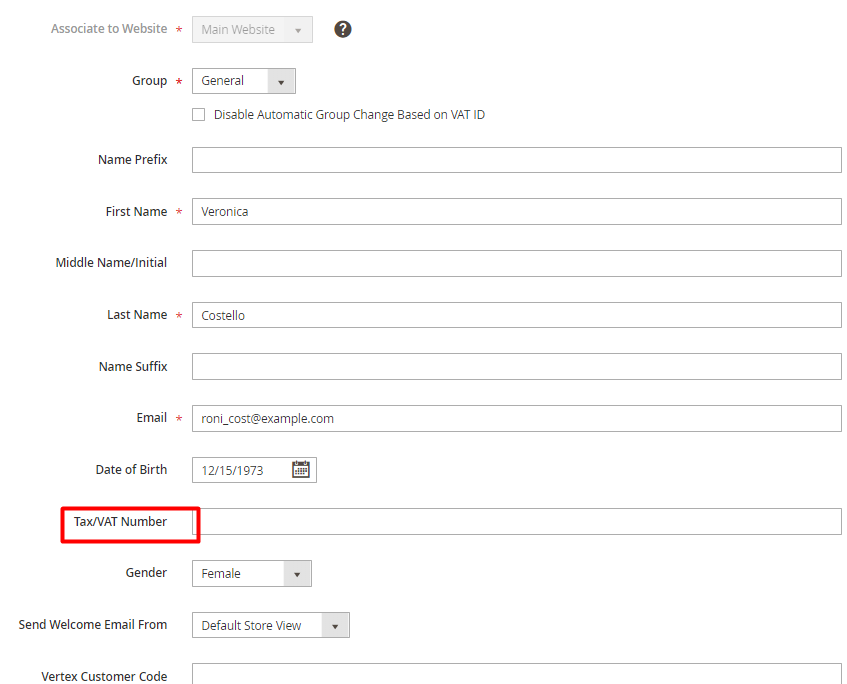
Press Edit at any customer profile you wish to add a VAT number to.
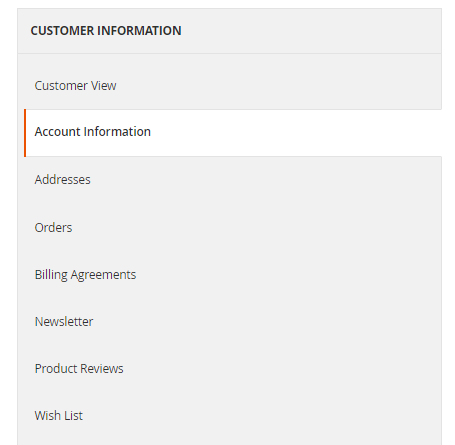
Open the Account Information tab.
Enter the VAT number assigned to the customer to the Tax/VAT Number field.
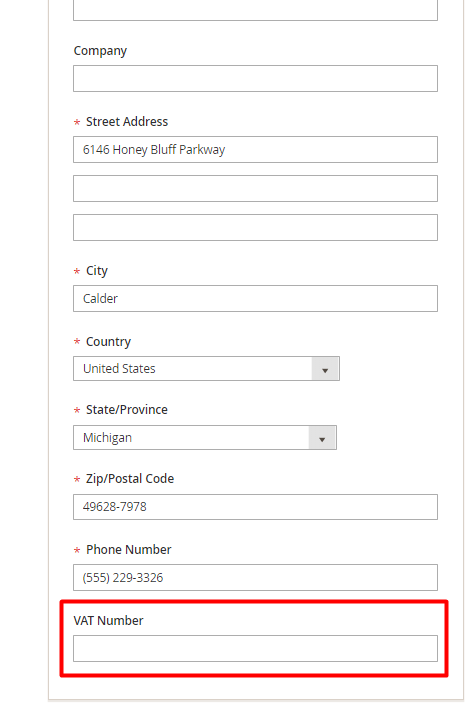
Open the Addresses tab and enter the VAT number to the corresponding field.
Press Save Customer.
Go to Stores -> Settings -> Configuration.
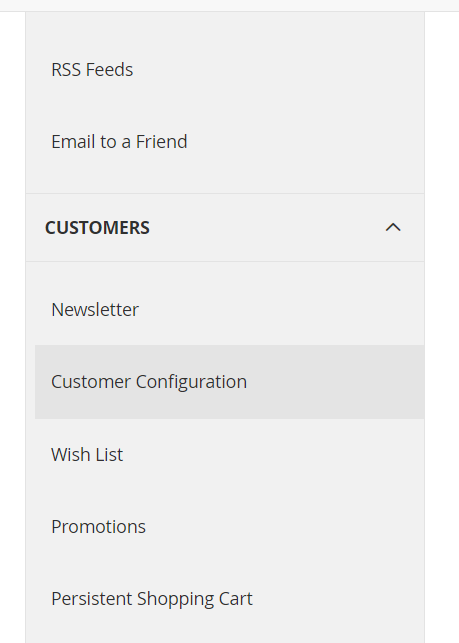
Expand the customer tab and select Customer Configuration.
Open Create New Account Options and enable the following fields: Default Value for Disable Automatic Group Changes Based on VAT ID and Show VAT Number on Storefront.
Press Save Config.
Step #3: set up tax zones and rates.
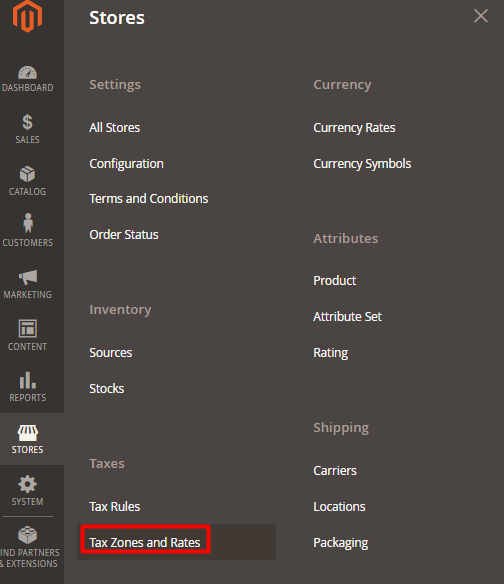
Navigate to Stores -> Tax -> Tax Zones & Rates.
Press Add New Tax Rate button.
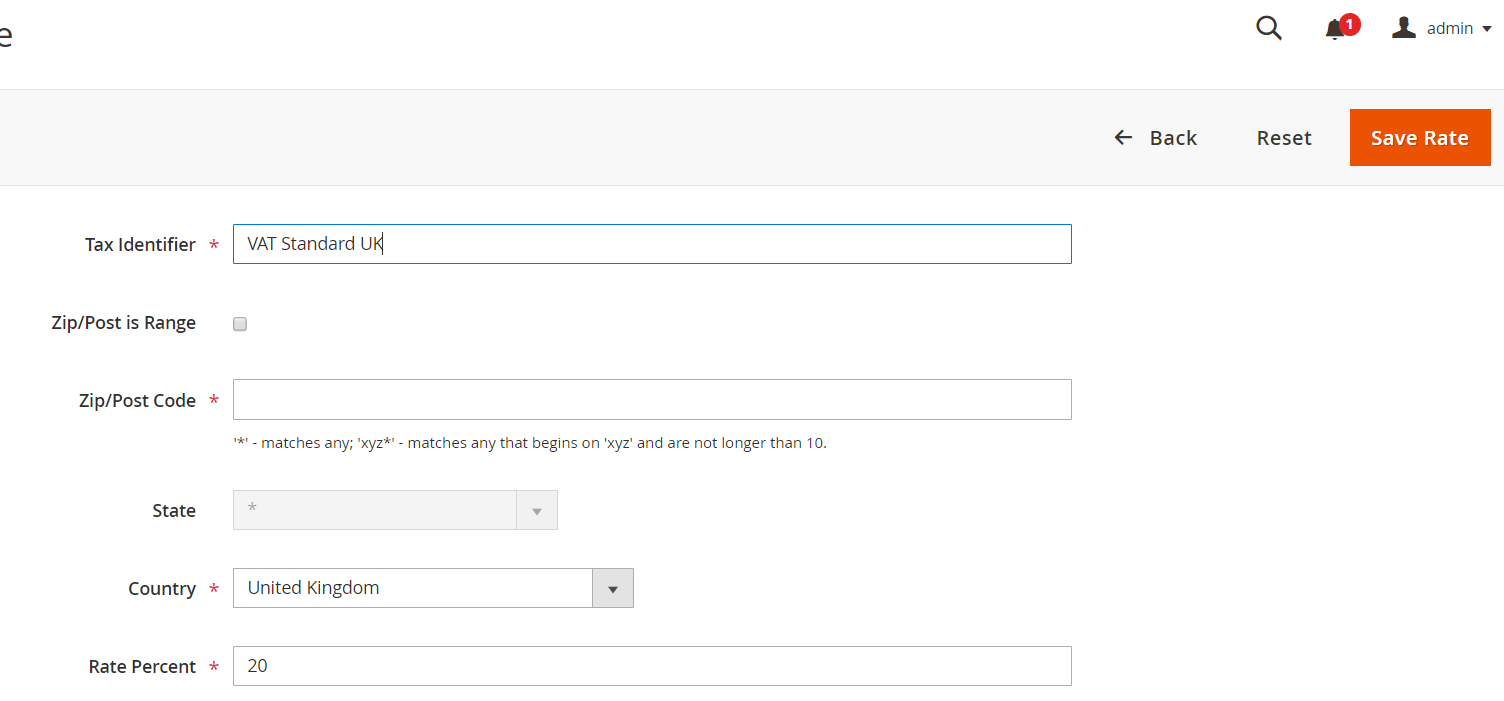
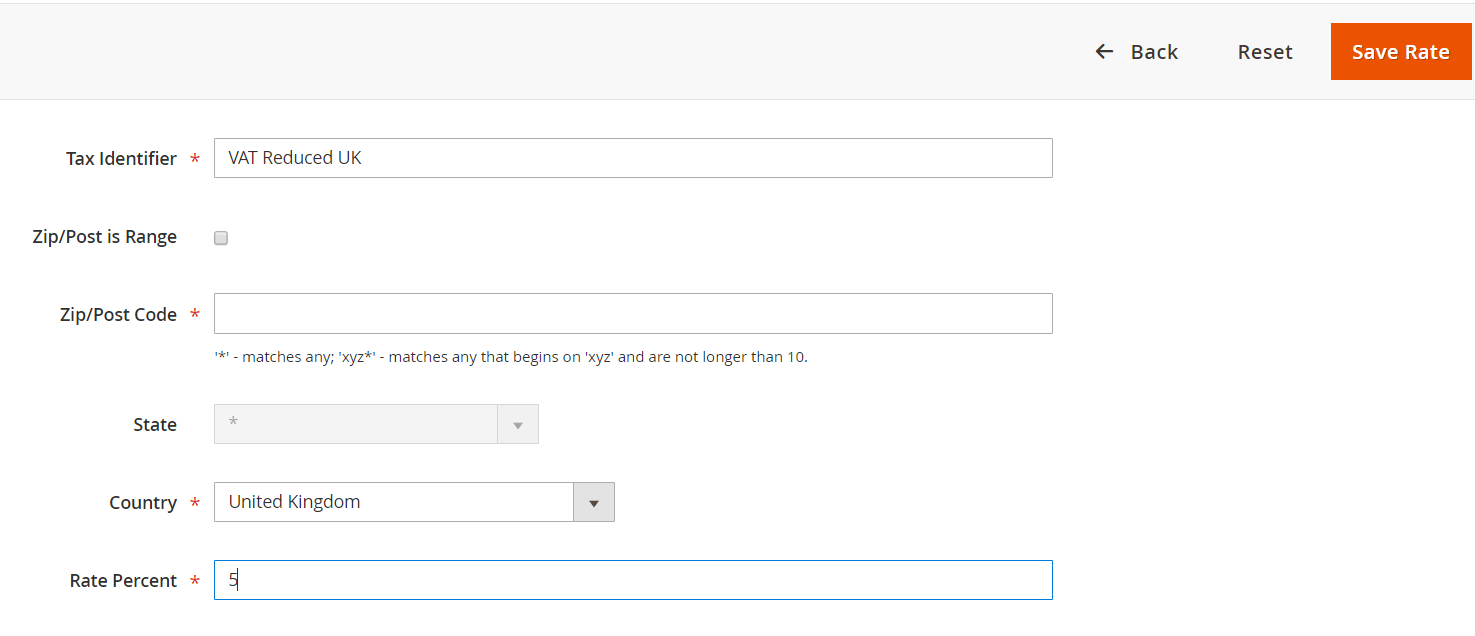
For the sake of demonstration, we create the VAT Standard UK and VAT Reduced UK tax rates; in your turn, you can create the tax rates with whichever rate percent configurations and for whichever countries you need.
Fill in the following fields:
- Tax Identifier
- Zip/Post is Range
- Zip/Post Code
- State
- Country
- Rate Percent
Press Save Rate for each new rate in the upper right corner.
Step #5: set up tax rules.
Navigate to Stores -> Tax -> Tax Rules.
Press Add New Tax Rule button.
Set up the following fields:
- Name
- Tax Rate – add the one you have created for VAT.

- Customer Tax Class – Retail Customer,
- Product Tax Class – VAT Standard UK.
Press Save Rule button in the upper right corner.
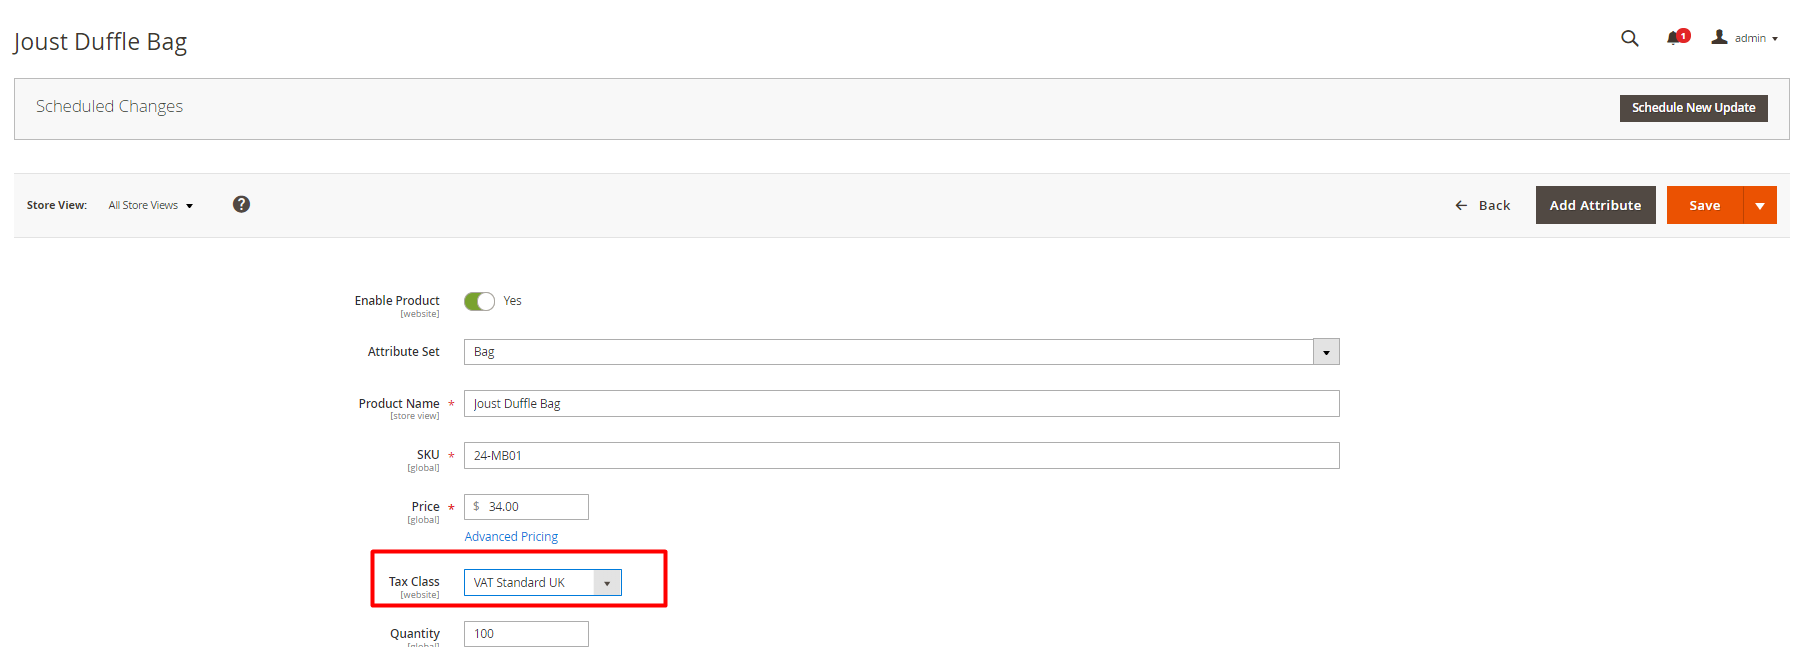
Step #6: apply the tax to the product.
Navigate to Catalog -> Products.
Open a product you want to add the tax to in the edit mode. In the Tax Class drop-down list, select your VAT class.
Press Save.
Wrapping it up
We hope that this guide laid the foundation for your further successful tax management in Magento. Stay tuned for more advanced guides on tax and finances in Magento. If you have any questions or comments, feel free to leave them down below.
Looking for an expert Magento development team? Turn to BelVG for excellent service.

