Every time before testing, the necessity to create user accounts, multilevel catalogs, items with specific characteristics and other stuff naturally arises. It sometimes takes a lot of time. In this article, I want to share my timesaving experience of working with repeated actions.
We of course can use same Magento, simply switching between modules every time. There is, however, no guarantee that previous module hasn’t left footprints impacting badly on new module. For proper testing, we want to use “blank” Magento for every module.
Timesavers should consider having Magento pre-installed. The platform should have all the necessary content and configurations to be copied for every new project. Let me illustrate it with an example of how we’ve organized Magento test preparation process here in BelVG.
The first thing to do is to install the version control system. I’ll describe management with Git in this example. Documentation on this VCS can be downloaded here http://git-scm.com. Next, install modgit tool on the server. You can find it here https://github.com/jreinke/modgit. It is easy-to-use. Because of the limited number of commands it simplifies testers work with repository. We can now create the pre-installed Magento repository.
If you have never connected server from your computer with a command line, it would be necessary to install the additional tool. It can be downloaded from http://www.openssh.com.
Let’s begin with creating a folder on the test server. In this folder, execute the Git initialization command. Open the command line (Start -> Run -> cmd). In the line, execute the following commands:
- ssh [email protected] (enters the testserver.com server using username with the help of ssh protocol)
- mkdir folder/ (creates a folder named “folder”)
- cd folder/ (opens a folder named “folder”)
- git init (initializes an empty git repository in the current folder)
As a consequence, “Initialized empty Git repository in /… “ will be displayed and a hidden “.git” folder will be created in your folder.
Now install Magento into our folder, following the standard procedure, and create the databace. It is of first importance that Git repository should be first initialized in the folder and only after that Magento should be installed there. This has to do with the fact that Git repository can be only initialized into an empty folder.
After you fill Magento with necessary content, create a database dump and record all the changes in your repository. The following commands should therefor be executed from our folder on the server:
- mysqldump -u user_name –p password db_name > dump_name.sql (enters MySQL using user_name and passwordand
creates a db_name database dump in the current folder, named dump_name.sql) - git add . (adds current folder content to the repository)
- git commit –m “first commit” (commits changes in repository and makes them available for download. In the current example, first commit is text of your comment, so it should be quoted)
So now we have the pre-installed Magento. Its copy is stored in the repository. If you need it to test a module, simply clone it and upload the dump to the empty database.
First, use command line to enter the folder you want to clone Magento into and execute the modgit initialization command:
- ssh [email protected]
- cd magento/
- modgit init
- modgit clone magento1 ~/public_html/folder/ (creates the clone under the name of magento1 from the repository in ~/public_html/folder/)
Do not close the command line and do not enter another catalog after the cloning is finished. We still have things to do in the current directory.
Magento files, database dump and .modgit folder will now be located in our magento folder.
modgit init command results in .modgit folder. Database dump is cloned into the current folder every time for further export to the new base convenience only. You, of course, can specify the absolute path to the folder where we took the clone as the export takes place; however, it seems inconvenient for me.
Let’s now create a new base and export our dump there. We may also need to change our new folder access rights. In the command line, enter the following:
- mysql –u user_name –p password new_db_name<dump.sql (enters MySQL using user_name and password and exports dump.sql into the new base, named new_db_name)
- chmod –R 0777 . (sets all permissions for the current folder)
Let’s now enter our new base and change web/unsecure/base_url and web/secure/base_url values to other valid ones in the core_config_data table.
In this example we will change it to http://testserver.com/magento/. This is your new Magento URL.
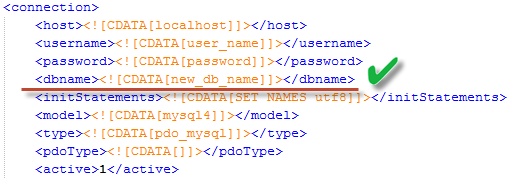
All we have to do now is to assign the cloned store a proper database. In order to do that, find the configuration file in magento/app/etc/local.xml and change its base to your one.
We now can use our cloned Magento in the browser and install the module on the platform. If your company developers use Git, module can also be installed with modgit. After testing is finished, use modgit update command to bring Magento back to initial state and recreate the database.
In this article, I wanted to describe how VCSs help save time and automatize module installation process. To use VCS you have probably to learn the operating principle of linux, Git and Modgit commands. Follow these links to find some instructions:
- http://githowto.com/
- https://github.com/jreinke/modgit/
- http://ss64.com/bash/


