In this article, we are going to discuss how you can fast and, what is especially important – safe move your Prestashop website from one server to another. We will focus on PrestaShop 1.6 and 1.7 as these two versions are the most popular and widespread today.
When should you consider moving a website from one server to another?
What should you take into account when choosing a hosting provider and server?
What are the types of servers?
What are the minimal and optimal server requirements?
How to move PrestaShop to new server
When should you consider moving a website from one server to another?
As in any other project – the goal comes first. Before getting started with a server migration, you need to assess the need for it. It is a complex process and you will have to suspend your website which can cause some financial losses, especially if you operate an online store. So, first of all, you should consider transferring PrestaShop from one server to another only when there is a clear reason.
Let’s take a look at the most common reasons for changing a server:
- Increased server rent price. If the hosting provider has raised the rent price, the website owner may want to check out the offers of other providers and transfer the website to a new server. Another option is to reduce excess server capacity if the actual burden on the website is lower than expected and not all of the resources are used.
- Not enough resources on the current server. It is the most popular reason for migration. In some cases, the website loads slowly because the server has low performance or narrow data channels. In other cases, switching a server is the solution when the website takes up all the provided disk space and it is impossible to increase the amount of space on a current server or for some reason it is not advisable to do so.
- Frequent problems with the provider or poor technical support. The website owners who need stable website performance and technical support 24/7 should consider changing the server if the current one is not able to provide it efficiently. Some providers specialize in specific platforms (as PrestaShop). It means that you can get more qualified assistance in case of a critical error on the server as well as when the errors are in the website code.
- Going live. Usually, the whole development process takes place on a weak or local server. It has to do with the fact that in developing the server is usually not loaded and there is no point in paying for unused capacity. So, basically, it means moving to a more powerful server.
What should you take into account when choosing a hosting provider and server?
- Required server performance. This variable is usually calculated from the number of requests per unit time but under certain conditions, it can also be correlated with deployed servers, with how much code was written and with how difficult data processing is. It is why you’d better choose a server with power capacity or possibility to increase it in the future. At the same time, some providers offer virtual servers with the possibility to use extra server resources at high loads but the price for such solutions is too high in most cases.
- Required disk space for storing website code, multimedia files and databases. Beware, that the dump size of the database may be much smaller than its working version. Choosing a disk, you need to calculate the optimal balance between the read/write speed and its capacity. Faster SSD disks will cost much more than regular slow HDD while having lower capacity.
- Support. It should come as no surprise that even the most reliable servers may fail or encounter software errors that require immediate correction. That’s why support is one of the most important considerations when choosing a server. Not all providers offer 24/7 customer support and you should take it into account. In some cases, hosting providers may specify support response time and you can be sure that your request will be processed during this time.
- Server’s physical location. This is significant for a website’s quick response. For example, when a server and a client are located at opposite ends of the globe, the response time can significantly impact page load speed. That’s why when the clients are located in one country, it is better to locate the server in the same country.
What are the types of servers?
When you have decided to move your running on PrestaShop website from one server to another and picked the provider, it is time to choose what server type will work best for you. Below you can find the description of web hosting types but keep in mind that not all providers offer all of them.
- Shared hosting. It is a regular solution and one of the cheapest options. If you choose this type of hosting, your website will be in one system with the other websites. It is a suitable option only for simple information sites with low traffic because shared hosting has some significant disadvantages:
- The resources are spread between all of the websites hosted on this server. If there are many of them or one of the websites is overloaded, the performance may be low or unstable from time to time.
- Security issues may occur. The websites of different clients of this hosting provider are separated only by the access rights of a specific account. If the server is hacked, all the websites hosted on this server can get under attack.
- There is highly limited control over the server settings. Most of the actions will require you to contact technical support. The same applies to additional software installation, and sometimes it is not even possible to perform it.
- VPS (virtual private server). It is the same as VDS (virtual dedicated server) – the virtual server which is one of the most popular and convenient options. VPS is a virtual emulated system on a physical server where it can co-exist with a couple of other systems of the same kind. Basically, you get your own cloud server with an opportunity to choose OS, install the necessary software and make configurations. VPS resources are provided according to your rate so you can be sure that no other website, located on the same server, will be able to use them. However, VPS has a few disadvantages. First is that you have to set up server software on your own or pay for technical support. Secondly, the visualisation system is not perfect and you may experience the reduced performance from time to time.
- Dedicated server. It is your own physical server that you can rent in a datacenter. It is the most expensive option because you rent the machine as a whole and you have to pay for its maintenance. There is a clear pro that all of the resources are yours to use but there are also some cons – the high price and configuration complexity. However, the main disadvantage of a dedicated server is that if for some reason, your software is not responding, there is a chance that you will not be able to restore the system even when the provider gives you access to the management console. Then, you will be able to solve the problem only with the help of data center technical support – their staff member will have to restore the system manually.
- Cloud. It is the most flexible solution which is getting more and more popular. It is similar to VPS, but the cloud is more secure and scalable at the same time. This solution is based on multiple servers gathered in the cloud and operating as one. It allows you to increase the server’s fault tolerance in case of errors or equipment failure as there is always a spare server which has the same data and is ready to process requests from the “broken cloud unit”. This solution can also offer a fast server deployment and server cloning which allows you to create an identical copy, for example, for development.
What are the minimal and optimal server requirements?
The minimal and optimal requirements for the server and software depend on the PrestaShop version your website runs on. You can find all of the necessary details here:
- For PrestaShop 1.6
- For PrestaShop 1.7
You should also keep in mind that a lot depends on the number of products, the website traffic and code’s quality, so sometimes it is better to opt for a more powerful server regardless of recommendations. When it comes to choosing the server, you need to take into account not only the current situation but the possible traffic growth and website expansion for at least one year ahead. In order to do this, you need to calculate your approximate traffic growth for every month and then for one year. The same calculations should be done for the disk space – you need to count how much more of the disk space your website occupies every month and how often you are going to add new multimedia and data files.
Here comes the main part – actual server migration of your PrestaShop website. Below we are going to discuss several ways for different original and target servers.
How to move PrestaShop to new server
Migration via cPanel/WHM
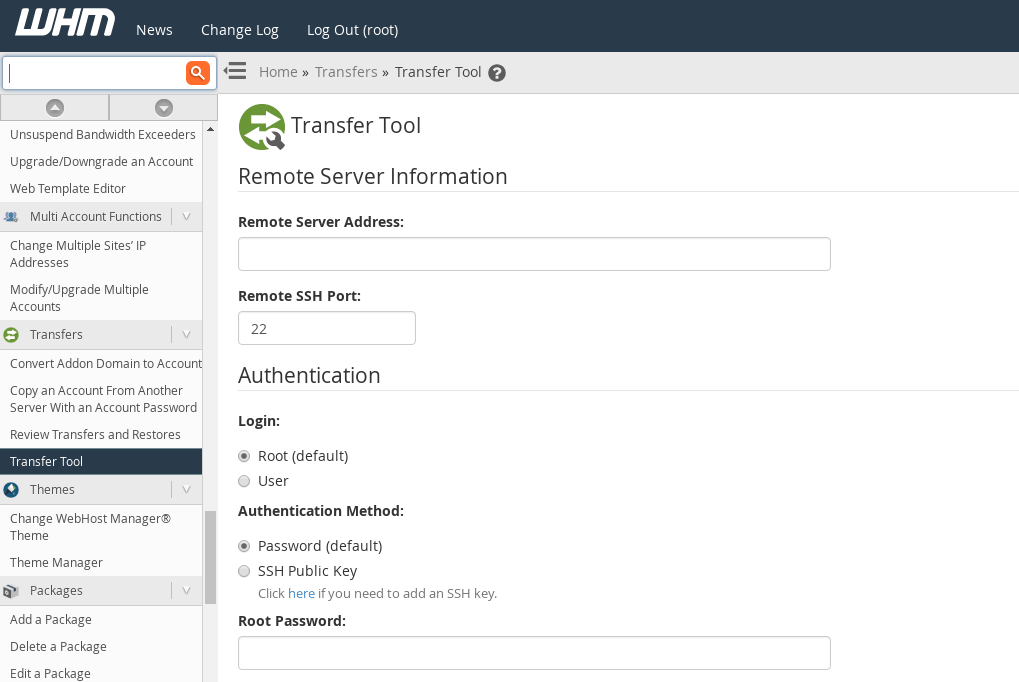
If WHM is installed on both servers, you can migrate your website using WHM Transfer Tool.
In order to do this, you should:
1. Enter the WHM panel of the final website using root access.
2. Find the Transfer Tool and set the path to the old website.
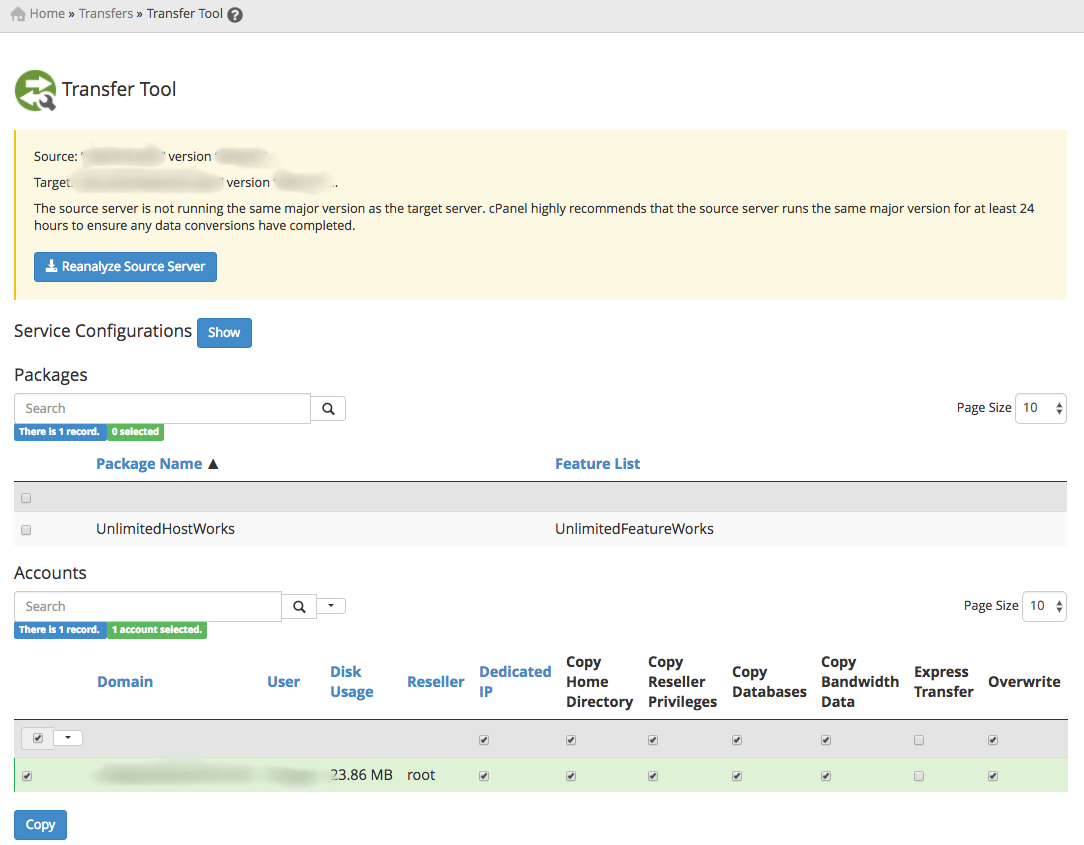
3. After you fill in the data, you can click on Fetch Account List. After that, WHM will try to access the old server and extract the information about the accounts.
4. Then, you need to choose the accounts for migration and click on Copy.
5. You should wait until the migration is over.
6. All you need to do now is to check the data after migration and set DNS for a new server.
Migration via Plesk
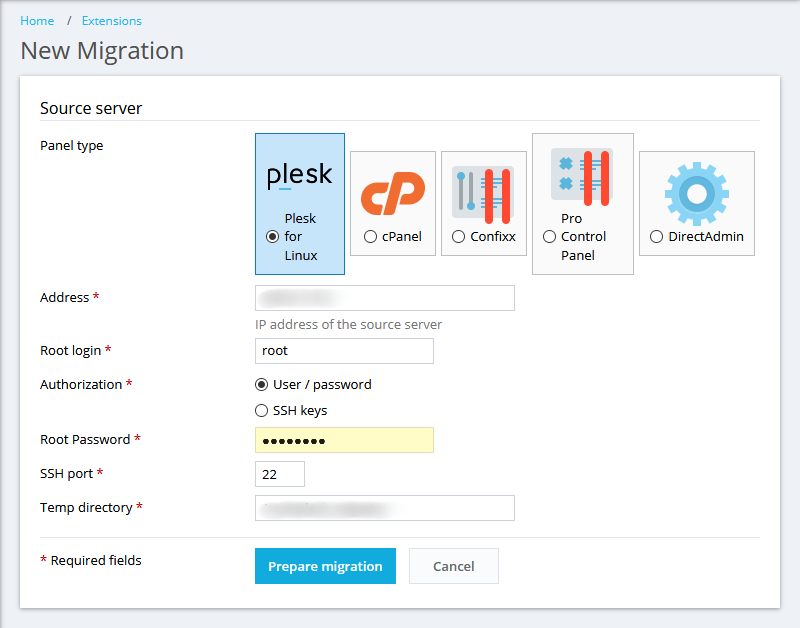
If there is a Plesk panel on both servers, you can use Plesk Migration Tool for migration (Server Management > Extensions > Plesk Migrator > Start a New Migration).
1. First, you need to set the SSH data from the old server and click on Prepare migration.
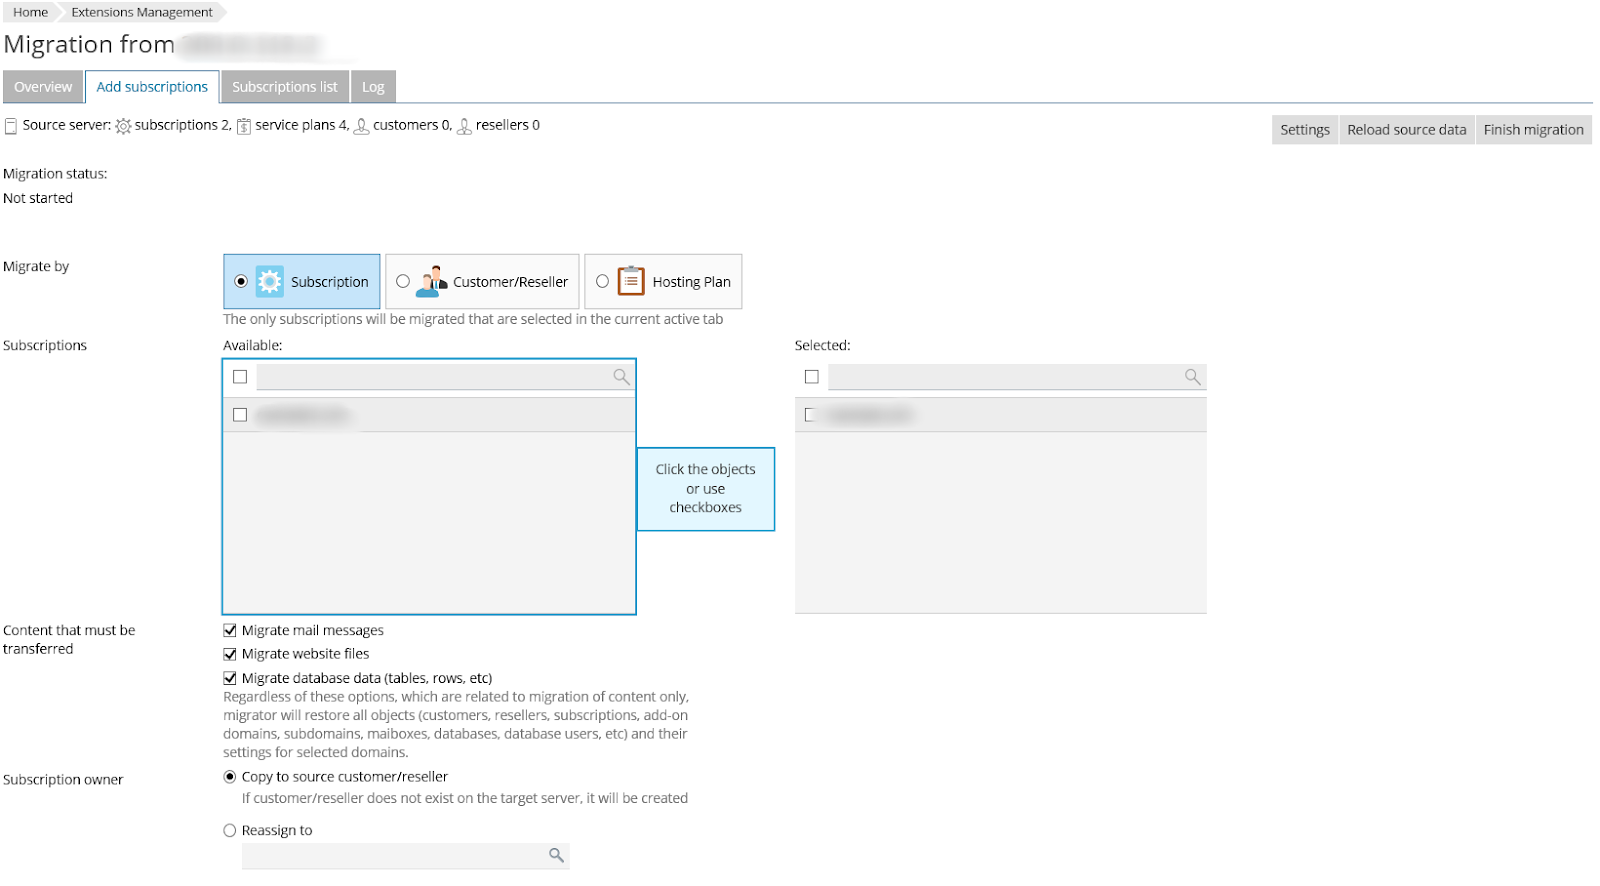
2. Then, you should choose the data for migration and click on Migrate.
3. Plesk will check the data for migration and if the check is successful, it will display the migration launch page. To start the migration, click on Start migration.
4. After the migration, you will receive a migration report. Then, you can check the data on a new server.
Manual database migration
To clean the old base from test products, the easiest way is to use the module called PrestaShop Cleaner.
Base Migration via console
To migrate the base via console, you can use the standard Linux instruments (all the variables in [] should be replaced with the necessary values. For example, [host] will be replaced with localhost if your base is installed locally):
1. First of all, let’s create a base on a new server. In order to do it, you should connect to the database using this command:
mysql -u [username] -p
2. Then, we create a base executing this command:
CREATE DATABASE [newdatabase]
CHARACTER SET utf8 COLLATE utf8_general_ci;
3. We create a base dump on the old server:
mysqldump -u root -p -h [host] [database name] > [database name].sql
4. Then we need to copy it to the new host:
scp [database name].sql [username]@[new_host]:[/path/to/database/]
5. The last step is to deploy a base on a new server:
mysql -u root -p [newdatabase] < [/path/to/database/][database_name].sql
Base Migration via cPanel
Here we repeat all the steps of the migration via console but we use the cPanel interfaces for it.
First, we create a database on a new server. In order to do it, you should proceed to Homepage → Databases → MySQL Databases.
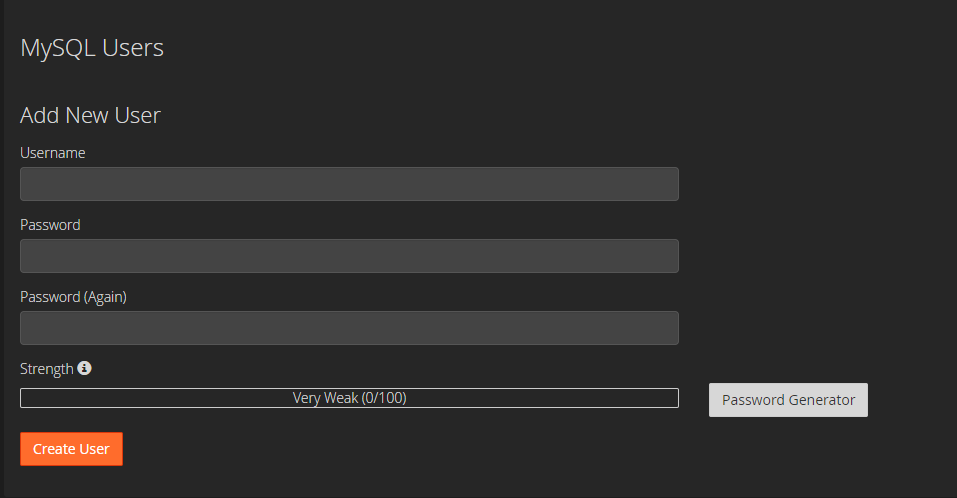
Put the database name and click on Create Database – the new database is created. Create a new user (save the username and password, you will need them for website configuration):
To create a database dump, you should use Files -> Backup. It allows downloading the last copy of a website’s database.
Here you can also restore the base using the Restore a MySQL Database field.
Migration via phpMyAdmin
Most of the modern cPanels support phpMyAdmin. If you have it, you can use to generate a database and migrate it.
To create a database on a new server, you should:
1. First, you need to authorize (sometimes it happens automatically and you just need to click on Go):
2. Proceed to Databases and set a name for a new database in Create database section, choose encoding utf8_general_ci and click on Create.
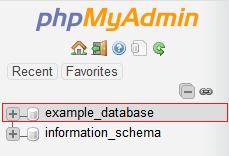
3. Then, we can create a dump on the old server. To create a dump for a database, you should pick it on left:
4. Click on Export.
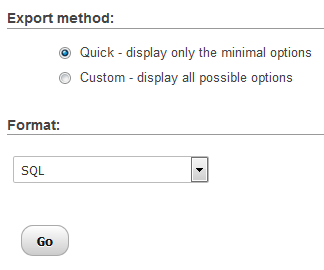
5. Select the export method and click on GO.
6. Then, the dump file of the database starts loading.
7. You need to restore this dump on a new server. You choose a database where we want to import the data.
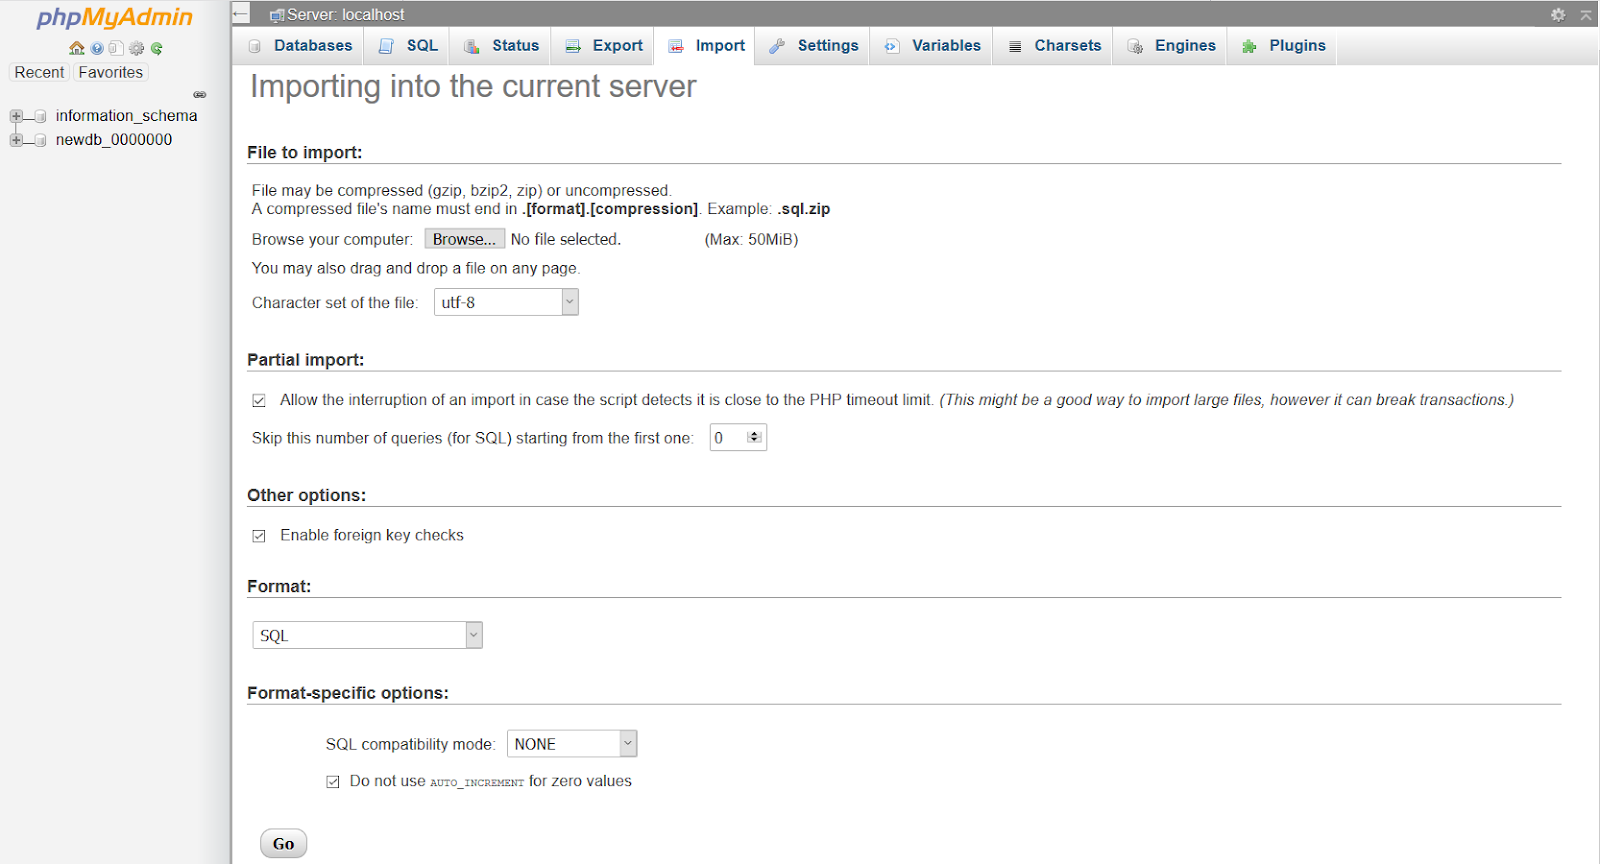
8. Select Import.
9. Choose the file for download and click on GO.
Manual files migration
Erasing unnecessary information from the website
You should delete unnecessary information from the website because it will decrease the amount of transferred data and also it is a good opportunity to finally delete outdated information if you have not done it for a while.
Partly, some data can be erased before this step (for example, test data) to decrease the website suspension time but such data as logs and cache should be managed right before the server migration.
You can safely delete:
- Test orders, test products and other unnecessary test data can be deleted via the website administration panel.
- Outdated history from the installed modules and, for example, the history of sent emails can also be deleted via the website administration panel.
- Website logs can be deleted from the directories in the root website directory. ./log, ./var/logs, ./app/logs
- Website cache. It can be deleted via the management panel or manually. The cache is located in directories ./var/cache, app/cache
- If server sessions are stored as files in the website catalog, you can also delete them.
- Compressed images (thumbnails) – PrestaShop stores all the images of all sizes used on the website. You can delete all of them except for the original images.
Migrate the files via console
To migrate the files via console, you can use the rsync tool which allows transferring files between servers fast. You need to access the new server and execute the command (changing the variables in [] to the necessary ones):
rsync -avz root@[old_host]:[/path/to/files/] [/path/to/new_server/files]
Migrate the files via cPanel
There are a few ways how you can transfer the files to your new server.
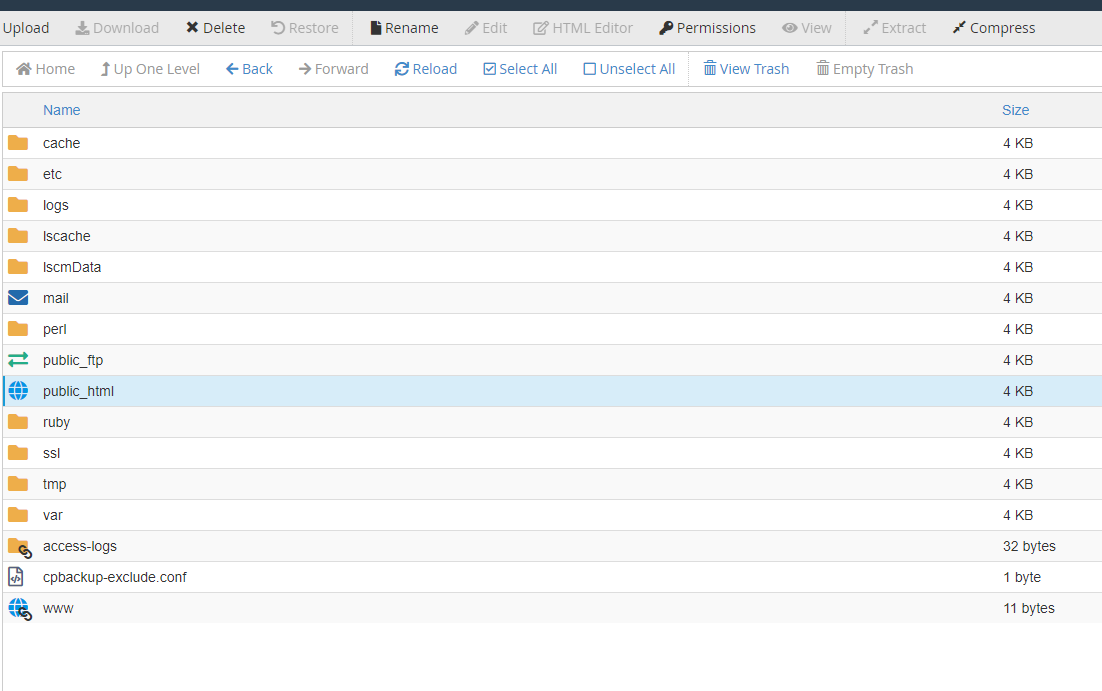
When it comes to cPanel, you need to use it to access File Manager (Homepage → Files → File Manager), select the root website directory and execute the command Compress.
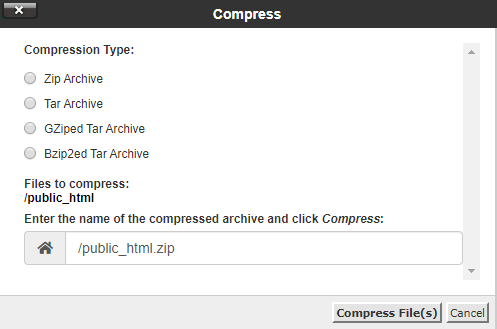
Select compression type Zip Archive, specify the archive file name and press Compress Files(s):
It will create an archive file with a full copy of your website files. Then, use the button Download to download this archive on the local computer.
Now you can download the archive on the new server and then unarchive the files in the root directory prepared for the website. For cPanel on the new server, you also need to use the file manager and click on Upload to upload the archive file on the server root directory. To unarchive the files, use Extract.
If the archive is too big to be uploaded via cPanel and in other cases when it is not possible, use FTP client.
If there are no admin panels on your servers, you will need access via SSH. Connect the server terminal, proceed to the directory where the root directory is located and execute the command:
gzip -c [directory_name] >[archive_name].gz
[directory_name] is the name of the root website directory, [archive_name] is the name of the archive that will be created. After the archive creation, download and upload it on the new server via FTP manager or via SCP (It allows transferring files via SSH in the console).
To unarchive the files from the console, execute the command:
gzip -d [archive_name].gz
The files will be unarchived in the current directory. If necessary, assign the administrator and manage access rights according to the PrestaShop documentation: directory 755 or 775, file 664 or 666.
Configuration and website testing
Depending on the PrestaShop version, you need to configure the database access settings in the configuration files (Prestashop 1.6 ./config/settings.inc.php, Prestashop 1.7 ./app/config/parameters.php) CMS. You can use a text editor from the File Manager or one of the console editors (vim. nano, mcedit).
Check the website efficiency using the temporary domain – all the website pages should open and load correctly, additionally, you should check the process of placing an order and administration panel performance.
To “explain” PrestaShop on what domain the website should work, you need to change the domain in the database. Use phpMyAdmin and replace domain and domain_ssl in the table ps_shop_url (pay attention that table prefixes may vary). Another option is to contact the base via console and run a SQL request:
UPDATE ps_shop_url
SET domain=’temporary.mysite.com’, domain_ssl=’temporary.mysite.com’
WHERE domain = ‘oldsitedomain.com’;
Temporary.mysite.com here is a temporary domain and oldsitedomain.com is the original website domain. After the tests, domain should be changed for the original one. If there are several stores with different domains on your website, you should change them one by one.
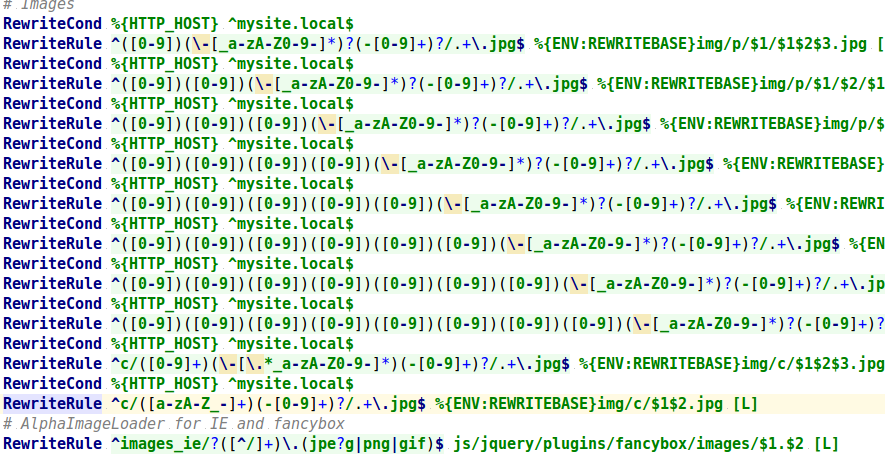
To make the images display correctly, you need to correct the .htaccess file in the website root (if you use Apache). Create a reserve copy of the file and change all of the domain accesses to the temporary domain in this file. After testing, retrieve the original file version. Be careful when editing this file:
If you encounter problems while testing, check all of the steps from the beginning, including database configuration and file and directory access rights. When you don’t have enough experience or knowledge in this field, you may need the help of a professional developer or technical support of your hosting provider.
Switch to the main domain and turn on the website
To set up the domain on the new server, you need to adjust the DNS settings.
To change DNS in Cloudflare, you should access the account and click on DNS.
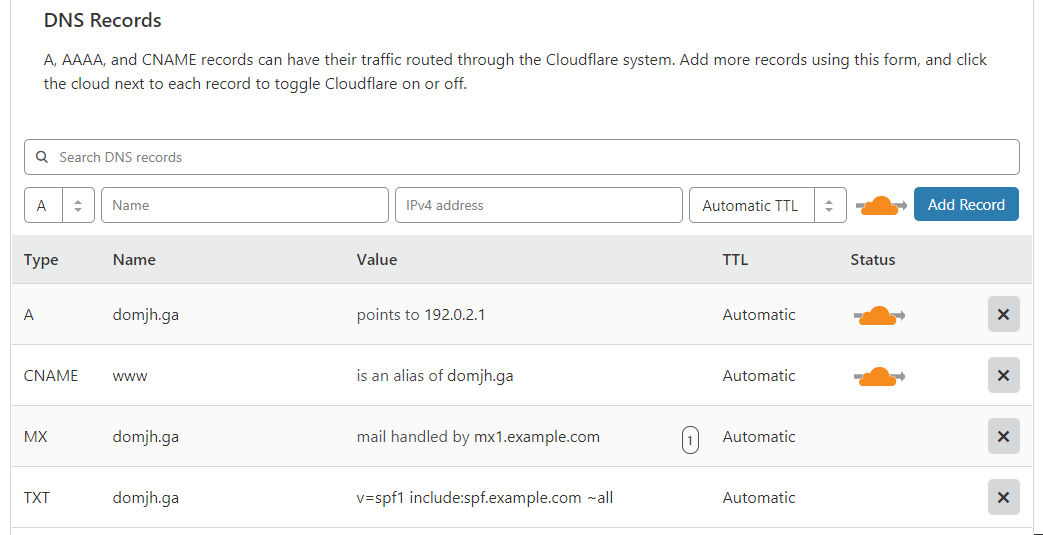
Then, you get the page with the current DNS records for the current domain.
You should edit the A record for your domain that there is an IP address of your new server in the Value field. In most of the cases, you get a new IP address when purchasing hosting or it will be mentioned in the cPanel of your hosting.
In cPanel, you can find the IP address in General Information.
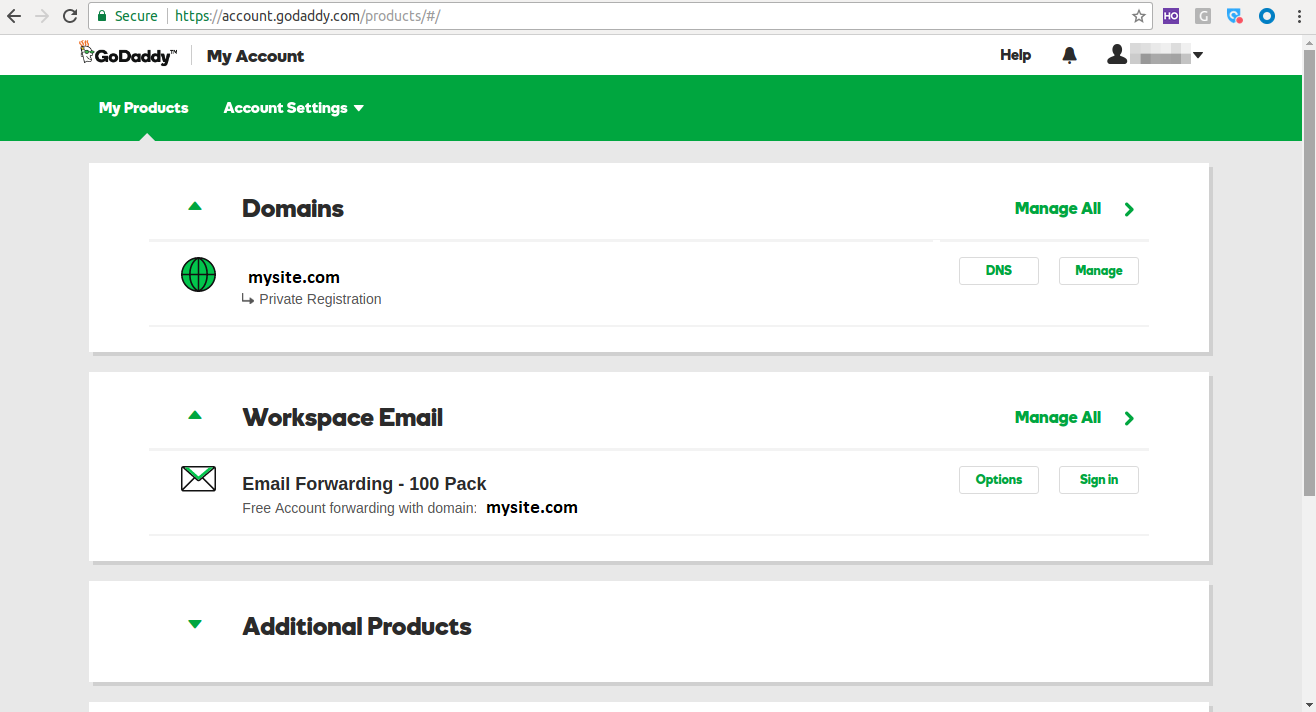
If you use the GoDaddy service, proceed to the list of your domains and press DNS close to the necessary domain.
In the value of the A record, you should set the IP address of a new server.
Put @ in the Name field (if required) and the new IP address should be placed in the Value field. Do not forget to do the same with the subdomain www, using www as a Name.
The IP address change works the same way for many registrators, only the user interface is different. After you change the IP address, because of caching the website will be available after some time. The caching time is set by TTL (Time to Live) configuration in seconds. If necessary, you can change TTL – the smaller it is, the faster IP address change for the domain will work.
There is also an instrument that allows you to flush your domain cache for public Google DNS servers. You just need to specify the domain, A type of recording and click on Flush Cache.
After the IP address is changed, turn your website back on, switching off the maintenance mode and test it one more time on the new domain.
Conclusion
Hopefully, this article has provided you with all the necessary information about how to move PrestaShop to new server and now you are able to successfully perform it yourself without losing any data or damaging any file. Make sure to perform bug testing before bringing your website live. However, if you feel that PrestaShop server transfer is beyond your developer skills, to keep your website safe, you should contact professional technical support who can manage it for you.
The following people contributed to this article: Andrey Matveev.


