
Here you will learn how to create new Magento 2 themes. Let’s look through all the steps you need to follow, including Magento theme declaration, registration, applying it in the admin panel, creating directories for CSS, JavaScript, images and fonts, theme logo definition and others. With our insightful guide, you will be able to create a theme without any difficulties.
In this article, we are going to discuss creating themes in Magento 2. Compared to Magento 1, the latter version is considered to be a more up-to-date and upgraded platform. As for theme development, the main difference is that a modular code structure has been implemented. Now, all static files such as JS, CSS, and images are located in the web folder while the skin folder has been removed from the home directory.
After completing the steps below, you can create your first theme, which can be used in the future as a template for your other themes:
Magento theme directory
Magento theme declaration
Magento theme registration
Adding Composer.json file
Applying theme in the admin panel
Creating directories for CSS, JavaScript, images & fonts
Theme logo definition
Image configuration
Using LESS for changing styles
Translations overview
Extending and overriding layout
Module templates
Theme removal
Magento theme structure
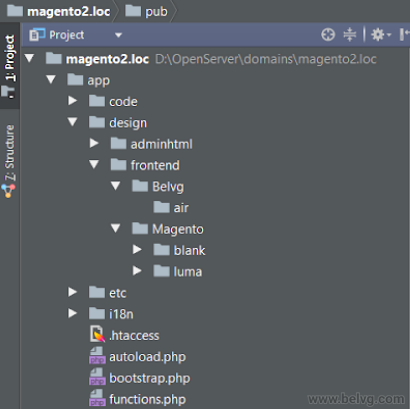
Magento theme directory
Magento 2 themes are located in the /app/design/frontend folder. First, it’s necessary to create a Vendor folder and then create a theme folder inside of it.
For example: /app/design/frontend/BelVG/air.
BelVG is a vendor, air is a theme folder. It should be mentioned that developers recommend to begin the name of a folder with a capital letter despite the fact this is not an indispensable condition.
Magento theme declaration
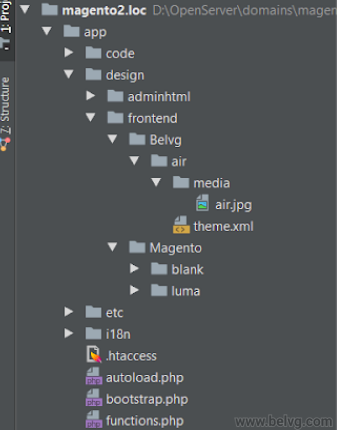
In order to define Magento themes, in the theme root folder you should create a theme .xml file with following details:
|
1 2 3 4 5 6 7 |
<theme xmlns:xsi="http://www.w3.org/2001/XMLSchema-instance" xsi:noNamespaceSchemaLocation="urn:magento:framework:Config/etc/theme.xsd"> <title>Air</title> <parent>Magento/luma</parent> <media> <preview_image>media/air.jpg</preview_image> </media> </theme> |
In the title tag, a subject name is defined. In the parent tag, a theme which is set as a parent one is defined. All unfound static files, as well as template files, will be taken from a parent theme. In this example, the “luma” theme bound with Magento 2 is defined. Whereas, Magento/blank theme is considered to be a parent theme for “luma”. It is a basic theme, so there is no parent theme. Compared to Magento 1, there are no limits on the levels of inheritance and their quantity. In the preview_image tag, a thumbnail is defined to present a theme in the admin part.
Magento theme registration
In order to register a theme in the system, in the theme folder you should create a registration.php file with following details:
|
1 2 3 4 5 6 |
<?php \Magento\Framework\Component\ComponentRegistrar::register( \Magento\Framework\Component\ComponentRegistrar::THEME, 'frontend/<Vendor>/<theme>', __DIR__ ); |
In our case, there will be:
|
1 2 3 4 5 6 |
<?php \Magento\Framework\Component\ComponentRegistrar::register( \Magento\Framework\Component\ComponentRegistrar::THEME, 'frontend/Belvg/air', __DIR__ ); |
Adding Composer.json file
It is not necessary, but you may create a composer.json file to spread a theme as a composer package.
For example, let’s take a composer.json file from “luma” theme:
|
1 2 3 4 5 6 7 8 9 10 11 12 13 14 15 16 17 18 19 20 |
{ "name": "magento/theme-frontend-luma", "description": "N/A", "require": { "php": "~5.6.5|7.0.2|7.0.4|~7.0.6", "magento/theme-frontend-blank": "100.1.*", "magento/framework": "100.1.*" }, "type": "magento2-theme", "version": "100.1.6", "license": [ "OSL-3.0", "AFL-3.0" ], "autoload": { "files": [ "registration.php" ] } } |
Applying theme in the admin panel
Proceed to the section Content —> Design —> Themes and make sure that the created theme is on the list:
If we see the necessary theme on the list, go to Content → Design → Configuration and then click Edit for the website or web store that you want to apply your theme to. Select a theme and save settings.
Creating directories for CSS, JavaScript, images and fonts
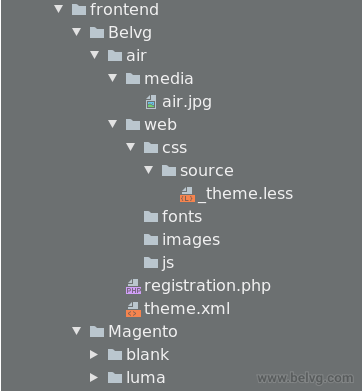
Let’s create a folder for theme static files. The structure should be following:
app/design/frontend/<Vendor>/<theme>/
├──web/
│├──css/
││├──source/
│├──fonts/
│├──images/
│├──js/
If everything related to CSS, fonts, images and JS folders is clear, there is still a question about a source folder and the way it should be used.
Magento 2 incorporates LESS, a CSS pre-processor that simplifies the management of complex CSS files. To define styles of a store, you can use both CSS and LESS stylesheets.
If your theme inherits from the Magento out-of-the-box Blank or Luma theme, you can override the default LESS files.
As an example, we can create a _theme.less file with basic variables override in Magento UI. In the /lib/web/css/source/lib/variables/ folder in source files we can find default values for those variables which can be overridden. The module styles can be set in a _module.less file as well as for widgets it can be performed in a _widgets.less file. For minor corrections, it is possible to create a _extend.less file. So as an example we’re going to change a _theme.less file.
Now we have the following structure:
Theme logo definition
In Magento 2, logo.svg is located in <theme_dir>/web/images by default. Logo format is SVG by default.
In order to use your own logo, you should:
- If your logo is .svg, you should rename as logo.svg and put in
<theme_dir> /web/images - If your logo has another format, it should be declared. For logo declaration it’s necessary to add a file
<theme>/Magento_Theme/layout/default.xml.
In this case, we extend the layout of a parent theme. Then in the layout, the data on the logo should be added.
For example, the logo.png logo with the size 70×40 will be declared as:
|
1 2 3 4 5 6 7 8 9 10 11 |
<page xmlns:xsi="http://www.w3.org/2001/XMLSchema-instance" xsi:noNamespaceSchemaLocation="urn:magento:framework:View/Layout/etc/page_configuration.xsd"> <body> <referenceBlock name="logo"> <arguments> <argument name="logo_file" xsi:type="string">images/logo.png</argument> <argument name="logo_img_width" xsi:type="number">70</argument> <argument name="logo_img_height" xsi:type="number">40</argument> </arguments> </referenceBlock> </body> </page> |
Image configuration
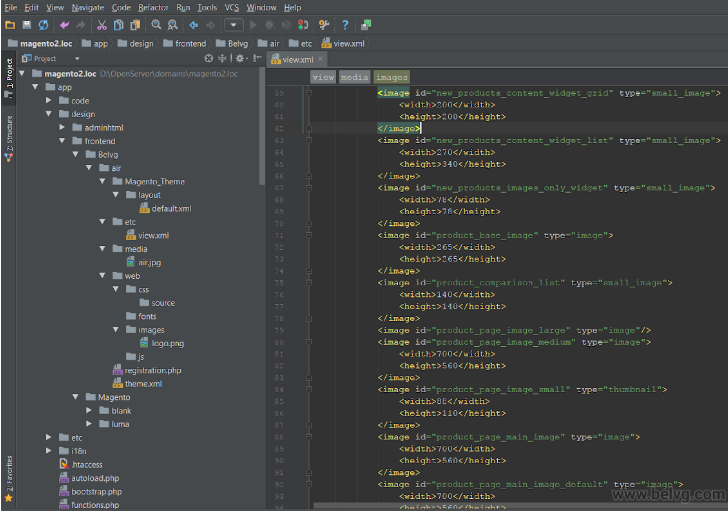
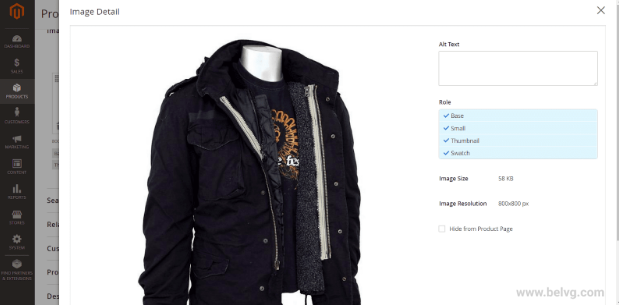
The function is considered to be a rather useful one in Magento 2. Product images configuration such as size, proportions, cutting, background color is described in the file <theme>/etc/view.xml. The file is required, so in case it wasn’t inherited from Magento 2 default theme “luma” or “blank”, it is necessary to copy it from a default theme (values are not inherited).
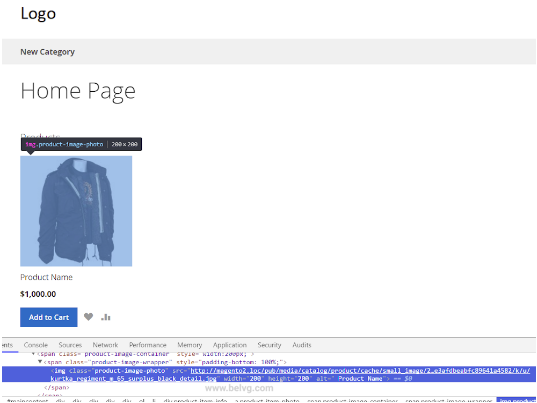
Let’s consider the example. On the main page, products are displayed with the widget. Now decrease images from 240×300 to 200х200.
|
1 2 3 4 5 6 7 8 9 10 11 12 13 |
<?xml version="1.0"?> <view xmlns:xsi="http://www.w3.org/2001/XMLSchema-instance" xsi:noNamespaceSchemaLocation="urn:magento:framework:Config/etc/view.xsd"> <media> <images module="Magento_Catalog"> ... <image id="new_products_content_widget_grid" type="small_image"> <width>200</width> <height>200</height> </image> ... </media> ... </view> |
new_products_content_widget_grid is unique within theme. Type small_image coincides with Small Image Role in admin part. Permitted values are image, small_image, swatch_image, swatch_thumb and thumbnail.
After saving an item, all images are cached. That’s why after size alteration a command php bin/magento catalog:images:resize can be executed for images regeneration.
As a result, we have the same “Luma” but with another logo and image size.
Using LESS for changing styles
After a theme has been created, but before starting to change the styles, you should decide which LESS compilation mode should be used. There are two modes available in Magento:
– server-side compilation mode;
– client-side (recommended for theme development).
Client compilation is used during development mode, as all changes performed can be seen in a moment. A browser will compile every time when calling styles file. If it’s server compilation, you should remove folder contents pub/static and var/view_preprocessed manually. These actions can be optimized with Grunt. It tracks any changes in files, removes definite folders and compiles LESS automatically.
The compilation type can be changed in admin panel: Stores -> Configuration -> Advanced -> Developer -> Frontend Development Workflow -> Workflow type:
Attention!
Client side LESS compilation setting are available in default and developer mode:
bin/magento deploy:mode:set default
bin/magento deploy:mode:set developer
In production mode, we only have server side LESS compilation:
bin/magento deploy:mode:set production
Let’s apply server compilation which is considered as default. We’re going to set background color as well as fonts in the file _theme.less.
@panel__background-color: darken(@page__background-color, 20%)
@text__color: #fff
@font-family__base: ‘Arial’, sans-serif
Since we’ve applied server-side compilation mode, after changes we need to remove directories contents /pub/static/frontend/Belvg/air/en_US и var/view_preprocessed.
Let’s observe the changes:
As we can see, the template structure in Magento 2 pretty differs from Magento 1.x. The structure has been improved, so now it’s much more logical, all the theme files are structured, which is very convenient for search.
Translations overview
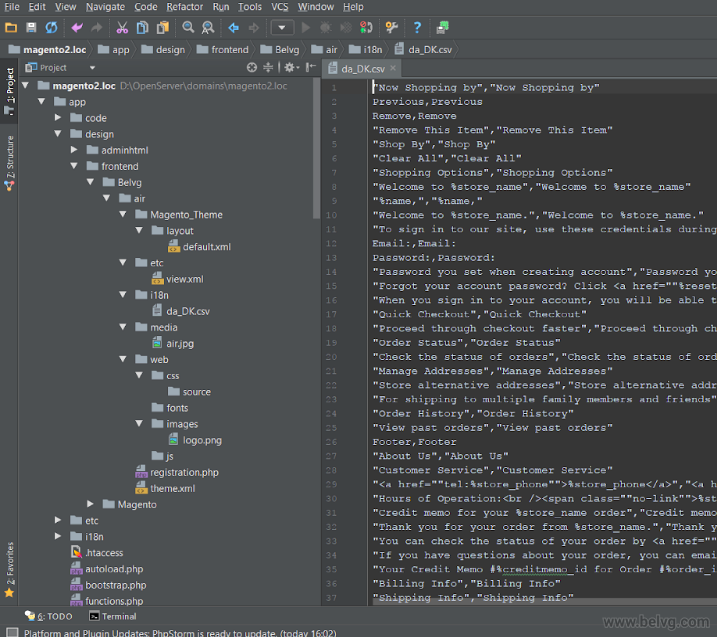
In Magento 1.9.x, for CVS files storage, a local folder is created in the theme folder. Then a language folder is created, for example, ru_RU, and within it, a file translate.csv.with is created. In Magento 2, it is has been changed. An i18n folder should be created in the theme root. Then in the i18n folder, a file with translation is created, e.x. da_DK.csv.
Example: /app/design/frontend/Belvg/air/i18n/da_DK.csv
In order to generate a translation file in the folder you may use i18n tool. The command can be executed in home directory in Magento 2:
php bin/magento i18n:collect-phrases –output=”app/design/frontend/Belvg/air/i18n/da_DK.csv” app/design/frontend/Belvg/air
All lines are compiled into a dictionary, then a dictionary file is created: app/design/frontend/Belvg/air/i18n/da_DK .csv. Translation file has the same format as in Magento 1.
Let’s generate a localization file by using default theme “luma” and execute a command: php bin/magento i18n:collect-phrases –output=”app/design/frontend/Belvg/air/i18n/da_DK.csv” app/design/frontend/Magento/luma
Here is the result:
Extending and overriding layout
Layouts in certain themes can be extended or overridden in Magento 2.
Let’s extend a layout:
In order not to copy page layouts or common layouts from a default theme, you should define extending layout. For example, to customize the layout defined in <Magento_Catalog_module_dir>/view/frontend/layout/catalog_product_view.xml you need to add a layout file with the same name in your custom theme, like the following: <theme_dir>/Magento_Catalog/layout/catalog_product_view.xml
To add an extending layout file page put the file in the following location:
<theme_dir>
|__/<Namespace>_<Module>
|__/layout
|–<layout1>.xml
|–<layout2>.xml
Let’s override a layout:
Main basic layouts can be overridden by creating a folder override/base in the theme module folder:
<theme_dir>
|__/<Namespace_Module>
|__/layout
|__/override
|__/base
|–<layout1>.xml
|–<layout2>.xml
These files override the following layouts:
<module_dir>/view/frontend/layout/<layout1>.xml
<module_dir>/view/frontend/layout/<layout2>.xml
Besides, parent theme layouts can be overridden as well by creating a folder override/base in the theme module folder:
<theme_dir>
|__/<Namespace_Module>
|__/layout
|__/override
|__/theme
|__/<Parent_Vendor>
|__/<parent_theme>
|–<layout1>.xml
|–<layout2>.xml
These files override the following layouts:
<parent_theme_dir>/<Namespace>_<Module>/layout/<layout1>.xml
<parent_theme_dir>/<Namespace>_<Module>/layout/<layout1>.xml
Modules templates
Templates are stored in the following locations:
Module templates: <module_dir>/view/frontend/templates/<path_to_templates>
Theme templates: <theme_dir>/<Namespace>_<Module>/templates/<path_to_templates>
Templates in contrast to the layout you can only override.
So in case if we want to override a template for search page that are located in the directory \app\code\Magento\CatalogSearch\view\frontend\templates\result.phtml, the path to templates will be following: \app\design\frontend\Belvg\air\Magento_CatalogSearch\templates\result.phtml

Magento Development
Take your online store to the next level with BelVG Magento Development
Visit the pageTheme removal
If a theme is a Composer package, it can be removed with a command:
Magento theme:uninstall [--backup-code] [-c|--clear-static-content] {theme path} ... {theme path}
The {theme path} here is the relative path to the theme, starting with the area name.
--backup-code backs up the Magento 2 codebase as discussed in the paragraphs that follow.
--clear-static-content cleans generated static view files, which is necessary to allows static view files to display properly.
In case if a theme is not a Composer package, you should carry out the following steps in order to remove a theme:
- Remove a theme app/design/frontend/(Vendor) folder;
- Remove contents var/view_preprocessed;
- Remove contents of pub/static/frontend/;
- Open Magento 2 database, find theme table and remove a subject name line;
- Remove cache with a command
php bin/magento cache:flush.
Magento theme structure
The structure of a Magento theme directory typically would look like this:
<theme_dir>/
├── <Vendor>_<Module>/
│ ├── web/
│ │ ├── css/
│ │ │ ├── source/
│ ├── layout/
│ │ ├── override/
│ ├── templates/
├── etc/
├── i18n/
├── media/
├── web/
│ ├── css/
│ │ ├── source/
│ ├── fonts/
│ ├── images/
│ ├── js/
├── composer.json
├── registration.php
├── theme.xml
Conclusion
As you can see, the structure in Magento 2 is different from Magento 1.x. The theme structure has been significantly improved and now theme files are stored all together which makes the search much easier to use. But the modified structure is not the only significant point. Asynchronous modules load with RequireJS has been added. It can be performed without adding scripts in the head section. Instead of Prototype library, now jQuery/jQuery UI is used. LESS is used instead of CSS which increases production rate when developing styles. In addition, we have an opportunity to create themes as composer packages.







Amazing article! great information with theme customization for Magento 2. Theme enhances the e-store look also helps to organize the inventory properly.
Thank you!
Properly well balanced information shared. Very useful information for readers.