API is an essential framework for ecommerce software, and even if you are only beginning working with Magento, you must have already heard of it. This article is an overview of what is Magento 2 Web API, the types of it and how to work with each of them.
Table of contents:
What is API in Magento 2
API in Magento 1 vs. API in Magento 2
Types of API in Magento 2
What is API in Magento 2
API stands for Application Programming Interface; in general, it allows you to access the data from an application. In other words, API can be called a middleman between a programmer and an application. When the programmer makes a request via the middleman, or API in our case, if the request is approved, the right data will be turned back.
API in Magento 1 vs. API in Magento 2
To fully understand how Magento APIs work, it is crucial to compare APIs in two Magento versions.
Magento 1 included a SOAP and XML-RPC based API. Later versions of Magento 1 introduced a REST API, although this REST API had less business logic functionality than the XML-RPC and SOAP APIs.
Magento 2 ships with a SOAP and REST-based API. There is no longer an XML-RPC based API. The SOAP and REST-based APIs are, from a business logic point of view, equal. It’s considered that REST API integration is less strict than SOAP API. The Magento 2 SOAP API has individual API objects/services and each has its own WSDL (https://devdocs.magento.com/guides/v2.3/soap/bk-soap.html)
The Magento 2 SOAP and REST APIs are versioned, which means that there are no guarantees that old API calls will work for future Magento versions.
Each Magento API call is incorporated with an elements sequence, such as:
- HTTP verbs, which are actions executed against endpoint. Those are GET, PUT, POST, DELETE.
- Endpoint, which stands for URL that defines server, web service, the resource against which the request was executed, and template parameter.
- Call payload that contains all input attributes and parameters supplied with the request. API operations input can be both required and optional. One can indicate input parameters in the URI and input attributes in the body of the request. It is possible to use either JSON- or XML-formatted request body.
- HTTP header renders request and response body info, request authorization, response caching and cookies. It stands for meta-data representation and is connected with the API request and response.
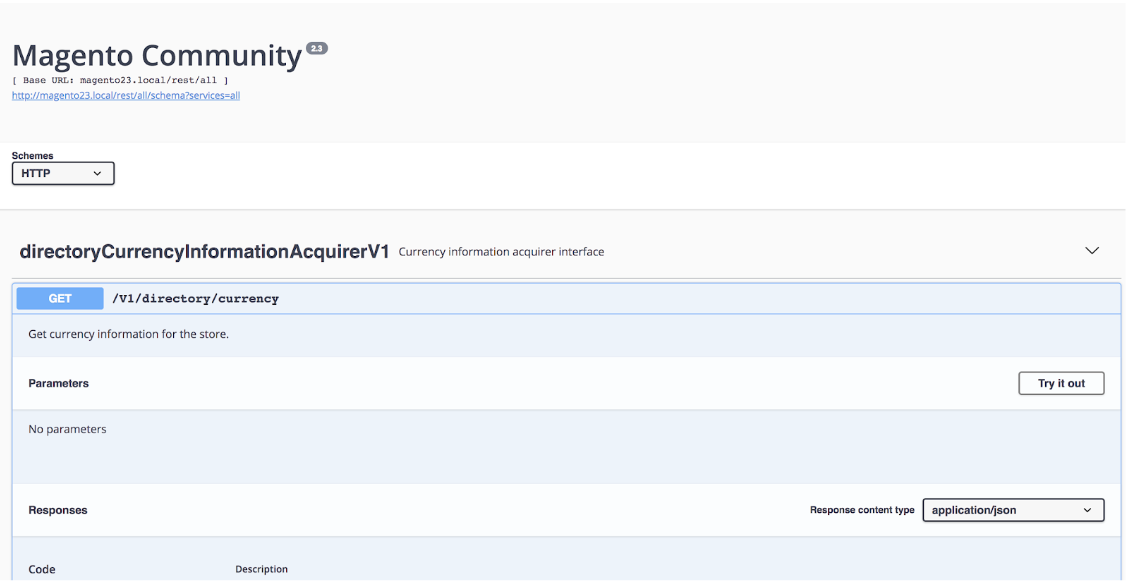
Magento 2 uses a built-in Swagger tool (which is shipped with each Magento 2 instance) for immediate REST API documentation generation. We’ll consider some examples here below. This is the interface:
According to official documentation, to configure a web API for a service, you define XML elements and attributes in the app/code/Magento/<MODULE>/etc/webapi.xml file, where <MODULE> is the module name. The webapi.xml file for your module must specify an XML schema file for validation. Your webapi.xml file can specify the default or a customized XML schema file.
For example, the web API for the Customer service is defined in the app/code/Magento/Customer/etc/webapi.xml configuration file. The default webapi.xsd XML schema file can be found in the app/code/Magento/Webapi/etc. directory.
Types of API in Magento 2
Knowledge of API types is crucial for further working with it. Before you can make web API calls, you must authenticate your identity and have necessary permissions (authorization) to access the API resource. Authentication allows Magento to identify the caller’s user type. Based on the user’s (administrator, integration, customer or guest) access rights, API calls’ resource accessibility is determined.
There are three types of authentication that we can use:
1) Token-based authentication
The idea is to provide the username and password during initial connection and receive the token to be used for requests that follow, until token expires. Here is the cURL example:
curl -X POST
|
1 2 3 |
"http://magento23.local/rest/all/V1/integration/admin/token" -H "accept: application/json" -H "Content-Type: application/json" -d "{ \"username\": \"%your_admin_username%\", \"password\": \"%your_admin_password%\"}" |
You will receive a token that looks the following way “0w2ckye7e6nrib29m8kmuta1npq4wodf” and then all queries should contain this token. This is an example of response in Swagger:
As an example, we will get customer info by ID:
curl -X GET
|
1 2 3 |
"http://magento23.local/rest/all/V1/customers/1" -H "accept: application/json" -H 'Authorization: Bearer 0w2ckye7e6nrib29m8kmuta1npq4wodf' |
And the result:
|
1 2 3 4 5 6 7 8 9 10 11 12 13 14 15 16 17 |
"id": 1, "group_id": 1, "default_billing": "0", "default_shipping": "0", "created_at": "2019-02-02 23:35:24", "updated_at": "2019-02-03 02:35:27", "created_in": "Default Store View", "firstname": "Test", "lastname": "Testoff", "gender": 0, "store_id": 1, "website_id": 1, "addresses": [], "disable_auto_group_change": 0, "extension_attributes": {"is_subscribed": false} } |
It matches with info in admin:
Another example of using SOAP API via PHP:
|
1 2 3 4 5 6 7 8 9 10 11 12 13 14 15 16 17 18 19 |
<?php $request = new SoapClient("http://magento23.local/index.php/soap/?wsdl&services=integrationAdminTokenServiceV1", array("soap_version" => SOAP_1_2)); $token = $request->integrationAdminTokenServiceV1CreateAdminAccessToken(array("username"=>"An%your_admin_username%", "password"=>"%your_admin_password%")); $opts = array( 'http'=>array( 'header' => 'Authorization: Bearer '.json_decode($token->result) ) ); $wsdlUrl = 'http://magento23.local/soap/default?wsdl&services=directoryCurrencyInformationAcquirerV1'; $context = stream_context_create($opts); $soapClient = new SoapClient($wsdlUrl, ['version' => SOAP_1_2, 'context' => $context]); $soapResponse = $soapClient->__getFunctions(); echo '<pre>'; var_dump($soapResponse); echo '</pre>'; |
We will get the following response:
|
1 2 3 4 |
array (size=1) 0 => string 'DirectoryCurrencyInformationAcquirerV1GetCurrencyInfoResponse directoryCurrencyInformationAcquirerV1GetCurrencyInfo DirectoryCurrencyInformationAcquirerV1GetCurrencyInfoRequest $messageParameters)' |
2) Session-based authentication
Session-based authentication is considered the simplest of all three.
In short, the Magento API framework uses your session to authorize access to the requested resource. For example, if a customer is logged in to the Magento storefront and the JavaScript widget invokes the self API, details for the logged-in customer are fetched:
|
1 |
GET /rest/V1/customers/me |
NB! The session-based authentication functionality is restricted to only allow for AJAX calls; direct browser requests are not conducted for fear of security vulnerabilities. A developer can create a custom storefront widget that can issue requests without additional authentication steps.
3) OAuth-based authentication
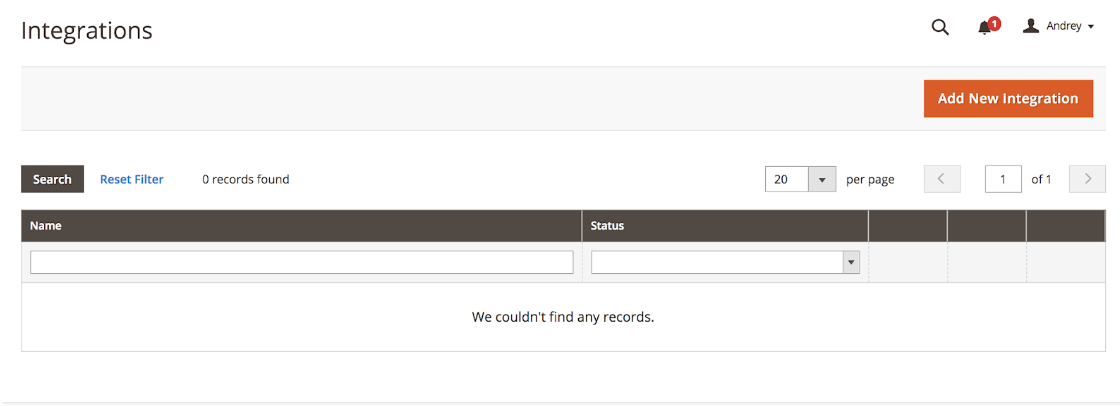
Presents Magento 2 API as a service for third-party resource access via getting approval got from the resource owners. To start using it, log in to the admin panel and go to the System -> Extensions -> Integrations -> Add new integration:
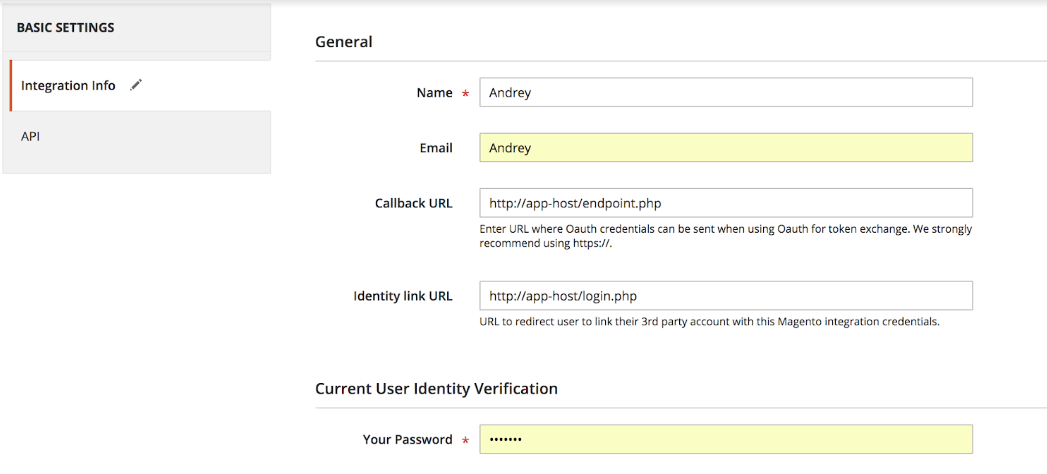
Click Add New Integration and complete all details in the Integration Info tab:
Select the Save and Activate option from the drop-down menu.
A pop-up window will appear for you to confirm API permissions. Click Allow. The credentials are posted to endpoint.php. Another pop-up will appear for the identity linking step that opens the script from login.php.
Click Login. (There is no actual login check in my case, since this is a simulation.). The checklogin.php script is called, and it uses the posted credentials to complete the token exchange.
When the token exchange is completed, the user is redirected back to the Integrations grid. The newly-created integration should be in the Active state.
Click on the edit icon of the integration and check the Integration Details at the Integration Info tab. It should show all the credentials that can be used to make an authenticated API request using OAuth 1.0.
Wrapping it up
In this article we explored API in Magento 2, the differences between APIs in Magento 1 and Magento 2; we also went over three types of APIs in Magento 2. Stay tuned for other API-themed articles at our blog, and if you have any questions or comments, feel free to leave them in the comments.


