Customizing your webstore is literally an endless process. There is always something to improve, add or update. Moreover, ecommerce platforms give their clients lots of customization opportunities. And it is so easy to get confused and lost in them. To prevent this we keep explaining how to use PrestaShop 1.7.5 admin panel and create your dream online store with the help of this platform.
How to Add a Language in PrestaShop 1.7.5.0
How to Add a Carrier in PrestaShop 1.7.5.0
How to Add a Language in PrestaShop 1.7.5.0
The default language in PrestaShop ecommerce platform is English, which is a perfect choice in case you work for English-speaking countries. However, if you aim your business at the international market, English alone may be not enough, and you may consider adding a couple of other languages to your online store. The reason for it is not in the language barrier itself, for most Europeans and South Americans know English on a sufficient level; this way you will demonstrate that you care deeply for your customer and wish to provide them with comfortable shopping experience.
To add a new language to PrestaShop 1.7.5.0, first go to Improve section -> International -> Localization.
In the upper section of the menu you’ll see 4 tabs – Localization, Languages, Currencies and Geolocation. Click on the second one. Here you will see the list of languages already existing in your PrestaShop online store.
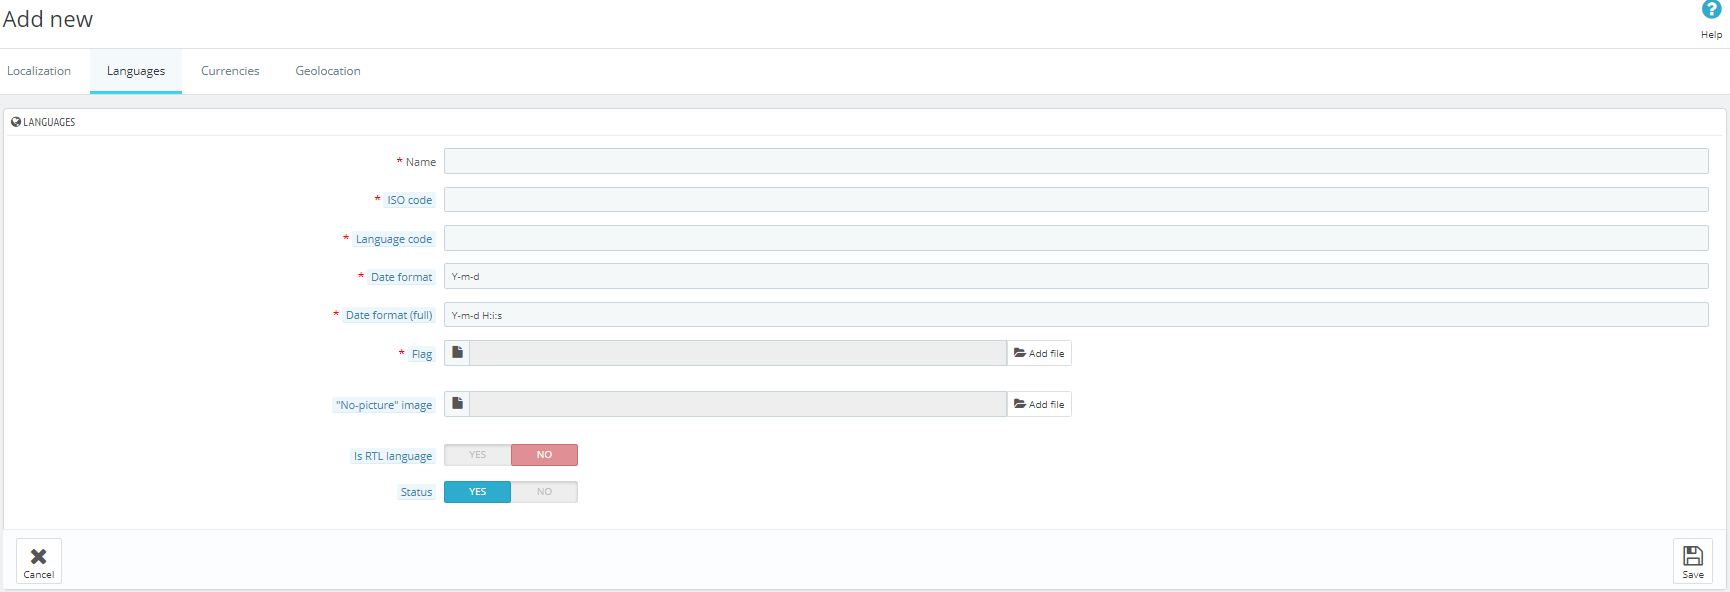
Click Add new language in the upper right corner. Here, fill in the following attributes of your new language:
- Name.
- ISO code – the two letters signifying the new language, e.g. French – FR, German – DE, etc.
- Language code – IETF tag that identifies human languages. To find the one for your language, simply google it.
- Short date format – set up the order of year, month and day.
- Full date format – set up the order of year, month and day, as well as hours and seconds.
- Flag of new language country.
- “No picture” image – if your language doesn’t have a national flag correlating to it, upload the picture that will define it otherwise.
- Is RTL language – enable if new language reads from right to left.
- Status – enabled or disabled.
Having set up all the parameters you found necessary, click Save. The new language will appear in the Languages tab menu.
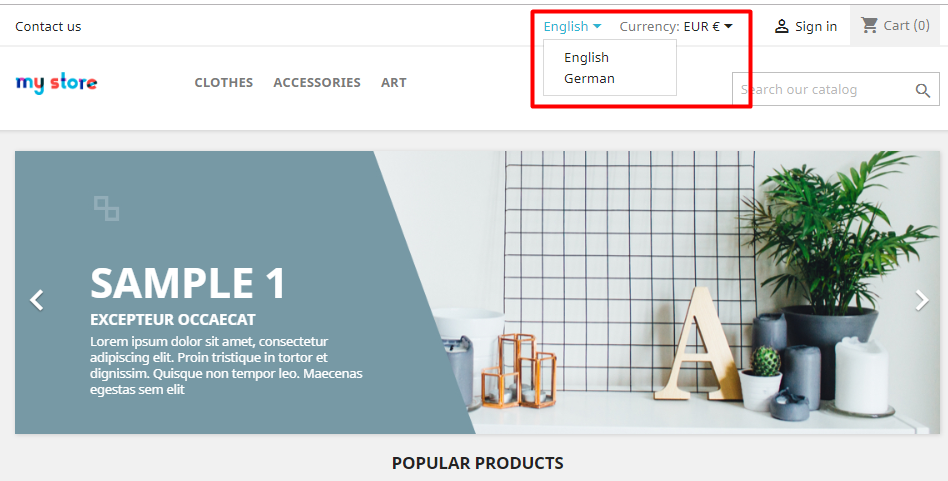
Now, as you go to the customer view of your shop, you will see not one, but two language options – English and German in our case.
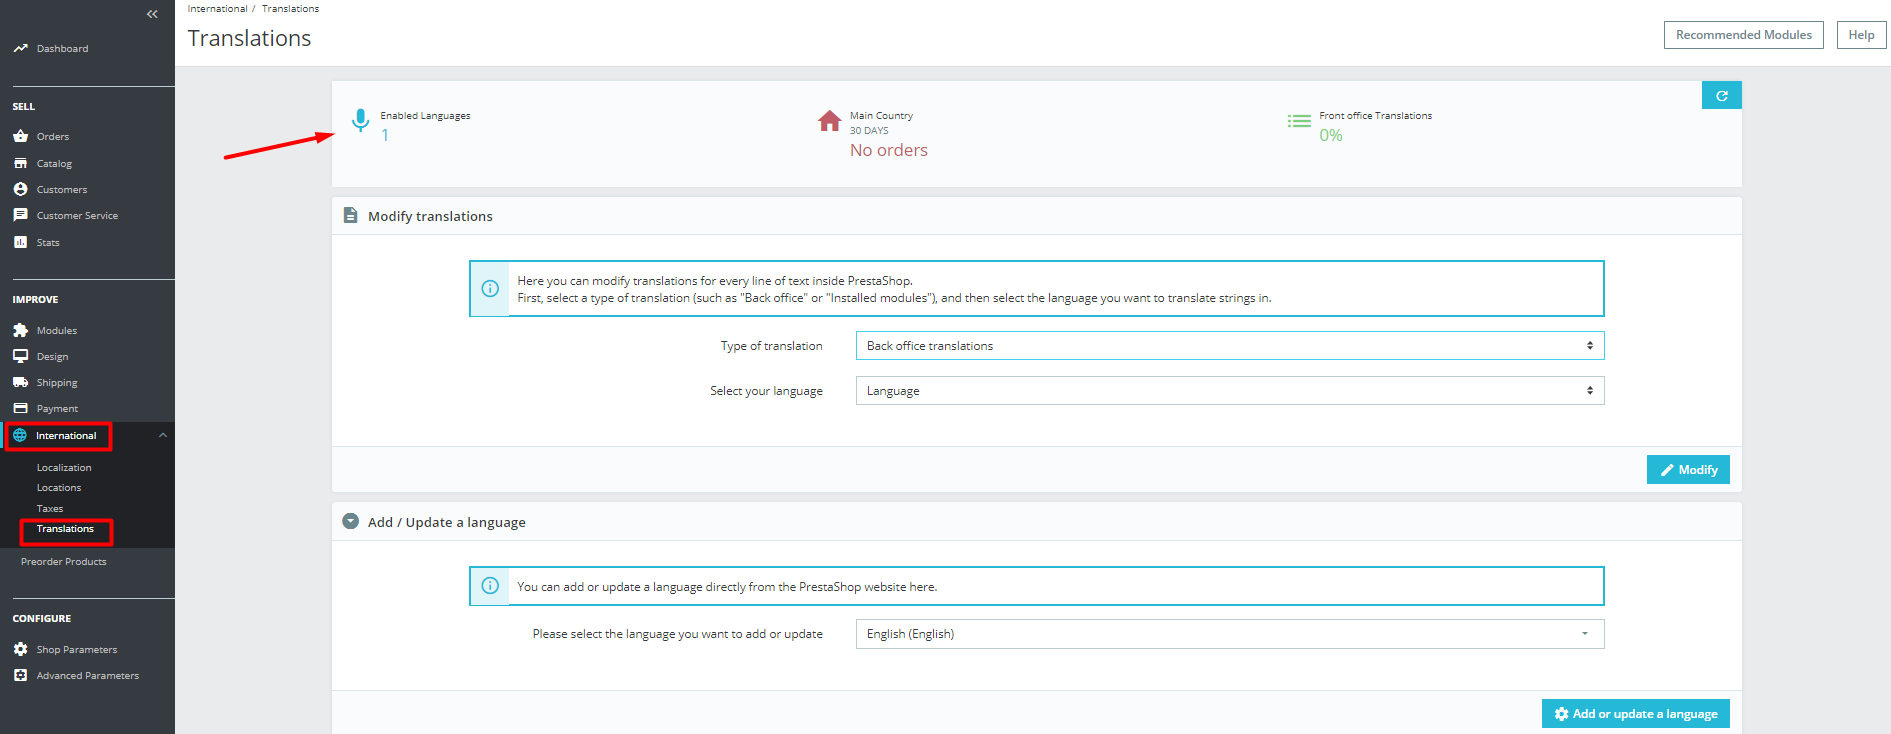
There is an alternative way to add a new language to PrestaShop 1.7.5.0. Go to Improve -> International -> Translations.
Here you will see four sections; you need the second one – Add / Update a language. In the drop down list find the language you wish to add. Press Add or Update the Language.
Go to Localization -> Languages and see the newly added language in the list.
The second method is, obviously, easier and suitable for more common languages. The first way allows you to set up the language from scratch. Which option to use is up to you.

PrestaShop Support & Maintenance
Take your online store to the next level with BelVG PrestaShop Support & Maintenance
Visit the pageHow to Add a Carrier in PrestaShop 1.7.5.0
Such prominent carrier companies like UPS, USPS and FedEx hold large shares of the shipping market, so turning to them for their services is a simple and convenient choice. However, if you have a personal carrier, you can always prefer their services over the conventional providers.
To add a new carrier to PrestaShop 1.7.5.0, first go to Improve -> Shipping -> Carriers. Click Add new carrier button in the right upper corner.
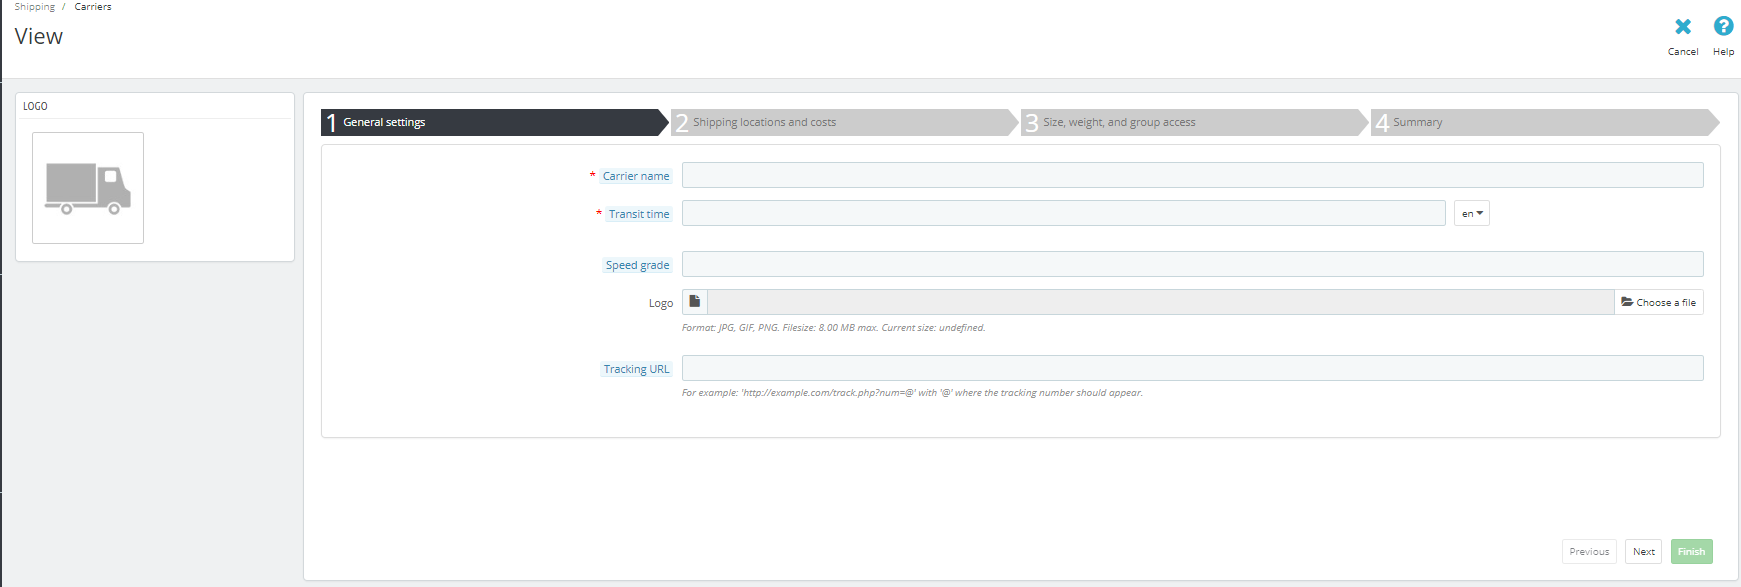
You’ll get to the following page with a four-step creation process. Step 1 is General settings. Here you need to fill in the following fields:
- Carrier name,
- Transit time – delivery period, displayed at the delivery,
- Speed grade – define shipping delay,
- Logo of the carrier,
- Delivery Tracking URL – type URL with @ for where the tracking number should appear.
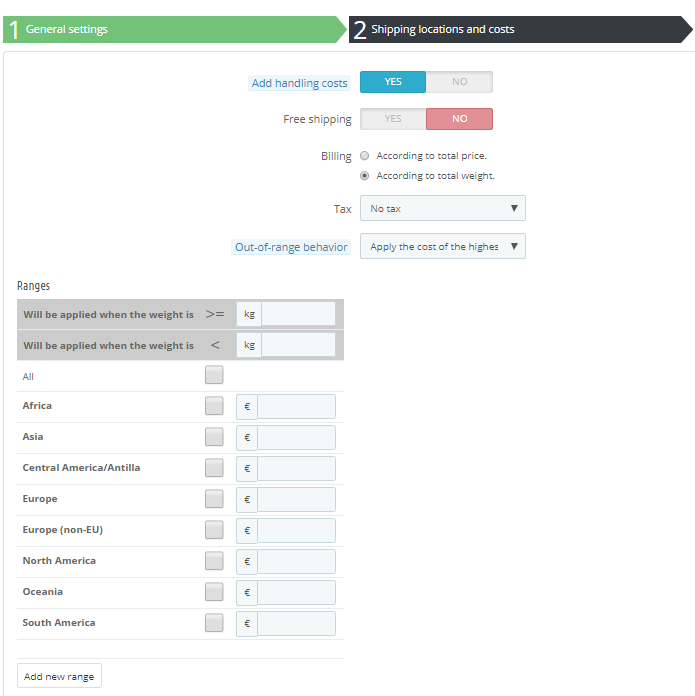
Click Next to proceed to step 2 – Shipping locations and costs. Here set up and fill in:
- Add handling costs to the final carrier price.
- Free shipping, if you managed to make such a deal with the carrier.
- Billing – calculated according to the total price or according to total weight.
- Tax.
- Out-of-range behavior options. Out-of-range behavior is the situation when the customer chooses the product option which surpasses your policy (higher weight or size). In this line you define what the platform should respond to such behavior: either Apply the cost of the highest defined range or Disable carrier.
Below you can see Ranges field, where you create rules for shipping cost application. You can create several of them.
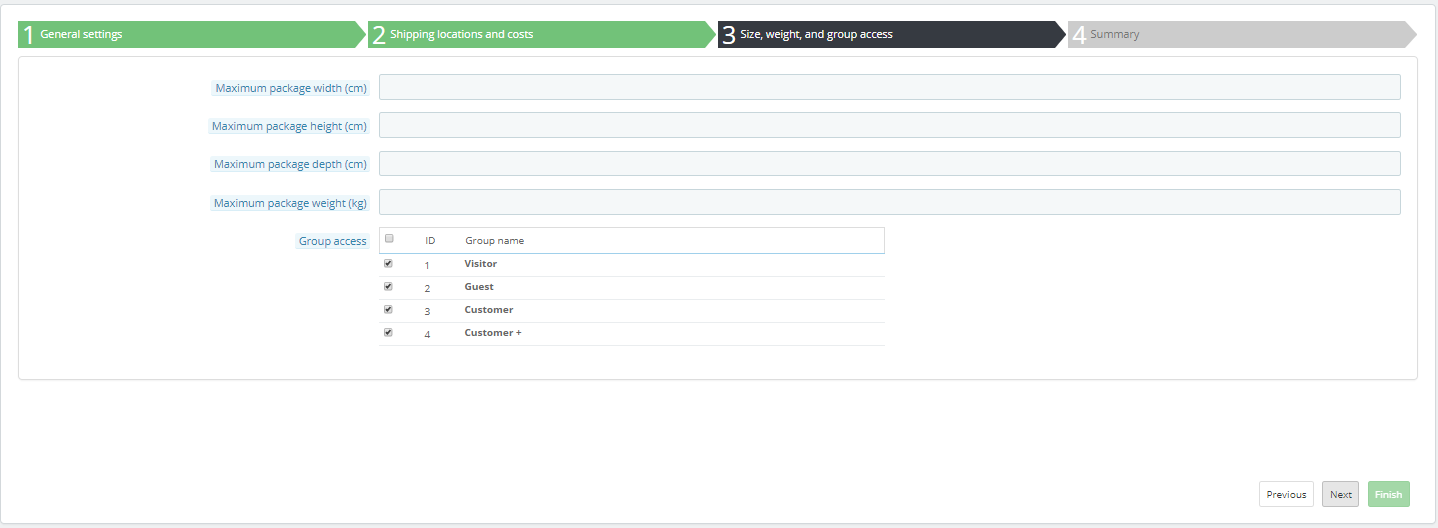
When you are done, click Next to proceed to Step 3 – Size, weight, and group access. In this tab you fill in:
- Maximum package width (cm).
- Maximum package height (cm).
- Maximum package depth (cm).
- Maximum package weight (kg).
- Group access – which customer groups may have access to this carrier services.
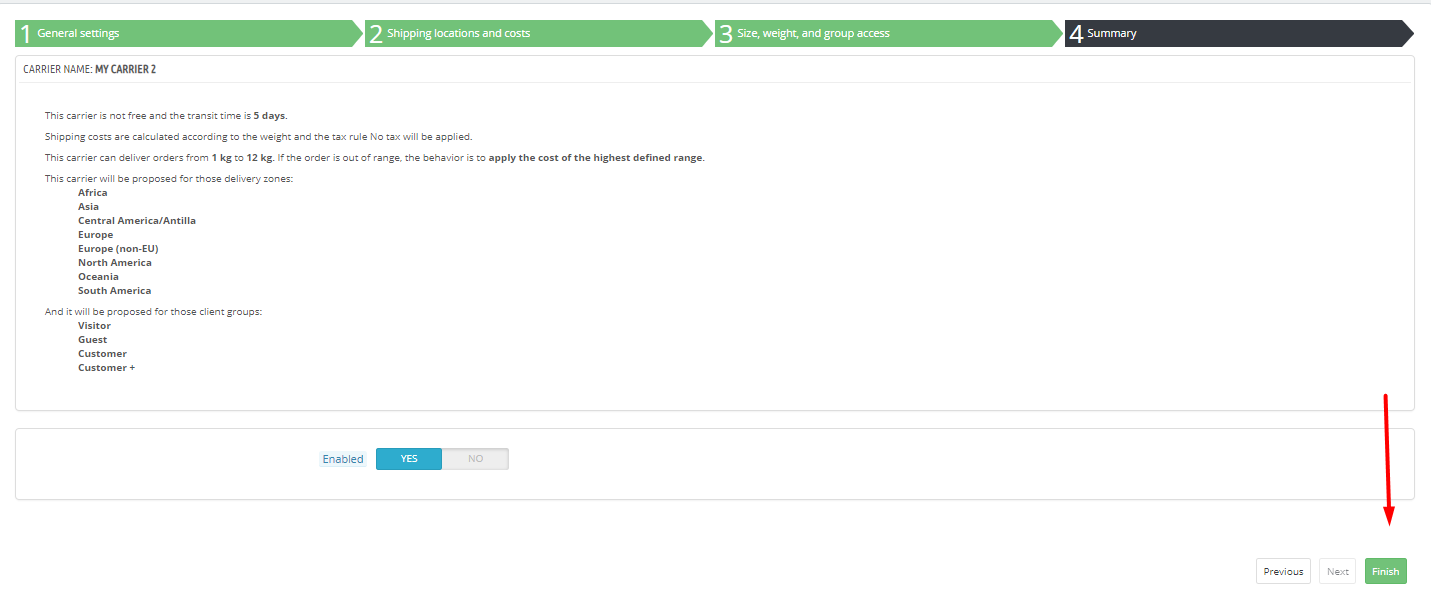
Click Next to proceed to the final fourth step – Summary. Here you will see your Carrier settings summarized in one paragraph for you to check it before clicking Finish.
This is all; new carrier is created and available for use.
I hope you find this article helpful. In case you have any questions left, you’re welcome to leave them down below in the comments.
If you liked this article and wish to learn more about PrestaShop admin panel management, you can find more tutorials in our blog by PrestaShop tag.

PrestaShop Development
Take your online store to the next level with BelVG PrestaShop Development
Visit the page








Hi, Henk! Thanks for reaching out to us with your issue.
Unfortunately, your description of the situation is not enough to offer you a credible solution. Please contact our specialists at [email protected] and lay out the whole picture.
Prestashop 1.7.5.2 doesn’t ad up the height of combined bought books in carrier category Letters. ( 1.6 did this) Over 3.8 cm the system should choose parcels instead of letter, because the books no longer fit in a letter. is it possible to fix this?
Henk