Nearly 3 years have passed since the publication of the How to Add Column in Sales Order Grid in Magento 2.1 article. Over this time two new versions – Magento 2.2 and 2.3 – have been released.
With the introduction of new versions, the syntax of UI Components has also been updated. Therefore, it seemed logical to update the article and adapt the code for Magento 2.3. There are few intuitive changes in the code that affected sales_order_grid.xml file.
The changes mainly affected the xml structure of the Ui component document. Also, xml attributes became xml element. In my opinion, the new code is more readable and understandable. Link to the updated module: https://github.com/Galillei/sample_add_columns_to_order_grid/tree/2.3
Magento 2 UI components serve for generation and display of several lists and grid types. Moreover, you can create a component yourself on the basis of the already existing code; yet the description of this mechanism is worthy of a separate article. For this one, we will focus on extending the sales order grid with an additional column.
Actually, it’s rather simple to add a new column to a grid, unlike, for example, create a new column with filtering. So let me describe how to implement it in Magento 2.3.
NB! The code in XML format I will put below is valid solely for versions 2.3 and further. If you still use earlier versions of Magento, I strongly advise you to migrate to Magento 2.
All the directives are situated in the <module>/view/adminhtml/ui_component/ directory. First, create a “sales_order_grid.xml” file. The filename has to match a parent component that we will extend.
Let’s add the following code into the file:
Let me break this piece of code down.
The line
adds a column into the order grid. Class Module\Ui\Component\Columns\OrderGrid extends the Magento\Ui\Component\Listing\Columns\Column class.
We need to override the prepareDataSource() method:
$item variable stores current grid row data, and the column name is available in the “name” array element:
This way we can fill the row data.
Let’s now return to the sales_order_grid.xml file. All the code written in the argument line and below is related to the column description.
The following line allows us to render any valid HTML code in the cell. Magento 2 supports a few pre-defined template renders out of the box, all of them are placed in module-ui.
In the following example the component isn’t specified, but we can additionally specify the column component in argument tag as well:
NB! In the earlier versions of Magento the component was installed in a different way:
The type of column (date, column, actions, multiselect, select or thumbnail) to use is defined by the component. Both templates and components are placed in the module-ui. At this stage, there is already a column in the order grid and the task is completed. However, if you require filtering by this column, we will proceed to work.
There are 2 solutions:
- Adding our column into sales_order and sales_order_grid tables and control CRUD operations for the sales_order table (sales_order_grid table and sales_order table are synchronized by cron).
- Writing a new plugin for a fast column update.
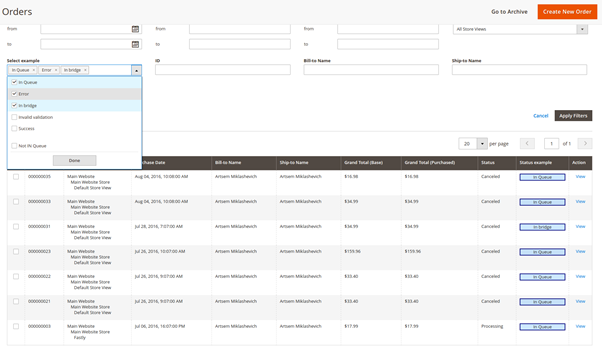
The first way left me with the excess of data and compatibility reduction; that is why I decided to resort to the second method – plugin filtering. I began with adding the filter into sales_order_grid.xml file and then added the following code right after the close tag:
In the line:
I specified the class in which the filter value will be defined. This class should carry out \Magento\Framework\Data\OptionSourceInterface interface.
The collection class for the order sales is sales_order_grid_data_source, defined in vendor/magento/module-sales/etc/di.xml:
Therefore, we use the collection as a filtering source. And now we apply the plugin that adds our data into filtering results.
Now let’s register the plugin in etc/di.xml:
And add Module\Plugin\AdditionalFields\CollectionFactory::aroundGetReport() method.
Current field filtering should become available after the plugin installation. As a result, we get the following:
You can find the described above module here: https://github.com/Galillei/sample_add_columns_to_order_grid/tree/2.3.
Bear in mind that Magento has kept the compatibility with the old ui-components structure, which means that the code for 2.1 version may work for 2.3 as well. In this very article, we demonstrated how to describe ui-components using the new syntax.

Magento Custom Development
Take your online store to the next level with BelVG Magento Custom Development
Visit the page


