Modules database update process has some significant changes in comparison to the Magento 1. Now we can use 4 files to control database/data update process (located in the Setup folder):
- InstallSchema.php – tables and keys creation;
- UpgradeSchema.php – updating tables’ schema;
- InstallData.php – populating data into database (additional attributes, table data etc);
- UpgradeData.php – updating/adding new data;
- Reccuring.php – initial launching of an application (for synchronization or indexing, but this feature enable only on Magento 2 EE version).
All the files are called in the order of the above listing. To install a module in Magento 2.0 you should run the following CLI command:
|
1 |
php <magento-install-dir>/bin magento setup:upgrade |
Let’s take a closer look to what exactly happens when the ‘setup/upgrade’ command is run.
Once called the magento.php script creates and launches the console application —
|
1 2 |
$application = new Magento\Framework\Console\Cli('Magento CLI', AppInterface::VERSION); $application->run(); |
This application uses incoming arguments (in our case this is setup:upgrade) and calls the respective handler. The handler assignment and implementation is done in the Symfony\Component\Console\Application ::doRun() method
|
1 2 3 4 5 6 7 8 9 10 11 12 13 14 15 16 17 18 19 20 21 22 23 24 25 26 |
public function doRun(InputInterface $input, OutputInterface $output) { if (true === $input->hasParameterOption(array('--version', '-V'))) { $output->writeln($this->getLongVersion()); return 0; } $name = $this->getCommandName($input); if (true === $input->hasParameterOption(array('--help', '-h'))) { if (!$name) { $name = 'help'; $input = new ArrayInput(array('command' => 'help')); } else { $this->wantHelps = true; } } if (!$name) { $name = $this->defaultCommand; $input = new ArrayInput(array('command' => $this->defaultCommand)); } // the command name MUST be the first element of the input $command = $this->find($name); $this->runningCommand = $command; $exitCode = $this->doRunCommand($command, $input, $output); $this->runningCommand = null; return $exitCode; } |

Magento Support & Maintenance
Take your online store to the next level with BelVG Magento Support & Maintenance
Visit the pageHere we determine the handler name based on the incoming command name ($name variable):
|
1 |
$command = $this->find($name); |
and then call the handler. In our case it is the object of the class Magento\Setup\Console\Command\UpgradeCommand.
|
1 |
$exitCode = $this->doRunCommand($command, $input, $output); |
The method Symfony\Component\Console\Application :: doRunCommand() launches the code of the handler (e.g. Magento\Setup\Console\Command\UpgradeCommand:execute()).
Here is the execte() method listing:
|
1 2 3 4 5 6 7 8 9 10 11 |
protected function execute(InputInterface $input, OutputInterface $output) { $keepGenerated = $input->getOption(self::INPUT_KEY_KEEP_GENERATED); $installer = $this->installerFactory->create(new ConsoleLogger($output)); $installer->updateModulesSequence($keepGenerated); $installer->installSchema(); $installer->installDataFixtures(); if (!$keepGenerated) { $output->writeln('<info>Please re-run Magento compile command</info>'); } } |
The factory method creates the Magento\Setup\Model\Installer $installer object. Installer runs 3 methods one by one:
- updateModulesSequence()
- installSchema()
- installDataFixtures()
The method Magento\Setup\Model\Installer::updateModulesSequence() verifies the deployment configuration, flushes cache, purges var/generate directory and passes modules’ configuration into the Magento\Setup\Model\Installer::createModulesConfig() .
Let’s have a look at this step in more details.
|
1 2 3 4 5 6 7 8 9 10 11 12 13 14 15 16 17 18 19 20 21 22 23 24 25 26 27 |
private function createModulesConfig($request) { $all = array_keys($this->moduleLoader->load()); $currentModules = []; if ($this->deploymentConfig->isAvailable()) { $deploymentConfig = $this->deploymentConfigReader->load(); $currentModules = isset($deploymentConfig['modules']) ? $deploymentConfig['modules'] : [] ; } $enable = $this->readListOfModules($all, $request, self::ENABLE_MODULES); $disable = $this->readListOfModules($all, $request, self::DISABLE_MODULES); $result = []; foreach ($all as $module) { if ((isset($currentModules[$module]) && !$currentModules[$module])) { $result[$module] = 0; } else { $result[$module] = 1; } if (in_array($module, $disable)) { $result[$module] = 0; } if (in_array($module, $enable)) { $result[$module] = 1; } } $this->deploymentConfigWriter->saveConfig([ConfigFilePool::APP_CONFIG => ['modules' => $result]], true); return $result; } |
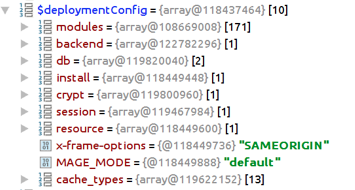
The variable $all contains the list of all existing modules (this is defined by the properly configured <module-name>etc/module.xml files). The variable $deploymentConfig is filled with settings from configuration files config.php and env.php (see the directory <magento-install-dir>app/etc).

Here the value for $deploymentConfig[‘modules’] is taken from the file <magento-install-dir>app/etc/config.php . Further on the modules are verified for disable/enable in accordance with the file module.xml and the results are recorded into <magento-install-dir>app/etc/config.php.

Ecommerce Development
Take your online store to the next level with BelVG Ecommerce Development
Visit the pageThe next step is to install table schema with the Magento\Setup\Model\Installer::installSchema() and Magento\Setup\Model\Installer ::handleDBSchemaData().
It is quite big, so we will touch only the most important moments.
|
1 2 3 4 5 6 7 8 9 10 11 12 13 14 15 |
private function handleDBSchemaData($setup, $type) { if (!(($type === 'schema') || ($type === 'data'))) { throw new \Magento\Setup\Exception("Unsupported operation type $type is requested"); } $this->assertDeploymentConfigExists(); $this->assertDbAccessible(); $resource = new \Magento\Framework\Module\ModuleResource($this->context); $verType = $type . '-version'; $installType = $type . '-install'; $upgradeType = $type . '-upgrade'; $moduleNames = $this->moduleList->getNames(); $moduleContextList = $this->generateListOfModuleContext($resource, $verType); foreach ($moduleNames as $moduleName) { // ... |
It is clear that the update can be used only with 2 process types: schema and data.
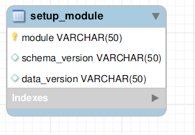
Each of them can have 2 possible states that are recorded in the variables $installType and $upgradeType. The variable $moduleName contains the list of all modules. The variable $moduleContextList is filled with the modules’ version. The version data is taken from the setup_module table with the following structure:

As you see, the table contains the module name, current schema and data versions. The loop goes through all modules and compares the current version with the version in the module.xml file. If record for the module is not found in the database the module’s InstallShema.php or InstallData.php file is called.
|
1 2 3 |
$installer = $this->getSchemaDataHandler($moduleName, $installType); // ... $installer->install($setup, $moduleContextList[$moduleName]); |
If module update is required we have the following code:
|
1 2 3 |
$upgrader = $this->getSchemaDataHandler($moduleName, $upgradeType) // ... $upgrader->upgrade($setup, $moduleContextList[$moduleName]); |
In EE version we have also <Setup>/Reccuring.php file. This file is used for the initial application start, for example, when we need to synchronize data between a module and the Magento 2 core.
The same process is used to update data (for the files InstallData.php and UpgradeData.php). The only difference is that the variable $type equals ‘data’ and, correspondingly, there will be called different objects, but the logic of the algorithm remains the same.
So, let’s make some conclusions:
Conclusion 1: To force the module reinstall we can remove record about the module from the table setup_module.
Conclusion 2: To reinstall data and implement only the file <magento-dir-install><module><Setup>/UpgradeData.php it is necessary to downgrade the data_version in the table setup_module.
Conclusion 3: Magento no longer controls the versions of your application through different files (e.g. upgrade-0.2-0.3.php). Now, the version type is controlled by the developer through the files <magento-dir-install><module><Setup>/InstallShema.php and <magento-dir-install><module><Setup>/InstallData.php

Magento Webdesign
Take your online store to the next level with BelVG Magento webdesign
Visit the page


Hi Tinshe,
This article is not about upgrading from one Magento version to the other, it’s about the mechanisms for updating modules in Magento 2.
I do not agree.