

Ready to send out exclusive emails? The power is in your hands with Magento email templates. In this comprehensive guide, we’ll walk you through everything you need to know to create a custom email template through the admin panel.
You’ll control every step, from understanding dynamic data to mastering the admin panel.
Table of Contents
Magento 2 email template layout overview
How to customize Magento 2 email templates in the admin panel
How to configure dynamic data for the Magento 2 email template
How to edit the files of Magento 2 email templates
Summing Up
Magento 2 Email Template Layout Overview
When creating a Magento email template, it’s crucial to remember that users can open your email with any app or device. Understanding this layout overview is the key to ensuring your emails are displayed correctly across all platforms.
Mail programs can add styles besides those a developer initially chose for email distribution. A large variety of mail software and render engines makes it necessary for us to opt for a one-size-fits-all approach. You need to follow specific rules to ensure that your emails will be displayed correctly on different devices. Here are some of them:
- Use table-layout (
<table>instead of<div>) - Do not shorten the HEX codes for colors (#FFFFFF instead of #FFF)
- Use CSS2 properties instead of CSS3
- Use HTML4 instead of HTML5
- Use background-color instead of background. You should also use the extended properties like padding-top, padding-left, and others
- Use background color instead of background images and add visual elements using the
tag
- Use the HTML attributes instead of CSS
- Add inline CSS styles in your layout
- Use standard system fonts for email content display
Follow the guidelines above to ensure Magento 2 email templates display correctly across all email clients. This helps maintain consistency and proper rendering of emails on various platforms.
How to Customize Magento 2 Email Templates in the Admin Panel
If you want to customize email templates, find the Magento email templates’ location and edit them via the admin panel. Go to Admin Panel -> Marketing -> Email Templates.

You will see the custom Magento 2 email templates created earlier in your store. To edit them, you just need to choose the one you want to change. You can filter them by the date templates were added or updated and choose the template type.

Magento Email Template Creation
Remember that we cannot change the original template; we create a new one based on the default Magento emails we found.
Now, let’s learn how to create a custom version and then how to replace the standard template with the one you made.
When you have found the location of email templates, you need to choose one from which you will create your own. To do this, click on Add New Template. Here, you will see a field for selecting a default template to customize and fill in its content.

Here, you can edit your templates by customizing Magento’s default ones from scratch or changing content to your existing templates that were created earlier.

In the Template Name field, you must enter the name for template identification in the Magento admin panel.
In the Template Subject field, you should add simple text that will be used as the subject of a letter. This field may contain system variables.
In the Template Content field, you create content for your letter. You can also use system variables in this field. When creating content, follow the rules listed in this section.
The Template Styles field is not obligatory; here, you can edit email template styles by adding CSS styles to the modified template.

Also, admins can access Magento 2 email template variables in the layout. For example, it can be a phone number, a country, or a region. How to add them we described in the third guide section.
When you finish the customization, press Save Template. Now, you have a new template that has yet to be used anywhere.
How to Choose the Customized Theme
You now have a template, but you can’t use it yet. To do this, you need to add it to the storeview settings. Here’s what you should do.
Click on Stores > Settings > Configuration.

Then, in the Sales section, you need to select Sales Emails.

Select the storefront where you want to apply your new template from step 1. In the Default Config drop-down list, we select the storefront for the change.


For example, you have created an email template for new orders. Select the latest Magento 2 custom email template you created in Step 1 in the New Order Confirmation Template drop-down list.

Click on Save Configuration.
Magento Development Services
Get consultation with Lead developers of 15-year experience in Magento
Learn moreHow to Customize the Header and the Footer of Magento 2 Email Template
You can create a header and a footer template for your Magento 2 email templates. Let’s see how they are displayed in a default New Order template first:

Directives {{template config_path="design/email/header_template"}} and {{template config_path="design/email/footer_template"}} are used for the default header and footer in all Magento templates. You can’t delete them.
If you want to customize a Magento 2 email footer or header template, chooseFooter or Header in Templates -> Magento_Email and press Load Template.

In Template Content, the HTML code for customization will appear. Here you can add several columns, necessary links, or a phone number by entering the required code. Remember to enter names in the Template Name field.
To save a template, you need to press Save Template.
How to Choose the Header or Footer Template for the Email Template
There is a configuration setting for all the templates created, where you can choose parts of a template to display.

Here, you can see your website, its variants, and the theme that was chosen for each.

Advanced theme settings, such as changing Magento 2 email header template, a footer one, or logo, are located in the design configuration section. You will not find them in the store configuration. Click Edit to open settings.

First, you will see the theme that was applied to the chosen website.

Scroll down and open Transactional Emails.

Here, you can choose the template for the Header or Footer you’ve created previously.

Click Save Configuration.
How to Configure Dynamic Data for the Magento 2 Email Template
We already mentioned directives and variables in our guide. They can be used to customize your email templates and simplify working with them.
For example, one of the main things that is almost always added to the email is the domain name. If you add this link as a simple HTML tag, it will work. Of course, as your business grows and expands over time, you’ll add a few new domains. In this case, you must manually change this link in all the templates. It will be quite a challenge if you have more than a hundred of them.
For such tasks, Magento 2 email templates support directives and variables.
Magento Support & Maintenance
Keep your Magento website up-to-date, secure and efficient with the BelVG team.
Visit the pageYou can enter a directive with a domain name. If the domain changes, the information in the letter also changes without the admin’s manual work. A directive is inserted in a template with two curly braces opening and closing one.

Let’s take a look at some of them.
A directive store can add a link to the current store. If you leave the URL value empty, the address of the current store will be filled out automatically.
{{store url = ""}}
The var directive is used to insert Magento 2 email template variables.
{{var customer.name}}
The directive of Magento 2 email templates is often used to format the header and footer in the same style. The path to a template is applied with the help of config_path attribute.
{{template config_path = "design / email / header_template"}}
If you need to display basic static content, then it is necessary to use translation of trans directive.
{{trans "Example string"}}
To add an image link to the corresponding image in Magento 2 email templates, use the media directive. It extracts the path to the file from the media folder.
{{media url = "/pathToImage/img.jpg"}}
There are two directives to add Magento 2 email template styles: CSS and inline CSS. The CSS directive extracts CSS from a file, so you must add the <style> </ style> tag. You can also add styles from a variable with an extra modifier raw. It allows you to insert them without looking through the HTML tags and CSS.
|
1 2 3 |
<style type = "text / css"> {{css file = "css / email.css"}} or {{var template_styles | raw}} </ style> |
The inlinecss directive unpacks styles and places them inside of inline tags, as appears from the name:
{{inlinecss file = "css / filename.css"}}
We showed only the most common directives. When you upload the original template for editing, you will encounter many variables. They will depend on the objects passed in the template.
Customization with Variables
Also, you can customize your email templates with the help of variables. There are two types of them: predefined and custom ones.
The Use of Predefined Variables
Magento offers a variety of predefined variables that can help you customize your templates. All the available variables will be shown when you go to Marketing -> Email Templates.
Here, click Add New Template.
And click Insert Variable.

The whole list of allowed predefined variables will be shown.

When you choose a variable from the list, it will appear in the Template Content field. We chose the Country variable in the New Order template in the example below.

After editing the template, click Save Template.
The Use of Custom Variables
If you have some specific data to add to your Magento 2 email templates, you can create custom variables for personalization yourself. It can be contact information or promotional messages. First, go to System -> Other Settings -> Custom Variables.

Here the list of created custom variables are displayed. Click Add New Variable.

Let’s create a variable to display a registered address. Enter the information about new variable:
Variable Code – enter the code of the new variable. It is used in templates to refer to the variable.
Variable Name – add the name of the new variable.
Variable HTML Value – enter the information that you want to save for the variable. It can be text, numbers, or HTML content.
Variable Plain Value – enter the text from the previous field without formatting.

Click Save to save the variable. To add the custom variable to your email template, go to Marketing -> Email Templates -> Choose the existing template or Add New Template. Click Insert Variable and scroll down to Custom Variables.

Choose your created template. It will appear in the Template Content section, like here:

After making all the changes, click Save Template.
How to Edit the Files of Magento 2 Email Templates
If you have code knowledge, here is another way to customize Magento 2 email templates.
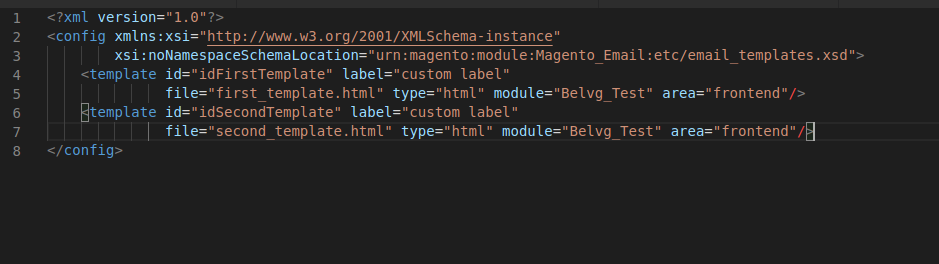
In Magento 2, email templates are stored at <module_dir> / view / <area> / email catalogs of the appropriate modules. It is not recommended to change Magento 2 standard files. Instead, you’d better create own templates. To do it, you can make the necessary files in your theme or with the help of Magento Admin.
Let’s see how to put a file in a theme and open it for customization in this theme. To do this, you need to find the original file, which needs to be customized individually only for the current theme.

Insert only the template required for the current customization into the theme.

The structure is similar to editing a template with the help of the admin panel. In this case, the subject of the email is transferred to the @subject directive.
Summing Up
Mastering the editing of Magento 2 email templates is a vital skill for anyone in the ecommerce industry. This guide offers you practical techniques to implement templates to your website and effectively engage your audience. Understanding template structures, leveraging variables, and using HTML and CSS judiciously are vital components. Using all the features of Magento, you can elevate your email marketing strategies and achieve success in your online ventures.

Awesome Blog very helpful so many queries over email templates in Magento 2 templates this article has to provide vast solutions from bottom to top. The email template plays a vital role in Magento eCommerce.