Customer management is a rather sensitive topic for every store admin, for every mistake in even small-scale configuration can lead to complaints and loss of clients. This article is dedicated to customer management in Magento 2 ecommerce platform; here I will touch upon the following aspects:
How do you add a menu item to the “My Account” section?
How would you customize the “Order History” page?
How to add or modify customer attributes?
How would you extend the customer entity using the extension attributes mechanism?
How would you add another field into the customer address?
What is the role of customer groups and what functionality do they affect?
How do you customize VAT functionality?
Magento_Customer module performs “My Account” management in Magento 2, so if you want to in any way modify this section (add new elements or delete existing ones or change blocks position), you will need to change the Magento_Customer module components. For this we can implement modules or our own theme. To make my examples more vivid, I will customize our own theme. In it, I will change the side menu in “My Account”.
How do you add a menu item to the “My Account” section in Magento 2?
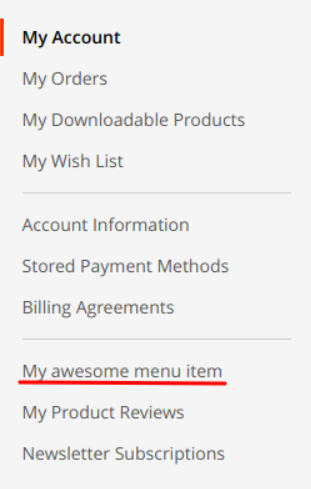
In order to change side menu you need to modify the customer_account_navigation block from the customer_account.xml layout-file. First, let’s create customer_account.xml file and place in our theme at the following path Magento_Customer/layout/. As you write instructions for this file, you can add new menu options, change their positions and delete them. In order to add a new menu section, add into customer_account.xml file the following instruction:
|
1 2 3 4 5 6 7 8 9 |
<referenceBlock name="customer_account_navigation"> <block class="Magento\Customer\Block\Account\SortLinkInterface" name="customer-account-navigation-address-link"> <arguments> <argument name="label" xsi:type="string" translate="true">My awesome menu item</argument> <argument name="path" xsi:type="string">path/i/need</argument> <argument name="sortOrder" xsi:type="number">100</argument> </arguments> </block> </referenceBlock> |
Here we add a new block of Magento\Customer\Block\Account\SortLinkInterface type and give it as arguments menu option name, page link and sortOrder parameter if we wish that our new menu appears in a certain place. As a result, a new menu option has appeared in user account.
In order to delete an existing menu option, use the following instruction:
|
1 |
<referenceBlock name="name-of-the-link-to-remove" remove="true"/> |
Specify the name of block you wish to delete as a parameter. This is how I delete the newsletter subscriptions link:
|
1 |
<referenceBlock name="customer-account-navigation-newsletter-subscriptions-link" remove="true"/> |
Finally, if you need to change blocks order, modify the sortOrder argument value. For example, let’s move the Wishlist link to the first position in the menu:
|
1 2 3 4 5 |
<referenceBlock name="customer-account-navigation-wish-list-link"> <arguments> <argument name="sortOrder" xsi:type="number">500</argument> </arguments> </referenceBlock> |

Magento Support & Maintenance
Take your online store to the next level with BelVG Magento Support & Maintenance
Visit the pageHow would you customize the “Order History” page in Magento 2?
In order to customize the My Orders page we need to modify sales_order_history.xml layout file of Magento_Sales module. Create sales_order_history.xml file and place it in our theme in the following path: Magento_Sales/layout/. You can further use any instructions that provide for layout customization in Magento 2. Let’s add a new text block before order list as an example:
|
1 2 3 4 5 6 7 |
<referenceContainer name="sales.order.history.info"> <block class="Magento\Framework\View\Element\Text" name="my_text"> <arguments> <argument name="text" xsi:type="string">Hey! I have been added to demonstrate the ability to adding the new blocks!</argument> </arguments> </block> </referenceContainer> |
As a result, the following text appears at the My Orders page:
Magento Development Services
Take your online store to the next level with BelVG Magento development
Visit the pageHow to add or modify customer attributes in Magento 2?
For adding a new customer attribute we can use setup scripts.
Example of adding a customer attribute:
|
1 2 3 4 5 6 7 8 9 10 11 12 13 14 15 16 17 18 19 20 21 22 23 24 25 26 27 28 29 30 31 32 33 34 35 36 37 |
... class InstallData implements \Magento\Framework\Setup\InstallDataInterface { private $customerSetupFactory; private $attributeSetFactory; public function __construct( \Magento\Customer\Setup\CustomerSetupFactory $customerSetupFactory, \Magento\Eav\Model\Entity\Attribute\SetFactory $attributeSetFactory ) { $this->customerSetupFactory = $customerSetupFactory; $this->attributeSetFactory = $attributeSetFactory; } public function install( \Magento\Framework\Setup\ModuleDataSetupInterface $setup, \Magento\Framework\Setup\ModuleContextInterface $context ) { $installer = $setup; $installer->startSetup(); $customerSetup = $this->customerSetupFactory->create(['setup' => $setup]); $customerSetup->addAttribute(\Magento\Customer\Model\Customer::ENTITY, 'new_attribute', [ 'type' => 'varchar', 'label' => 'new attribute', 'input' => 'text', 'required' => false, 'visible' => true, 'user_defined' => true, 'system' => false, 'used_in_forms' => [ 'adminhtml_customer', 'adminhtml_checkout', 'checkout_register', 'customer_account_create', 'customer_account_edit', ] ]); } ... |
Customer attributes can be represented in different forms, specified in the used_in_forms parameter. You can find the list of all forms in the customer_form_attribute table.
To modify the attribute you should use \Magento\Customer\Setup\CustomerSetupFactory. You can also implement the updateAttribute method or upload the attribute with getAttribute method and modify it through setData.
|
1 2 3 4 5 6 7 8 |
$customerSetup = $this->customerSetupFactory->create(['setup' => $setup]); $customerSetup->updateAttribute(\Magento\Customer\Model\Customer::ENTITY, 'new_attribute', 'visible', false); $customerSetup = $this->customerSetupFactory->create(['setup' => $setup]); $attribute = $customerSetup->getEavConfig()->getAttribute(\Magento\Customer\Model\Customer::ENTITY, 'new_attribute') ->setData('used_in_forms', ['adminhtml_customer']); $attribute->save(); |
How would you extend the customer entity using the extension attributes mechanism?
Module developers can’t modify API Data interfaces catalogues in core Magento 2, but the majority of modules, in their turn, have the extension attributes mechanism. Extension attributes are specified and stored separately from the data object of the initial class, therefore a developer should perform all the data storage and retrieval actions himself.
To create an extension attribute, you need to declare it in the etc/extension_attribute.xml file of the module:
|
1 2 3 4 |
<config xmlns:xsi="http://www.w3.org/2001/XMLSchema-instance" xsi:noNamespaceSchemaLocation="urn:magento:framework:Api/etc/extension_attributes.xsd"> <extension_attributes for="Magento\Customer\Api\Data\CustomerInterface"> <attribute code="new_attribute" type="string" /> </extension_attributes> </config> |
To get or modify extension attributes use the plugin system for Product Repository to save, get, getList methods.
Example of extension_attributes for Customer.
File etc/extension_attributes.xml:
|
1 2 3 4 5 6 7 8 9 10 11 12 13 14 15 16 17 18 19 20 21 22 23 24 25 26 27 28 29 30 31 32 33 34 35 36 37 38 39 40 41 42 43 44 45 |
<?xml version="1.0" encoding="utf-8" ?> <config xmlns:xsi="http://www.w3.org/2001/XMLSchema-instance" xsi:noNamespaceSchemaLocation="urn:magento:framework:Api/etc/extension_attributes.xsd"> <extension_attributes for="Magento\Customer\Api\Data\CustomerInterface"> <attribute code="ext_customer_attribute" type="string" /> </extension_attributes> </config> etc/di.xml <?xml version="1.0"?> <config xmlns:xsi="http://www.w3.org/2001/XMLSchema-instance" xsi:noNamespaceSchemaLocation="urn:magento:framework:ObjectManager/etc/config.xsd"> <type name="Magento\Customer\Api\CustomerRepositoryInterface"> <plugin name="extensionAttributeExtCustomerAttribute" type="Belvg\CustomExtAttribute\Model\Plugin\CustomerRepository" /> </type> </config> Model/Plugin/CustomerRepository.php <?php namespace Belvg\CustomExtAttribute\Model\Plugin\CustomerRepository; ... class CustomerRepository { … public function afterGet(CustomerRepositoryInterface $subject, CustomerInterface $result) { $extensionAttributes = $this->getExtensionAttributes($result); //custom logic $extCustomerAttribute = $this->customGetExtCustomerAttribute(); $extensionAttributes->setExtCustomerAttribute($extCustomerAttribute) return $result; } public function aroundSave( CustomerRepositoryInterface $subject, callable $proceed, CustomerInterface $customer, $passwordHash = null ) { $extCustomerAttribute = $customer->getExtensionAttributes()->getExtCustomerAttribute(); $result = $proceed($customer, $passwordHash); $this->customSetExtCustomerAttribute($extCustomerAttribute); return $result; } |
How would you add another field into the customer address in Magento 2?
Magento 2 has a default attribute set for the address that is stored in the customer_address_entity table. The rest of the attributes must be added as EAV attributes. They will function through the Custom Attributes mechanism.
In order to add new fields into customer address, create an EAV attribute using \Magento\Customer\Setup\CustomerSetupFactory.
|
1 2 3 4 5 6 7 8 9 10 11 12 13 14 15 16 17 18 19 20 21 22 23 24 25 26 27 28 29 30 31 32 33 |
$customerSetup->addAttribute(\Magento\Customer\Api\AddressMetadataInterface::ENTITY_TYPE_ADDRESS, 'custom_address_attribute', [ 'type' => 'varchar', 'label' => 'Custom address attribute', 'input' => 'text', 'required' => false, 'visible' => true, 'user_defined' => true, 'sort_order' => 100, 'position' => 100, 'system' => 0, ]); $customerEntity = $customerSetup->getEavConfig()->getEntityType(\Magento\Customer\Api\AddressMetadataInterface::ENTITY_TYPE_ADDRESS); $attributeSetId = $customerEntity->getDefaultAttributeSetId(); $attributeSet = $this->attributeSetFactory->create(); $attributeGroupId = $attributeSet->getDefaultGroupId($attributeSetId); $attribute = $customerSetup->getEavConfig()->getAttribute(\Magento\Customer\Api\AddressMetadataInterface::ENTITY_TYPE_ADDRESS, 'district'); $attribute->addData([ 'attribute_set_id' => $attributeSetId, 'attribute_group_id' => $attributeGroupId, 'used_in_forms' => [ 'adminhtml_customer_address', 'customer_address_edit', 'customer_register_address', ] ] ); $attribute->save(); |
What is the role of customer groups in Magento 2 and what functionality do they affect?
Customer groups allow to manage taxes and discounts as well as create separate price rules and entitle with different rights. Each customer group has different cash for blocks.
This is the default customer groups list:
- NOT LOGGED IN
- General
- Wholesale
- Retailer
NOT LOGGED IN – the only customer group you can’t delete; it is assigned to each user without a session and gives them the guest shopping cart. You also can’t delete a default customer group for the logged in customers, but such groups are not static and you can modify it.
General – default groups for the registered users. Wholesale and Retailer groups don’t have individual properties like the groups created by user.
How do you customize VAT functionality in Magento 2?
Magento 2 provides a default functionality for working with VAT. VAT depends on the country of the customer and their delivery address. If downloadable products are purchased, VAT depends only on the country.
To configure VAT, go to: Stores > Configuration > General > General > Store Information.
VAT Number – here you customize VAT number for a seller.
Customers > All Customers > Edit Customer ->Account Information > Tax/VAT Number – if specified, then VAT will be calculated based on this field.
Addresses > VAT Number – if selected, then VAT will take delivery address into account while calculation.
Configure > Customers > Customer Configuration -> Show VAT Number on Storefront – allows user to specify VAT Number as he creates or modifies the account.
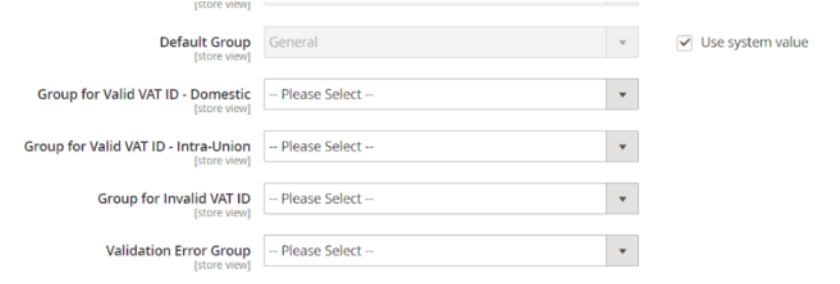
Default Value for Disable Automatic Group Changes Based on VAT ID – if selected, it automatically changes user group after VAT Number validation.
The parameters you can see in the screenshot down below are responsible for selecting the group after validation, if the Default Value for Disable Automatic Group Changes Based on VAT ID parameter is active.
For correct operation of VAT in Magento 2 you need to configure user groups and create TAX rules and rates.
TAX can be applied separately to products and users with Product Tax Classes and Customer Tax Classes (Stores > Tax Rules). You can also create unique tax rules for certain geographic regions, using Tax Zones and Rates (Stores > Tax Zones and Rates). TAX can be influenced by sales_quote_collect_totals_before event that calculates the final price of the order.
This is all to the topic; I hope this article was useful to you. If you have any questions or comments, you are welcome to leave them down below.

Ecommerce Development
Take your online store to the next level with BelVG Magento Extensions
Visit the page


Hi, Otawa. Thank you for the comment.
Use standard Magento – pager. You can create it here:
vendor/magento/module-sales/Block/Order/History.php :: _prepareLayout()
Override this method. And before it is added as child, just set up new limits:
$pager->setAvailableLimit([8 => 8, 16 => 16]);
$this->setChild(‘pager’, $pager);
Thank you for this tutorial, Do you know how to limit order history list to 8 items per page please?