

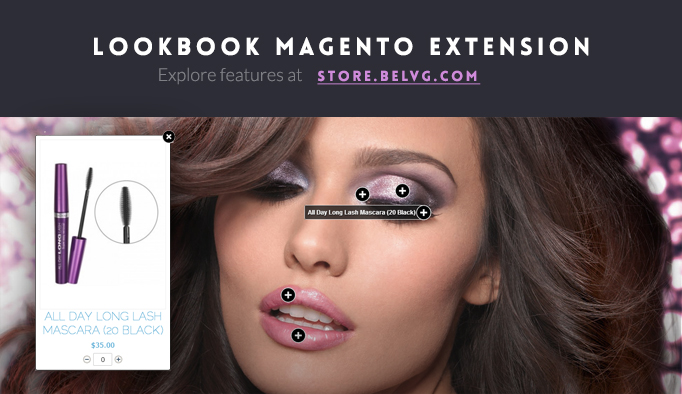
Magento LookBook extension lets you put a set of markers to the product image and then link these markers to other products, which will appear in a pop-up as soon as the customer clicks on a marker. You can also select specific area on the product photo and it will get automatically highlighted upon mouse hovering.
Key features:
- Add markers to product images and link these markers with other goods which will appear in a pop-up;
- The pop-up window will display the product image and will also let customers specify product quantity;
- Select specific area on the product photo, and this area will get automatically highlighted upon mouse hovering.
![]()
![]()
![]()
![]()
![]()
![]()
The LookBook module introduces a new approach of arranging and presenting your product pages. Now with this extension you will be able to present to your customers a set of associated products on a single page within a single image – to emphasize their unity and relevance to each other. Such approach is a perfect solution for e-stores that promote grouped products: furniture sets, makeup sets and other items as a single group.
The module lets you display your product page as a single big photo, which contains a set of markers. Each marker is linked to an associated product, which appears in a pop-up when the customer clicks on a marker.
To attract attention to some specific items, module can highlight certain areas on the main photo.
How to Use
When the module is enabled, the product page starts displaying the main grouped product photo with a set of markers.


All associated products are displayed either at the bottom or at the side of the page, in accordance with the module settings.

When the customer clicks a marker on the main product photo, the pop-up window appears. The pop-up contains the image and the price of the linked product.
In the pop-up customers can also specify product quantity and click on the product link to proceed to the simple product page.

Top (Horizontal image)

Left (Vertical image)

How to Configure
How to create markers and link them to associated products
To create your first set of markers for a grouped product, the following steps should be taken:
- Create a set of simple products.

- Create a grouped product.

- Go to the grouped product settings – Images Section – upload your product photos and select the image which will be used as a LookBook main image.

- Go to the Associated Products section and define your associated products – these products you will link to the markers on the main product image. SAVE THE PRODUCT!

- After you save the product the LookBook section will appear. Set the markers on the main image: click any of the associated products at the bottom and a marker will appear on the main photo. Drag the marker to any place on the photo which you wish to associate with that simple product.

- If you also wish to highlight a specific product on the image, you need to click with a mouse on the photo to invoke the highlighting points and then arrange them around the area you wish to mark out. To remove points use the right mouse button.


- Finally, go to the General Settings section and in the LookBook Image Position field specify the position of the main photo on the product page.

This is the way you create and set markers on the main product photo. These markers are associated with simple products, and these simple products will appear in the pop-up window.
Configuring module settings
Now it is time to manage the module settings. Go to System – Configuration – LookBook.
General settings
- Enable module for frontend – select Enable to switch on the module;
- Marker – choose if the marker should be static or dynamic. In case you select static, the marker will always show a description;
- Tooltip – switch tooltips on/off;
- Mapster – this option lets you enable the product highlighting feature;
- Default image position – specify the position of the main product image which will be applied by default;

Marker settings
Marker options let you choose and change the size, style and color of the marker and marker description.
- Image – upload image file which will be used as the marker on the main photo;
- Image width/height – specify marker image dimensions;
- Border width/radius – set up description border dimensions;
- Border color – indicate the color of the description border;
- Font padding – specify the size of the font padding;
- Font color – indicate the color of the font which will be used in the description window;
- Font CSS – specify description font style;
- Font shadow – indicate dimensions of the description text font shadow;
- BG opacity – indicate the transparency level of the description background color;
- BG color – specify the description background color;
- Animation speed – define the animation speed in milliseconds;

Tooltip settings
Tooltip options let you customize and define the tooltip size, color and position.
- BG image – upload image file which will be used as the tooltip background;
- BG image width/height – specify tooltip background image dimensions;
- Position – define the positions of the tooltip in relation to the marker;
- Horizontal offset – this option defines the horizontal displacement of the tooltip. If the offset number is positive – the tooltip moves to the right, if the number is negative – the tooltip is moved to the left;
- Font color – indicate the color of the font which will be used in the tooltip;
- Font CSS – specify tooltip font style;
- Font shadow – indicate dimensions of the tooltip text font shadow;
- Top padding – specify the size of the tooltip top border padding;

Pop-up settings
In the pop-up settings you can manage and customize the size, color, background color and many other preferences of the pop-up window, which will appear when customers click on the markers.
- Popup background color – specify the popup window background color;
- Popup shadow – indicate dimensions of the popup window shadows;
- Popup duration – indicate how long the popup window should be displayed until closed automatically (in milliseconds);
- Overlay opacity – indicate the opacity level of the main photo, which will be displayed in the background when the popup window appears;
- Overlay color – indicate the color which will be applied to the main photo for the opacity effect when the popup window appears;
- Border color – choose the color of the popup window border;
- Border width/radius – set up popup border dimensions;
- Border padding – specify the size of the border padding;
- Close button – if you enable this option, the popup window will have the close [x] button;
- Close button image – upload image file which will be used as the close button on the popup window;
- Image width/height – specify close button image dimensions;
- Show product name – enable this option to display the name of the product in the popup window;
- Show product price – enable this option to display the product price in the popup window;
- Font color – choose the color of the font which will be used for the product name/product price text;
- Font CSS – specify font style which will be used in the text of the product name/product price;

Mapster settings
Mapster settings are the configurations of the highlighted area. Here you can define the color which will be used to highlight products, image opacity and other options.
- Fill opacity – indicate the opacity level of the selected element on the main photo, to which the opacity effect will be applied;
- Fill color – – indicate the color which will be applied to the selected element on the main photo for the opacity effect;
- Stroke color – choose the color of the stroke;
- Stroke opacity – set up the opacity level of the stroke;
- Stroke width – define the stroke width dimension;
- Fade – if you enable fading, the opacity effect will smoothly fade in;

Advanced settings
In Advanced settings you can export/import module settings, reset module settings and add your custom CSS styles.

![]()
![]()
![]()
![]()
![]()
![]()

Partner With Us
Looking for a partner to grow your business? We are the right company to bring your webstore to success.
Talk to Andrey


Есть ли такая, хотя бы малюсенькая вероятность, что этот модуль появится для Prestashop 1.6? :)
Is there any chance to see this module for Prestashop 1.6?